
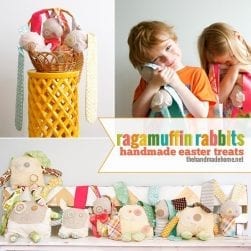
A few easters ago, the easter bunny decided to try his hand at a few creations for my little ones. I had seen a lot of these guys floating around the internet in all kinds of different versions, and realized the commonality between them all: a basic shape for the body, with limbs as extensions. So, I decided to make my own version.

The best part about these little guys, is that you can basically alter them to fit whatever need you have…whether it be a season, different animal, or just because.


I simply love the idea of a lovie that’s handmade for my children. Not to mention, they kind of make great children’s room accents. {bonus} Something unique for their rooms and your home…something handmade.

Want to try your oh so talented hand at one of your own? Here’s what you’ll need:
basic sewing skills + a sewing machine (if you have some time on your hands and really want to do this, you could also hand stitch it-but I recommend a machine.) And if you want to learn, I am totally self taught. It’s actually pretty easy, if you want someone to show you how to thread it…that’s the hardest part! If you can make a pillow, you can make this plushie. If you’ve never made a pillow, I recommend trying a pillow first, OR, getting a friend who is knowledgeable to help you the first time around…
For the Rabbit:
1. some main body material {I used minky-the softer for snuggling the better}
2. material for the ears, 3. arms, 4. and legs {I chose to do contrasting fabrics-one different one for each side-for each of the extensions}
• A contrasting fabric for the face
• Some felt for the eye pieces
• Buttons {2} {or three if you add an embellishment as seen on the ones above, for his chest}
• Embroidery floss {a few varying colors} {a needle with a slightly larger eye for threading embroidery floss}
• sewing pins
• poly fill + a good pair of scissors

Cut your minky {or main body} material in the shape of a giant gumdrop. I folded the fabric to the first piece in half, and then used it as my guide for the second piece. {I wanted to make sure it was accurate, first.}
If it helps, use a piece of craft paper to trace your shape, first, and use it as your guide. My size: 14.5″w x 13.5″h. But the great thing about this, is that you can do it at whichever size you want. I tend to roll with it better when I know there’s no real restrictions. Just remember to leave a nice amount (about an inch to half an inch) for hem and borders.

Next, cut the shapes for your ears, arms, and legs. The arms and legs are a basic tube shape with a curve at one end. The legs a bit longer. I cut my ears to flare a bit at the ends. Again, I kind of eyeballed it, but you can certainly use a bit of craft paper to establish your shape, first, if that helps.

Again, adjust yours accordingly, but my ears were roughly 10″ l x 3.5″w, arms: 8″ l x 3″w, legs: 12″l x 3″w

Choose your contrasting fabric for the face. I brought in multiple colors of felt, and cut a few floral shapes for the eyes with my sizzix. For such few pieces, however, you could always do a simple circle, or cut some for your own flowers from a template {again, easy to make with paper}

Here’s everything placed, to make sure you have all the parts! {note that for now, all of the fabrics are placed together, by prints but when we actually put the legs and arms and ears together, the fabrics will be paired up. You’ll see more of what I mean, below.

I decided to add a little stitching around the face, and sew the nose and mouth with a little embroidery thread. The eyes were embellished a bit, as well, and I hand stitched them to the face.

I also went ahead and added a little pin for the little plushie. She’s looking a lot like Regina the Rabbit, to me.

I secured the face to the body. I could have done this with the embroidery thread, but since a child will be playing with it, I decided some reinforcements were necessary.
{Just a side note for all of you with little ones: while these plushies make great decor, I am just now letting Malone, at 20 months, snuggle with his at times, but never unattended. Those little buttons can be dangerous, and this toy is not for play for children under 2.5 years-or anyone still putting things in their mouths.}

Next, to make the extensions.
1. place your fabrics, now paired up by contrasting fabrics, by each side, right sides together (printed sides together, blank sides out) {as shown in the photo} 2. sew them together 3. careful when going around the curves to rotate slowly. Leave the flat edge, to allow for turning it right side out 4. avoiding, and leaving room for the stitching, trim up the edges and turn it right side out, just like a pillow. {use your scissors to push them all the way through}

your arms and legs should look like this, once sewn.

For the ears, follow the steps you just used for the limbs, above. 1. place the contrasting fabrics, right sides in, blank sides out. 2. sew them together, every side except the very flat end, 3. so you may turn them right side out. Flatten them with an iron. 4. Take the flat end, and lightly fold the two edges together, and hold with a pin, as seen in the photo. It makes a slightly cinched shape at the end.

Give that cinch a quick run through with the sewing machine to secure it.

1. all of your pieces should now look like this- bust out the polyfil, and stuff your arms and legs. Run each end {the end remaining open} through the sewing machine to seal in the polyfil.
2. Take the face or front piece of your rabbit and lay it out. Take your arms, legs and ears, and pin them to the piece. The way you pin them, should be as shown, but with the opposite sides showing. {the sides facing up, when you pin them inward, will be the sides that face backwards, when the rabbit is completed. The sides facing in, when you pin them inward, will be the sides that face frontwards, when the rabbit is completed.}
3. place the second gumdrop piece, right side in, facing the rest of the rabbit, wrong side out {just like the arms and legs and ears were sewn} and pin it to the rest of the rabbit. Here comes the tricky part: sew around the edges, careful not to stick yourself, and removing pins as you go. Watch for pulling and puckering, and adjust accordingly. If you used minky fabric, it will be silky on the opposite side facing out, which makes it slippery underneath the machine. So sew carefully. Leave a small section, about 1.5 inches wide, at the bottom of the rabbit, unsewn, so you may pull it all the pieces back through once completed.
Remember, it doesn’t have to be perfect. It is handmade, after all!

1. Once completed, at the part you left unsewn, 2. carefully pull your rabbit 3.right side out. 4. He should look like this. See how the pieces you had folded inward are now facing out on your rabbit?
Carefully stuff the remaining hole to the desired amount of fluffiness with your polyfil. And stitch up the remaining section by hand or machine.

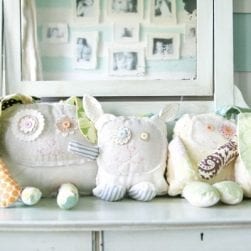
TADA! Regina is finished.

For the Lulu the lamb, you will use the same materials. But for this lamb, I chose the main minky fabric for the body, and two main contrasting materials for all of the extensions. A more simplified approach. I loved the look of polkadot, and ticking stripes, so I went with it.

1. cut your piece. This time I made the body in the shape of a square with curved edges, for more of a “pillowed” look.
2. + 3. just as before, cut your ears, arms and legs in one fabric, and then in the contrasting fabric. You will have two of each, in each fabric. The ears, this time, will be a bit pointy. I also made the lamb a bit smaller, and you can make yours any size you like.
4. lay it all out, to make sure you have all the pieces. Again, I cut the flowers and face, and placed the buttons.

I stitched the face, secured the eyes, and sewed the nose and mouth. I then secured the face, as before, with the sewing machine. Following the same steps above, I also made the ears, arms, and legs. This time, I used less fabrics, so the contrasting pieces all match. I then stuffed the limbs, as before, and quickly ran the end of it through the sewing machine to seal in the polyfil.

1. place the front part of the lamb, with all the correct pieces facing out, just as you would want them.
2. then fold them all inward, remembering again, that when they’re finished, the opposite will be on the front facing. It basically just takes a little thinking it through, as with all sewing projects. This time, because I only used two fabrics for each extension, I chose to reverse the arms and legs with patterns and look. {the arms will be striped, facing frontward, and the legs will be polkadot facing frontward. Just think through it, and decide what you want to do!}
3. pin the back piece on top of the rest of the rabbit, right side facing in, wrong side out. {just as above with regina rabbit.}
4. carefully sew it all together, removing the pins as you go. Leave 1-1.5 of an inch, open and unsewn, so that you may pull the lamb back through.

Once pulled through, stuff, and sew.

TADA! Regina and Lulu. Regina is a bit of a comedian.
You’re finished!

These are great little treats for your little ones.
Let me know if you try one…I’d love to see!


So fun!
LOVE this…I am so making these for my boys!!!! Thanks for the tutorial.
These are adorable. It’s really a shame that I lack basic sewing skills.
these are just so beautuful..i would love to give them a go…just thinking if i have some lovely soft pale fabric for the body.,..don’t think i do….oh well..i’ll see what i come up wit,,,take care and have a wonderful week…xxx
Oh my goodness. These make me want to get some basic sewing skills more than evah. A.dor.able.
these are soooo sweet!!!
🙂
shaunna
These are so adorable! I love all of them together in the bucket. Your fabrics are fun that you’ve used. These would be cute baby shower gifts.
These are absolutely adorable! <3
How clever you are 🙂
You are very talented lady! I would be insufferably happy with myself if I made a pail of such cuteness. So sweet and fun and adorable.
so cute can i order some from you ?
Okay, I just totally fell in love with these guys. I appreciate the detail you put into your tutorial. This is absolutely FANTASTIC!
I just made 3 of your Bunnies-they are so adorable-mine are named Minnie Mae, after my great grandmother. I make bunnies every year for my 3 grandgirls. I think they will really like these. Thanks for the great tutorial.
hi there…well..i thought i’d piop by to say thankyou for the wonderful inspiration…i made 3 of these over the last 2 days…one each for my twins and one for 2 of the new babies in my family…they are somewhat loved by ll and thought you may like to pop by and have a look…
http://mandyeightisenough.blogspot.com/2011/04/happy-easter.html
thanks again and happy easter…
xxx
I’m back to say my BFF and I made 4 of these last weekend for Easter gifts for the kids who came to our egg hunt… And were inspired to try 2 different kinds of stuffies too! So we made SIX of them at once!! We forgot to take their pictures before we gave them to the kids so we grabbed them back and only got a couple shots in before the kids demanded we return their stuffies… haha So I wish I’d been able to take beautiful photos like you did… ANYWAY, here they are!!
http://graceonehundred.blogspot.com/2011/04/easter-stuffies.html
THANK YOU for the tutorial!!!!!!!!
First off: LOVE this. A great use of potential scrap fabric, and nice to have a unique toy for your child.
Second: How do you wash it? I would be worried that the edges around the face would fray. Do they not? If I removed the buttons and, say, embroidered eyes, would that make it safe for the littler folks?
Too many questions. Sorry! 🙂
Hey Hannah! Well, my first ones were done in felt, (the faces) so no frayage. Also, the second one I did was in a fun linen, so I invite the fraying. I think the more fraying, the cooler. 😉 And yes, on the no buttons part for littler folks. 😉 I use mine for decoration, for the most part, because I love the buttons so much. 😉
It would be so cute to use pieces of baby clothes and blanckets to make one of these for a keepsake.
Thank you for sharing. I also make things by hand. I usually hand stitch everything since I broke my sewing machine on a quilt (one year at Christmas time), and had no choice. Since then, I hand stitch everything I make. It kind of teaches you patience.
Have a great and happy day!
Pam Keith
Hello! IN the fourth pic from the top, there is some kind of framed collage in the background. Is that on your blog somewhere and how you made it? It looks really neat! These are really cute, btw!!
Heidi
HI Heidi! I think you’re just seeing a reflection of the rest of the room? You can view it, here! thanks girl!
love my rabbit, took me a while to make and had to get some help of my mum but im very pleased with the result. thank you very much!
Everyone i make looks different! I love them, these are so cute and not very hard to make. i think a little black lamb is next and thinking about a camo rabbit… 🙂 The possibilities are endless…CUTE CUTE CUTE. Thank you for sharing this cute tutorial.
Yay Gigi! So much fun! ;}
These are super cute ! I am planning on making a couple of them soon .
Thank you for sharing !
Hi! These are so wonderful and cute! I haven’t made any animals or ‘toys’ but you inspired me and I’m sure I make something! Wishes from Finnish woman living in Greece!
These are absolutely darling! They would be so sweet in a baby’s room as well as for Easter! The lamb is my fav!
how gorgeous are these love the cat so simple to make my new challenge thankyou for sharing it (:
Thanks for this wonderful idea. I did try my own and they turned out so cute! I am going to make them to take to a hospital for children. I took them to my grandchildren and they went nuts. Don’t know how to send a pic with this.
Thanks again. They are most wonderful.
Hey Javene! What a great idea. Bless you! We will have a reader’s gallery soon, where that will be possible. Please keep that in your back pocket, it would make me so happy if you were able to upload! Thanks so much again! ;}
I cannot see but I need a rabbit!!!!! It’s an EMERGENCY! Lol. Can I buy one?
Just made one – love it! Gonna make another one tomorrow evening for my mom who is sick with cancer. It will really her her up! Thanks for sharing!!
Hey Phyllis. Our thoughts and prayers are with you and your mom.
I just made your lamb for my just turned 3year old, Harry, for this Easter, 2014. Sooooo cute!!! He LOVES lambs and calls himself a “shepherd” because of the 3 lambs in his bed. I pinned the lamb I made on Pinterest if you want to take. Look. It’s under my name Karen Barton Erskine, sewing stuff. Thank you for the awesome idea!
So cute Karen! Thanks for letting me know! ;}
Oh my gosh…these are absolutely adorable!
I just finished my first rabbit…so cute I know my oldest daughter will love it! I am making a second one for my youngest daughter and can’t wait to finish it. Thank you so much for sharing this idea.
Melissa
So glad you can use it, Melissa! Thank you for letting us know and happy creating! ;}