It was really fun to I share our living room with all of you last week. A few of you were curious about our gigantic polaroid (Instagram) frame. Today I thought I would share a little on how we did it. {to see our updated post, click here!} 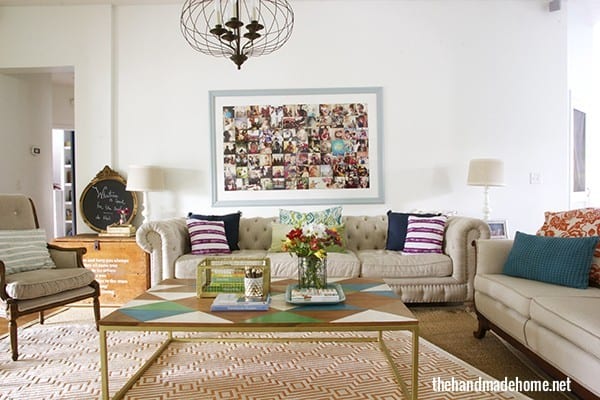 We all know that Instagram is all the rage right now. But to be honest, I was wondering where all those great photos go, once it’s all said and done. Some of our family’s greatest moments have been captured on that little iphone, when my gigantic Canon wasn’t handy. And I wanted a great way to display our family’s photos in our home, without using a billion different frames. Who said photography has to be formal to show in your home? I feel like the best, truest moments are captured with a simple click of our own personal cameras…so how true is that for our phones? Enter this crazy idea:
  We started by deciding what size we wanted to go with on our gargantuan wall. I pulled out a measuring tape, before the space was even close to complete, once I had the idea for what I wanted to do, and played with the possibilities of different shapes and sizes. I knew I wanted it topped with glass, so I called up a local glass shop for a quote on a large piece of plexiglass. It seemed like a practical, affordable solution for more of a finished look. A large piece of 4′ x 6′, was around 80 dollars. It was the look we wanted, and I know we paid a fraction of what it would cost to have one professionally made. OR if we’d purchased it at our local home improvement store.
  Once I knew the glass was doable for us money wise, I began with the base, or underlying support, of the frame. I grabbed up a piece of basic hardy board at the local store cut to size, and painted a fat border around the edges. (It depends on what you want for your space, but we did the math, and knew that if we printed out all of our photos that we liked at 5 x 5, the border would need to be a little uneven at 6.5″ x 6″. This allowed 7 rows across holding 12 photos each.) Once the paint was dry, as shown in the photos above, we drilled holes in determined portions of the hardy board. Don’t do this until you know what you will be using as the actual frame. We had about three holes on each edge, and one each corner. Placing the holes on the very edge, as we knew we could cover that with the crown molding we would use as the actual frame part. Once those were drilled, we laid the plexiglass down on top {with its protective plastic coating still on each side to avoid scratches.} Helpful tip: When drilling the plexiglass on top of the hardy board, it helps if you’re conscious of your original orientation where it was laid on the floor so that you can avoid scratches on your plexiglass. We may or may not have forgotten said original orientation, so when that final moment came {as explained below} for us to place the plexiglass, we had to move it around a few times until we had it right again. You can avoid scratches by remembering which way it was laid. The crown moulding we used = the cheap stuff you can get at Lowe’s. It was 2.5″ wide. We made sure they were evenly placed, and using the first holes as guides, repeated the same holes in the plexiglass.
  The rest was touch and go, but we used our drill to first eyeball and position the piece, then use the pre-drilled holes to mount the board. We removed the board, and used anchors underneath each hole to insure a good mount. We then secured the actual board on the wall, in a few places (not using all the holes initially-save some for your plexiglass) to hang it.
  From there, came the fun part: we marked our spot from the far left, lower corner. We used a straight edge, and a pencil, and drew two lines to serve as borders: vertically and horizontally, making sure they were straight. These were the guides we used, to ensure that each line in this frame would be perfectly even. From that first, perfectly placed photo, I simply used double sided tape, and decided on the placement of each photograph as we went. Having a nice, fat boarder gives the illusion of a mat, and keeps the frame from becoming too busy.
  {Don’t worry: this photo is crooked…not the entire piece.} From there, we painted over the lines still left in the lower corner, and once it was dry, added the plexiglass. We removed the plastic coating on each side, and carefully placed it in it’s rightful place over each hole.
 Once it’s on top, simply screw the screws into the remaining holes waiting to be used with the already-placed anchors. It should be securely mounted to the wall.
  From here, we used our foam filled crown moulding, purchased at Lowe’s. I touched a little on it in this post, but we used a simple miter box and saw to cut the pieces at the correct angle. We then painted them, and let them dry.
  Once they were dry, we simply followed the lines of the {already straight} hardy board, photos and plexiglass, and mounted the molding pieces directly to the glass. How? With just a few dabbles of hot glue in on the ends and middle of each piece, until they all fit together.
  I think it will be fun to replace these photos as the kids grow, to keep the frame ever changing and current. So popping the frame off should be no problem.
 Once the frame was pieced together, there were small gaps {nothing’s perfect!} so I went back with my fingers and smoothed in some wood putty. When it was dry, we simply touched it up.
  Tada! Our gargantuan instagram frame was finito. And it looks like a fun collection of vintage polaroid prints. A giant tribute to family fun at a fraction of the price.
  What was the total cost of our frame, with hardy board, plexiglass, photos, and crown moulding? With photos: $140 {without: $105} This was by no means a cheap project, but it wasn’t outrageous considering the end product. {Especially when compared with what you would pay in a custom framing shop for such a piece…} We are certainly happy with it! It keeps our living area lose, real, and fun.
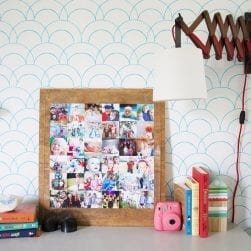
  So there you have it. Great, personalized dynamic artwork for your family’s living area. The best part: it’s easy to switch out when you feel like it, and fairly affordable considering the size! Please let us know if you try it!

Comments
Trackbacks
-
[…] Instagram is the biggest source these days to share our life experiences, adventure, and so much more with others through the pictures. So it would a great idea to bring those momentous Instagram pictures to your home decor and let them add the most custom touches to your living room decor. So choose the best of the Instagram picture, print them out and make a huge collage of them on a frame and display it on the behind wall of your living and let it remind you those fun moments you had in your life with your beloved ones. Tutorial detail and instructions here thehandmadehome […]

I’m so happy to you posted how you created this- I was wondering the same thing!
Question: How did you print the photos and did they print that size from Instagram automatically? (sorry if this is common knowledge, I’m a little behind when it comes to technology!)
Again, thank for sharing!
Hey! You can get that option at most photo developing places. We simply took ours on a disk to Costco and asked for that.
I love this. I have so many great photos on my instagram. Great gift for grandparents in a smaller scale.
i am obsessed with instagram. seriously. wait, are we following each other? well maybe you have a million followers and it seems overwhelming. anyshways, i love this instagram idea. did you just send them into costco? how did you do that.
Hey jami! I think I’m hidden on instagram. I don’t know how to find people or how to get people to find me 😉 took the photos on a disk to costco and asked for that size option. They were very helpful!
LOVE this project….inspires me to snap more pics with my phone. Hope you’re great, friend!!
🙂
shaunna
Thank you so much for sharing! I love this idea!
Love this creative piece of large wall art! And I love that you used your instagram pictures! I have oodles of them on my phone but haven’t done a thing with them except email to family. Thanks for sharing, and a great tutorial!
so, so cool and that is a great price for such a big piece! i’m wondering about the printing of the pics as well…
Love it! How did you send the pics to Costco…did you combine them together (2 shots in one 4×6, etc.)?
What a great idea and what wonderful photos! I’m goijng to try to coerce my daughter into doing one for me with her kids. Bwa ha ha.
Awesome idea and fabulous tutorial! Thanks! Definitely gonna’ do this! *Love* it!
Love, love, love this! I have been wanting to do this above my mantle but I wanted to wait till our little family was complete so maybe in a couple of years. I will definitley need this tutorial in the future!
megandcalconner.blogspot.com
LOVE THIS! Thank you for sharing this tutorial! I am so making one for my living room!
This is so amazing! If I wasn’t stuck in another country in a house I know I’m not going to be settling in long-term, I would SO try this. I will definitely be doing something similar when we move back to the US one day. 🙂
I love this idea so much. You did a great job of it.
Hi there! I am in AWE of your home!! DO you happen to know what color you used on the frame of the instagram? I LOVE IT!!! Thank you so much:)
HI chantelle! Thanks for dropping a line! it’s benjamin moores wedgewood grey
Gosh I wish I had an iPhone so I could use instagram! Wonder if there’s a similar program for the Android??
Hi Ashley, cool idea and great work! We just launched our hipstamatic and instagram wall art service today which I thought you might want to check out. Drop us a line and we can probably send over a sample very soon! Here are details on the new service…
Hi there,just loved!!!! how thick should be the hard board and the flexiglass?thanks heaps
Hi! I just picked up their standard thickness. Nothing particularly special about it! ;}
Just saw this on Nate’s TV show and luv it. I wanted to do something like this in my newly redecorated front room. I am so greatfull for your tutorial on how you did it. I’m going to start sorting out all my pictures this week-end. Keep up your great creative ideas – just love them all!
Thank you so very much Magguie! Keep me posted on what you do…we’d love to see!
How do I find you on Instagram. I’m new to all of this I saw you on The Nate Show and love the things you do in your home.
I know that it has been asked about how you had these pictures developed but I would love to know what size pictures they are? They kinda look like 3×3 but I’m totally guessing:) I love this project so much because I too use instagram as my primary source for taking pictures, so its such a fun way to take them off your phone and hang them up this way!
Thanks for sharing it!
corrie
Hi!! I love this idea. silly question — where do you buy hardy board? I don’t even know what it is. This is such a great idea. Any ideas where to get the plexiglass?
This is an awesome idea. I am working on my own now. Instead of plexiglass, Im using acrylic from my local lowes ($23 bucks for a 4ft by 2ft sheet). They also sell the hardy board and the moulding. I also used the walgreens iphone app, which now allows you to select and print 4×4 instagram or facebook pics directly from their app (plus use the code TOTAL25 for 25% off print thru 4/13)! Thanks for the great tutorial!
Hey, My name is Laura and I have recently just started blogging about tips for displaying printed Instagram photos. I have been doing lots of looking around to find unique ideas and I just want to let you know I love this idea! thank you for the inspiration and thank you for sharing. I really hope this display inspires people to print their Instagram photos, its so nice seeing people being crafty with their Instagram photos!
Hi Ashley. Love this. I know this seems like a simple question, but what ap or program did you use to put that cool black border around your instagram photos? I used a similar TTV frame overlay on some large photos I have in my phone, but haven’t been able to find an ap that offers something similar for my instagram photos. Any help is totally appreciated.
Great! I did a smaller one with holiday family pictures to hang on Thanksgiving til I decide to take it down.
I love this idea! I ordered a bunch of my favorite photos from MPix in the 5×5 size. But I’m looking into other options for the frame after pricing out plexiglass-it is about double the cost of regular glass ($90-$100…yet cheaper than custom framing). I am going to hobby lobby later today to check out the extra large frames (50% off!) and see if one will work for my space. Anyway, thank you for the inspiration! I have a GIANT bare wall in my living room that is begging for some personality!
Can’t wait to do this! By the way, the link referencing the crown moulding and miter box is not working.