Today, I’m wrapping up 2011 by designing my last inspiration board of the year! Woohoo! I think this may bring the grand total for the year to around 40? Sweet Lemonade, that’s a lot! ;}

My little brother Walt, his wife Cristin, {the same fabulous gal who’s been the brains behind our Keys to the Kingdom Disney Series} and their sweet little girl Harper Rose (also known as the one who will be stolen and adopted as my fourth child) are a lot like most of us. They’re learning to love their home for what it is, and make it work for them by utilizing it for all it’s worth.
You’ll probably be seeing a few of their space designs in the future here, because this is just the beginning of a home overhaul for them, I’m always up for a challenge, and Cristin + Walt are gracious enough to let me play. ;}

So what’s up first? This little sitting space just off the kitchen of their home. A room that has been used for entertaining in the past when they originally bought the home as a couple, but now with a one year old and space feeling a bit cramped, it’s time to create a much needed, gracious play area for their entire family.

With the idea of a play space, also comes the challenge of creating charming appeal, since it is right off of their kitchen. Walt and Cristin are playing it smart, and most of their current furnishings have been or are in the process of being sold in order to make space for + and fund the new design.
Here are the needs for this play space: this room will need storage for toys, to serve as an entertainment area + as a space for the adults, hold a television, and serve as a makeshift guest room when family and friends are staying over. So here’s what I was able to cook up:

8. Out of order as usual (and probably driving my OCD readers out there crazy) let’s start by addressing the overall paint color of the space. Walt and Cristin have a very open home. So we’re changing almost the entire level over from this beige to a very light grey, {nearly white} likened to that of Behr’s Irish Mist. {See Emerson’s room, The Veranda, or the Dining Room for a sneak peek of this simple, easy to update hue in action.} I think they’ll be in love with this change and the bright feel it will bring to their home. I’d love to see the main fabrics used as this: For coordinating pillows, and maybe even some floor cushions.
1. The sofa!
This pretty little sleeper sofa serves double duty as a place for guests to rest their heads. In the same space where their daybed currently sits in front of the window, is the logical area for this, as it keeps the space open. It is Pottery Barn, and as you know, I usually steer clear of the pricey elements, unless it’s something I really deem worthy of dropping some serious cash.
I kind of think you don’t mess around with sleeper sofas, and it helps to be able to sit on one in real life, before purchasing. All prefaces aside, research, check out warranties, and audition sofas galore, but I think this slipcovered style is a smart choice, washable, and one to grow with them for years to come.
2. This plush little number really makes the space, and pulls the color scheme of the room together, while bringing some real charm into the room.
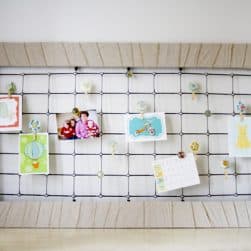
4. The key to this area will be utilizing storage for this space in a clever way, while keeping it visually appealing, all at once. A combination of vintage wire baskets, woven, and crates will be a great solution to all of this, while providing plenty of space for those little toys that need to be corralled. I recommend searching hobby lobby and keeping an eye on their sales when needing to purchase multiples, as well as stores like Ikea. I think she should also go for natural hues to balance out the bright colors for the room, {It keeps the design from becoming to ‘baby-ish’ in a shared space + brings in that natural element.} For the crates, of course, you can make your own, or even purchase the basic shape at your local craft store and attach the casters to the bottom…the possibilities with this really are unlimited when you look long enough! The key to coordinating all of this, will be she shelving, and I came up with a rough drawing of my idea for their wall…
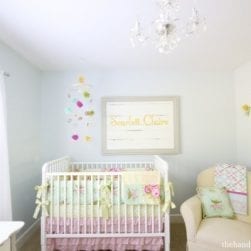
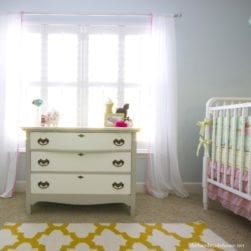
Here’s the before:
 And the potential after:

This is very rough, but just to give you the idea…{and that paint color, much to my disdain is turning a bit green in this quick mockup so please disregard.} The most basic of all shelving can be done with a level + a hammer. All you need is a generous piece of wood, and some corbels, like the ones seen here. Perhaps in a simpler shape, and all painted white, but the installation would be pretty basic, and easy to do, with an approach like the ones seen below…
A little bit of charm and clever use of wall space goes an awfully long way!
3. + 7. Another challenge for the space was that Walt and Cristin also wanted a television for the room. The cable was on the other wall {the one with the chair} so to save space for Harper’s toys, and make room for the larger items, like a table + play kitchen right below, I suggested something like this mounted on the wall, as I think they’ll be really glad for that valuable wall space later when it comes to a parking spot for those larger toys.
A handmade frame for their television gives it an appealing, built-in, intentional approach, and a shelf underneath keeps the second open wall simple, while balancing out the main storage space with the mantel.
5. + 9. + 10. A nod to clever accessories: I’d love to see adorable, one of a kind vintage pieces like this that they can really use as relevant decor in the room, while hiding away all the plastic Barbie mania that’s sure to be headed their way in a few years’ time.
DIY Chalkboards never get old, and neither do labels galore for all those baskets.
As well as some adorable prints for the space {I die!} It’s a smart way to bring classic taste into a shared space for the entire family!
6. Like a crowning touch for the room, these lights add some instant character, and more vintage flare.
I think that just about wraps up the beginning stages of this room redo! I can’t wait to see what they do with it, and actually plan to have this one coming right back at ya with a full out finished photo shoot in a few months! It’s so exciting to see a vision in it’s completion. Hurray for going for what you want, and making where you are in the moment, a true home you can really love.
I’m really enjoying the growing trend of people I’ve observed learning to create true havens in their homes, when they realize they’ll be nestled in for the long haul. I think it’s really wonderful to see people go for what they really want, and refusing to settle. I also think there’s a major advantage in realizing what you truly want from your spaces, once you’ve been there for a while. Have you guys found this to be true in your own homes?
Tell me your thoughts!

I always love your playful boards! Loving that striped rug!!
wowo – what a happy wonderful space you’re putting together. LOVE the red letters, ethe baskets, the owl – the EVERYTHING! will you adopt me?
xoxo
http://www.northerncottage.blogspot.com
I love your design board! I am sure it is a huge secret how you do these boards but I was wondering what program do you use to put your inspiration boards together? I am redoing our play/bonus room and want to do a design board for it. Thanks for the advice!
Hey Kathleen! No secrets here. I’m a graphic designer so I use photoshop and illustrator for all my design boards. I hope that helps! It’s just the issue of learning how to use them, and it’s pretty easy to get the hang of it when you teach yourself…it just takes some time. ;} good luck!
Can I just say I love your blog? Adorable room. Makes me want to make a playroom for my boys!
I’ve been reading for a while but just had to comment on this adorable playroom/entertainment room. I’m redoing our LR and I’m loosely mimicking your LR because it’s gorgeous!! I’ve been looking for fabric with those exact colors and thanks to you, I found them. Keep up the beautiful designs and thanks so much for listing your sources.
thank you so much Casie! ;}
Yay Yay Yay!!! I’m so excited about this! And I know Harper Rose is going to be too. Thank you so much for delivering an AWESOME, happy, precious inspiration board for us to work from. Not that I’m surprised at all at how cute it turned out. I officially can’t wait to get started!
Love this! So much I wnt to copy some ideas… But sone of your links to reference the products aren’t working for me. That fabric on the right of the yellow pillow, where is that from? (it link up to some rainbow toothpicks from crate and barrel haha). And also what are those gorgeous fabric covered boxes (or books?) lined up on the shelf? Thanks! Love it!!!
What a great inspiration board! I love the shelves flanking the fireplace and the HELLO sign 🙂 I sooooo want one of those couches !
How cute! They, and we, are lucky to know you. Have a very Happy Christmas, Ashley. 🙂
Just love you ideas. The ceiling fan was a nice touch.