And while we’re in list mode, did you check out Country Living’s 50 things to do in 50 states this summer? You might recognize the place from Alabama… hurray for Rescued Relics!
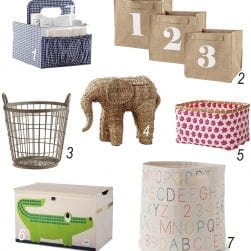
On to my main point for posting today…remember this post?

My sis in law had been searching for the perfect color scheme for her nursery…her second little girl {my neice!} is due in just two short months. She’d gone the pink route, and this time around, she was inspired by the vintage equestrian roomI created for a friend of mine.
We’re off to help them set everything up this weekend, as they’re inheriting a few, ahem, no longer needed pieces of ours, and I can’t wait to show you a few ideas we’ve come up with. The bedding she ordered won’t be available until later, so I’m sad to say I’ll have to wait to shoot the entire thing and share it with all of you, but I thought I’d give you a few teasers until then. ;}

Isn’t it adorable? Love that entire Etsy store.
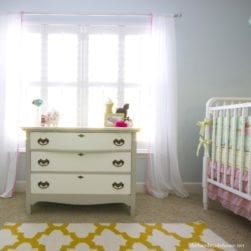
So this week, I decided to knock out a sign for their nursery. She wanted the baby’s name over the bed {and I know that lately, I’ve been on a bit of a planks kick} but I wanted something both grand and simple with a bit of a dainty vintage charm to work with her color scheme.


Her colors on the wall are Benjamin Moore’s whispering spring {The same blue you see in our kitchen} and I picked up a few coordinating colors that I felt would go well with the bedding: Corn Husk + Silver Song, as well.
Here’s how we did it:

Deciding on a size that would go well over the crib {4 x 3} we selected enough planks to stack in various sizes to create a bit of that found, vintage feel. Medium grade white pine from our local Home Depot fit the bill. Once they were trimmed down to the appropriate length {don’t forget, they’ll do this for you for free in the store} I went with some stain in random areas, and placed it on the edges of the wood. The the boards were joined together in the back with two vertical boards. Once the stain is dry, apply some feed-n-wax (or vaseline) to the areas that you wish to remain exposed. {I think that vaseline would work fine with this as well, and if you remember, I did the same approach with our barn door project} Apply your paint, and then simply wipe away the areas that were covered in your glossy mixture. Tada! A fun, distressed feel.

Once the paint was dry, I brought in our projector and an overhead. {In case you’re wondering, Chloe’s one goal in life is to photo bomb every single shot I attempt to take around the house. I have a collection of Chloe photo bombs.} Fontleroy Brown worked perfectly for this project.

When I was finished tracing, I added the letters in paint. When those were dry, I decided they needed a little more interest, so I wiped some of the paint away, and filled in a few areas with touches of stain. {Minwax’s Early American was on hand, and it also happens to be my fave.} I also went along some of the cracks on the wood, lightly with a thin paintbrush to make sure their edges were showing through.

Next, it was time to place the frame around our finished piece. For this, we used some crown moulding from Lowe’s, made of a high density styrofoam, to keep it lightweight. We simply measured, and then cut them at right angles. You can do it our way with a fancy shmancy saw that we caved and decided to purchase saw, or a simple miter box will do. {For a few more details on that subject, click here.}

Once they were cut, I gave the moulding a quick pass with the paintbrush, and when they were dry, we were ready to mount them to the piece. The trick to doing frames like these, is to never expect perfection. We simply pushed all four pieces together, to make sure they would fit nicely on the boards {this is touch and go, and is a two person job} and then placed them with {gasp!} hot glue. When we were finished, I simply filled in the gaps with wood filler {aka your new bff} and painted over when dry. I lightly went over the grooves with a little stain, and tada!
 We have a unique piece of art for Scarlett’s nursery. Don’t you just love her name? I can’t wait to help them put the rest of their space together…stay tuned!
Of course, as usual, let me know if you try this. I’d love to see.
Have an inspired Thursday, everyone!


What an adorable sign, and that nursery design is precious! Thanks again for being part of the Designer Challenge. I’m honored to have you!
You create some of the coolest things. I adore this sign. Might have to try this for my own house-maybe with my family’s name on it. I’m thinking it’d look cool in the kitchen. Thanks for inspiring me!
Beautiful sign. I can’t wait to try this out. A great summer project. I love, love, love the babies name too Thanks for the tutorial. Have a great day.
LOVE it. And I LOVE the photo bomb. Awesomeness. I need to see that collection.
LOVE it all! My baby is due in two months as well and I wish I had his name figured out so I could get started on making him a sign! What a lucky sis in law you have–she gets your help in decorating!
I think you read my mind! I was sitting nursing my babe last week while staring at his wall above the crib and I decided to make a framed name plate to go behind the bunting in his room. Glad someone’s on the same page as me. Looks great!
Beautiful!! We just finished painting our September baby’s nursery this past weekend & this is exactly what I have been hunting for! (now to decide on the name!) 🙂
Where did you get your projector?
Hey Rachel! It’s an old one I’ve actually borrowed from our church that no one uses anymore! ;} You never know where you’ll find one…be sure to ask around and you can always just borrow one as needed! They’re pretty affordable from office supply stores, as well. We just had access to this one and no one was using it.
Haha! Love the photobomb! And the sign is pretty awesome too. 🙂
Sweet nursery 🙂
Is that bed for sale?! If so I want it!
Hi Emily, I’m not sure which bed you’re referring to? If you’re talking about the crib, it’s a part of the etsy seller’s photo shoot. I am pretty sure it’s just so they can style their bedding and sell it. sorry!
I was wondering what color you used on the walls? I love the whole color scheme, that blue on the walls and accent flower fabric really makes it. Pleas let me know!
Thanks, Bree
Hey Bree! It’s Benjamin Moore’s Whispering Spring. I hope that helps! ;}
Love the sign & it is my daughter’s name! Your sister has fabulous taste in names!!