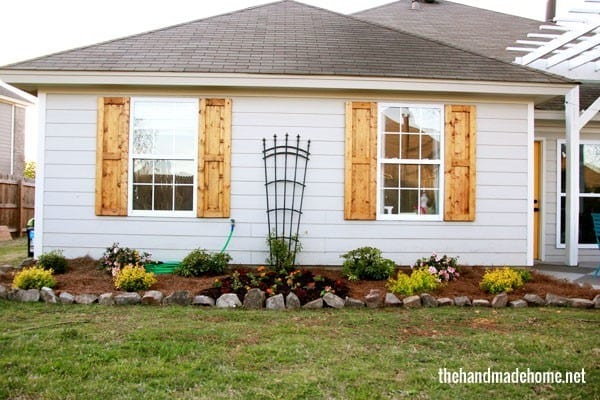
 editor’s note: because the we decided the garden box was too close to our home… see our updated version here!
 Hello out there in internet land! Me, Jamin here again today, this time with our second how to from our back yard bliss. If you missed the first edition on how to build handmade shutters, you can find it here.

Hopefully you found the shutters super easy and this little project should be the same. Today we’re covering our garden box.
There really isn’t a standard supply list this time, because it will depend on how long and wide you want your garden box to be. With that said you need to first measure your space to determine the amount of supplies you will need.
Our box measured 21 feet long by 2 feet wide. We knew that we wanted to use a 6 inch board, and for it to stack 3 high. We also knew that we would use the exterior wall of our house as the back of the garden box instead of building a fourth wall……so here is what we purchased.
• (9) 1 x 6 x 8’s pine
• (3) 1 x 2 x 10’s rough pine (this is the cheapest wood you can find
• (4) 1 x 2 x 10’s select pine
• 1 box of 1 & 1/4 inch screws
• Roll of painters plastic
• Stain of choice and weather protector
Unlike most projects, I found it easier to cut the 1 x 6 to size and then stain them before assembly. Because of the size I only had to cut down 3 of my 1 x 6’s to 5 feet. I used (2) 1 x 6 x 8’s and (1) 1 x 6 cut down to five feet for every row (3 rows). My ends were 2 feet so I made sure I cut 6 of those.
You also will need to cut your corner trim that will attach to the outside of the walls. The size will depend on your height, mine are 16.5 inches.

Once they were all cut I laid them out to be stained and weather proofed. Thompson’s Water seal has a great line of products for this step. We especially love their great weatherproofing finish for this project.
![]()
While the stain was drying I cut down my rough 1 x 2’s to (16) two foot pieces and then cut a point on them to make a stake. You can simply cut two 45 degree angles on one end to form the sharp point of your stake, then you are ready to go all Buffy on some vampires. ;} Cut the rest of your rough 1 x 2’s down to about 15 inches. It is not a bad idea to weather proof these as well.
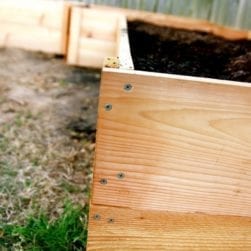
Once my stain was dry, I flipped everything over and laid it out in the order it would go.
I took my stakes and screwed them in, making sure that the top of the stake was at least an inch below the top of the garden box. I spaced these at least one every 2 feet and then went back and filled in the gaps with all the 1×2’s cut down to 15 inches.
This is our minion friend Mark who was helping me that day. Ashley was finishing up some last minute book stuff, so we were hanging out. You know the usual guy stuff. Garden boxes and whatnots.

Once all the pieces were screwed together, it was time to put it into the ground. Start with one of your end pieces. Use a mallet or turn your hammer side ways and beat the steak screwed to the boards into the ground.

Next line up the longer front piece and repeat the above step. Once that piece is in the ground add the final end pieces. Make sure to screw the end pieces on both ends to the long center piece.
(Side note, you may want to take some scrap pieces and screw them in any places that see to need a little extra bracing.)

Next take your painters plastic and line the inside of your walls with it. This will help protect your wood and walls. We also felt it was good to line it with plastic, to protect our growing veggies from any of the stain that may seep through the wood. I simply stapled it in. We also used it on the side of our home, to protect the siding from the dirt. We taped the plastic on this side to brace it (when it was filled with dirt, removed the tape).

At this point your box is mostly completely and ready to be filled with dirt. Just a side note on the dirt: This box would require a lot of it. So, we used dirt from our fire pit {we had to dig a little to put those pavers down} and then used a few bags of top soil for the plants on top. This saved us a little moolah.
Once it is filled, it’s time to add your trim that will run across the top of the garden box as well as the last two corner pieces. Simply cut your select pine down to the size of your box, stain/protect it and screw it into place.

Once this is done it is time to plant your plants, water and marvel at how things grow.
We can’t wait to use ours this spring to grow some yummy veggies! The kids are all kinds of excited. What do you plan to grow?
Hope you have an inspired day-and as usual, let us know if you try it, or have any questions!
To read any of our DIY projects from this back yard overhaul, be sure to check them all out, here!
![]() This post is brought to you in partnership with Thompson’s WaterSeal, read our full disclosure here.
This post is brought to you in partnership with Thompson’s WaterSeal, read our full disclosure here.

I am just SO impressed with your whole backyard! Wowsers! Love the colors in contrast with the wood. I still can’t get over the painted patio!!
Thank you, Megan! We have that one coming up, soon! ;}
The “after” picture makes me happy…I can only imagine how much your family is enjoying this cheery space!
You guys really are just amazing at DIY and decorating. I can’t believe the before and after pics of your backyard alone. Your house looks absolutely fab.
Thank you, sweet Allison! HUGS! ;}
I love the look of this, and how fun to grow either perennials or annuals, like pumpkins! However, dirt, debris etc. Should never be closer than 6-8 inches from your siding. Using the wall of your house can cause damage to both your siding and your foundation. The dirt can hold lots of moisture, which can cause dry rot, and dirt against the house is an open invitation for termites. When you try to sell, it will no doubt need to be removed. We bought a house that had built in firewood storage up against a wall. The house ended up getting wood beetles that way and the whole house had to be tented and treated to get rid of them.
Toni, Thanks for the heads up. I will definitely research this a little more. May even turn into a part two post. Ha!
I LOVE the look, in fact I have a wall I’ve been eyeing for the same sort of thing.
I was thinking the same thing. When we were house-hunting, we were told the bank would not give us a loan if there was any siding in contact with dirt because it could open up a whole can of (structural) worms.. It’s beautiful though!
Thank you for posting this! You may or may not believe this, but I have (have had) the picture of this backyard hanging on my refrigerator. I don’t even remember where I saw it 🙂 But, I LOVE it! I love everything about it and I hope my back yard grows up to be just like yours 🙂 lol!
This will be perfect around my mobile home. I am putting on a plywood skirting before it snows here. I have been trying to figure out a good way to make it look nice without making it look like something it isn’t. I don’t care for the fake rock or fake cement. I’m a carpenter. I was just thinking to paint it to match the trim on the house. Bad enough that the siding is metal rather than wood. I think if I put shutters similar to yours and than a flower box, it will really make it look great. I have a very small yard so putting the box up against the house will also make better use of my space. Thank you for the wonderful ideas, pictures, and instructions. Your place looks nice. If I don’t loose the link before I get finished, I will share photos.