
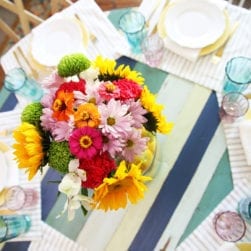
This Thanksgiving, I wanted something a little different for our dining room table.

Centerpieces are fabulous and everything, but when they’re large and in charge, it’s kind of obnoxious to do the whole, let-me-remove-this-even-though-I-spent-time-on-it-so-it’s-not-in-our-faces-and-we-can-actually-have-a-covo, thing. People sit down, and you lose the entire table scape/ambience/pretty potential-ness of it all, when your centerpiece is in the way.
 So this year, we decided to build a little something to bring some character to the space.

Want to know how we did it? What we started out with:
• 4 @ 1 x 3 x 1’s
• 1 @ 1 x 6 x 1
• End pieces made out of scrap 1 x 6 x 1’s
We cut them down to 60 inches x 7 inches…the overall final measurements, once assembled, were 61 3/4 {L} x 7 {W} we also left the end pieces a smidge higher. I just liked the look of it all put together. Of course, as always, you can adjust to whatever size you want, but this worked the best for us and our dining room table, and should give you an idea of what to purchase if you wanted to make this simple little weekend project.

First things first, I went ahead and stained all the wood I would be using. On each side. {except the bottom of the bottom piece. You can totally skip that.} When working with wood glue, I find it best to stain first, or else the glue can effect the outcome of your staining, if you get it on your wood. (And getting it on your wood, is inevitable.)

We applied a strip of wood glue on the edge of one of the 1 x 3’s, and clamped them together to dry. If you don’t own one of these beauties, but wish to build things, these things make your life oh so much easier…and are worth the small splurge at your local DIY shop.

Once tightened, wiping away the excess, and making sure they were placed level together, we waited for the pieces to dry. We then repeated the same steps with the second set of 1 x 3’s.

When they were completely dry, I then decided to add a little paint to each piece. I wanted a “found” look, so I did some distressed stripes with a combo of a dry/wet brush technique, adding layers and interest as I went. I started out with eyeballing and painters tape, and then decided it was just as easy to freehand with short strokes, so do whatever you are comfortable with. Just watch those drips! I also decided to treat each plank as if separate from each other, to make it look as though the pieces were found separately, and joined together, later.

Once the top coat of paint was dry, I went back over with the same stain {aka my fave finish color, seen here as minwax’s early american} and wiped the excess away. Read more in detail on the process of this lil wax on, wax off tea stain technique, here.
Once the painting was complete, it was time to finish putting the piece together.

Flipping it upside down, we joined it together, once again, with the miracle clamps.

See? No stain on the bottom most part. Once we made sure it was all level, to avoid screws on the outside, we used face plates in four different places for each piece, to join them together. An extra set of hands come in handy, to support it on the bottom side, while you join the first side, and bottom together.

We then repeated that step for the second side, and added the ends, as seen above. All it needs is a little felt over that metal, and you’re good to go on any surface.

The ends also had small holes drilled in them, for me to thread twine, to serve as handles. Tada! A sturdy, fun, ‘found’ looking piece for your table. And the best part? It can stay there…all the way through the dessert course, and your latest dinner partay.

Perfect for gourds in the fall, christmas ornaments galore at christmas, clipped hydrangeas in the spring or a flower delivery in the summer…oh the fun I will have with this thing!


 A little something different than the usual, for your Thanksgiving table scape.
…And beyond! {cue Buzz Lightyear voiceover.} As always, let me know if you decide to tackle it. I love to see your awesome projects. Happy Tuesday!


Cool idea! I have been wanting a dough bowl for our huge farm table, but I’m a little scared to try carving one myself. Maybe I’ll try this!
This is beautiful! And you are so lucky your husband will help with all your projects!
I love this piece and can see the versatility of it! I am inspired to make something for myself although I do not have clamps. Well done!
I really love this!
I love this! Such an easy build & it looks amazing! I love that you painted the top & bottom boards on the sides separately. I think that’s part of what makes it look so wonderful
Great idea! Thanks for sharing 🙂
Love it!!!
It looks great! And definitely “found”! Thanks for the tute!
this is FABULOUS! love love love this idea!
It looks warm and inviting. Just need all the yummy food! Have a wonderful Thanksgiving!
My husband and I have tackled a couple of your projects! When we want a distressed/found look, we rub beeswax in random spots between paint layers and then scrape it off. It gives great results!
That’s not a centerpiece…that’s a masterpiece! I love how you work together as a family. The “blessed” sign is such a beautiful, simple touch. Great job!
thank you so much, Leslie! 😉 you’re so sweet. happy thanksgiving!
THAT is beautiful!!
Verrrrry nice! I enjoyed your pecan pie recipe and story too. I’m so jealous about the t hought of getting pecans in the back yard! We could get…. bare branches and snow??
What are the dishes on your table?
Hey! they’re from Better Homes and Gardens via Walmart, of all places!
http://www.walmart.com/ip/Better-Homes-and-Gardens-Ivory-Scroll-16-Piece-Dinnerware-Set/10098872
Thank you so much for sharing a great information. I appreciate your time and effort in your work. Keep posting.