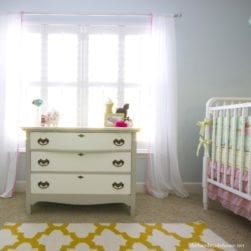
Hello all you wonderful people! I hope you had a great weekend. We certainly did…we’re so close to finito on the mini bungalow and can’t wait to show you…if only that rain would stop. Stay tuned…and in the meantime, we’re back with more handmade nursery ideas!

As you may know, Jamin and I spent a weekend {a few weeks ago} helping put together my brother and sis in law’s new nursery. It was so much fun, and as a result, we came up with quite a few affordable + simple handmade nursery ideas to share with all of you. This series isn’t limited to nurseries, and I think would be super fun adapted to any space…children or no.

Today’s project is so super easy, and it’s certainly not exclusive to girls only. The idea of a simple frame as a shadowbox display is so universal and fun, it’s a great way to display one of a kind pieces…or make those pieces one of a kind… {Egg or chicken?} In terms of interiors, it’s all about the presentation, after all.
This project came from a bright red frame Walt and Cristin had stored away in their garage. They weren’t sure what to do with it, but when I eyed the size, I knew it would make a fun piece for the nursery. So We gave it a fresh shot of white. Any average frame from your local craft store would do, or simply shop your home…you never know what old frames you’ll find that will look newly über spiffo with a fresh new coat of paint.

From there, we cut a piece of cardboard to size that would fit right inside the frame. We also cut some fabric in a nice coordinating yellow for the space, and after wrapping it around the cardboard, dabbed it with a hot glue gun on all the edges to secure it.

We popped the cardboard into the frame and tada! We were almost finished.

This part would work with any old bow you no longer use {or use your frame as a holder until you want to use it} a handmade flower, or even the simple finds you can score at your local Hobby Lobby {On sale every other week} Sub the flower with something like a toy car for a boy, or even a sweet hospital bracelet and a simple background…and there you have it. From shells, to a special poem on a napkin… the possibilities, as usual, are quite endless. Easy peasy insta art for the nursery!
This flower {one she scored on clearance at Anthro} had a pin on the back, so I simply stuck it right into the fabric/cardboard/background combo. You could easily secure anything with a dab of hot glue, or even tape, if you would like to use it again.

This one made a funky + frilly, unexpectedly easy combination. Picture it in any color, style and combo for your own nurseries or spaces, and it’s probably the easiest thing you could do!
 And there you have it! An easy peasy nursery project.
To read our other posts in this lil series, be sure to click here, here + here!
As usual, let me know if you try it, and have an inspired day, everyone!


simple and fresh and lovely and oh so perfect (& could be used for AN”Y room) nice show!
Love the simplicity of this. Looks great!
I’m in the midst of decorating my nursery now!! i love this idea! thanks!
Again, love your ideas! I have hit that point where I have my September baby’s nursery all put together furniture & paint wise, but her walls need some decor. Fabulous inspiration!! Thanks! 🙂
I am still on the lookout for an overhead projector – I asked several friends where I could find one & was told 1987. hehe! I want to make a “you are my sunshine” sign inspired by your “mills fab 5” sign. What route would you take without your projector?
Hey Rachel! Most office supply stores sells these. Have you tried amazon? or even Ebay. It might be worth the investment if you plan to create more things for your home. Do you go to a church or have contact with a school? Those places always have one…I can guarantee it. ;} I am asking all this because fonts are like faces in the world of art. If they’re off by a smidgeon, they don’t look right. If you could print each one on a grand scale, backwards, then trace it with tracing paper, and transfer it to the piece using a rubbing method, making sure you keep each word on an equal plane, that may work as well. It gets a little tricky otherwise. I hope that helps!
Love this especially because I have the very same fabric that I want to use. Small amounts would look great!
One word…Lovely!
This is a gorgeous idea. My little girl (now 3) has a special flower that was on a headband for her dedication ceremony when she was a baby. This is the perfect way to use it and decorate her room too.
Love this! I am now searching for the fabric I want to use for our little girls nursery we are currently decorating! Thanks for the project!!!