Remember this lil gem of a post from last week? If you have no inkling whatsoever as to what the term “carebear vomit” may be referring to, I do suggest you check it out here, first. I personally think it will make this post much more enjoyable, to know I fell flat on my face, and then got back up swinging.
But, to make a long story short, because of the encouragement from some of you, and because sometimes I’m ridiculously hardheaded, I stepped away for a few days, and then decided to…

…Try…try…again.


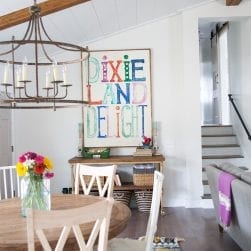
Our mantel and the space, were crying out for something different. And…well…it’s definitely different.

Different as in, it’s a handmade-one-of-a-kind-I-treated-this-like-it-was-a-painting-so-it’s-really-fun-different. There’s something that’s just rewarding about that process for me.
 Either that, or this-was-salvaged-from-the-Little-Mermaid’s-secret-cove-where-she-fantasized-over-Prince-Eric-different. Meh. The Jury’s still out on that one, as I do read/watch/reinact that one a bit much with the Eminator. It’s her favorite.
We’re enjoying it, so I have to say I consider it a little personal victory of my own.
Wanna see how I pulled it from the depths of despair?

First things first: I decided to tone down the carebear stripeage with some trusty wedgewood grey. I dry brushed it on top, glooped it on, and rubbed it off. Someone recently wrote in to ask about dry brushing, and I just gotta say, my pal Shaunna put it oh so eloquently, here. {Be sure to check out her wonderful post.}
Once the Wedgewood Grey was dry, I added some of Behr’s Adriatic Mist on top, with another layer of dry brushing. {Adriatic Mist is a great go-to light aqua color} Some I dry brushed, and some I layered on, and after waiting a few moments, wiped away for an older, layered feel.

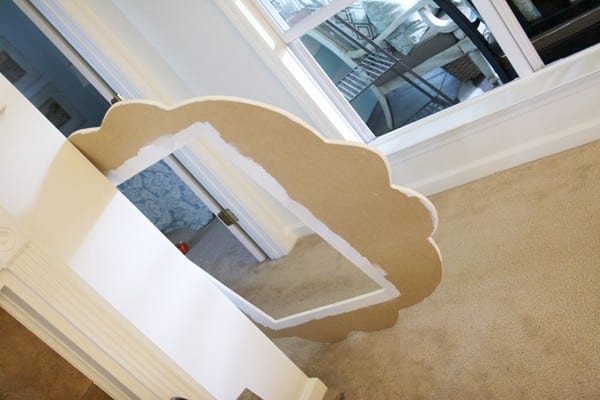
And after THAT, I created a rough recreation of the original little mirror, and the basic idea of it’s pattern in illustrator, to print out on a transparency.

It wasn’t a perfect fit, {I’d already cut the hole for our mirror, and wasn’t following a pattern, originally…} so I lightly penciled in the idea of the pattern, and adjusted as I went with the positioning of the shape. From there, I filled in the shapes with some more white {Chantilly Lace.}

It was already looking better. I loved the varying shades of color, and even smidgeons of the yellow stripes underneath. So I took some Minwax stain, and working in smaller areas, applied, and then wiped the frame clean, to bring out subtle variants of the color. It provided an entirely new depth and look to the piece when all was said and done.

Think you wanna tackle this project at home? I know it seems complicated, but I’m hoping that in my darkest hour, I was able to simplify it for you by at least providing a few ways to jump ahead of the learning curve. Below is my transparency… If anything, use it as a guide to make your own version. I just love the shape, after all was said and done.
Simply save and print-and adjust the size to your liking. I would LOVE to see it if you decide to make something like this!

Here’s a basic break down/summarization, again, of what we did:
MDF + Transparency (just the outline part) + Projector = Trace + cut with jigsaw. Curves are easier than you think-just go slow and have someone hold it for you.
Freak out over misshapen areas, then realize you can make this work to your benefit. Paint to your liking, but as seen in the first post, I coated it with white, {chantilly lace} then added yellow stripes. {generic yellow from our garage} with painters tape. From there, I dry brushed Wedgewood Grey, and on top of that, Adriadic Mist. After that, Used the transparency again, to trace the top layer of interesting shapes, and paint in with white. Once all is dry, finish off with stain.
And there you have it. Your very own frame.

PS. If this frame WILL be holding a mirror, remember to paint the back edges white. It reflects the color on the backside of the frame and you want it to look purdy. 😉

How did we mount the mirror? And the frame? Over the fireplace?
It will take two of you. Jamin and I have tried lots of approaches, and while it may seem icky on the surface, it’s actually the best of what’s worked for us. The business of framing mirrors is scary. We learned that the hard way, when we ruined a client’s mirror she wanted framed {a while back when we were still doing furniture and art} and we felt terrible about it. It was that last screw in mounting it to the back of the frame, that sent a gigantic crack up the side. WOMP WOMP. Too much pressure, especially on an older mirror, can be fatal. So here’s how we make it work:
Eyeball {or measure-I can’t be bothered to measure} the mirror over the area you wish to hang it. Once you’ve decided, mark the two lower corners it with a pencil.

Then, with an L bracket, mark the areas with holes on the current marked corners {your “L”} This is where your support screws will go. {Ignore the “L” to the right. That was us, trying to figure out the best way for this.}

At this point, I was on a ladder. Holding the mirror. So there were no photos. But place the L bracket under each corner, and gently screw in the screws. Oh, PS. these dry wall anchor thingies really help.

 Once the anchors are in the wall, place your L bracket(s) over the spot, and screw them in. {We actually layered two L brackets on the bottom, to give it a nice, stable “ledge”} Then, brace it even more screws across the bottom, once it’s stabilized with the L brackets.

Again, be mindful of the pressure you place on your mirror. Crack kills.

The key is to keep it stable, while getting it as close to the wall and mirror as possible. Don’t leave a bunch of screws sticking out, or you won’t be able to place your frame.
We added two more (basic shaped) brackets in the upper, top corners. (overlapping, as seen above)
And TADA! Stable.

To add the frame, We simply took two nails, and put them in each side, THROUGH the frame. Yes, we could use a picture hanging kit, but the nails are un-detecable with this design, and are more stable, in our opinion.
If your frame falls, please don’t come after us. In fact, if you think we’re crazy, just ignore us. But we just know this worked. Time and time again. For us.
So there you have it: our method for making and hanging our framed mirror.
From Carebear vomit to The Little Mermaid: a lesson learned in perfection : It doesn’t have to be.
The End.
As always, let me know if you go for it!
PS. Linking up to Home Stories A to Z today! {tutes + tips} WOOHOO!


I knew you could save it!! Looks really great!
I knew there would be some wedgewood grey involved! Looks puurrrrrtttty!
LOVE it. And it didn’t look like carebear vomit before. 😉 And…thanks for the sweet mention! I’m dying to order a lens (mine broke) so I can show our white walls, too! Hope you have a great day, friend!
🙂
shaunna
Oh my gosh! You painted your living room!!?? Why am I just now noticing this?
haha well, I’ve only shared a couple of photos in passing, so no biggie! I have the “big reveal” coming up in the future. 😉 I hope. if I ever finish…
It’s absolutely beautiful! The entire mantel is. I LOVE everything about the way you styled it. Especially that victorious framed mirror. 🙂
Awe thanks TIffany! it’s kinda different, so I was a little nervous about sharing it! 😉
Wow! That turned out great! Your creativity is just beautiful.
I think you might just be my new hero. 🙂
Love the project. Love that you allowed us to see the “bumpy road” along the way.
It’s really quite lovely!
It turned out really pretty. Good for you for not giving up and throwing it in the fire pit!
Wow!!! So different from your Care Bare mirror. I knew that you would be able to save it and boy did you!!! Nice Job!!!
eeekkkk!!! i LOVE it! looks great
eeekkkk!!! i LOVE it! looks great
I had no doubt that you would have that “ah ha” moment and pull something together so fabulous!! I L.O.V.E it!!! Thanks for letting us know how it turned out!!
Yay! I knew you could conquer it. It looks beautiful!
I just put a pin in this. I am SO going to make this. I have some left over MDF sitting in my garage right now. Between this mirror and your chevron nursery sign tutorial, I’m pretty sure I’ll use up the rest quickly. Thank you SO much for sharing all your designs and ideas. I am so grateful for them. 🙂
Hey! Please make sure you have the latest version of Adobe reader, as mentioned above. I think that should take care of the problem! 😉
Beautiful!
Kisses from Hong Kong,
Nicole
I almost fell over after seeing this! It is fantastic! Always amazed by your talent…
This would look awesome with a huge black and white picture in the middle instead of the mirror! Inspiring! Thanks so much for sharing 🙂