Hello lovelies!
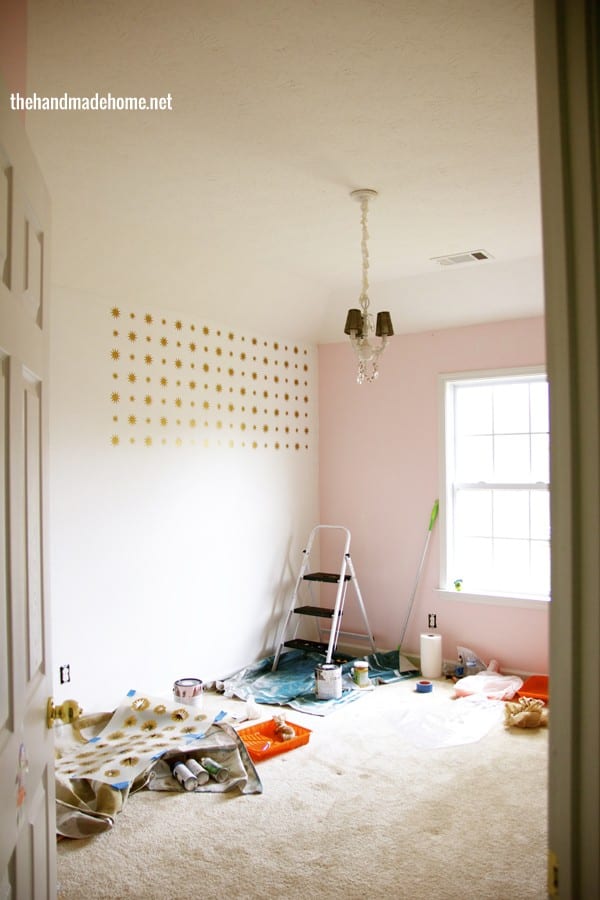
We’re back today with Emerson’s space and a few tips for that stenciled wall!
First things first: I’d never tackled a full-stenciled wall before. I’d only used them in smaller projects like frames or wall art. To be honest, they always kind of intimidated me.
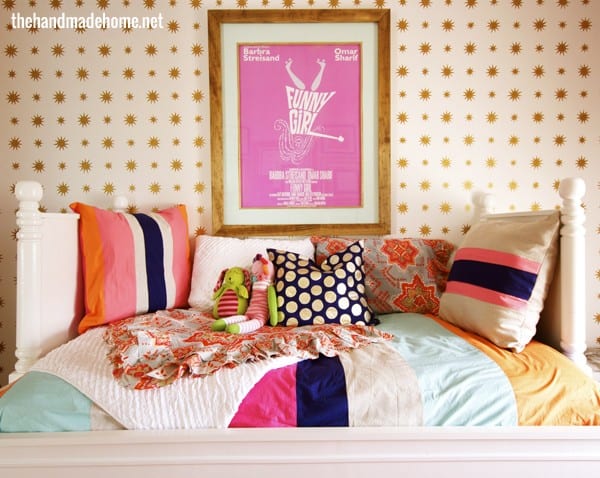
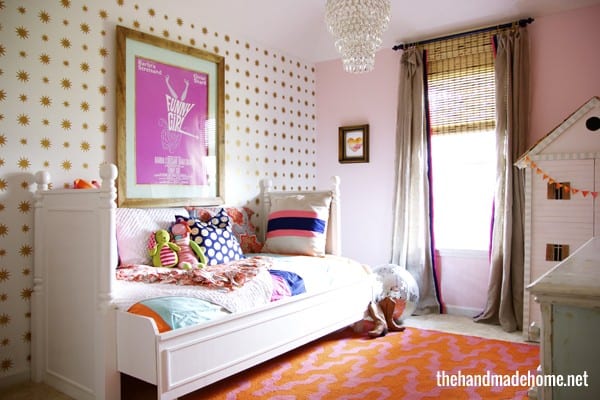
But we fell in love with, and used this fabulous stencil, from Royal Design Studio. And we adored the outcome. Most importantly, so did Emerson.
Today, I thought I’d share a few of my favorite tips if you’ve never tried to tackle a project like this before. Because hindsight is always 20/20… and I love skipping over other people’s mistakes. ;}
1. Have a plan. Math is your friend, and so is a level. Much to my high school-self’s great dismay, math has a lot of say in the world of design when you really break it down.
Don’t ever trust your builder to give you perfectly straight walls. Looking up close, the place where our wall connects to the ceiling was actually all over the place, and we officially want to punch our builder in the face so if I’d simply used the ceiling line as my guide, I would have failed miserably. It never hurts to check as you go, so start with a plan in a specific place. We actually measured our wall, and started in the middle. Even though in the end with this pattern, it wasn’t imperative.

2. Be brave. Use some painter’s tape to start at your point of choice, and get to it. Don’t let it intimidate you. I’m saying this, because big, intricate-looking patterns intimidate me. But that’s what the stencil is for. Treat it as one big piece of art, and just dive in, head first.
I’ll tell you what one of my fave oil painting professors told me : paint is the most forgiving medium. {Unless, of course, you spill it on the carpet…}
Feel free to practice first, and use a combo of brushes until you find what you’re the most comfortable with. Because this particular design was high contrast, we shamelessly went back and touched up the edges of stars with white paint. {We used Chantilly Lace in a matte finish for a high contrast look.}
Treat it like any other project, and you’ll be fine.
3. Patience pays.
A. Use the stippling method with your brush, and brush away from the edges.
B. As always as it pertains to walls… Two thin coats are always better than one thick one.
C. Wait for your stencil to dry, before you move it to the next one. That means you may want to work on this in small periods of time, stretched out for days, and take your time. Don’t be afraid to walk away and come back.
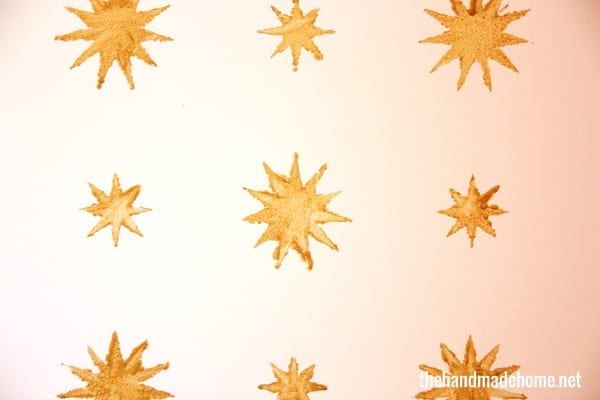
4. Do your research. I thought I knew which paint would work best in the world of metallics. But In the process of creating a fun accent wall, I kind of used the wrong paint. And because I used the wrong paint, it peeled, bled, was translucent (requiring at least three coats) and made me want to claw my eyeballs out, in general.
It actually made what I was trying to accomplish much more difficult than it needed to be. I spoke to the amazing Melanie of Royal Design Studio afterwards (hindsight is always 20/20) but I should have done a little research. From their site:
Our metallic Royal Stencil Creme paints are the perfect way to stencil metallic start like this EASILY. Use Bright Gold Stencil Creme for a fresh look like this, or try Antique Gold Stencil Creme for a little more depth.
Total duh moment. Just for you.
In the end, it all turned out fine & fabulous, and I love this wall. So look at it this way… what doesn’t kill you makes you stronger. But that whole part about learning from my mistakes? Uh, yeah.

5. Have fun. Sound like an oxymoron? Or maybe I just sound like a moron… don’t answer that. It really is super rewarding and fun to create a wall like this. And we adored the outcome. Just treat it like one big piece of art, no stress allowed. It won’t be perfect, because it’s done by hand. But I can guarantee you that none of my friends (unless they’re now reading this and plan to make a funny – and risk being smacked) will be in Emerson’s room examining those stars. So roll with your mistakes, decide what’s worth fixing and touch up those little boo boos.
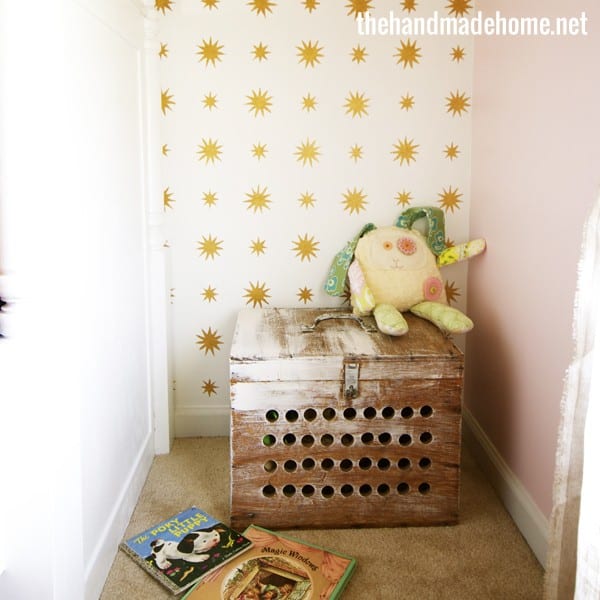
Did you know that everyone who has seen this in real life thinks it’s wallpaper? {Winning.}
Have fun with the process. It’s actually a very rewarding one… We learned a lot and loved the outcome. Emerson literally has stars in her eyes…
So what are some of your favorite tips for stenciling? We’d love to hear your favorite techniques, tips, and takes that you’ve learned along the way. Or if you have any questions, feel free to ask them here! Spill those beans, awesome friends!
And stay tuned for Saturday. Royal Design Studio is graciously giving away a fabulous prize to three lucky duck readers. So be sure to come on ova and enter while you’re sipping that fabulous cup of Joe!
Have an inspired day, y’all!

I just love it Ashley! Stars and dots are the perfect combo!
How do you get in the corners. Did you have to cut the stencil to get the halfsies?
Hey! – My last comment posted weird. ;} I totally meant to cover this. The way the pattern fell, we had to improvise. We didn’t want to cut it, so it took two pairs of hands, and we traced that last row… and then freehanded them. ;}
That room pops with the stencil! would LOVE to win!
What do you use to make your stencils?
Hey Charlene! Royal Design Studio designs them… they have a plethora of beautiful designs to choose from. We collaborated a little on the design of the stars, but they made them. 100% pure fabulous talent from them! ;}
Ashley, it is more than lovely. I have always wanted to love stencils, but they have never, ever….EVER. loved me back. I think I use too much paint because they smear and get globbed up. Then I cry. Well, actually sob. ;0)
Perhaps waiting for it to dry is the key. I also liked your tip about painting AWAY from the edges. Nevertheless, it is stunning!
WOW! Looks awesome!
IT’s just so perfect, and if you finished it without scratching out your eyeballs, maybe I can too. I did just a few jumbo circle stencils with chalk board paint on my daughter’s wall and half way through, thought, this is good enough. They love it and that’s what matters. 😉 (Even if my goal was the whole wall. haha)
I love that I’m not alone in these secrets 😉 “Yup! Looks great! All done!”
Well, I don’t profess to be a great judge of art but, The wall looks great to me!! Stenciling is a nitpicking kind of project but with patience and perseverance, you can get great results as your pictures prove. Congratulations on a job well done.
I’ve been thinking of doing a wall in my master bedroom and these tips are amazing!! I love your blog btw 😉
Jamie @ Better With Age
This wall, and the entire room looks just amazing, what perfect colors! And thanks for the tips. I’ve been wanting an accent wall in my home and might be brave enough to take it on soon!
thank you!
I love that rabbitt!!!!!! you did it???
tutorial tutorial tutorial
closer pictures please!!!!!
love the entire room, house, family, etc.
Hi, Noel! You can read all about how to make them here!