Hello wonderfuls!
Today, we thought we’d share a little project we took on with some good friends of ours over the holidays. Martin and Andrea are the proud owners of a home they’ve lived in for a few months, but they were ready to tackle the stairwell for a fresh look. And we, being the total dorks that we are, jumped at the chance to create something fun.
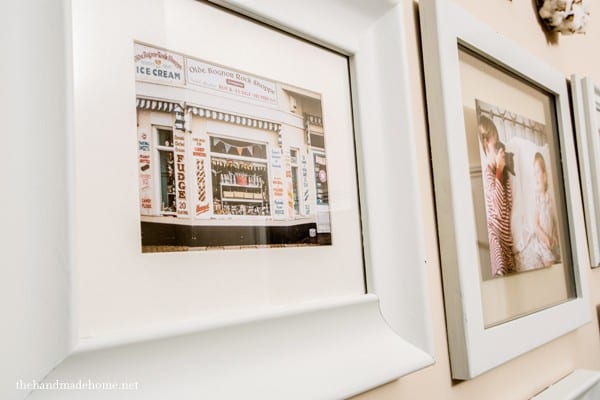
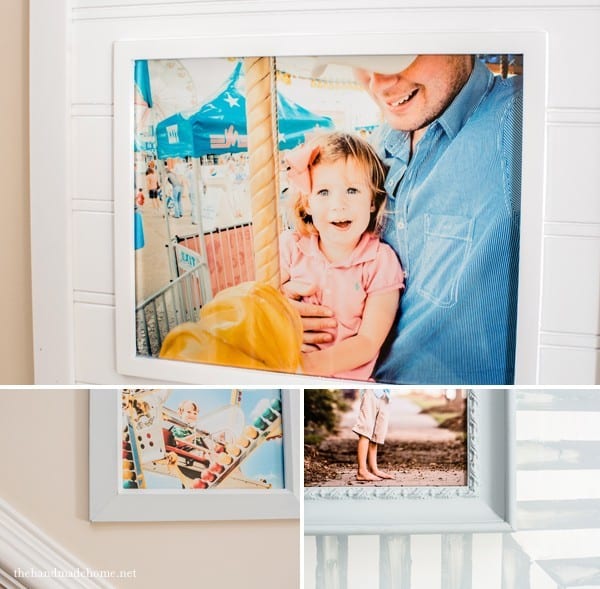
I love an entry way. It’s the chance we all get to set the stage for the rest of our homes. Sometimes, they’re easily overlooked. Martin is a photographer {Our friend Britsnap – all photos for this post were ever so kindly snapped by him, along with the beautiful prints you see in the end results} So he has a plethora of personal art at his fingertips, ready to display. We all saw it as a blank slate – the perfect opportunity to showcase his beautiful work.

So we put our heads together, and decided to come up with a really fun design for their stairwell. We ended up having a party ourselves, while we put it all together.
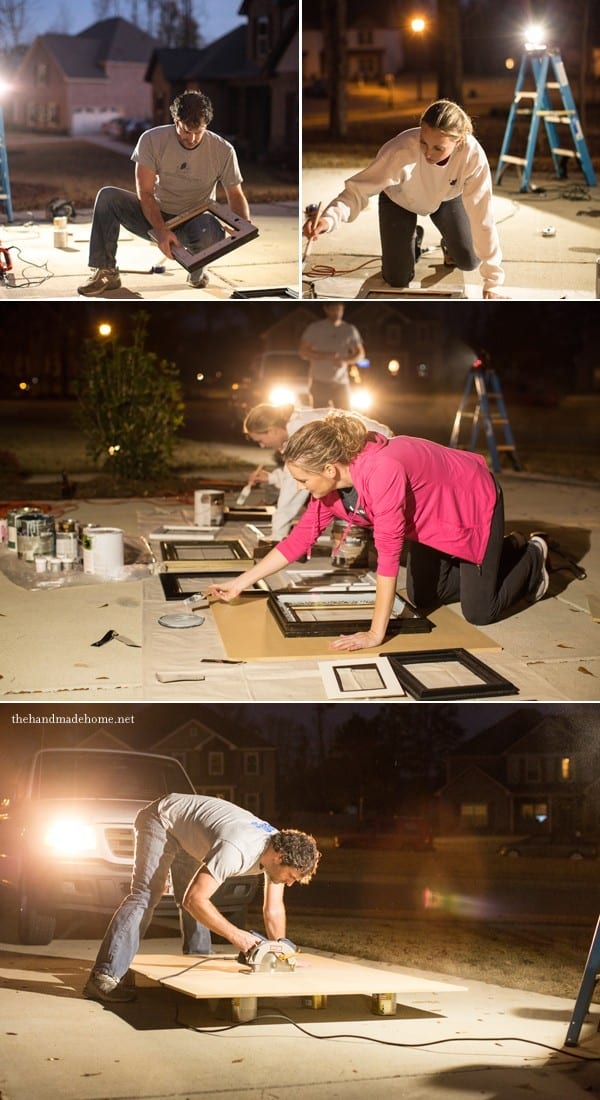
It was dark. And it was chilly. And we were those people. {The ones where their neighbors were all, what on earth are they doing over there? Our neighbors are used to it by now. I’m convinced they think we’re crazy since the day they saw me balancing on top of Jamin’s shoulders to get a shot for a project… but their neighbors are unaccustomed to our shenanigans.} But it was also lots of fun.
Martin and Andrea had quite a few frames already in their home, so we literally just shopped their house and came up with the pieces for their gallery wall. We then took them all outside and got to work with project revamp.
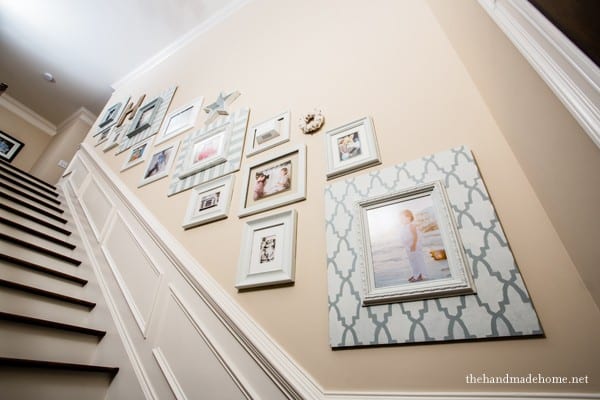
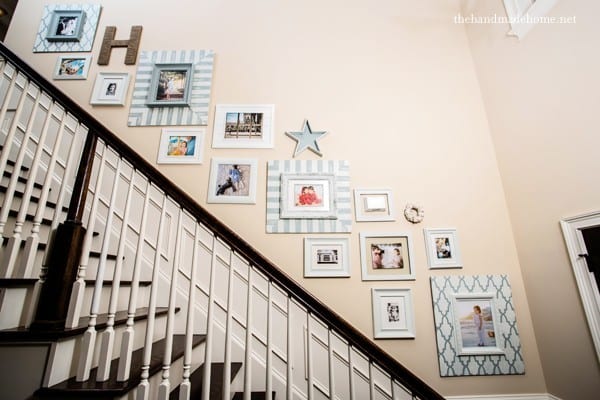
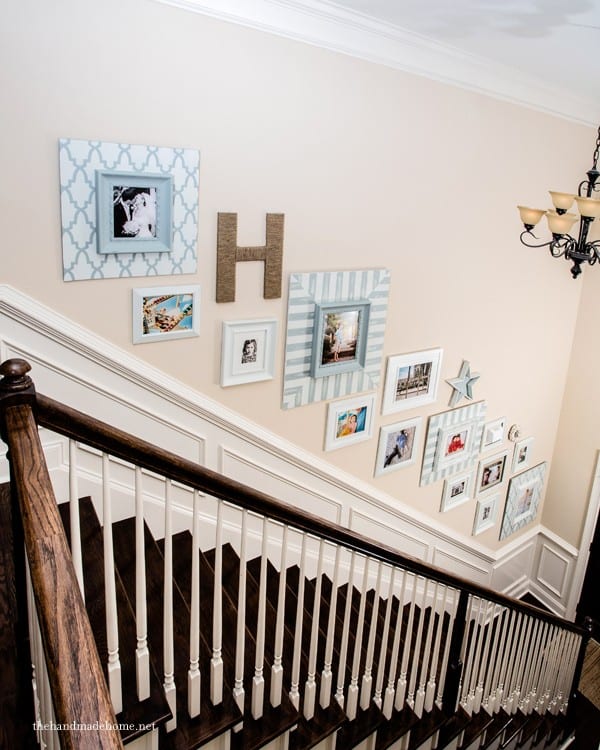
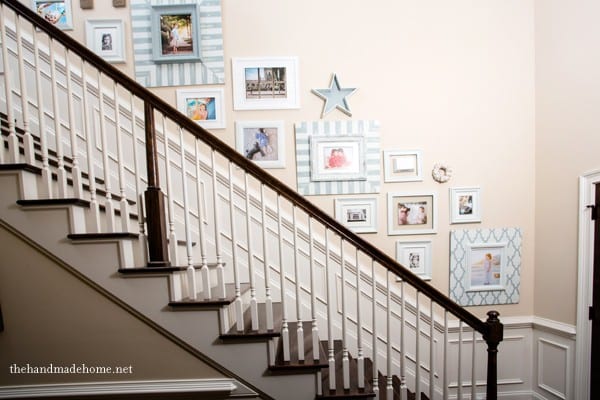
We simply measured the staircase wall, and laid everything out in the same length on the ground. We planned as we went, alternating by size, or position, and deciding from there what colors to paint our found items, planning as we went.
Once we were finished with the painting stage: While I’m usually the fearless eye-baller, the look we were going for called for a little more preciseness. We measured and borrowed the brilliant process (via Young House Love) of cutting your paper to the size of your frames, and previewing it on the wall. All of the little adjustments here and there weren’t really a problem, because we simply shifted the paper that was taped in place. We even switched a few things around that we wouldn’t have seen before everything was hung if not for our paper preview. We probably saved their new wall an untimely death of fifty additional holes.
Also use this little helpful hint to help you get the frames up there. Tada! You’ve got yourselves a gallery wall. And dirty teeth. ;}

Breaking it down, here’s a few simple steps for creating your own gallery wall.
1. Shop your house. We used all kinds of salvaged items to create this wall. You never know what you’ll find when you start looking at things in a different light. We embellished frames in different ways, and even built a few. {PSST! To make some like these, check out our ebook, here!}
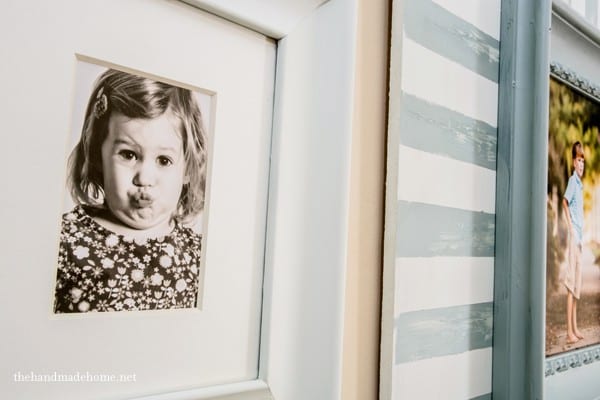
2. Unify with color. Once you find those salvaged elements, stick with a few colors to help keep those different pieces looking intentional. Here we used grey and white, and scaled it back so that Martin’s photography had room to breathe.
3. Set up a Rhythm. This wall took planning. And while it looks overwhelming, we simply measured out the wall with a ruler, and then laid it out on the ground outdoors, to set a bit of pacing within the overall look. While it wasn’t perfectly symmetrical, we made sure it was balanced. You’ll notice larger frames in the same pattern, repeated. For this look, consider balance in your pieces, to keep it a bit like organized chaos.
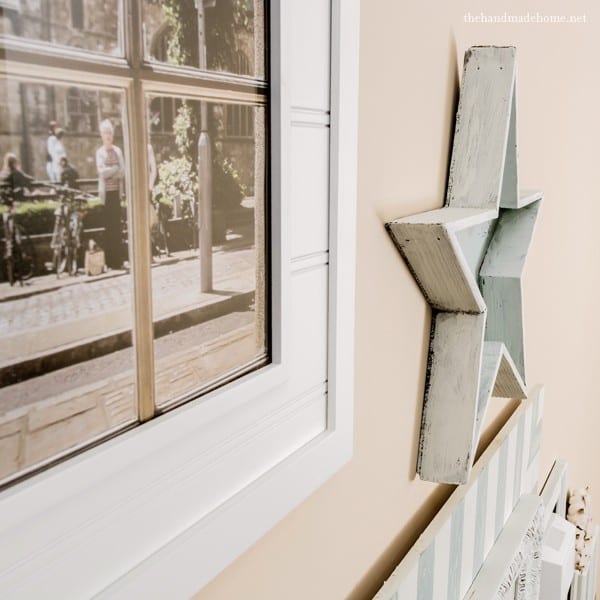
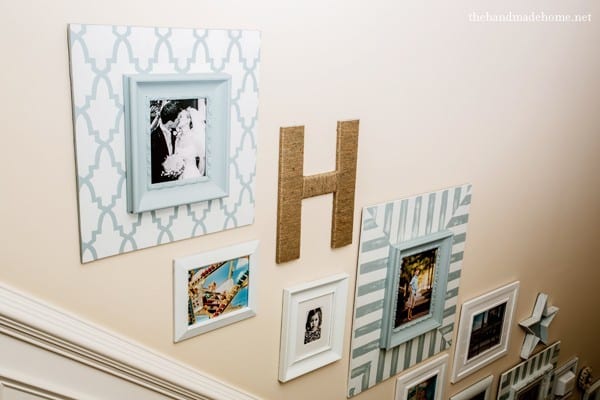
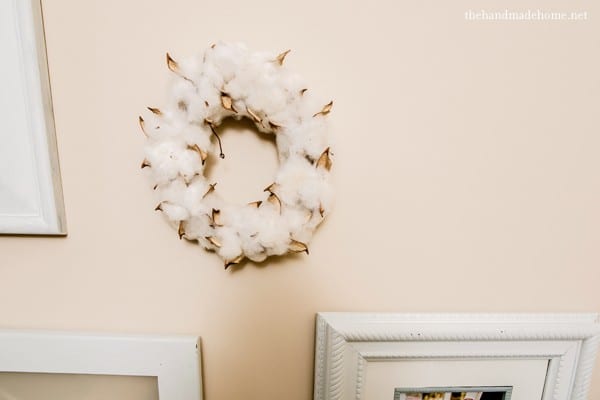
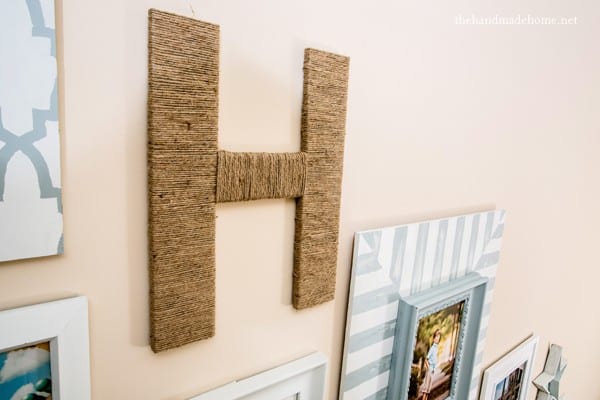
4. Sprinkle the unexpected. To keep it fresh, we used items like a star I scooped up from the center of Andrea’s table (and with her permission, painted + gave it a new home) or a cotton wreath. We drew and cut an H from a piece of MDF, and Andrea wrapped it (do you see how perfectly? I was impressed) with Jute one night while watching TV before they placed all the pieces. She simply planned ahead gluing as she went. Even though art and photography are beautiful, a wall can become interesting when other elements are considered, as well.
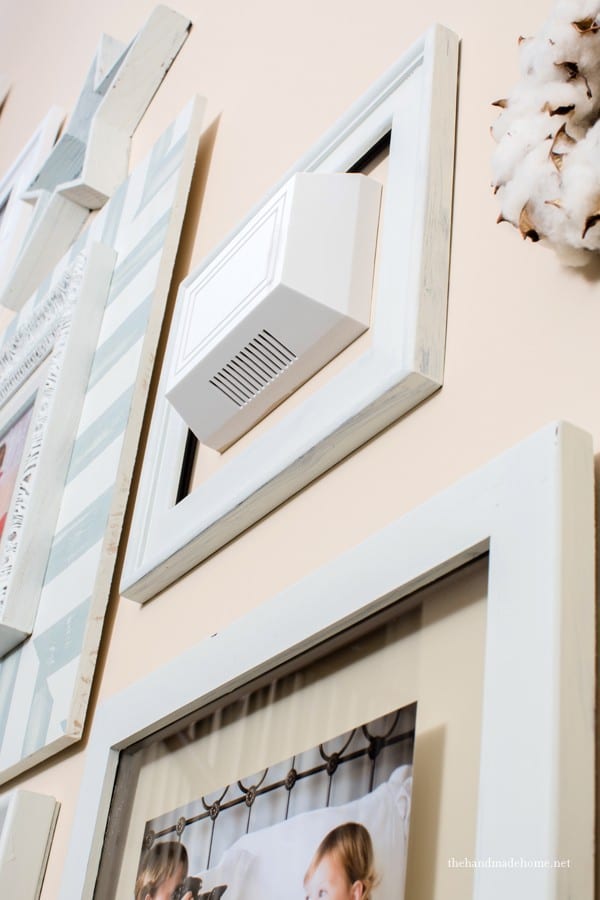
5. Embrace what you can’t change. No, this isn’t a life lesson. Rather a metaphor in the form of a nasty doorbell chime greedily taking up prime real estate on their gallery-to-be. We were a little miffed as to who dropped the ball on that one on the planning and construction side of things, but there was nothing we could do about it. (Without knocking a massive hole in the wall.) So we decided to frame it. Work it into their design. She can even cover it with a light canvas later, if she grows tired of the look. But because we worked in a touch of the unexpected, this doorbell chime box thingy (?!?!) blends in a fun way.
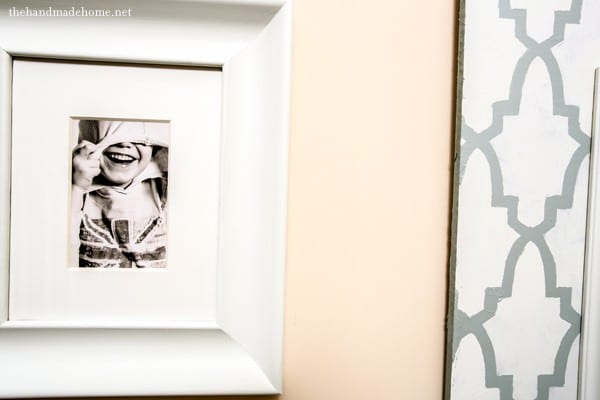
6. Infuse it with a story. Martin and Andrea chose beautiful prints chock-full of personality for their wall. This entryway truly reflects the people that live there. I walk into their home and it gives me warm fuzzies. Even though most of the frames display vibrant, punchy color, the black and white photos hold their own, as well. They make the viewer stop and take in the story behind each one.
No, we can’t all be photographers. But we have personal memories that can be shown in different ways. Think through simple things like art purchased off of a street vendor on a special trip, or a pretty Instagram photo. These are part of the tapestry of what makes us who we are. They should be reflected in the home that way.
This wall is full of happy people, places, and inspired memories. Life on display.
7. Enlist some help. We had a blast bringing this area to life with Martin and Andrea. With four of us painting, it quickly went from a chore to a party. Just a little proof to show what can be done with friends, a few creative ideas, and fun times!
I don’t know about you guys, but I suddenly want a stairwell! Have you guys started a gallery wall in your homes? Have you found it a challenge to hang those frames? What kind of solutions have you found for your stairs?
We’d love to see your pretty mugs on a wall! Send them our way. Have an inspired day!

I love the way it turned out! And I didn’t even notice the doorbell chime until you zoomed in on it 🙂 Great tip with the news paper ~ that is exactly how I decide how I’m going to set up my walls! That way I don’t have to put 500 nail holes in the wall ~ HA!
Yes, I think Andrea and Martin were grateful I didn’t mutilate the walls! haha! ;}
It looks fabulous!!!!!
Thank you, sweet friend! ;}
That looks absolutely terrific! Love how you made some of the frames larger with boards.
I have several gallery walls in my home. I just love them. I even mix and match across frame colors and mattings.
You achieve such great balance here!
Oh my! I just love this! I love the frames you made too! Well done! Great tutorial as well!
Looks fantastic! I love the colors and the patterns…and the letter and the star! Pretty much everything! Wanna come to San Diego and help out my walls? 🙂
That’s gorgeous! The light blue/teal color works so perfectly. And that cotton wreath – holy moly, I have to have on immediately.
OOOH you can come do mine! 🙂 I hate it! IT’s CURVED and I have NO IDEA what to do with it…. so it’s up there… just bare…and ugly…. 🙁
Love how it turned out! I wish I had a stairway everyone could see but ours is in a stairwell. Gallery walls are the best- I think it makes a home so meaningful and you can see what that family is all about. Check out my links below for two of my gallery walls. And yes, I eyeballed one (who has time?) and laid the living room wall stuff out on the floor ( since more people see that one ).
http://lifeoncircleavenue.blogspot.com/2013/01/stairway-update.html
http://lifeoncircleavenue.blogspot.com/2013/01/welcome-home.html
such a lovely home, Danielle! I love that you shared that. Beautiful!
I am in the middle of my stairwell project. I have been collecting frames for the past three years while we waited to find out if we were going to move or not. As soon as we found out we are staying and after the Christmas holiday I got to work. Using my drafting skills I drew out my wall to scale on paper and then cut out the frames to scale so I could place them where they work best. I am just now cutting them out of paper to hang on the wall. Then comes painting them all and picking out what to put in them. It Is such a long and tedious process!! I am sure it will be worth it in the end, there are over 30 frames on my wall. I have a feeling they will hang empty for a while while I figure it all out.
Good for you Bekki! It is a TON of work! ;}
Ashley, we just love to stand there and stare at it. Friends who come over make us laugh because they just stand there staring, too! We LOVE it!!!!
Yeah Cheers Ashley and Jamin. Great work and vision, we all love it. When Mags walks down the stairs she stops at every image of herself and does an impression of her face in each picture. We would never have come close to doing this by ourselves! Cheers!
Absolutely love it!! I used the Young House Love method and the toothpaste method on a display wall at my old house and it worked like a charm.
Would you mind giving the DL on those pretty paint colors? 😉
Hey Abbie! The blue was BM’s Wedgewood Grey. The grey was a light grey they had – I love Behr’s Irish Mist, if that helps! ;}
Abbie, the lighter color is Benjamin Moore’s Pearl Gray. Love it!
It reminds me of Claires staircase on Modern Family 🙂
Beautiful! I so need to do this for my blank stairwell!!
xoxo, Tanya
LOVING this! I’ll pin in a bit on the BHG blogger home favs board. “Wicked” awesome as we say here in Boston 🙂
Wow…so creative! It is amazing the before and after shots!!! Do you ever sleep? I love the photos…someone is a great photographer too. I loved the simplicity of repeating the blue and cream and the variation of different way of framing photos…such as the floating frames, the composit of multiples creating one and so on…and the textures were great too…when can you come over? lol!
Great ideas for the wall! I love the frame around the door chime box! I wouldn’t have noticed if you hadn’t pointed it out. It’s great! Have an awesome week.
Leslie
Love it! Time to get to work on our stairwell!
LOVE IT! i was starting to think that stairwell gallery walls were a bit played out, but i really love what you’ve done. the non-picture elements give it a whole new spin.
Hey! I absolutely love what you did with this wall!! Question for you – How did you attach the large boards you used to the wall? I have an idea for something I would like to do using plywood boards similar to this but was not sure how to best/safely hang them. Thanks! Laura
Hey Laura! We just use picture hanging kits and make sure to anchor them into the wall. Hope that helps!
LOVE this!!!! I have a blank slate stairwell that I’ve been TERRIFIED to tackle for 6 years! I’m going to do it! This is awesome!
Thanks so much for this post! I have been thinking of doing a gallery wall for our stairs, but was too overwhelmed to even begin planning it out. Now that I’ve seen this, I know I can do it. We have a similar wall color and I think I will go with the same frame colors to make it even easier on myself. THANK YOU!
Ahh Beautiful. It looks absolutely gorgeous.
Great idea!! thanks a lot for sharing!
Our gallery wall in our dining room was my favorite thing to work on in our apartment. I love it because you don’t have to own to make it your own with a gallery wall! I also use the newspaper technique, it definitely helps save some holes in the wall! I also incorporated a fabric covered star, a painted plate, and some iron trinkets from my beloved Hobby Lobby to fill some space. I love using my own photographs, because when people ask where you found the beautiful pictures, doesn’t it just feel good to say you took them?
Absolutely, Sam! Love that.
I LOVE this! I have been trying figure out what to do with my stairwell since we moved in our house months ago. This is perfect! I just ordered the book. Love your blog!
This is wonderful, I’m an artist, and i’ve decided to create my first in home stairwell Gallery of art. thank you for such wonderful idea’s. when i do the showing i will send you photo’s.
Again thank you so much.
Phenwar
What a LOVELY post:) your blog Is SO inspiring and I always leave here with a smile.
Check out my blog….with lots of cute Swedish decor inspiration:)
Have a great weekend dear
LOVE Maria at inredningsvis – inredning it’s, Swedish for decor 🙂
babies frames and am getting tired of them after five years. You have given me some great ideas for hanging. Thanks I am now adding spouses and children of my gang. If I can find you, I will send photos when I finish.
I LOOOOOOOVE this. You are seriously awesome! I have been stalking your site regularly…I love all your projects!
Thank you, Beth! ;}
Beautiful 🙂
Quick question: On the frames that do not have a mat around the picture, did you affix the picture to the front of the back of the glass? What do you use to affix and not damage the picture? Thanks!
I absolutely love the look of this wall! Would you be willing to share the dimensions of the four frames you cut?