
A few weekends ago, we spent Memorial day weekend, here.

Our friends’ parents own this incredibly wonderful {read: coolest on the entire planet} vacation home, which just so happens to be perfectly situated on Alabama’s southern coast. Martin and Andrea and their kiddies were headed there for the weekend, and graciously invited us to join them. Needless to say, we {us and our beach bummin’ kiddos} jumped all over that invite. Bonus round: Dr Bob {Andrea’s dad} is also our pediatrician. To say we kind of adore their entire family, would be an understatement.
They {their daughters: Andrea, Amber and spouses} unofficially refer to this home away from home as “The Perfect Prescription.” I can honestly say I whole heartedly agree, and would move in at the blink of an eye. If I owned this place, you couldn’t pry me away. I would be that person. The creepy lady with leather skin and bleached hair who never leaves the porch all year. I’d just break out my jumpsuit in the winter months and continue to plow through my collection of ill fated a-la Nicholas Sparks beach novels. But alas, digression.
Of course, I, fascinated with all things decor and home, eagerly soaked up the backstory of their new vacay home. They found a major score with the home, as it was. The inside was already furnished with some interesting finds, to say the least. Of course, over the last year or so, they’ve slowly but surely added their own personal touch to it all, but here’s just a small sneak peek at some of the fun elements it holds:

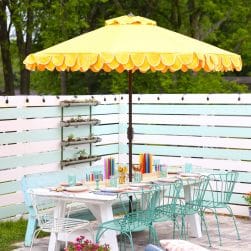
This beautiful table makes me swoon every time I see it. Jamin and I were wondering if it was handmade, and we LOVE the natural look. The lines and coloration are vaguely reminiscent of koa wood. But the table itself provides the perfect spot for gathering family and friends.

This mysterious, gargantuan piece fondly referred to as ‘the sarcophagus’ provides ample storage and holds the family’s linens + various beach supplies. Of which, everyone knows, a beach house can never have enough. It looks like it was made from old pieces of something…I’m still wondering how the original owners managed to get it inside.

It’s basically a large indian design-I swear those are railroad ties. ;} It makes for a better story that way.


Don’t you just want to reach up and snatch that hand towel? Trust me. I resist every time. Charming details, like this adorable anthropology-esque towel, adorn the house and make it a home away from home.

This beautiful coffee table made from reclaimed wood simply offers more eye candy, as well as a place for family to gather when they bust out the scrabble board at night, or various finger foods while they watch a football game in the fall. {War Eagle.}


Fun pillows, pops of bright colors, and pretty paintings adorn the kids’ room…

And beautiful, simple white bedding with green accents for an additional bedroom add the perfect contrast to that perfectly stained headboard.

Speaking of headboards: Andrea dreamed up this all-too-clever one for one of the additional bedrooms. She simply used fabric, batting, and dry wall for her materials. They were cut into 6 squares. She covered each one in cotton batting, and then fabric via a staple gun. They were hung with wooden brackets by her dad, Dr. Bob. What a great practical and creative idea for a headboard. Like Flor for the walls: Instant interest + mad props.
But what I really wanted to show you today, was their latest addition: an outdoor shower.

A prime example of the generously clever couple’s handiwork, this spot provided the perfect place for the kids to rinse and adults to wash…all in private while enjoying the great outdoors.
And after admiring it all weekend, I realized that a project like this isn’t just for those with a beach house.
Have you ever thought about putting one in your back yard? I know I have… There’s just something about a shower outside on a hot day. I don’t even have a pool. And I don’t live near a lake. But to jump into a cold outdoor shower after working in the yard, or a hard run, just because I could…wouldn’t it be fun?

So today, I thought we’d take a look at this wonderful work, as well as a little informative how-to for making your own…

Dr. Bob was kind enough to humor me, and answer a few questions I had about the entire process. I thought you would find it interesting, too! He’s kind of a jack of all trades, master woodworker-you should see their real house. So, without further ado:
1. I know the project appears to be pretty straightforward, but if you wouldn’t mind, a little step by step? I guess you started by digging the holes for the posts, and then went from there?

I started with a location for the shower. I could have kept it in the original location on the carport, but this would have meant opening up the ceiling to get to the floor joists above and breaking open concrete to secure it to the floor. To me it was easier to move it under the deck where the joists were more accessible and it allowed the water to drain into the sand rather than onto the driveway. I wasn’t sure about the plumbing but I thought I would figure that out when I got to it. {gotta love that no-fear gusto} In trying to get an idea of the size I needed, I came up with a size of about 4 feet square. This seemed to be big enough to be comfortable, and it also fit in with the dimensions of the joists on the deck overhead.
2. What materials did you use to build the shower? And if it’s okay with you, a rough estimated cost?

For materials, I knew I wanted pressure treated lumber to stand up to the salty beach air and stainless steel screws because of the environment even though they are a good bit more expensive than galvanized screws. I did have to use galvanized bolts, hinges, and a door latch.
• The siding is just cedar fence boards like you use on a backyard fence. I was going to use pressure treated material for this also, but while we were looking Cathy saw the fence boards and liked the decorative detail of the dog-ear top. One of the most important things about the siding is that we primed and painted each piece with 2 coats of a good exterior paint to give as much protection as possible. Cathy did all the painting by herself. I think all the materials were about $300 or so.
• I started with 12ft 4×4 posts which are anchored to the overhead floor joists with 5/8″ galvanized bolts and extend about 2ft into the sand. I just packed the sand back and did not use concrete around the posts.

• The siding was 6ft high, so I ran 3 horizontal 2x4s between the 4 corner 4x4s starting at about 1ft off the ground, one about 5 1/2ft, and one in the middle I installed these flat which made a little shelf to put soap, shampoo, etc on and gave more stability for the siding.
• To install the siding I used the stainless steel screws and used a level frequently to keep the top level and the boards as plumb as possible. When we finished the siding we realized the boards probably came down too low to give adequate air circulation inside, so I took the level and marked a horizontal line about 10″ from the bottom and cut it off with a circular saw.

• I used the same materials to make a door about 3ft wide.
3. How did you re route the water? Do you think this would be easy for other people to do in a non-beach home?

• As for the plumbing I wound up using a flexible tubing called PEX tube which was similar to the piping already there. This is easy to work with and is not rigid, so it can be bent a little if needed. The main thing with this product is that it uses special clamps which requires a special crimping tool that costs about $60. If I had to do it over I might just use PVC tubing and glue joints which would be much less expensive. It took just a little experimentation to learn how to use the clamps and crimping tool, but once I got the hang of it, it was rather fun. I had to run the pipe from the old existing shower about 25ft to the new one, so it took some preplanning and frequent measurements to make sure each piece fit.

• Also I placed spacers behind the pipe hangers or supports. This will give room to go back later and put foam pipe insulation around the pipes since it gets below freezing in the winter even on the beach.
4. Did you run into any unexpected problems along the way?

There were 2 snags which required some modifications. One was that the 2 posts right against the driveway did not go exactly to the driveway because of a little concrete on the edge I couldn’t remove.
This left those 2 posts about 1″ out of plumb so I added some shims behind the siding to make it look plumb. The other problem was the placement of the shower head. At first I was going to put it flat on one of the corner posts, but this just sprayed water down the wall and even adjusting the shower head as much as possible, it still just barely made it usable.

So I cut little triangular blocks of wood and placed it at a 45 degree angle in the corner, then mounted the shower head on that so the head angled into the center of the stall. This also helped make the plumbing run easier in that area. I thought this was a rather elegant solution to this problem.
-Agreed!
5. Any recommendations for anyone who wants to try it at home?

I took 2 1/2 days to do this project, but I ran out of plumbing fixtures and had to go back for more, otherwise it would have taken about 2 days. Also it was a very big help that Cathy painted all the siding boards. 38 boards in all and took 2 half days to allow for drying
Great advice, Dr. Bob! Didn’t they both do an awesome job? And as usual, thank you very much a million times to Dr. Bob and Mrs. Cathy for generously opening their home to us and our crazy beach lovin’ children. ;}


In our last house we had a pool, an outdoor shower would have been a great project. Sadly we moved and now I don’t have a pool! Maybe we should build both! Thanks for sharing this awesome home and shower!
Debbie
I’ve wanted an outdoor shower for a loooong time. We live in Arkansas, nowhere near a lake and we don’t have a pool. But when I was a little girl, my mom always had a small pool on the deck every summer and that’s where I always wanted to bathe. She’d get the hose and shampoo out and I would stand under the water for as long as she’d let me. Now, I make my husband hold the hose (it has a showerhead nozzle) over my head as many times as possible when summer roles around every year. We’ve talked recently about installing an outdoor shower, so I was excited to read your post!
Yay! Go for it! 😉
My very good friend and her husband put in an outdoor shower 2 summers ago. They have 10 children that love to “explore” in their woods behind their house and swim at the neighbors. The shower really helps out so the kids don’t carry in all the dirt with them and she doesn’t have extra to clean up. Hey, even if they didn’t have the woods to play in, with 12 people in the house an extra shower wouldn’t hurt! 🙂
I only have 4 kids and I would love an outdoor shower…..”honey-do list” – ummm???
Haha you “only” have four. I don’t think you can use the term “only” past one. Ten!? Wowsa.
I soooo want an outdoor shower! Especially at our beach house. We were just there at the AL Gulf Coast as well. we have an old cottage in Orange Beach. Our neighbors have an outdoor shower on the side of thier house which is right in line with our front porch. Our front porch is basically our beach house’s living room. So it was kinda funny, everytime our neighbors took an outdoor shower my son would run up to the end of the porch look over and then say, ‘Who’s taking a shower? Why are they taking a shower? Are they still taking a shower??’ I tried to convince him to stop, but to no avail! 🙂 I’m sure the neighbors were loving his commentary while they were trying to shower! I’ll have to keep this tutorial, because next summer I want to install one at our house. We hose down after the beach, but a nice outdoor shower would be perfect. There was one growing up, but it blew away in a hurricane… This looks like West Beach… Trying to figure it out… 🙂 War Eagle…. 🙁 I have to throw in a Roll Tide! hehehe…
Hilarious! Yes, touché. Roll Tide. 😉
We had an outdoor shower at my aunt’s house next door when we were kids. It was camouflaged by a large bush. In between the bush and the wall of the shower was just enough space for 3 or 4 kids to sit behind and call their “secret hideout”. It wasn’t so secret from the adults, they just couldn’t fit in there with us. We used to rinse off from the pool, wash the chlorine out of our hair… I remember taking actual real showers in it only a few times- those few times after being in the pool all day on a Saturday right before going to church for an evening service. We would NEVER be allowed to wear swim apparel to church though our hair may have been dampish 😉 After church, back in the pool for a summer night’s swim. I would LOVE an outdoor shower at our little bungalow since we are right up the street from our lake. However, with the way our house is situated on our hill, it could get awkward with the neighbors being able to look down into it. 😉
OH and one more thing about our shower- my uncle installed a little water fountain that was connected to the shower line, it was at kid height directly below the shower head. For what reason? In case you’re parched while showering? To get my cousin to stop drinking straight from the hose? No clue. However, as kids we thought it was the neatest thing.
I’d love the shower! ………….and the house, too! SO pretty, and bright! Will they let total strangers come visit? I’ll bring cookies!!
We’ve been talking about building an outdoor shower off and on for a while now, but we are miles from any swimming hole or lake and don’t have a pool, so it would be just for cleaning off after gardening and perhaps cleaning up the children a bit after some serious backyard playtime! We talked about making it ‘solar’ by putting a coiled black hose on a roof and letting the sun warm the water – the problem with that would be regulating the temperature so we didn’t get scalded! There is something so very fun about an outdoor shower! Perhaps we’ll just start with a ‘foot shower’ like they have at the hotels in Mackinac, MI so we don’t bring quite so much dirt into the house!
I’m extremely inspired with your writing talents as smartly as with the layout on your weblog. Is this a paid theme or did you modify it yourself? Anyway keep up the excellent high quality writing, it is rare to look a nice weblog like this one nowadays..
What a beautiful home, thanks for the tour and I have the outdoor shower part linked to my DIY outhouses and outshowers post too today!
I LOVE this idea! I want to do this…no pool. We do have a camp house where people come in from hunting, fishing, playing in the dirt, planting gardens, etc. I think this would be an awesome addition. That way the dirty clothes could stay outside during spring, summer and fall. (Way south Georgia where it is very warm except for November-mid March.