
a no sew teepee
Hello lovely friends! We’re back today with a super fun project we were wanting to whip up this week. With our veranda now empty, we’re enjoying the extra space for play. And we’re excited to share this no sew teepee.
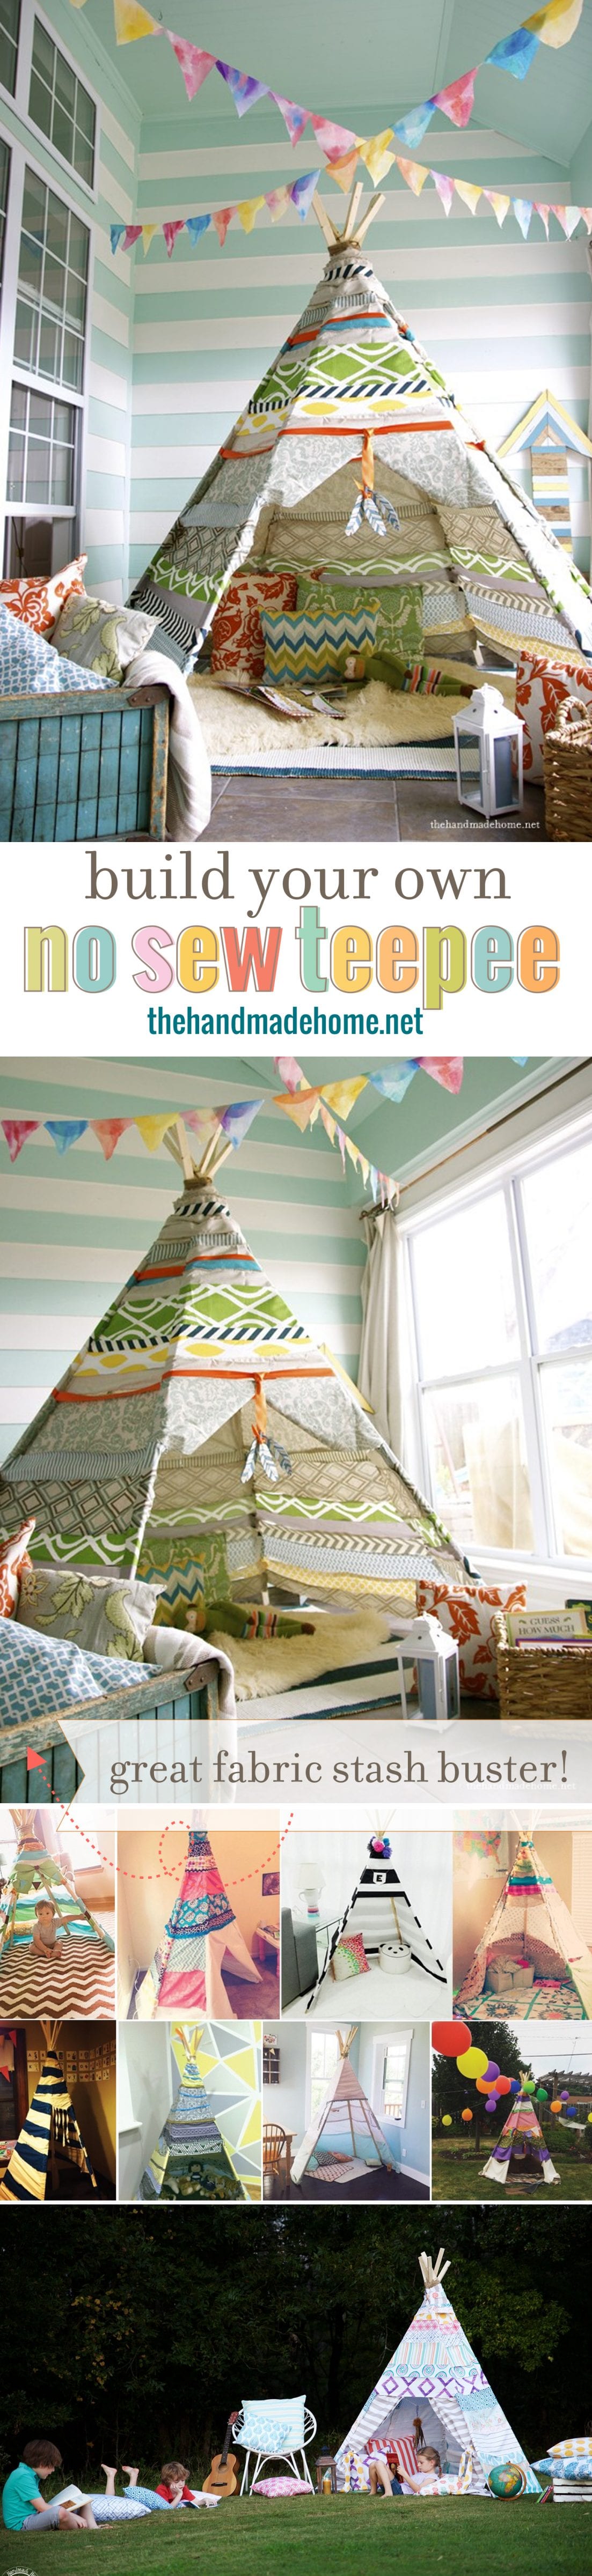
No sew teepee – a second version
pssst: to see our no sew teepee with some of our fabrics, and some reader creations… be sure to check it out here!
 I’ve wanted a teepee for about, oh, seven years now. (PS. did you know tipi, tepee + teepee are all acceptable? The things you learn when writing a blawgh.)
I first spied one in the mall before I got the nerve to try things on my own, and the price tag was not pretty. ($$$ x 4!) Then I wanted to make one, but the sewing part always freaked me out a little. You know, triangles and preciseness, and giant poles falling on your children and eight hour projects amongst other various whatnots. I’m getting the hang of sewing, but I was looking for an easier approach.
 So I decided on a no sew teepee tactic.
 We wanted to beat the winter blues, give the kids a little something fun for Valentine’s Day, and the best part?
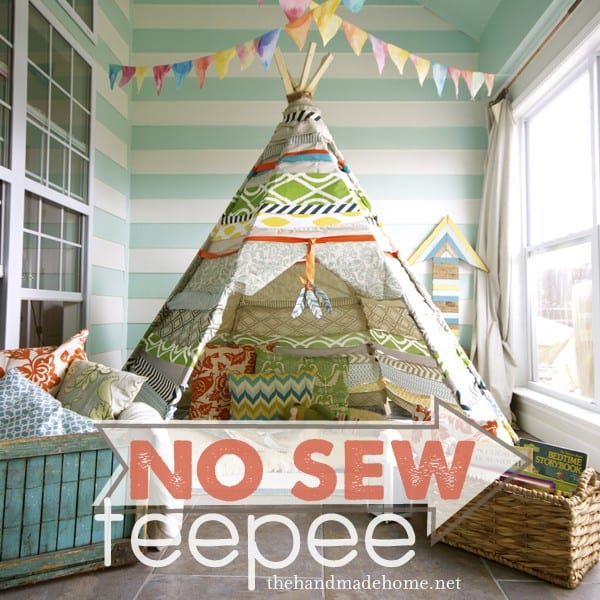
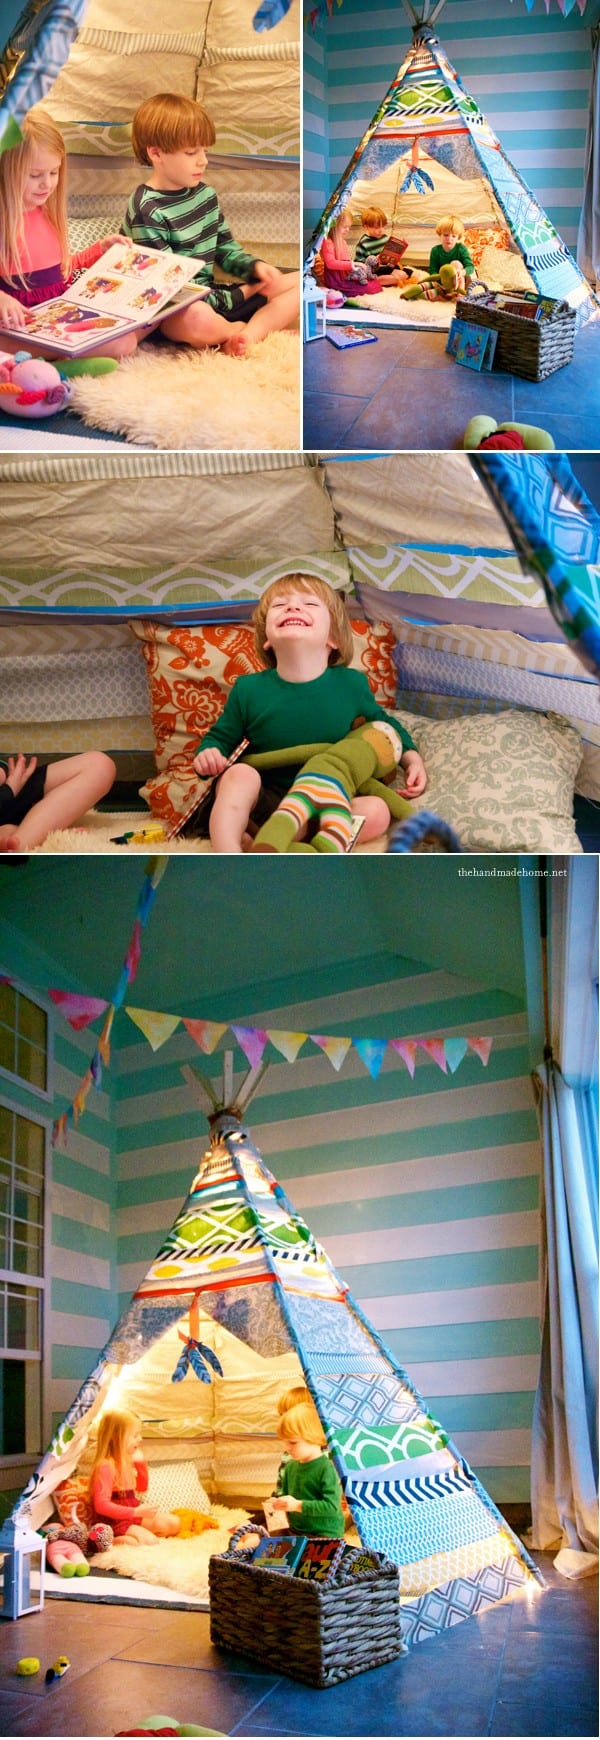
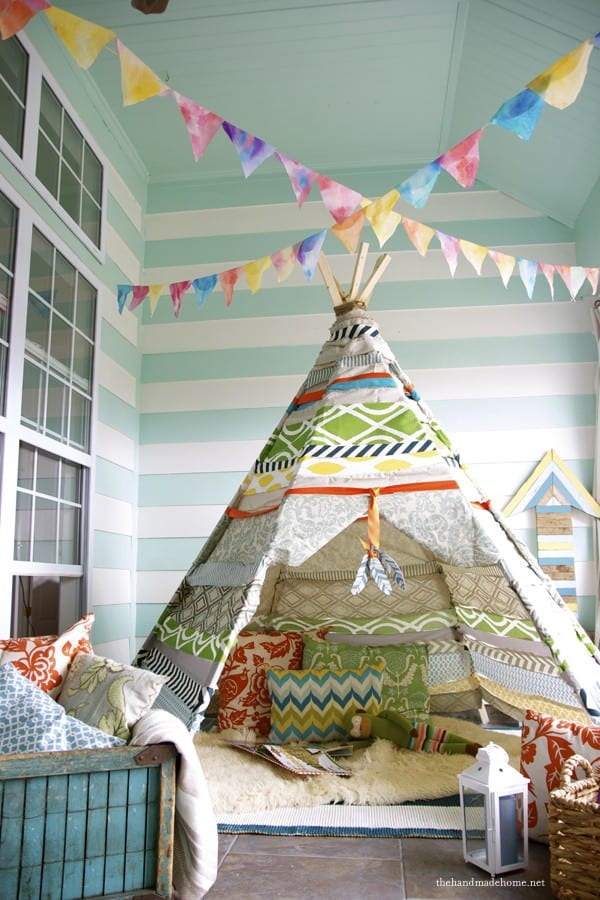 It’s the official reading no sew teepee. Aiden made a bee-line for the new fort this morning. I’m just excited to see him so excited…
Want to know how we did it?
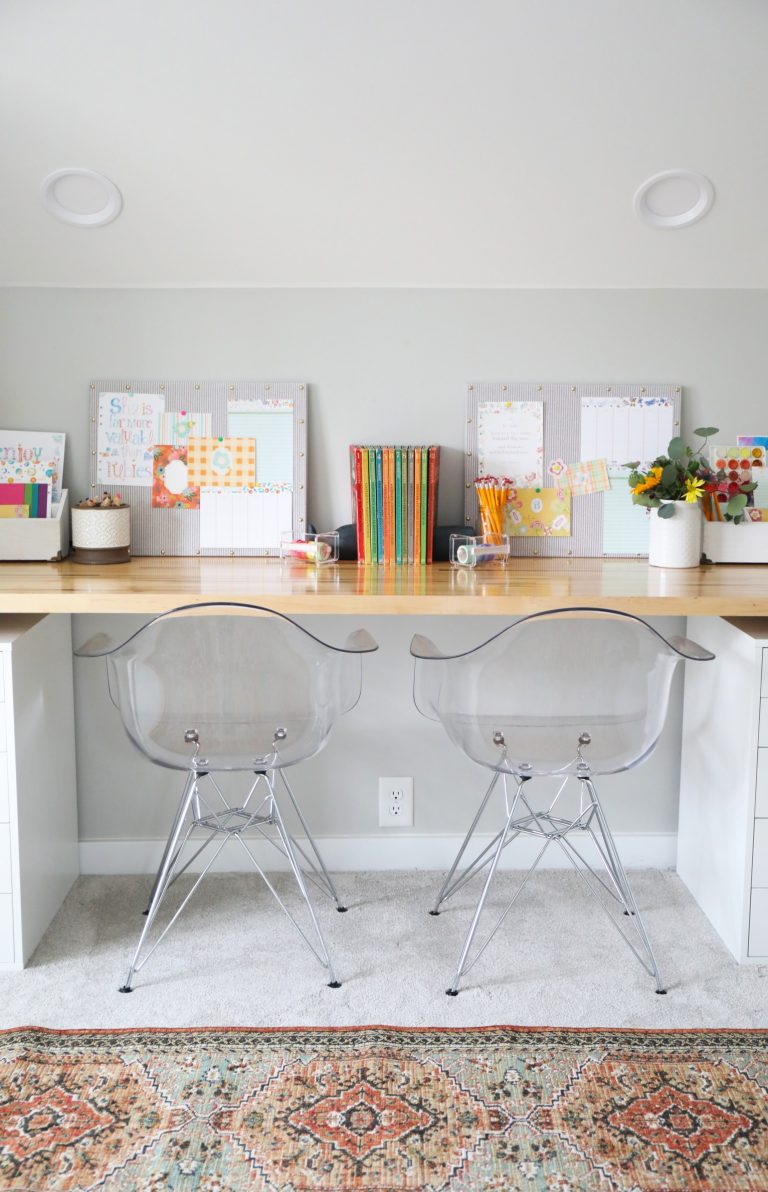
Our final no sew teepee measures about seven and a half feet tall by 6 feet wide. We wanted something large enough to hold all three kiddos, without taking over our entire house. This little hut can stand on it’s own all winter, and when we’re finito, we’ll simply fold it up and stash it away. (See: under our bed.)
no sew teepee – how we built it.
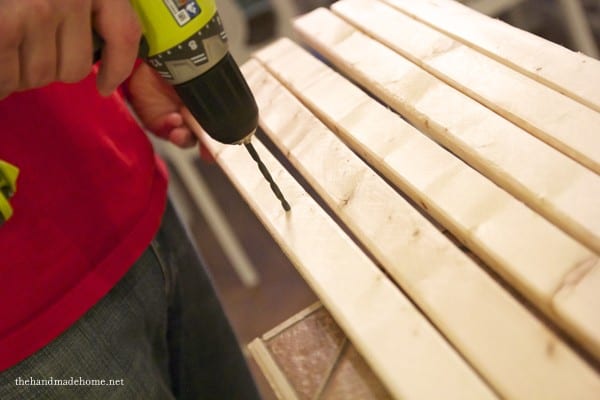
We purchased six 1 x 2 x 8’s at our local store. On each piece of wood, we measured 1 foot down and in the center, drilled a hole using a RYOBI cordless drill. This is for the jute that will hold it all together.
I wish I had a photo of us putting it together, but it really wasn’t that complicated. You’ll definitely need an extra set of arms, but we just gradually positioned the poles, and as we added each one, strung them all through with jute until they felt right for a teepee shape. When we were finished, we wrapped it around until it was secure.
Because our no sew tee pee is currently residing on the tile of our veranda, we used some hot glue to stabilize the bottoms on the floor. When we’re finished, we’ll just pop it up.

It’s not perfect, so let go of the notion and don’t let it drive you crazy if you decide to tackle this one. It’s fun and that’s all that matters.
no sew teepee – the second stage
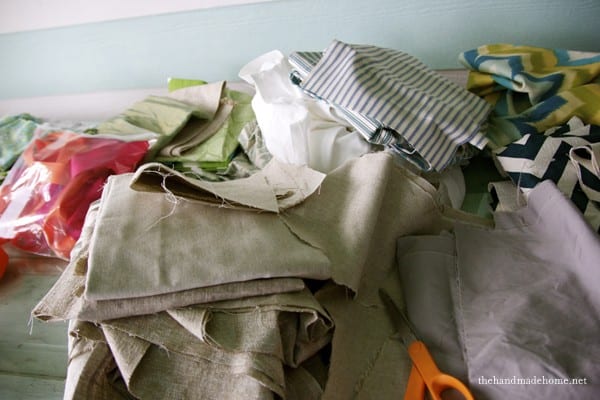
The second best part to this whole insane little creation? The total cost for us with this no sew teepee, was a whopping seven dollars. Why? Because we only paid for the wood. I decided to use this project as a fabric buster… Apparently I’m a little bit of a fabric hoarder in denial. I measure fabric for products like I do spaghetti and I’m all, what? It’s not three yards in a foot? Then I have enough fabric to cover a small village (or build a few teepees) and it sits in my cabinets for three years. Alas. Sigh. Digression.
Consider this a little project to get your purge on. I even purchased two large drop cloths from the hardware store (which we will now be returning) but you could slice one up, and supplement with patterned fabrics in between.
I actually knocked this out in a day, and once you get into the groove of it, there’s a learning curve. I recommend it as a weekend project if you want to take your time. (If you’re anything like me, once you’ve started you don’t want your kids dive bombing all your fabric or singeing off their hair in the glue gun, so you just want to finish.)
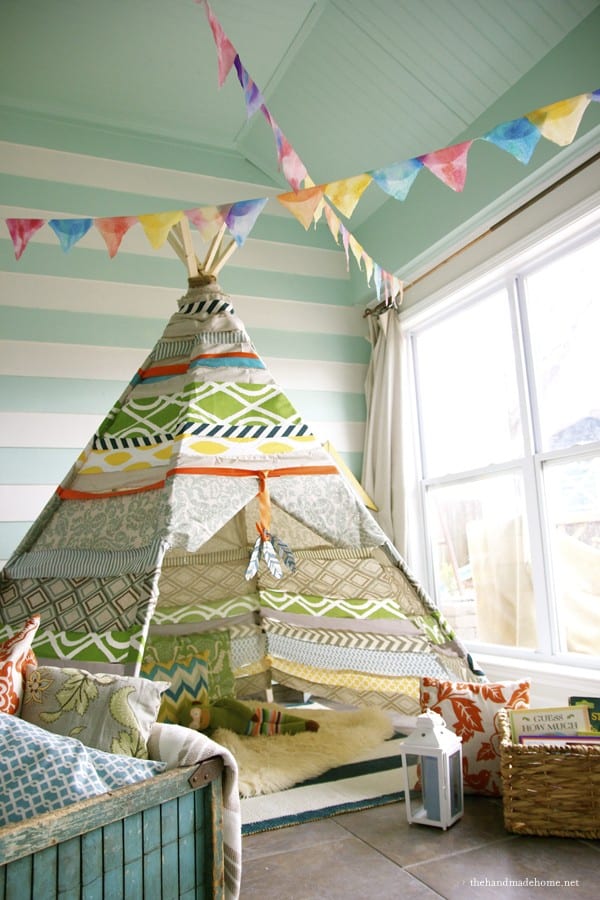
I wanted something fun and frilly since you can see it from all corners of the house, but a second alternative would be to take a simple drop cloth, drape it over and pinch it in place with a giant clip. I’ve seen those floating around the interwebs as well.
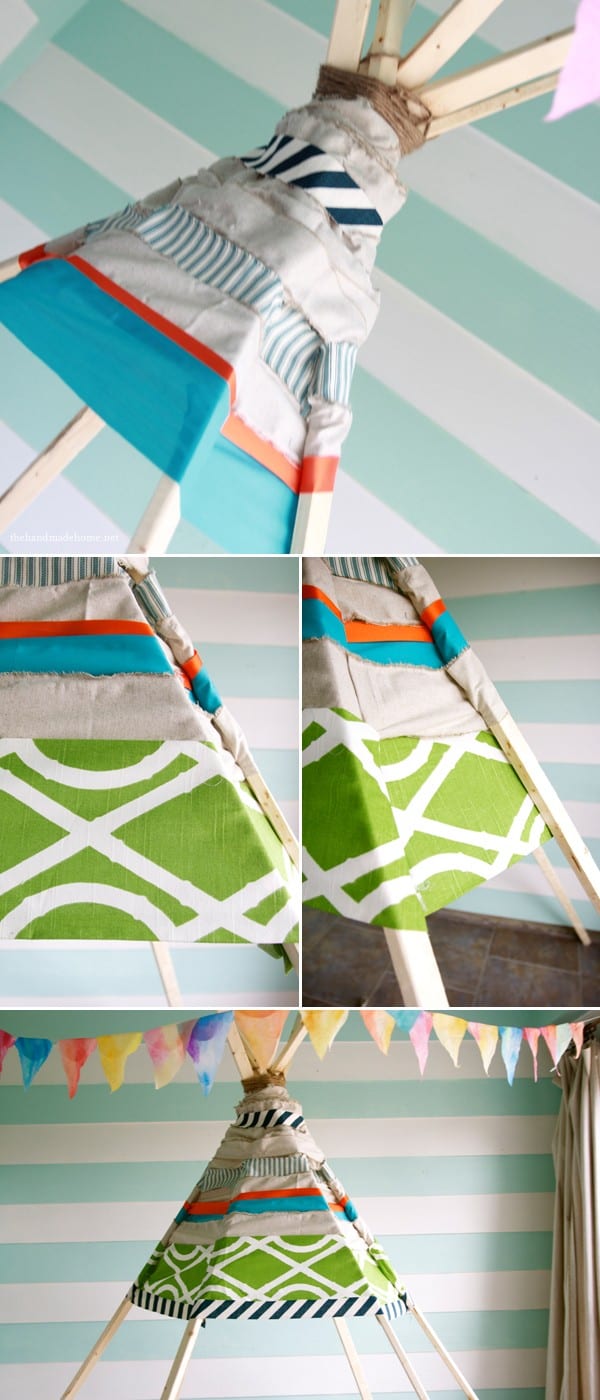
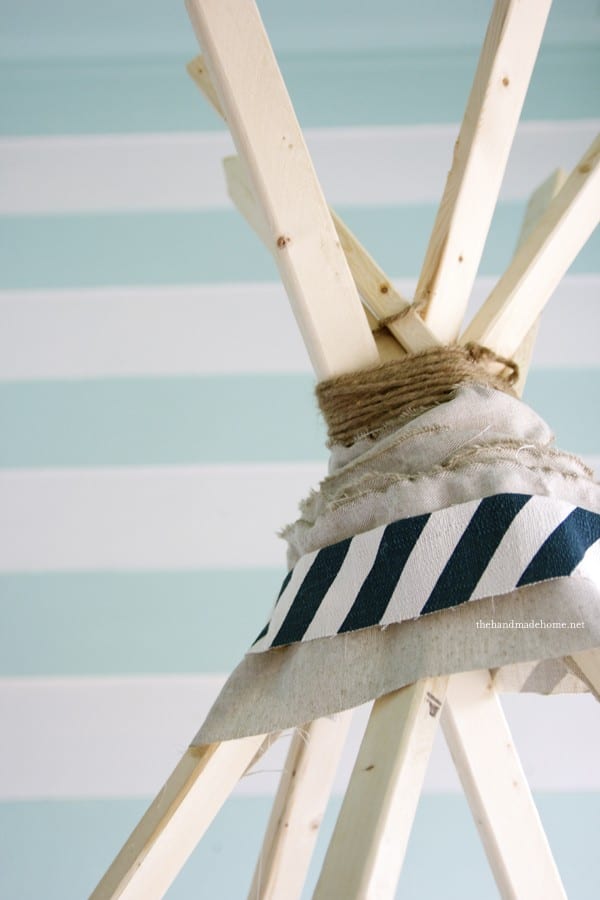 So I eyeballed it and starting at the top, cut my fabric into strips. I simply mimicked the rope action above, because the top part was a bit jumbled and complicated. I layered a few pieces, and secured them with glue. Tada! The top of my teepee. (Tipi. Tepee.)
Once I was about half a foot down, I began a system of ‘weaving’ the fabric through the poles. Since I was choosing from my fabric stash, I would eyeball to make sure I had enough, and cut to length. The pattern went over, under, over, under. When one section was under, I made sure the next section tucked around the pole, so that it was hidden. I just made sure to hot glue as I went, and hide the wood.
no sew teepee – A few more hints:
• It doesn’t really matter how you do it, as long as you establish consistency. I found myself touching it up as I went. You can go back and tuck and glue and fold, until it looks right.
• Because this style is really made up of pieces of fabric, it will have a ‘ribbony look’. Read: gaps. I went back on the inside, and tacked the pieces together with hot glue. The kids said they like the ‘ribbon’, because they can peep through and see who’s coming. Eventually the hot glue will come loose, but it’s low maintenance and easy to repair.
• Put your glue gun on low, so a. you won’t singe the skin off your finger and curse the day you were born b. when you’re pressing said glued pieces together, it doesn’t take that long to dry.
• When you’re dealing with fatter pieces of fabric (see how I alternated my layers?) the angles with joining them from pole to pole will be a little more noticeable than with a skinny piece. Make sure they (the fat pieces of fabric) stretch all the way across from top to bottom, before securing with glue. There were a few sections I pulled down and had a redo. Thus the glue gun. Glue guns make everything okay.
• Make sure you save your biggest pieces of fabric for the bottom… the gaps get larger (and the pieces get longer) as you go.
• I took the front section as low as I wanted it to go, and then cut a slit nearly through the center for that ‘teepee look’. You can finish yours off however, but I figured nice and open means they’re less likely to pull it down in a torrent of spazdom.
My children are known for their torrents of spazdom. I have no idea where they get it. ;}
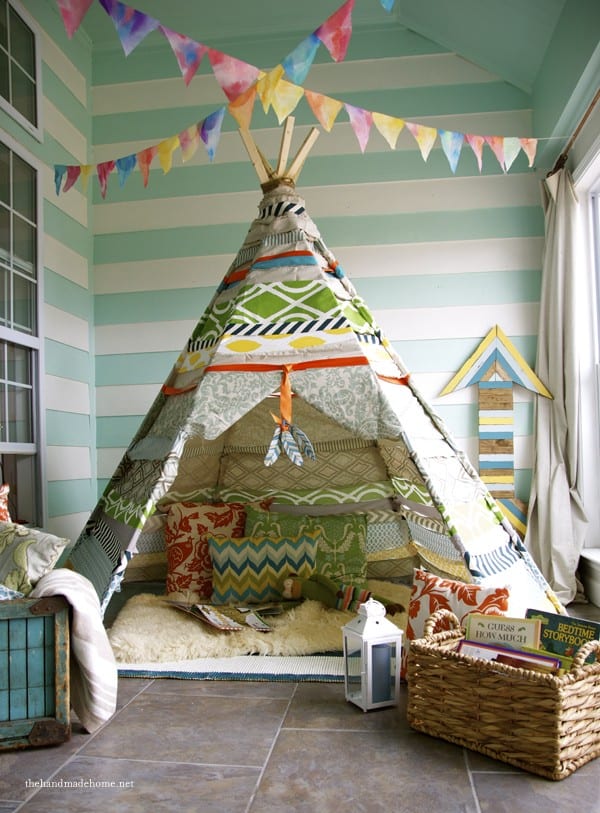
You may have noticed… I just didn’t have the heart to pull down our bunting from Emmy’s watercolor party. They’re like a shot of happy on rainy days. And those little feathers are from our thanksgiving place setting.
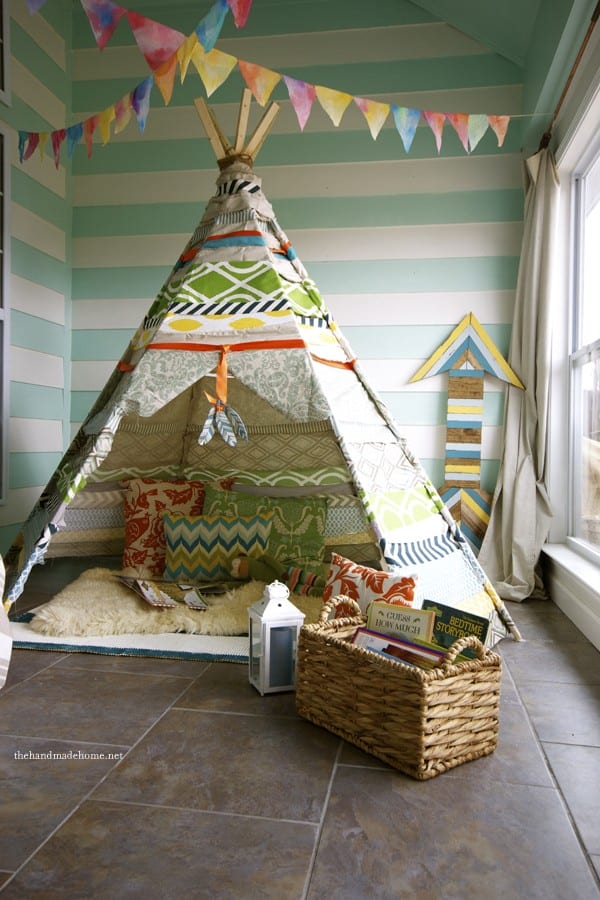
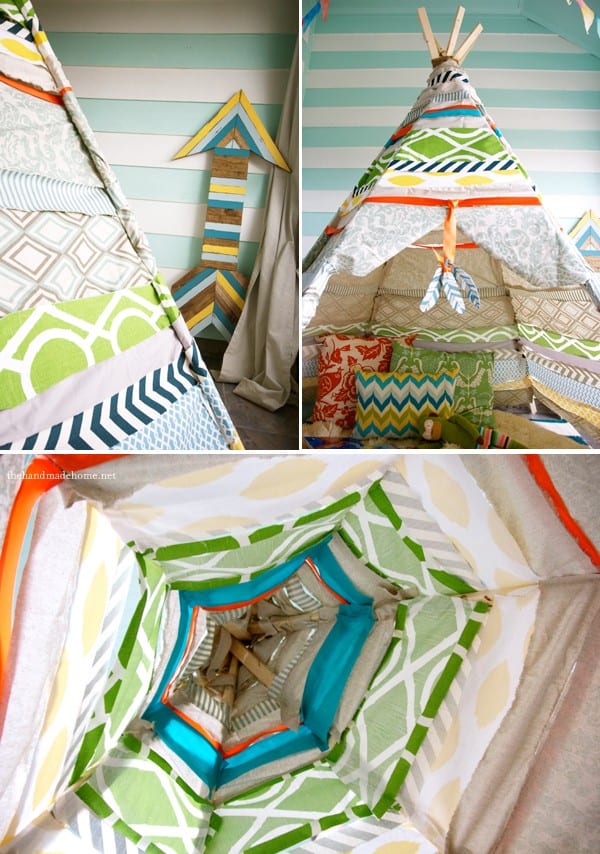 That arrow is a project from our book. Probably my absolute favorite. Get the step by step to that arrow and a few versions of it, here!
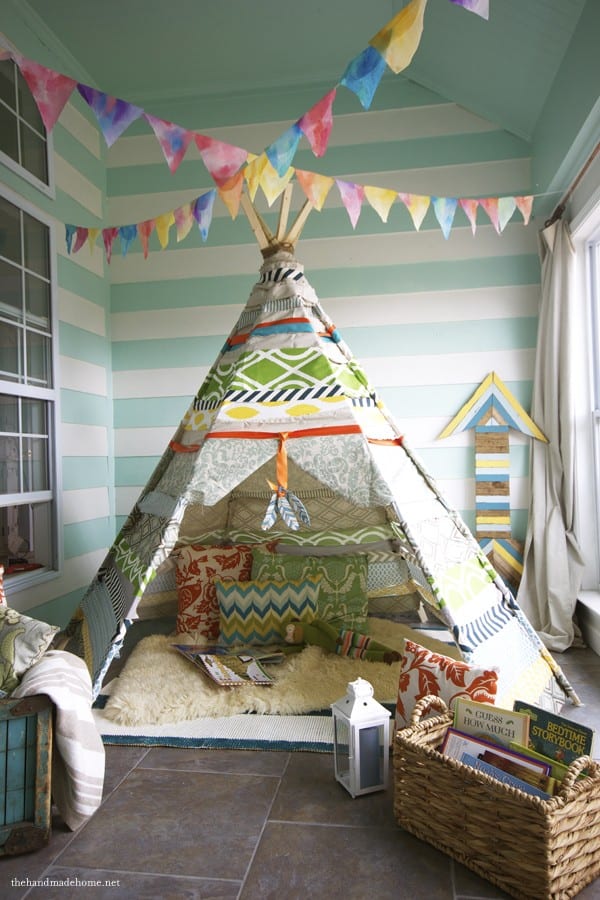
It’s bright and colorful, but I figured they’re only young once. May as well have fun! We threw some christmas lights in the top, and I have to say, it scored six thumbs up.
Here’s to doing something fun for your kids… and getting rid of that ridiculous fabric stash all at the same time!
Have an inspired day, y’all!

Love it. It is like a pretty organized fort.
I LOVE THIS!!!! You are so creative & such a fun mom!! Is 28 too old to have a reading fort?!?! 😉
I may or may not be writing from it this morning. ;} Rainy days call for forts, right?
Absolutely!! 🙂 maybe I need a “fort room”
Never too old for anything sweetheart…you go for it+
OMWord !!! If this isn’t the cutest thing, I don’t know what is —– I have wanted to make a teepee for my grandkids for a very long time but haven’t been able to work out the logistics in my mind. This is a terrific idea !!! And I just love that its all so colorful and inspiring for the kiddos. Thanks for sharing.
I.LOVE.IT!!!
That is the coolest every! I love all the fabrics and colors and… well… absolutely everything! Thanks for sharing… I bet you have to beg your kids to go to bed at night 😉
Love it!! amazing.
question: does it fold up though? i would have to be able to take mine to the beach;)
Hey kasey! I honestly haven’t folded ours yet. I would imagine it would be stable enough to make it… Maybe even with a different kind of glue. I just planned on storing ours when not in use and then touching up accordingly. In the yard, etc. sorry that’s not much help. I would imagine super glue would make it totally permanent (?) 😉
Using a staple gun would make it very permanent with no more effort than a glue gun. Hope that helps!
Thanks, Krisaundra! We tried the staple gun, and because of the force, and angles of the wood with how it sat on the tile, it was a bit of a problem with the wood and fabric. But please try it – you never know if it will help!
yes. a million cheers for this! The teepee was next on my DIY list, and now? permission to not sew! We are so doing this. Also, I’m pretty sure my boys are too old to think this is cool, think it’d be weird in our master bedroom?
Cutest thing EVER! Love the colors, shabby edges, fun pillows and the sherpa rug inside! Perfection.
BOOM- I was just looking for some tent or TP to make for the kids- this looks easier and cuter- doing it!!!!!!!
INCREDIBLE!!! Seriously the cutest and coziest thing ever!! No-sew makes you a hero!!
Oh my goodness – this is fantastic!! I am head over heels in love with it. I want to make one immediately. Seriously, it’s so incredibly amazing. My nieces and nephews would love this!! Heck, my husband would love this, haha 🙂
I love this- wish i had a closed in porch to put one of these for my grands……you have such a fantastic imagination…….love it!
I don’t have a ton of fabric, but I have a closet full of old sheets. That should do the trick! LOVE this idea, and, like you, I am not willing to pay what I saw it listed for online. Besides, your version is way cuter!
Seriously, will you be my mom? So that may sounds weird…. but really, this is such an amazing creation, I could move right in! You are incredible.
xo,
Jen
Okay, I’ll say what everyone else is saying…Ashley that thing is just too cute! seriously, I want one…for me..and the kids.
way to go!
It’s fabulous!
This is amazing! I want one of these for myself. 🙂
How fun! Kids are lucky to have such a Mom as you.
Where did you get that beautiful bluish crate on the left hand side?
stop it.
no really.
so much goodness in one blog.
killing me!!!
New fan via Pinterest. Love this idea and hope to make one for my son before our next baby comes in a couple of weeks. Just wish I had your fabulous collection of fabric scraps!
I did one of these several years ago for my grandchildren using basically the same method. I used a paint dropcloth instead of fabric and let them help me paint designs on the teepee using acrylic paints. They loved it and played in it for hours. Thanks for sharing.
this is seriously awesome. and love your photography. thanks for sharing!
No Sew teepee and the Tree House–it’s good to be a kid!
I’ve seen those uber expensive tipi’s on the web for years and thought that there HAS to be a way to make them but couldn’t figure out how and NEVER thought they could be THIS fantastic!! This is the best thing EVER! Thank you so very, very much for the detailed instructions so people like me can actually make one. I, too, am a fabric hoarder and happen to have a bare spot in my sunroom just calling out for a tipi. What a great mom you are, and how lucky your children are to have you!
Happy Valentine’s Day!
Awesome. Definitely deserves pinning!l
super love. i think i need a reading teepee of my own 😉
Grand idea…will keep it in mind for my granddaughter when she is a bit older. Love the lights inside…makes it perfect for reading!
I can’t wait to make this and have the grand-kids over for an “Indian Party”. Have to find some directions for some tom-toms now. Thanks to “the farmers wife” for the sheet idea.
Hello! This absolutely lovely! I saw this on Pinterest and instantly fell in love! I don’t have children yet, but I am definitely planning on making this…for myself!
And your blog is fantastic! Absolutely brilliant and inspiring…thanks!
thank you very much! ;}
I really liked the no sew Teepee- right up my ally. No sewing, bright and beautiful colors, and a fun camping look for inside the house. Thank you for sharing. I look forward to researching more of your wonderful and inspired ideas.
This is SO absolutely adorable. I love everything about it (and the room it’s in)!
This is fabulous! Your photos are stunning as well. I had to pin this to my kidspirations board….too cute. I’m sure it would be big hit in my playroom. Thanks for the inspiration. New follower 😉
LOVE LOVE LOVE this so much!!!
Stop it with the awesomenesss!!!!! (just kidding. keep it coming!)
I feel like the teepee is the hot lovechild of all the best fabrics from all the best spots in your house- born on Christmas day in the coolest room in your home.
that’s just how i feel.
ang
I love this! So colorful and fun. And yes, a great way to use up fabric. I won’t even go there! (that is, out to the shed for the BINS of fabric I have stockpiled like a squirrel). Well done!
This is so smart and so very cute and original. I have grand-sons coming to visit in June and I will make one…Thanks !!
Great project
I am so happy to see this post. I remember when I was elementary school somewhere around 4th – 5th, we had a student teacher, can’t remember her name but it was the fall of the somewhere around Thanksgiving, she gathered a group of us girls and made a teepee and spent a weekend at her house making popcorn necklaces for the class. I must try this project for my grandchildren but I’m sure they will have to fight off my baby, the 16 yr old, LOL.
I have a wraparound porch and would love to put one there. What do you think of that idea? I’m thinking a really bad rain could mess up such a beautiful tipi (love this spelling!). 🙂
Great project! Thanks for sharing!
Very fun and cute project! I really like the fabrics – very nice print and colors! Such a great idea! Thanks for sharing 🙂
How I wish I had space for something awesome like this. My kiddos would love it!
Did you glue the strips to each other or to the wood? I am having trouble with the “weaving”. Did you just cut each strip long enough to reach from one pole to the next, or did you cut them long enough to wrap in and out around the poles?
Hey Tammy, Most of the time, I did separate strips of fabric, and I would just hot glue them to the wood as I went. If I did one over the wood, I would to the next one under, making sure that piece of wood is hidden. Those photos above should give you a pretty good idea as to how it went. But with smaller gaps and skinnier pieces of fabric (like the orange ribbon you can see, I used longer pieces, and simply wrapped them around. It’s hard to describe, so it’s kind of touch and go once you start, to figure out your own method-what works for you. But definitely doable! Hope that helps!
I have one almost completely sewn and ready for the poles (another issue with it) but I can’t figure out the top part where it is held up by something….pattern wasn’t too clear and doesn’t seem to match what I ended up with (and I’m an experienced sewer!). Thanks to this I can figure out what to do!
Thanks for posting and wow all that weaving was energetic of you…I’d’ve serged the strips together but that’s just how I roll. Kinda lazy.
Love how it looks and during the summer it can go outside instead of under the bed.
haha lazy? see I’m thinking I sound lazy. What works for one is different for everyone, I guess! ;}
Pretty darn cool!
I think that is awesome. My 6 yr. old grand daugter would love this.
What a fantastic ideas!!! I may try one for the summer!!!
“Torrent of spazdom” = my kids every 4.3 minutes. That was a perfect description!
I love this and just sent my husband an email with this as the subject line: “We will be making this.” SOON.
Is it wrong that I want one – all for myself?!
Love this – and no sew is the icing on the teepee!
Kelly
I love it! I’ve been hankering after a teepee for my son O’s room….
What a beautiful hideaway. Thank you so much for sharing
I am thrilled to have found your site (by way of a Pinterest post)
My children will love it and my husband will think I’m amazing too:)
could not love this more! gorgeous and so fun! i have four kiddos myself and they would be over the moon with this…..
Oh. My. Goodness!! This is spectacular! Bravo to you. A creative approach. And it’s so colorful and fun. Pinning!
<3 Christina at I Gotta Create!
Wildly Original linky party is open
love it! So going to make one of these! Thanks for the idea
I absolutely love this idea and actually wouldn’t even consider it without the mix/match of fabric used to make it look so unique. I would love to see the rest of your home if your sunroom looks this cute! Thank you for sharing.
I LOVE this! Last week my little sis & I created a girly version of a tee pee for about $20 out of an embroidery hoop & some netting style curtains. I just found your tee pee today & as soon as Spring comes I’m going to make one with treated wood & outdoor fabric for the backyard! 🙂 I can’t wait! Anything no sew works for me.
My girly tee pee is at http://www.lovesissy.com/4/post/2013/02/tee-pee-time.html if youd like to see it.
That is absolutely awesome!!!
Hi! I love the teepee! I love the rod for the curtains even more….Would you please be so kind as to email me and let me know what you used? It looks like it goes all the way across both windows. I just recently got an sliding glass door installed and I’m agonizing over the window treatment! I would appreciate any help. Thank you!
Hey Debbie! That is a copper pipe – the only thing we could find that was long enough and totally affordable at the time! ;} You can read all about that here! (We have it all throughout our house.) I hope that helps! ;}
What a fantastic idea. My daughter wants me to make her one. We both love it.
Thankyou for sharing it.
Nice idea, two question can you store this teepee? how do you roll the fabric so tight? please, please help I would like to do it for my boys.
Hey! I haven’t quite taken it down yet. But when I do, I’ll probably just close it up, and then roll it in a sheet or drop cloth for safe storage. Hope that helps!
I am so gonna make this for my grandsons…they are forever trying to make them a “house” using their blankets, pillows, chairs and anything else they can get their hands on. They would have fun making this…they like to help out a lot…they are 5 & 3 they are the babies of the house and I usually let them have at it…they can make a nice mess…this is perfect for them…Thank you for sharing 🙂
Could you tell me how tall your teepee ended up. Getting ready to make it and wasn’t sure how far to spread the poles before wrapping the material?
this is so amazing!!! I love how low maintenance and very spur of the moment feel 🙂
I want one!!! LOVE this and your colors (the entire room) is amazing! Makes me happy just looking at the photo! The children are adorable!
You are so clever. I’ve always wanted to make the grand kids something different, and, yes, I do have lots of fabric. Might have to buy a bit. So cute Thank you for posting. I’m going to give it a try for an. Easter gift for both kids. They’ll love it I hope.
I love this idea. What did you use for lighting inside the teepee? I think I may have enough to do this project, but perhaps not as tall. Thanks for sharing! 🙂
Hey Becky! We only have it on when we are at home, but it is just christmas lights. pulled around the top poles and down. ;} It’s fun for the kids!
I’m thinking on turning this into a bed for myself! So cute and easy!
Wow, I love this tepee! You should consider making them and selling them. 🙂
This is the cutest…..I am going to attempt an outside one made with
Sunbrella Fabric…..maybe even a row of mesh for some air circulation.
I have been going to do this forever, now the grand kids are older so they
will enjoy helping. I just hope I can keep grampa out of it!!!!
The teepee is just awesome! I bought the supplies and fabric scraps that I cut the way yours are. I wanted to know before I start if you surged the edges so the fabric doesn’t fray? Also, I bought embroidery thread, and was going to stitch each layer together with an X stitch. I can’t sew well enough to do some of the other tutorials. Do you think this approach would work? What and how did you make a bottom for the teepee? Thanks
Hey! I did not surge the edges, because I am lazy. But that’s a good idea! Ours hasn’t frayed that much, but again, it just depends on what kind of a look you can tolerate/want to go for. ;} Sewing the layers together is a great idea! It would take a lot of time, though. The fabric will stretch out over time because that’s just the nature of fabric. My kids have leaned on it, etc. so I go back and tighten the layers/patch it up with hot glue… I like the flexibility and time saver of glue. We will eventually fold this puppy up and just take it outside. the gaps that come over time don’t really bother me that much. I didn’t do a bottom. Those are rugs that I layered… but you could always paint a drop cloth or just throw one down and layer with pillows. I hope that helps! ;}
I have a small daycare and can’t wait to make this and watch the excitement in the children’s eyes when they see it!
thanks a bunch!
I am very inspired by this project. I am going to give it a try (:
I FREAKING LOVE this!!! I found you on google + This is the first time I have ever become a follower of someone because of G+. I am most definitely pinning this project!
Thsi is so nice..Tanks for Sharing !
Loved this
I fell in love with this the moment I saw it. I am going to make this for my son’s 5th birthday next month. He ALWAYS wants to make a tent AND we are from Oklahoma! This will be perfect!
I’ve bought all of my supplies and I am ready to start. I wondered if there was anything you would change or do differently before I start my teepee?
This is the most amaZeball-ing thing I’ve ever seen with my eyes.
This is soooo perfect for me! Have been hanging to have a teepee for the kids but have found it hard to find one I really like/doesnt cost a fortune/will ship to Oz/is suitable for someone who can barely hand stitch. I am really good at gluing stuff ha ha. Thanks xx
OH MY GOODNESS… I am making this for my son! AMAZING idea! THANK YOU FOR SHARING IT!
I’ve just come across this! Love it! I can see it’s been said many times before, but it’s an inspired idea and looks amazing. The rug and cushions are the perfect finishing touch and I’m sure your kids love playing and cuddling up inside. My daughter wouldn’t get out! I will definitely be back to your site when I’ve got a little more time to spend browsing! In the meantime, I’ve posted a link to this on our Facebook page (hope you don’t mind!) and will pop in on our blog too if you’re happy for me to do that x
Thanks so much, Sue! ;}
You’re more than welcome! I’ve just popped it on our blog with a link back to your tutorial; the image is looking great, if you’d like to take a peek it’s here: http://www.gingerandmay.co.uk/a-perfect-nook-homemade-no-sew-teepee.php.
Just been reading your info on making garden boxes. A little project I could do with completing now we’ve finally got some sun here in the UK!
Very clever indeed. Already started an outside one with canvas today but will try this soon.
Oh wow, I want to make this RIGHT NOW, even though I don’t have a crafty bone in my body. Thank you for sharing the instructions! Pinning it now. 🙂
Perhaps a dumb question, but how easily could this be moved? While my child is small I would like it for his room, but when he is a little older he might want it for his “play room” downstairs.
Do you have a pdf file or printer friendly way of printing this?
Hey Holly! I have not moved ours yet but I am sure with a little folding and minor repositioning it would be no big deal. ;} Hope that helps!
Nothing short of brilliant! You have some mighty lucky kiddos!
I Love your attitude!! I am 70 and have wanted a teepee (tipi , tp etc) since I was a kid! I am having my Grandnieces come visit next year..the young ones..and I will make this our project…I think they will love to get involved and I will have a teepee, at last!!!
Hi, this is very beautiful, I’ll do it to my 6 year son, he will love it.
You could use old sheets and dye them in tea or coffee to make them look like hide if you want a more teepee authentic feel. Muslin maybe? With sheets you could use fabric paint and paint Native American symbols like Buffalo and suns on it. After you get it up and assembled, would a staple gun work to secure the fabric more permanently? I have sooooo much left over fabric but no young kids… The cats might like a nice teepee to sleep in!
It’s the best idea ever…I always wante a tepee when I was a kid thanks for shared this wonderful proyect now my husband and I will make it for my 9 month baby boy we aldo have a 18 years old girl and I’m pretty sure she’ll enjoy read some stories to her baby brother. Regards
Any estimate on amount of fabric
No, I’m sorry. It depends on how large your teepee is and what strips you use… this was a scrap fabric deal for me so I didn’t keep up with it. ;}
YES you have!!!! I’m on my way to the store for wood!!! Wish me luck!!!!
I am totally inspired. This is absolutely fantastic. Such good work, and I’ll bet the kids are just loving it!
Pinning!
Amy @ Creative Kid Snacks
What an amazing tepee. The happy faces of your kiddio’s says it all. What an inspiration need to save you on my favories list.
Helen xx
wow, this is amazing! I do have a question, I’m not sure I have enough scrap fabric laying around, so if I wanted to purchase some, could you provide the dimensions of the teepee? Maybe the width at the top and the width at the bottom and height?
thanks!
Great projects! My grandkids would have a blast in this!!! Thanks for the creativity that everyone can enjoy!!! Kudos!
I made this following your directions. I used a staple gun and very little glue gun. It is something my grand kids love. They sleep in it whenever they come over. It folds up very easily and I store it in the corner of the room. I added material over the front and then split it to fold back. They liked that. Thank you for sharing your fabulous ideas!
Awe how fun! I’d love to see some photos! So glad your family loves it! ;}
if you don’t have extra fabric lying around and have to buy fabric how much would you need to buy?
Hey Patricia! I’m sorry – I honestly do not know. It depends on the size of your teepee and how much you have. it also depends on how much you overlap and how you wrap it. I think it’s one of those things you are touch and go on, buy more as you need to. I hope this helps.
that totally makes sense. i will just buy the fabric as i go. i would like it to not be so tall because this will go in the playroom in the basement. thanks again!
I wish I had you on speed dial! I feel in love with this teepee a few days ago and got right to it. I have the poles constructed but cannot for the life of me figure out how you weaved the fabric. Any tips? I don’t understand how you did it!
Now I understand! I read up a few comments and realized you didn’t actually weave the fabric, you cut each piece to fit between the poles. I got it now- can’t wait to finish it!!
that’s so absolutely cool!
I linked to your tutorial on my blog – thanks for sharing!
♥, doro von Hand zu Hand
Hi! Love the tepee…but my question is about this paint color. I love it and am looking for something similar. Can you share with me the name of the aqua/blue paint? Thanks SO much!
Hey girl! Thanks so much! You can read all about our paint colors here
Wow.. What a great, easy idea. I love it…. I am making this my plan for this weekend and I know the kids will really enjoy it.
Thanks for showing us how it’s done… Now I can use up all the fabric in my cupboard 🙂
This is amazing! Roughly how much fabric would i need if I was using some canvas cloth, I can’t work things like that out! Thanks
Hey Natalie! I literally made this up as I went, with the fabric that I had. I have NO idea. I’m sorry! I recommend buying a little, and doing a little at a time. I hope that helps! I know it’s annoying, but I just did not measure, and it would still be impossible because of all the different widths of the fabric that I used. It would be different for everyone. I hope that helps.
I love this! You did a beautiful job and I love that it is no sew! One question…how much glue did u use? And what type of glue gun?
Hey Cheri! It was just a standard glue gun. ANd I have no idea how much glue – I wasn’t keeping up. Sorry! It will probably be different for everyone, anyway. ;}
I love this! I’d love to make one for my daughter’s 2nd birthday as she loves, loves, loves, to play “fort”! But I had trouble understanding the weaving fabric part and where to glue exactly. Did you glue each piece to the prior one? What did you mean by “The pattern went over, under, over, under. When one section was under, I made sure the next section tucked around the pole, so that it was hidden.” Does this mean that each layer was a double layer of fabric, one over the other?
Hey Angela,
So on the first pole, I wrapped the fabric over it. and then went to the next pole, with the same fabric, and finished it off by also wrapping the fabric around so it was over it. Then when I started with my next piece of fabric on that same pole (same pattern) I started underneath by gluing it. Then attached that one underneath on the next pole as well. So each pole alternated. But that way you can not see the wood. If I can make one recommendation, just get started with it, and what I am saying will probably make more sense. ;} It’s kind of impossible to describe in writing until you’ve tried it. I hope that helps! ;}
i’m so glad you posted this comment! i have also been trying to figure out what you meant, since i thought your fabric pieces were one large piece wrapped around. lol! thank you for clarifying!! i’m so excited to try it tomorrow!!
I love this idea and will make it for my classroom reading nook. I teach grade 4/5 and I think they will love this.
Wow, amazing teepee.
Thank you for inspiring me to make a teepee after seeing yours.
My fabric stash is now busted!
here’s a photo of my sewn teepee, though it felt like a big top, It’s quite heavy!
https://www.facebook.com/photo.php?fbid=290170794459043&l=16964a683c
Clare
how did u get your sticks to be even at the top. I cant seem to mimick that. What is the width in between the two back poles?
Hey Teresa! That width is going to be different for everyone, so I wouldn’t worry about what ours did… Honestly, we just played with it until it looked right, and then used a dab of hot glue (Its sitting on tile) to keep it that way so it wouldn’t fall while we worked with it. All I can tell you is to play with it. I hope that helps!
Hi! I’m a complete idiot when it comes to creative things, but I would love my daughter to have one and at £300 plus I can’t afford one. If I try to make this, am I right to think that you (pardon the ridiculous explanation) went under one rod over the next….how did you cover the wood from the ‘under bit’ or have you left slight bits of wood exposed. Is it just one strip of material on each ‘go around’ does this make any sense. Arrrggh! Sorry! Thanls
Hey Kelly-Louise! Sorry for the slow response – I would recommend getting everything and just starting. it will probably make more sense then. But I did separate strips of fabric, and I would just hot glue them to the wood as I went. If I did one over the wood, I would to the next one under, making sure that piece of wood is hidden. Those photos above should give you a pretty good idea as to how it went. But with smaller gaps and skinnier pieces of fabric (like the orange ribbon you can see, I used longer pieces, and simply wrapped them around. It’s hard to describe, so it’s kind of touch and go once you start, to figure out your own method-what works for you. Hope that helps!
It looks like something from Pier One!!! A complement from one who is addicted to the place, also a great fabric buster…not that I have THAT much…
Good use for glue gun too, fun!
Thanks for the idea!
LOVE THIS TEEPEE!!
You’re such an awesome mom! I came across this on pinterest and can’t wait to try it. Sigh gotta have kids first tho, or maybe be a cool auntie and make this for the little ones!
That tee pee is amazing! I wish I had that much fabric just laying around because I love the idea!! I think I am going to have to hit up the clearance sections of my local fabric stores and try to score some cheap fabric to make my own. Thank you for such great pictures!! Can’t wait to try this!
So cute! I am pinning and sharing on my FB page!
Wow! This teepee is magical. Great job!
I love this., I have been working up the courage to sew one for a while. thank you!!!!
What a fabulous idea, if my kids were small (as opposed to adults) I would make one today. If I had bigger rooms I would make one anyway, but as it is I’ve got nowhere to put it. Such a shame. I want to go inside it.
Hey I love this idea, I work at a preschool and I’m always trying to find fun things to do during the holidays this is the perfect craft for thanksgiving. Cant wait until next month gets here I have the wood and fabric already on hand. I’m so excited !
Love this idea! I’m making one for my 5 grandchildren to eat Thanksgiving dinner in! They can make their pilgrim hats or Indiam headdresses before . I’m going to get some fabric paint and put their handprints on the outside and date it so years from now ( and cousins more) it will become a tradition! Little ones last at the table not long so this will be fun for them… Who knows ” Meme” may eat eith them! Thank you. N
Love this idea! I’m making one for my 5 grandchildren to eat Thanksgiving dinner in! They can make their pilgrim hats or Indian head-dresses before . I’m going to get some fabric paint and put their handprints on the outside and date it so years from now ( and cousins more) it will become a tradition! Little ones last at the table not long so this will be fun for them… Who knows ” Meme” may eat eith them! Thank you.
I am over the moon crazy about this! Your whole room is an amazing feast for the eyes!
Thank you! ;}
This is so cute and inspired us to make a similar one for our Resident’s in our Nursing Home as a Thanksgiving Decoration. It sits in the corner of our Activity Room and is admired by all. Our Resident Cat, Jacob, enjoys it also as a great place to nap. Thanks for the inspiration!
I love this! SO sweet! We’d love to see photos! That makes us so happy. I hope you all enjoy!
Hello! My name is Vanesa, I am from Argentina. This Project i great! Easy! And I do it to my birthday´s son, because i thinl, that he will feel happy!!!! kisses!!!!
How much fabric approximately??:)
Hey Kamila. All of the fabric was different widths, and with my wood lengths, all the teepees will probably vary a bit depending on what you decide to use. I am sorry I just do not know, as I literally used fabric remnants. I would recommend adding as you go so you don’t overbuy. I hope that helps! ;}
So cool! you should do this upstairs in you loft for cooper!
I love this! How sturdy is it? I have a little 10 old running around and he loves to pull himself up on everything. Would I need to keep him away from it?
Hey Emily! I think it all depends on where it is, and exactly what you use. ;} I think you always use caution but we literally hot glued ours to our tile, and it didn’t budge. ;} When we were ready to take a break and move it, it literally came right up. I had three children acting crazy and it was fine. Just a lot to consider, but always use caution when it comes to the littles! ;}
The.coolest.thing. I have been saving your page for weeks now and am going to start in on making mine tomorrow. I just had some questions because I’m new to the glue gun :). Is there a specific glue gun and glue I should be looking for for fabric? Did you attach each different piece of material together using the glue gun to make one long piece of material or did you wrap each end of each piece around a pole? I’m trying to really study your photos, they are awesome. Thank you!!!
Anna – my apologies for the slow response if you started this yesterday. Any type of standard glue gun + glue will do and with each pole- depending on where we were- we wrapped the strip of fabric over and then under each one so that the wood never showed. I recommend just trying it out before you start, and if you wrap one length over, then start the next one underneath that one. Just glue it to the fabric from the last strip already there, and begin. I hope that clarifies a little! It was very difficult to explain without just going for it. I hope it turns out fantastic! ;}
Thanks for this wonderful project, just made a teepee for Christmas for my 2 year old. Fingers crossed he loves it. For those who have asked about how much fabric is used, I used about 8 yards and I cut my 1x2x8’s down to 1x2x6.5’s. But I had a lot of scrapes and wasted pieces. I wish I would have taken my fabric and cut it in half length wise (one half slightly bigger than the other). Because the width of the actual fabric wasn’t wide enough to cover the bottom parts of the teepee. So I had to hot glue pieces of fabric together to make them fit. And if you have hardwood floors lay down an old sheet before making the teepee, its helps to keep the wood from sliding. And I used a lot of hot glue (like a whole package) so much sure to have plenty. It was a super fun project but diffidently not one, you want your little ones around for. And like the author says make sure you give yourself plenty of time to complete this project, it took me all day.
This is so helpful, Felicia. THANK YOU! So glad it worked out for you! ;}
Looks like a hippy orgy tent from the 60’s!
Awesome! We love orgies! What?
This is really great. We have a real tipi in our back yard (complete with mobile firepit, couches, tables, etc.), but I couldn’t afford to buy a real/traditional canvas cover (read: typically over $2k) so we used a giant blue tarp instead, cut to size. I spray-painted it to make it look prettier but a crazy wind-storm actually blew most of the paint off, so I’ve been thinking about what else I could do to fashion another cheap-ish cover for next summer, and this has inspired me to make a patchwork canvas one instead! No doubt it’d still cost a pretty penny in appropriate fabric & weather-proofing (our tipi is pretty big – approx. 20′ diameter at the base), but certainly doable! Thanks & cheers for getting my brain-wheels turning. 🙂
This is an adorable and cozy and beautiful and imaginative and good vibe place to cuddle in.
This is wonderful! You are so blessed to have a gift of creativity! Your children and family are so fortunate to have you! The rest of us want to know WHEN you will sell one of these beautiful creations to us for our kids. = – ) Count me in as a first customer!
I love this! I want an adult one! 🙂
Wow! This is absolutely amazing. I feel thoroughly inadequate now. I’m not going to show this to my son as he would insist on 1 of 2 things: a) that we make it immediately and that he ‘helps’ me; b) you adopt him… It’s really gorgeous and if I ever dared to embark on such an ambitious project, I have a question for you. Did you have to cut down any of the lengths of wood? Presumably, if they’re all the same length, they don’t actually all reach the floor as a stable frame?
HA! Dani, don’t feel inadequate. I can show you my piles of laundry and lack of total ability to cook, so there’s always that. ;} We did not cut down the lengths of the wood. We just used them as is. I also had them on a tile floor, so I was able to secure a few of them with hot glue. It just peeled right up when we were finished. I hope that helps!
I was totally going to buy one of the B. brand tents at target but this is so stinking cute and so easy looking I’m totally making this. Thanks for sharing this really cool project.
Funny how I saw this and said to myself that this could be a pretty fun tent to build!!! I am from Haiti and my backyard is so green and I would envision something like this on it!! thank you for your creativity. I have work to do:)
WOW!!! This is AWESOME!!! Totally inspired. Thank you for the awesome teepee blog!
This is seriously amazing!!! I love it. Thank you so much for sharing.
I LOVE this!! Anyway you would want to make another one & sell it ;)! I lovee your fabric choices!!
Super cute! except I wish you had left more instructions for the tying part at the top – we can’t fold ours up – it is so taut – it just stands open. Help! What do we do? It is too big to put anywhere… fail.
Hey Daisy! I am so sorry you feel it is a fail. I would recommend untying it to store it, if the top is your hold up. It’s kinda hard to see what’s going on from here ;}
Thanks for sharing this! It’s lovely and huge! I am concerned about the poles slipping apart. I made a teepee and my poles would spread too far out when using it. Any problems with that?
Hey Angela! Thank you so much! I mentioned in the post that I was concerned about the poles slipping because we “built” it on tile, so honestly, if you’re okay with it, hot glue helped to keep it skid-proof. Just a dab underneath that can peel right off the tile (if it’s on tile) when you put it together. I am not sure I would try it on hardwood. A rug underneath, or in grass would be ideal. ;} I haven’t had any problems. I hope that helps! ;}
You’ve completely inspired me to do something with my stash of fabulous fabric that I’ve been hoarding in my cupboard as well. You’re not the only one! This has been on my to-do but like you, the sewing has turned me off cause that’s a lot of fabric to waste if it doesn’t turn out. But you solved both of those issues here!
Thanks for the inspiration! Looking forward to checking out more of your site!
Thanks so much, Lina! ;}
This is FABULOUS! thank you for sharing!
Just happened upon this and finally a tee pee I think I can do for my granddaughter.
Thanks so much for the idea. 🙂
I LOOOOOVE this. Talked my husband into putting one in our house. We’ve got it up BUT the fabric part is kicking our butts! We just can’t get it to look taut/straight/nice! Help??
I’m sorry Beth – I probably won’t be much help over here… I did just what we described… I would glue it to one side first before stretching it, and then just work with it until you get into a groove that works for you. If you’re stretching it from one side to the other and attaching it with glue, it is just a little bit of a process, but should work out nicely once you get going. Glue one side before you stretch to the other, to keep it nice and stable. I hope that helps!
Oh my goodness ~ thanks for writing me back! I see what you are saying…we were trying to do it with REALLY long pieces and it was not working! I really appreciate you taking the time to write me back!!!
Ha! I wasn’t really sure how to explain it – I am so glad it helped. Hope you enjoy your little creation! ;}
goodness this is my most favorite fort of all time … i shall build one over my bed & thank your glorious genius !! THANK YOU for sharing this … YAH!!
This is so darn cute! I don’t even have kids and I want one!
I love this! We don’t have a lot of space to keep it up all the time, does it collapse ok as it’s not sewn together?
It is glued. So when I’ve brought it back out, I’ll just go back quickly and dab a little glue on each seam to put the pieces back that have fallen apart. It’s just glue, so it doesn’t take that long. I hope that helps!
Oh wow! Thank you for sharing. I am looking for a teepee for my visiting grandson for shade on the garden (here’s hoping the weather plays ball) and this totally fits the bill!! Amazing. Thank you again 🙂
Thanks, Helen! ;}
My 7 1/2 year old son and I made this together on Saturday with $18 in wood, fabric scraps I had left over from other projects and a glue gun. We started at 1pm and he was sleeping in it by 9pm. We had so much fun doing this together! My son drilled the holes, wrapped the twine (standing on a step ladder), and handed me the fabric strips while I glued them. We also cut the bottom of the wood posts at an angle so we didn’t need to glue them. Thank you for sharing this awesome idea!
So glad, stacie! I love that! Send pictures if you can? We love to see! [email protected] ;}
Thanks for the idea, I love it.
Would like to do one for my kids.
I’m native american & this is a cute idea. I may have to put one on my front porch for the Gkids. Thanks for sharing!
What a God sent idea!!! thank you!!! I have been looking for something like this for a while!
So adorable!! I would LOVE to try this out!
what a really cool teepee,thank-you for sharing your wonderful idea.All kids would love to have one of these.kind regards Stacey
Thank you for your inspiring DIY tipi, teepee lol. My kids will love it! I was just looking for ideas for an outdoor space and I think this would be super!
I wish I could borrow you for a week to help me with projects like that, and then some. That is terrific. You did a fantastic job.
Haha! Thanks Jennifer! I wish there were two of me to loan out… then I might get some things finished myself! HA! ;}
I LOVE THIS! Do we know if it’s collapsable yet? If so… I have a question. For the right price would you consider making and selling a few? Please let me know as I am very intrested. It’s fabulous and exactly what I’ve been looking for! Keeping my fingers crossed! 🙂
It is collapsable! You should loosen the rope at the top a little, and you will have to re-tack some of the fabric over time. But ours has been great! Haha- thanks, but I will not be making them! ;} These teepees are so expensive because of the time it takes, and the materials. This was a good, lengthy project. But totally doable on your own end. You can do it!
Oh heavens! I have been searching for a teepee DIY that I actually liked for a LOOOOOONG time! This is absolutely darling! It just so happens that I have 12 1X2X8s in my garage and my fabric stash is driving me crazy, so this is PERFECT! I have two black labs in desperate need of shade and a 3 year old nephew that will love this! And me. For napping. 🙂 Thanks for such a great idea!
Thanks, Jonelle! ;}
I absolutely love this!! My son is only 16 months old so he’s in the destroy everything(on accident) stage of life. It will be wonderful to have this later down the road. I know he would absolutely love it!!!
I completely LOVE this! Just came across it while looking for a pattern to make my baby girl a pretty little coordinated teepee and now want to make one like this! Thankfully I also have an 8 and 10 year old so maybe I’ll just HAVE to make both types!
I want to make this as a gift, do you think I can transport it??
Hey Melissa! I think this depends on your car/method of transportation. Ours folds up nicely though. I would count on patching it up once you get there just in case -I hope that helps~
Is this able to fold up? I love this and wanted to make my daughter a teepee for her birthday =) thank you!
Hey Samantha! We fold ours up. You may want to repair it a little with some glue every now and again as it becomes loose over time but it’s a great little teepee for minimal cost compared to the big store prices!
So creative and fun! This really is a piece of art! I made a plain, aboriginal inspired canvas teepee for my grandkids and it certainly isn’t this funky. I cut 6 triangles, sewed it together inserted bamboo poles in less than 2 hours though. This one looks time consuming for sure, but great results. Love it!
Hi, would love to see a photo of this folded down?
Thanks!
I have wanted to make a teepee for soo long as well! You have made it seem doable and fun at the same time. I can’t wait to see what fabric I have and make this! Thank You!
This is magnificent!!!! My 3 little ones (who LOVE to read) are so excited about this as our next project 🙂 Thanks for sharing!!!
Hi,
This is really great 🙂
Plan to start on this Xmas for my little girl. Thank you for sharing. This will be my first ever project of DIY stuffs for my baby, so wish me luck 😀
Just one question: without hot gluing the bottoms of the sticks to the ground, any suggestions as to how I can include like a carpet fabric on the bottom of the teepee (attached to it)???
I can’t to start!
Hey Grace! Thanks so much! I do not think I understand the question? Once it’s built you can just add rugs or whatever underneath, and move it around to get it just right – if you want carpet on the bottom, it will probably slip on hard surfaces, but you could always get carpet samples and glue to the bottom [if you’re trying not to scrape the floors} I hope that helps? ;}
hi! i just made this for my nephews for christmas and i am so excited to give it to them! it was so easy to make! thank you so much for this tutorial! i can’t wait to see their faces when i give it to them!
also it folds up beautifully!!
one thing i did differently was i bought wood that was weather proofed so it didn’t have so many splinters in it (found a big difference at home depot)! and i really didn’t want to sand it!
thanks again!
kourtney
Hi! Well, I’ve followed your blog for a little while, but just came across this post a few weeks ago. I sent this link to my husband and he was on board to give it a shot! So, we pulled together all the supplies for our teepee (we had to buy the fabric since I didn’t have any on hand) and planned it for yesterday. Instead of a glue gun we primarily used a staple gun, but did use the glue gun for minor touch ups. It took us a good chunk of the day and it still needs some futzing, steaming (gotta get those fold marks out of the fabric!) and embellishing (pom poms around the top of the doorway, chinese lantern, Xmas lights, etc.), but it’s done and my girls LOVE it and so do we. It’s kinda magical in there! Just wanted to send along an instagram pic and say THANK YOU for the inspiration!! http://instagram.com/p/yBEimWFkXx/?modal=true
LOVE it, Christine! Thank you so much for sharing it! ;}
Ohhhh, I loved this so much I tried to make one for my little ones…. FAIL!! It was not as easy as I thought it would be, and I was my worst critic… I wanted it to look perfect and it didnt, so I tore the fabric off, all to try again tomorrow!
Thanks for the great idea!!
You can do it, July! Don’t worry about perfect. They certainly won’t care! ;} Anything you do will probably look better than ours, anyway! ;}
Hi there…you’ve inspired me to get creative… Just finished a 2nd Teepee for our 5yr old. He helped too :))
Would love to send you a pic!
Karen
Awesome, Karen! Would love to see it! Ashley @ Thehandmadehome.net
What type of light did you use in your teepee?
thx
Hey Brooke – they were just regular old white christmas lights – we strung them around on the inside for a cheap and fast lighting solution. Hope that helps!
This is beautiful! I can’t wait to make it for our new home! What is the overall size of it? Is it sturdy? I plan on putting this on carpet so I can’t glue to floor. Thanks for sharing this whimsical teepee! I’m sure my husband will be excited about this too!
Hey Katie! Ours is folded up now, but it’s probably around almost 5.5 feet tall by 3.5 feet wide??? Plenty sturdy. You can make it whatever size you want depending on your wood! ;}
how many yards of fabric do you think you used?
love
That is so neat wish I had this 4 years ago when I had my daycare that would.been awesome. I. Might do it anyway I got alot of fabric and 2 gazebos out side lots weather fabric. Thank you
Love this. Need a reading tent/den and have a lot of spare fabric!!!!
This is beautiful! I can’t wait to make it for our new home! What is the overall size of it? Is it sturdy? I plan on putting this on carpet so I can’t glue to floor. Thanks for sharing this whimsical teepee! I’m sure my husband will be excited about this too!
how many yards of fabric do you think you used?
Hey Helena! Thanks so much for dropping by. Unfortunately, I have no idea as this project is now several years old. I just used what I had because #fabrichoarder. I’m sorry I’m not more help! But the project is relatively easy and you can definitely skip the glue. Carpet will give the same results. I hope that helps!
Its an amazing tepee and offcourse happy faces of your kiddo’s says it all. What an inspiration need to save you on my favories list.
Aww this is so cute and nice, kids gonna loving this.
I savour, result in I discovered just what I was looking for.
You have ended my 4 day lengthy hunt! God Bless
you man. Have a great day. Bye
can’t believe you made it yourself, this looks absolute gorgeous, thanks for sharing the ideas with us all.
Aww this is so cute and nice, kids gonna loving this.
Oh my goodness! It’s been AGES since I found a teepee DIY I actually liked! How adorable is this? I just happened to have 12 1X2X8s in my garage, and I have a massive fabric stash, so this is PERFECT! The shade will be perfect for my two black labs, and my nephew, who is three years old, will also be thrilled! Including me. It’s perfect for napping. 🙂 Thanks for such a great idea!
Thank you for being the reason I smile
This is really cute and nice. Kids will enjoy this a lot.