
how to build shutters
We are always looking for simple and easy ways to transform the outside of our home so today we thought we’d share how to build shutters. They are super simple and very cost affordable.
 We’ve written all about the process of explaining how we transformed our backyard from this…
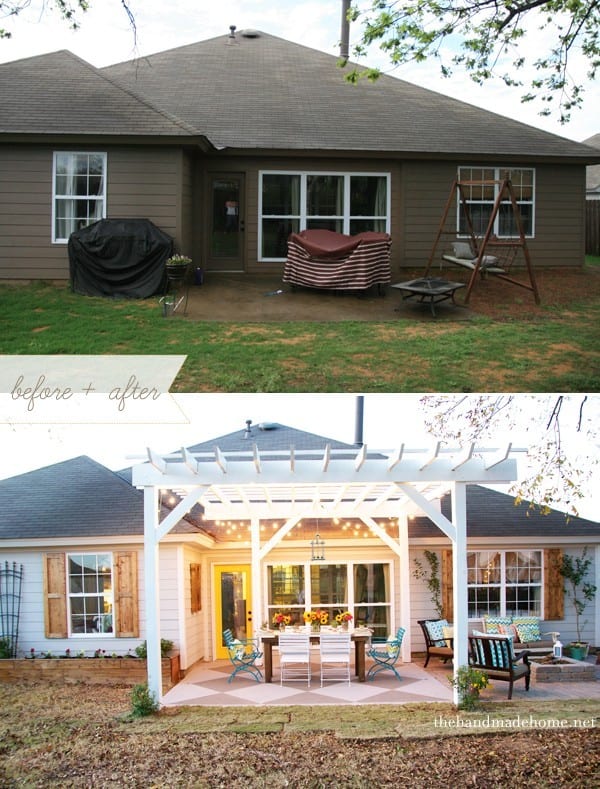
To this.
How to build shutters – a great transformation
Today we are going to start with the simplest transformation: how to build shutters. They are so easy, we think you’ll have a blast making them-it’s amazing, the character they can bring to your home. Hopefully this little how to will help if you’re interested in making your own.

How to build shutters – the supply list
Let’s start with the supply list. This list is per shutter, also all wood sizes are based on our window length so make sure to do your own measurements to figure out your exact amount. It might be more it might be less.
Supplies
(30) #6 1 & ¼ inch exterior wood screws
(2) 1 x 4 x 8’s wood (type of your choice)
(3) 1 x 6 x 6’s wood (type of your choice)
(4) 2 & ½ inch screws exterior (type depending on your house, see below.)
How to build shutters – measuring
Starting off you will need to measure the length of your window. Do not make the mistake of assuming your windows are the same size as ours. If you do, you’ll have some pretty cool shutters, but they just might not fit your window. ;}
How to build shutters – cutting
Once you know the length of your window cut your 1 x 4’s and 1 x 6’s down to that size. For us, this meant we would cut ours down to 5ft. This gave us (3) 1 x 4 x 5’s and (3) 1 x 6 x 5’s. Remember your length may be shorter or longer than ours.

Next, cut the leftover 1 x 4’s to 9 & ½ inches (if your window length is longer than ours you might need to buy extra wood.) You will need (3) 1 x 4 @ 9 & ½ inches.
How to build shutters – building
Once everything is cut, you will screw (1) 1 x 4 to (1) 1 x 6’s. (use 6 screws alternating front to back as you work up the board.) Make sure that they are flush on one long edge and at the top and the bottom, then screw them together. Repeat this with another set. (You can either do this using a clamp or the old fashioned way by laying them face down on the floor with the 1 x 4 on the bottom and the 1 x 6 resting on top of it. Hold them flush with your hand as you screw them together. A second pair of hands might help in this approach.)

Next take your (3) 1 x 4 @ 9 & ½ inches and lay 1 at the bottom of a pair you just joined, 1 at the top and one in the middle. Hold them flush to the 1 x 4 sitting on top of the 1 x 6 and screw them in (make sure to screw them in from the back side). Use two screw each time you screw the 1 x 4 @ 9 & ½ inch piece to the 1 x 6 piece. (6 on each board)

Now slide the other 1 x 6 x 5 that is joined to a 1 x 4 flush to the 1 x 4 x 9 & ½ inch piece and screw it in from the back side. (Again 6 screws, 2 on each 1 x 4 @ 9 & ½ inch.)

Finally, take the remaining 1 x 6 x 5, slide it in flush, and screw it in from the back side. (Again 6 screws, 2 on each 1 x 4 @ 9 & ½ inch.)
How to build shutters – staining
Take a little extra time to sand any rough edges. Use some wood conditioner and stain to a shade of your liking to finish them off with a look that works for your home.

Major finishing note: Don’t go to all this trouble of building these shutters only to have them rot out in a couple years. Finish them off with a great weatherproof seal. Thompson’s WaterSeal makes a great, dependable line of wonderful products, and we love their multi surface waterproofer. We recommend you check out some of their products for your stain and weather proofing projects.
![]()
We topped ours off with this great weatherproofing finish.
How to build shutters – attaching them
Once they are dry, you are ready to attach them to your house. The type of screw you will need will depend on the type of material on the outside of your house. Make sure you get the correct screw and drill bit. The guys at your local hardware store can help with this.

Because you’ll need an extra pair of hands, we suggest you get your spouse or neighbor to help you. You’ll thank me for it later. Also, if you have two drills or can borrow an extra one you’ll want to get your hands on it. This way you can drill with one and screw with the other for a faster process.

Line up the shutters with the top of the window and drill through the shutters into the side of your house (I suggest starting with the top corner closest to the window. Go ahead and put a screw through that hole. Break out your level and make sure the shutter is level, then drill and screw your other three holes.
Now step back pour a glass of sweet tea and pat yourself on the back for a job well done. You’re finished… and if your house is anything like ours, these shutters make a major improvement. Stay tuned-we will be slowly introducing the rest of our how-to’s for the back porch redo as we go! But for now invite the friends over and share the knowledge on how to built shutters
{Side note: And if you missed when it all started with the hideaway… you might want to peruse a little, here.}
Have an inspired day, everyone… and as usual, let us know if you try it!
![]() This post is brought to you in partnership with Thompson’s WaterSeal, read our full disclosure here.
This post is brought to you in partnership with Thompson’s WaterSeal, read our full disclosure here.
To read any of our DIY projects from this back yard overhaul, be sure to check them all out, here!


THANK YOU for posting this! I’m so excited to talk my husband into making some for our house. Is there any way you could give us a time estimate and about how much it cost per shutter?
Alisa, for someone who is familiar with their tools they should have no problem making one in 15-30 minutes and they cost (depending on wood type) around $35-40 each.
That’s doable for sure! Thanks!
I love it! I love the updates you’ve done to your house, especially the lighter paint + the shutters! I have some shutters on the front of my 1960’s house that definitely need to be updated, I’m thinking this is the look I want!
DO it! ;}
I’m doing this exact thing to my backyard next spring. Thank you so much for being so inspiring. I hate my backyard as much as y’all did 😉 y’all are truly amazing.
Thank you so very much, Rachel! I can’t wait to see what you do! ;}
I love love LOVE this. Thank you so much for posting on it! I can not wait to try these.
They’re beautiful! Looks doable too.. thanks for sharing!
What a difference in your backyard, I am amazed all over again every time I see it. The shutters on your house are fantastic. I am hoping to make some for my own house, and I am dreaming about your pergola, too. Great job!
Thank you, Sandra! We’re just glad to bid that awful brown farewell. (on the back at least… we’re working our way around the sides) ;}
Thanks for the instructions—they don’t look difficult at all!
love these – looks amazing! now, as soon as we stop renting and start being homeowners, this is one of the first things on my list to do 😉
Wow, i am so excited to utilize this tutorial. your back yard is beautiful! new to your site and can’t wait to see your other projects
These are awesome….thanks so much for showing how you made them. I’m wanting to make some for our house that look like a barn door but just haven’t gotten to it yet. This inspires me to go ahead and do it next spring.
Would you mind sharing what kind of wood you used on your shudders and the stain color?? Thanks!
Hey Lacy- I am so sorry for the delay in response. I am just now seeing this for some reason! You can read all about the details, here. ;} I hope that helps!
Hi, I LOVE your back porch! You did a great job! I’m wondering what kind of wood you bought for your shutters and what kind of stain you put on that made it have such a cool effect. I want to do this and have it turn out just as your’s did. Any tips?
Thanks,
Ruthie
Hey Ruthie – So sorry for the slow response – I’m just now seeing this question. We used Select Pine, and Minwax’s Early American as a stain. Then we topped it off with Thompson’s. I hope that helps. ;}
Thank you so much for taking the time to share your skills. I am a total newbie to doing anything like this ,so forgive me if my question seems silly :- Will these shutters actually shut or just decorative?
Hey Irene! Your question is not silly. They are just decorative. ;}
Do your shutters open and close? If not how do u make them do that? We want shutters that close. I hate blinds!! And that’s an understatement!
Hi Lori! They do not close. I would guess placing them on hinges would do the trick. Ours were simply decorative. ;}
Did you paint your siding as well? Did you stain the shutters?
Nevermind…I just saw the post and they helped me. I do have another question though. Did you guys paint the house yourself? What equipment did you use?
Hey Michele so sorry for the slow response. We painted it ourselves with paint brushes. Our siding is Hardy Board though so It’s not your average siding, if that helps. ;}
Love the makeover, looks awesome! The shutters add the perfect touch, it would be great if there was a printable version, perhaps a pdf file. Thank you for sharing!
Thank you Patti for the sweet comment. You can turn any web document into a PDF by selecting File>Print>PDF>Save as PDF.
Awesome tutorial, very straightforward. Every other tutorial I found used plywood of some sort so required a table saw… which I don’t have and don’t want to play with 🙂 This whole project can be done with a compound mitre saw, which is great! I’m making shutters about 46 inches tall, I just very precisely costed out the lumber from Home Depot at $14.07 per shutter. Plus screws and paint. Vinyl shutters (which are disgusting) are about $35 for the set of two…. so for about the same cost, I have wood and custom. My costs are based on using pressure treated lumber (first because its protected best from elements, second because I dont care about the look as I intend to paint them). Also, to help estimate paint cost – I measured that these are 23sq feet of paint coverage (total for front and back)…. a typical gallon does 350sq …. single coat on the back double coat on the front – I should be able to do about ten or so shutters with a gallon. So thats about $2.50 per shutter.
I started working on this. I answered my own question. Though pressure treated wood is a tad cheaper, its also significantly heavier. My finished shutter was way too heavy, I think I’m gonna buy some regular wood instead and let the paint handle the weatherproofing. Also, I’m pretty confident that using my nailgun and woodglue will work just fine and is much quicker than working with screws.
Also, I’ve been reading wwwwwaay to much about shutters because of this project. And one thing I’ve learned is that a shutter should be the height of the insided of the window casing (so that if it closed it would fit inside the casing), so yours are a tad too tall (common mistake and minor detail that most wont notice), but if I’m gonna make ’em wood – might as well do them proper. I’ve also realized … if I’m going to make them wood – why not make them functional, so I intend to mount mine as working shutters… should get interesting. I have a tiny house with lots of windows and during the last hurricane (we have few) I realized I had few places to hide, so this will add a bit of security.
Joe, so glad you are happy with your shutters.
Yes, if you want functional shutters its obvious they need to fit the inside measurements of your window. We weren’t trying to achieve that look thus why we used outside measurements. Also, I would be very careful about using wood windows as protections from a hurricane, they will provide extremely insufficient protection. Hurricanes are a problem in your area I suggest you seriously look into storm windows and hurricane shutters and not rely on wood shutters like these.
Yes good point regarding hurricanes….. I live in New York, we get once a year on a bad year – so its not a real issue. Nobody here has hurricane shutters – let alone functioning shutters. I really was just thinking they’d be better than nothing to break before the glass breaks. But no, not providing ‘reliable’ protection.
Regarding the fitment being proper – I read a very ridiculously long and detailed article about shutters and just one point they made is that – even if your shutters are for show, its best to make them proportions and mounting in such a way that it looks like they work. They gave photo examples, but it is a noticeable improvement (albeit minor detail) when compared side by side with a ‘functioning look’. This is really just nitpicking, yours look great anyhow and from the slim casings of your windows might not have looked much different either way.
Thanks again.
Hey, do you think all the small screws are absolutely necessary vs some wood glue and a trim nailgun? . especially since these aren’t functional, only decorative. Just faster to work with nail gun.
Actually after building these – I figured out what is best. I constructed using glue and a trim gun which holds it together pretty securely. And then just two or three screws on each board. I made one without glue by accident and they popped apart.
We are getting ready to make these shutters for our house and I appreciate your detailed instructions so much. I am a new follower to your blog and I absolutely love it! Thank you for all the time and effort you put into it 🙂
Quick question: I noticed the exterior of your house was a dark brown in the beginning, did you guys paint it yourself? What paint colors did you use because I really like the look ! Thanks!
Hey Allie! I am sorry for the slow response! This comment was lost. You can read all about our sources, here. I hope that helps!
I love this and plan on making them
These are great and just what my house needs! I am going to make them! I was wondering about the windows in the front of my house though…there are 2 that are fairly close to my front door. I wouldn’t have room on the sides of the window closest to the door for shutters. I was thinking about only doing one shutter per window…or just not doing any shutters on those Windows. I am just worried it will look goofy if I have the other 4 windows decorated with shutters and the others are bare. I appreciate your suggestions! I sure love your blog and have received so much inspiration from you guys!!
Hey Cori! So sorry we are just seeing this comment – I think it all depends on how the front of your house looks. There’s certainly nothing wrong with leaving some bare, if you’re afraid they will look funny. I think it just all depends on the look you want. ;} Sorry we’re probably not much help on this one!
One of new neighbors built shutters from your site. He sent me your information. I hope to make some for our house soon. I see you are from south Alabama. I grew up in Saraland, AL and my family lives in Baldwin County. I was wondering where you guys live. We live in Vestavia Hills, AL and looking forward to moving to Baldwin County in about six years. Thanks, Angela
Hey Angela! We are originally from Birmingham – I grew up in the 280 area, and Jamin grew up in Pelham. We are now located in Montgomery Alabama – Such a Small world! So fun! Thank you for saying hi! ;}
What size are your windows? 36″? Thanks!
Hey Amber!
Yes they are, but of course you can adjust this to any size.
Thanks for reading!
Shutters look nice and house looks great with lighter colored paint job.
How often do you have to take these down to re-stain? They look great, btw!
Hey Amanda! Well, we just re-stained them for the first time, a few weeks ago. They have now been up for over two years, so I’d have to say that’s not bad at all! ;}
Which color stain did you use on these shutters?
Hey there! Although we are located in Ohio, with tons of snowy weather, I was wondering how your shutters faired in the past seven years? Did they weather well? Thank you for posting this tutorial, by the way! I can’t wait to try this!
Hey, They have held up really well. I would suggest staining and resealing them every few of years if you want to keep that like “new look”. And you always have the option of using cedar as well.
What type of wood & what color stain did you use?
Thank you!
Hey,
We used simple southern pine, but you can use any wood you like, then we finished it off with Minwax Early American.
Love the style …what I’ve been looking for to have husband build shutters. What kind of wood and stain did you use…please
Thanks so much Patty! I have to say, if it’s not in the post I don’t really remember. {It’s been a while} But I would try Minwax’s Early American because that’s probably what we used. ;}