PSSSTTT: see the final space, here!
It was a perfect sunny Sunday morning, and I was up and at ’em {Confession: Until a few years ago, I totally thought it was Up and Adam. Nice, right?} and in a moment of complete weakness (see beercanmoldpocalypse ’14) since we’re redoing our bedroom and everything and its grandmother is completely freaking me out right now at a snail’s pace, I decided to just buy something, already.
Do you ever have moments like that? Where you have a price range and you’ve been searching for the perfect piece, and all of a sudden your patience runs out so you freak out and buy something because it looks like a (semi) good deal and you think… Finally. The DIY gods have shone upon me with twinkling fairy lights and angel choirs. For once I will not have to put any work into revamping something and we will call it a day. End of story. Hurray! {I’m not the only one who does this, right!?????} Sometimes it’s worth it to spend a little more to avoid the elbow grease.
You know we love elbow grease. Just… sometimes.
Enter nightstands. I wanted two. But I needed storage. And I wanted a certain look. Oh, and let’s not forget the budget factor. But I was perusing the internet on said sunny Sunday morning and spied two of them on Overstock. I was all, duh. I’m totally taking the easy route. These cost a little more than I wanted to spend, but…. insert other rationalization/pity party things here and… click! Yehaw happy dance. End of story.
Or so I thought.
As it turns out, the DIY gods were punishing me for A. Going over my own predisposed challenge of a budget and B. forsaking them.
When the boxes arrived, they had multiple holes, and kind of looked like they’d rolled across the interstate a few times before they were hit by a ravenously angry Mac Truck. We held our collective breath, and opened said boxes. It was worse on the inside.
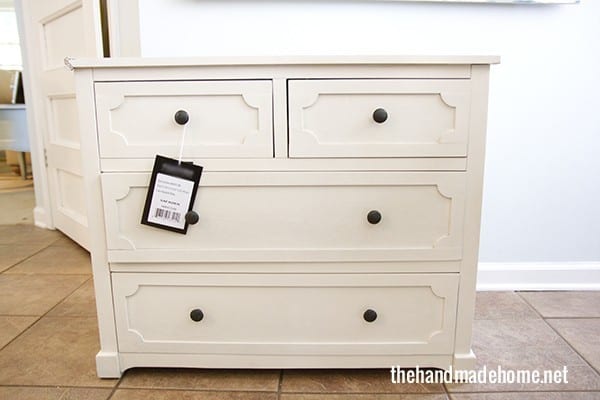
These photos don’t do it justice. The side tables, both of them, were in shambles. I’m talking, falling apart, drawers coming to pieces, insides shattered… frustration.
We think they were actually run down by a Mac truck.

We didn’t even think they were salvageable.
Here’s the deal with Overstock… we kind of love them, so excuse me while I sing their praises for a moment: We’ve used them in the past, and have always been very satisfied with the products… For instance: Overstock is a great source for bamboo blinds and accent pieces and rugs. These things have never arrived with a problem and their prices are always great. This was a fluke in our experience with them.
So we contacted Overstock, and after sending photos, we were immediately connected with a rep to discuss the problem. Here’s where Overstock brought the awesome: Not only was getting in touch with someone not a hassle at all, but we received a full refund. So, major props to Overstock {and no, this is not sponsored}. We truly value them as a great resource and think they did a wonderful job on the customer service end. When people handle stuff right, we come back. Bottom line.
So, suddenly, {after waiting to make sure the shipping company didn’t want to come claim said merchandise after the predisposed amount of days as directed} we now had two {free!} night stands to revamp or dispose of, as we wished.
I was ready to trash them. But the dork in me wouldn’t let it go.
Cue DIY gods laughing heartily from Mt. Olympus.
Enter elbow grease.
It’s funny how something you paid for with XXX amount of ridiculous dollars is crap vs. something for free suddenly worth working with. Beauty truly is in the eye of the DIYer.
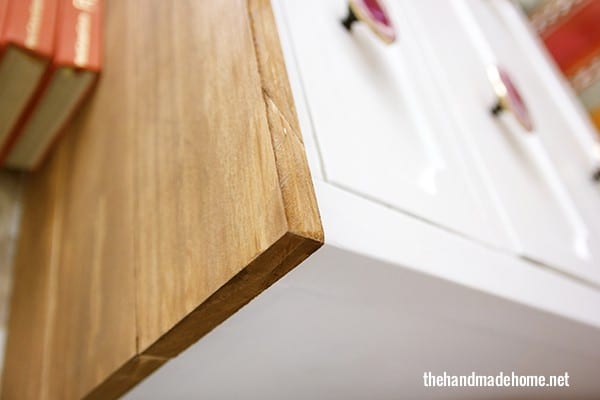
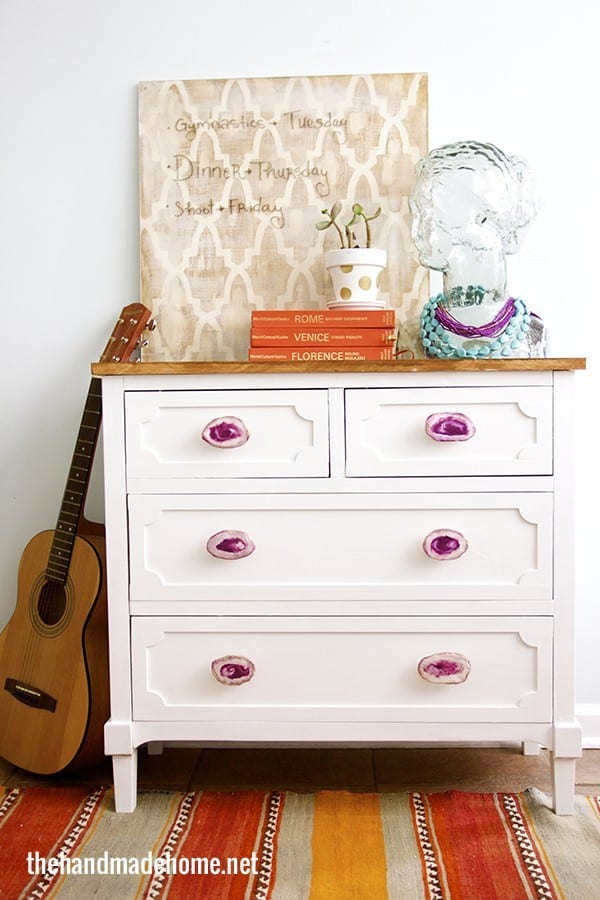
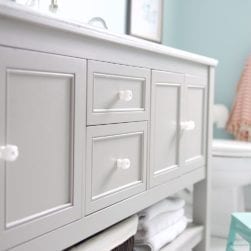
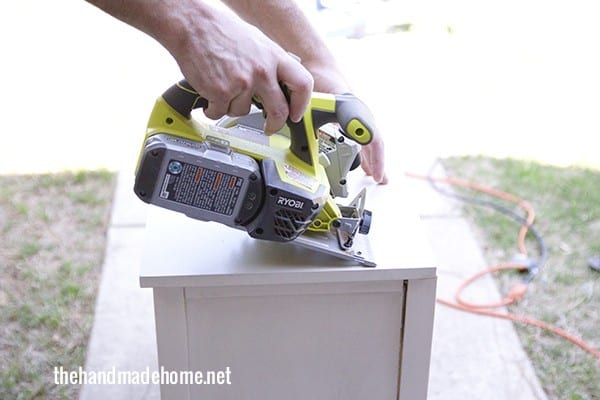 The tops were totally ruined, with corners completely busted. So it was Ryobi to the rescue. We decided to replace the tops. We patched it up, glued it back together, and secured everything that was falling apart. We gave it a fresh coat of white {since even the paint was looking a smidgeon of dingy in the yellow category, and we were looking for something totally fresh.}
And… {Drum roll, please}
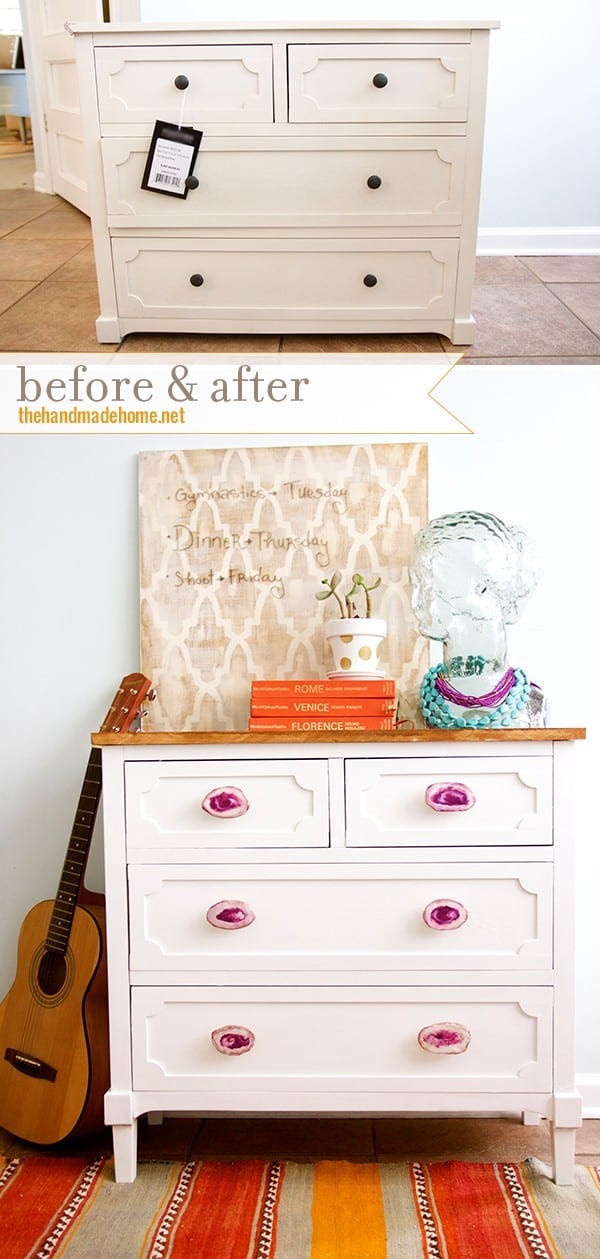
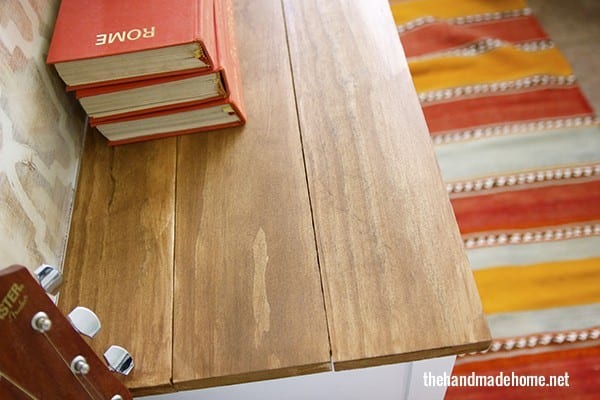
It was totally worth the work. The tops were planks of wood cut to size with a combo of stains – one stain + sanded + another two top coats of a darker shade, for an aged look.
The fresh coats of white brought it back to life. And while the drawers might still take a little finessing to open… (hey… it was free.)
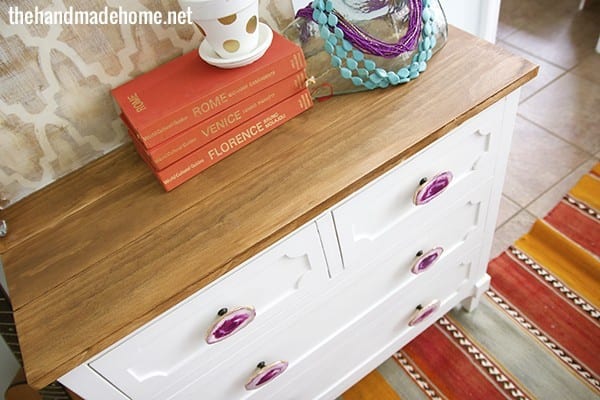
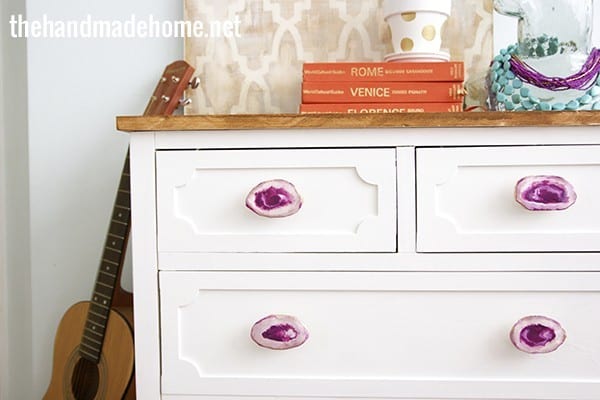
Oh, and the hardware? Since we kept the piece so simple, I decided to rock it with something super fun. No pun intended.
We ordered each piece for 50 dollars at a super cool to-the-trade only store. So sorry guys, you’re out of luck. It was a bit of a splurge, but I have a gorillion dollars since I just got a huge discount, and needed to make up for the fact that the piece was free. Let’s spend some money up in here!
JK. This is me, hoping that you kept scrolling… (The title probably already spoiled it) but I made them from scratch from stuff that I had around my home.
Wanna know how?
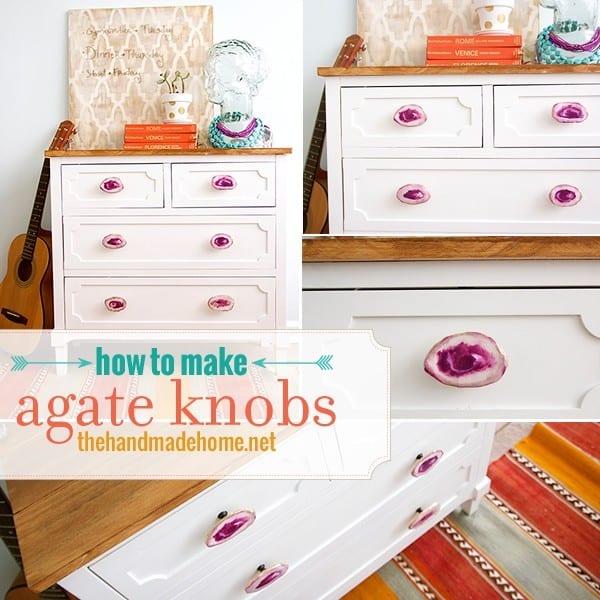
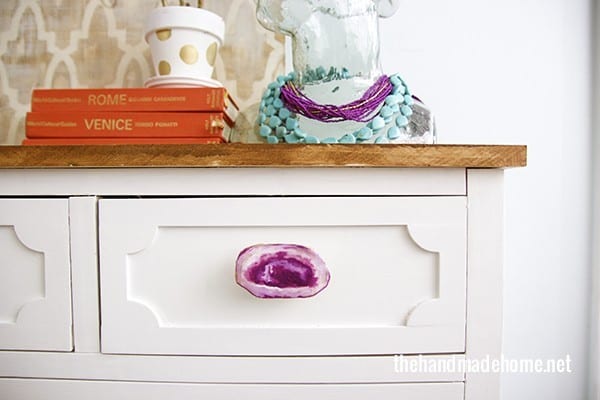
I’ve been craving the natural rock/geode/agate look for a while now, and truly wanted the look with some hardware. But I wasn’t sure how to do it. I’d noticed a few online, but they were a little steep in the price range for what I needed, and I wanted purple. Plus, I always like the challenge, and had to make it up to the DIY gods.
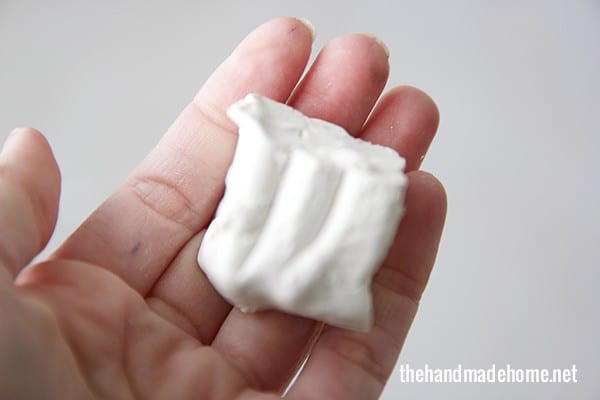
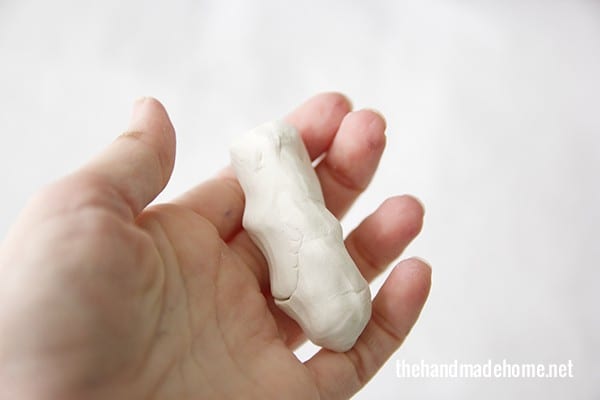
So I took some Sculpey clay, and rolled it into a small tube kinda shape. {Cue raptor hands} If you practice a few times, you’ll get the amount just right. Each of our knobs fluctuated between 3 x 2 + 3.5 x 2 with a thickness of about 1/8 of an inch.
I rolled it out with a bottle {or rolling pin} – Don’t use this bottle. Too many grooves with the label. I used an empty salsa bottle and then realized you guys would need photos and grabbed this one.
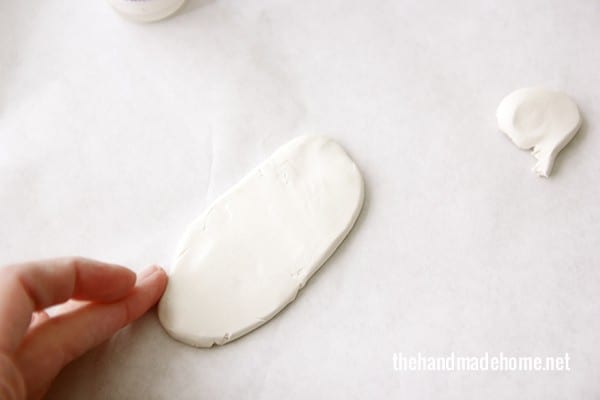
Pull off any excess in the length once you get it evenly thick, and smooth out any inconsistencies with your fingertips. Keep the shape basic and organic, just like other agate slices you may have seen. Let them vary for a realistic look.
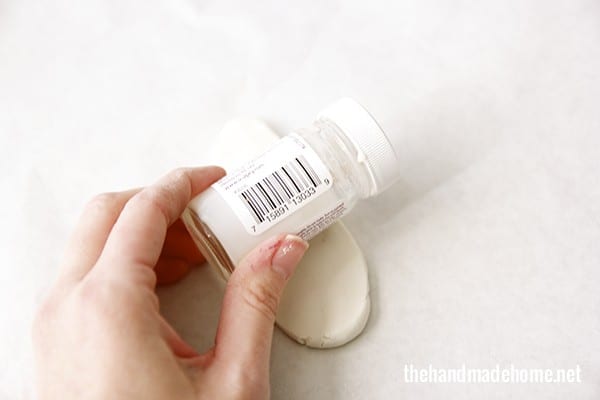
I baked each one {according to the instructions on the back} on foil + a cookie sheet at 275 for around 10 minutes. {This will all depend on your oven} While it was cooling…
Bust out the paint. For this, I used what was already in my cabinet:
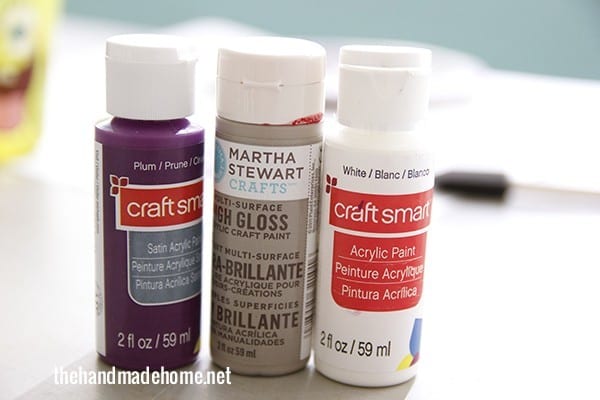
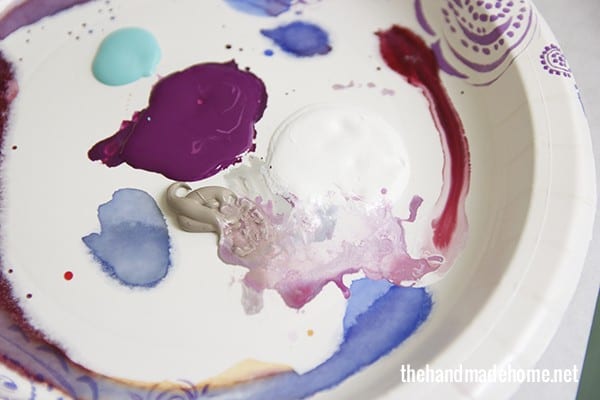
And with two fairly thin craft brushes {go for soft, brown bristles} I stirred up my own palette on a paper plate. Ignore the other colors, I was playing with more ideas and settled on the three paints above.
Use a cup of water for mixing and cleaning your brushes in between colors, as well.
Ever notice how all these rocks have a very painterly appeal to them? This is the approach I took, with {what I feel like} were really fun results.
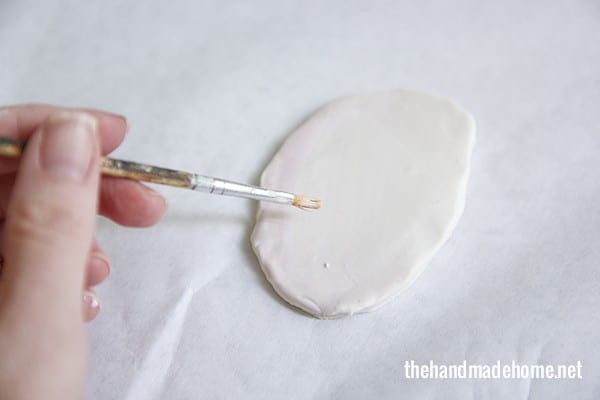
Using the very light version of grey {white + a dab of grey} and mostly water on the outside of the “agate” I did a nice white wash on the outside, and when I had my grey just the way I wanted it in a border, left a gap.
And then went for some purple in the middle. Don’t paint that gap, because you already have the natural clay shade that a wash can go over, but this way your center won’t bleed as much. Have some paper towels handy, because you’ll want to take away any as you need.
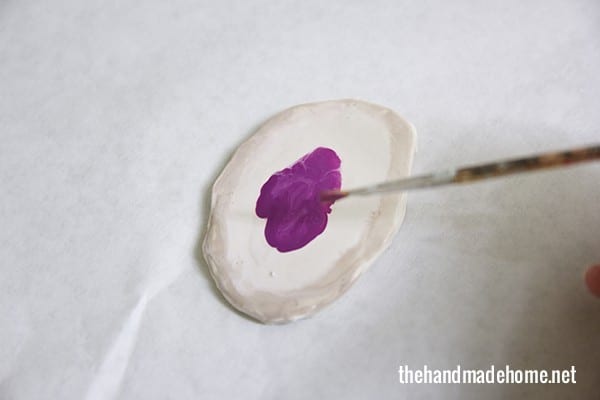
Let the purple kind of spill into the middle, and play with light vs dark areas with water, and concentrated paint.
Let it swirl around until you’ve found a nice balanced place in the middle. I’ve found that happy accidents yield the best results.

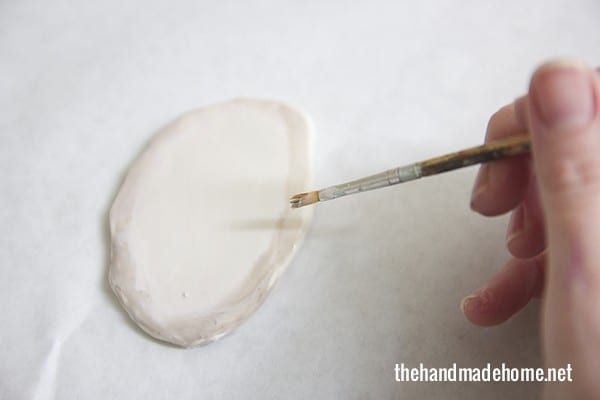
I went back and blended little by little on the outside… a touch of purple all the way around, and added a little purple to the grey, as well.
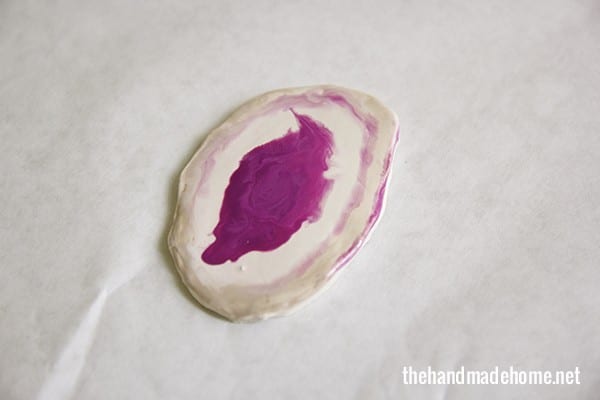
Then took up any stray swirls with a dab of paper towel, and blended the two outer colors with a wet brush.
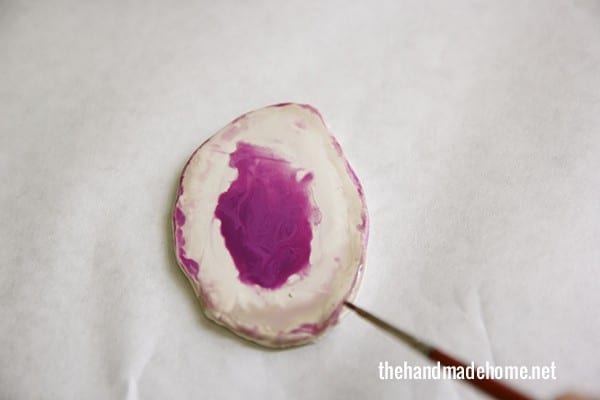
I just played with a few until I reached my desired consistency and realized it really was working. Nothing can ever compare to the natural beauty of agate (God is kind of the ultimate artist – duh) but I thought this was a nice {on a budget – exactly what I wanted} try.
 I added a few swirls of white to my paint in the middle. The key is to work with it all, and keep it moist until you’ve settled on your final design. Work slowly… and don’t over work it, or it will take on a painted {rather than natural} look.
Just think in terms of watercolor on clay. Fun swirls = varied designs.

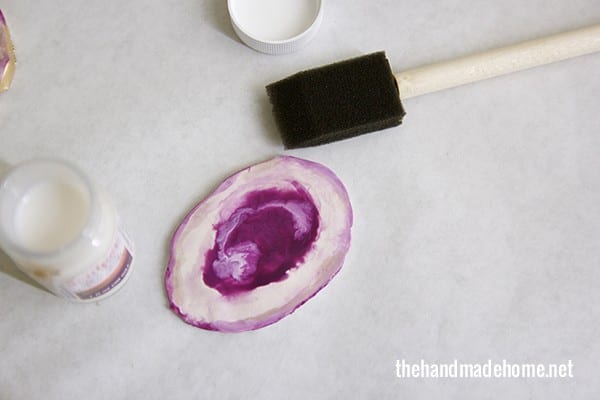
When it was dry, I took a little of this with a sponge brush, and rubbed some on. {Make sure it’s completely dry, first} and rubbed a little off with a moist paper towel to get rid of any brush strokes, and gave it a smooth top coat.
I repeated for as many times until I felt like it reached that glossy “geode” look. {I did about three coats with rubbing a little in between to get rid of the strokes}. It deepened the color and made it look a little more genuine.
Finally, I took some gold leafing paint and did the very edges, careful to overlap a little occasionally on the front, so that you can see the gold when the drawers are facing forward. It gave it that ultra finished, realistic look. Suddenly the clay was completely gone.
I simply glued these to the existing hardware, but you could make some from scratch as long as you use a screw that fits in the existing piece and attach it to the back.
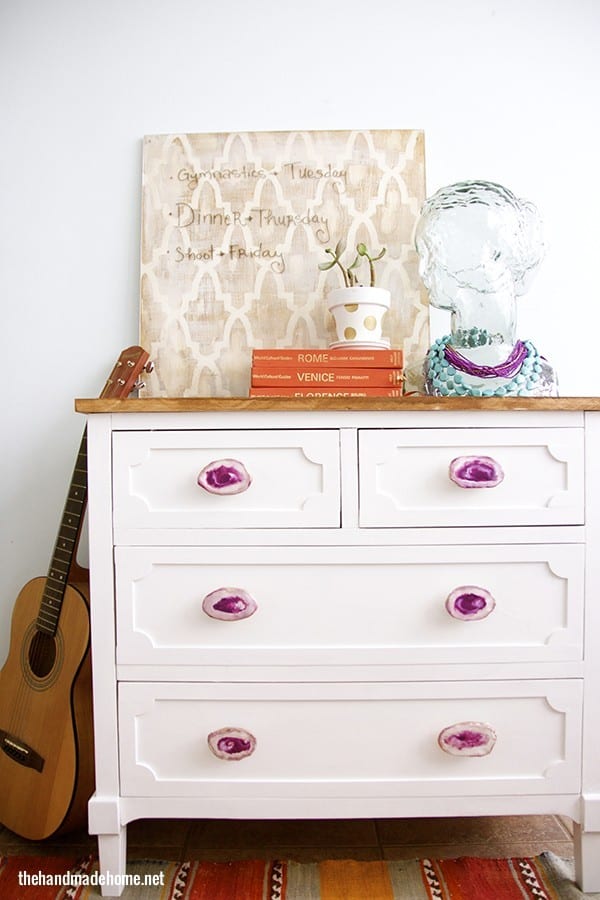
Tada! {For real this time.} These totally rock.
Sorry not sorry. I can’t help myself today with the puns.
They’re certainly not for everyone, but I thought a fun hardware never hurt. And when I grow tired of them… they were no big investment on my part other than a fun afternoon project…
This little design has so much potential… in all kinds of colors, designs, sizes, etc. We’d love to see what you do with it!
I can’t wait to pull together our bedroom space. These are certainly firing me up!
Kind of excited. Even in the doldrums of a dusty redo. ;}
Have an inspired day!
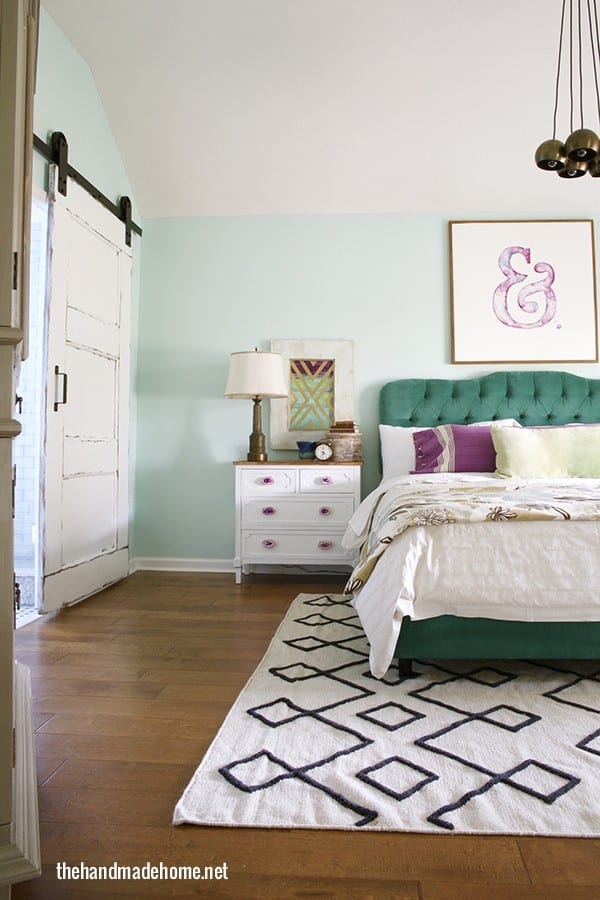
pssst – see them in our bedroom, here!


AWESOME!!!!! SCORE!!!!
I thought it was “up and Adam” until…about 3 minutes ago when you said it wasn’t. Crazy the things we say without actually thinking about if they make sense or not. haha. LOVE the agate handles!
HAHA! So glad I’m not alone! ;}
Love! You are so talented!
Your nightstands turned out fabulous! I bought a dyson vacuum from Overstock a few years back and like your experience the box looked like it had been through the ringer. It was even taped up with duct tape to hold it together. The vacuum didn’t fare much better – it was scratched up, missing parts and had tons of hair caught in the the roller. Gross and clearly they sold me a used product. I did not have a great experience with their customer service so to this day I still won’t buy from them.
That stinks! So sorry you had a bad experience. But aren’t my knobs fun? 😉
WOW! Amazing working.
LOVE. I seriously might do this tonight, but not for knobs. I have a few other fun ideas. I’m not a naturally gifted painter…but it’s always fun to play? Love how yours turned out! 🙂
No, Tania… definitely try them! I asked Jamin that, when I was finished because I tend to love to paint, and didn’t want this to be a project that people felt like they had to work with a lot. I think that’s what I love about these is that the more you fiddle with them in the painting realm, the less genuine they look. Because I tried the painting approach at first. It’s just an issue of knowing there to put the color, and letting it flow a lot with the water, naturally. I would practice on a few pieces to get the hang of it. If you blend the colors with water and a paper towel, you should be just fine!
I couldn’t figure out where you were going with the sculpey at first. I was trying to think ahead “and then she presses the rocks into the sculpey.” Not ’till the end did I realize that the sculpey was the rocks. They looked real to me!
I too love overstock. We bought a 36″ flat screen TV and received a box full of heavy iron junk. Obviously the original item was stolen on the dock. Called Overstock, sent pics, filled out a form and received our new TV in a short time. Now you had me with the $50 a piece knobs. The dresser looks awesome. It’s a very unique piece that no one else will have.
Wow very cool!!! I’m redoing a dresser and I’m going to give this a try!
I NEVER would have known you made those knobs if you hadn’t said so. You could have stopped at spending a gazillion dollars at your to-the-trade source and I would have totally bought it. You guys are so ambitious! I love the make-over.
Very cute! The most wonderful thing is that you could do them in any color that you wanted. I can definitely see them in shades of blue. 🙂 I am definitely bookmarking this post.
It turned out beautifully! Useful DIY, thanks for sharing.
Impressive! What a creative idea, and they turned out beautiful. I’m adding this to my inspiration list. 🙂
I love your DIY drawer pulls! I totally thought you’d spent quiet a bit of $$ on those side tables. I have a dresser in desperate need of new drawer pulls. I think I’ll try this amazing DIY. Thanks for sharing