Once I posted on the kitchen this week, I got quite a few questions from some of you. I figured this project was so big, it would take a few posts to explain it all, so I’m glad you guys could outline some of them for me! We love your questions, and I hope this answers some of them. Please know that this is what worked for us, and maybe isn’t for everyone. We encourage you to look around, pick and choose, and use the things that make sense to you.
So, let’s begin, shall we?
Did you paint the cabinets yourselves?
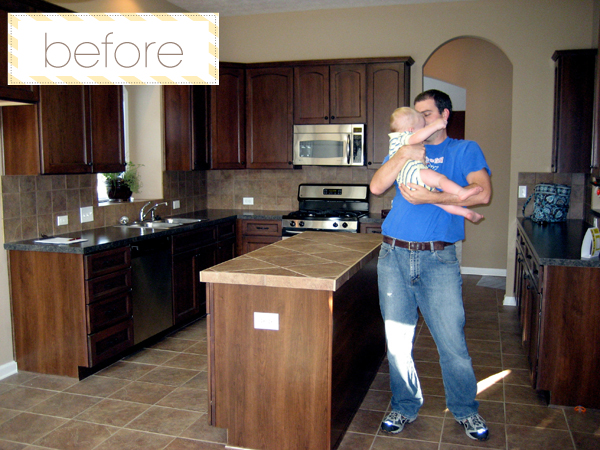
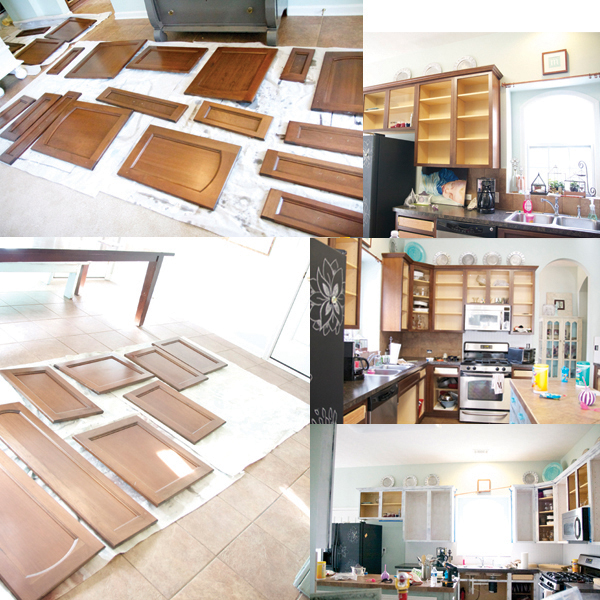
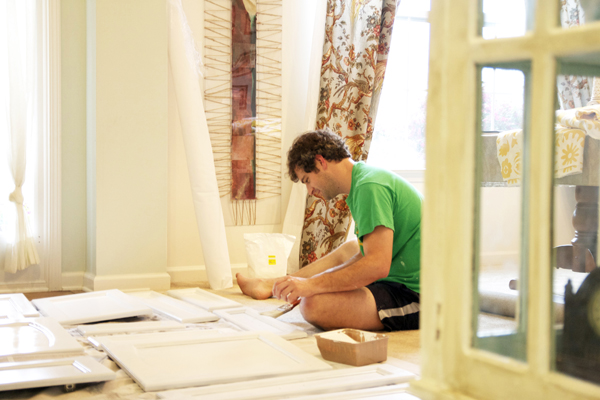
Absolutely. Here’s the steps: We started by taking off all the hardware, removing all the doors and drawers, and wiping them down. We have so many cabinets, that this job alone took the better part of an afternoon. We laid them out on different parts of the floor with drop cloths {though drips were inevitable, it still helped to have that underneath}
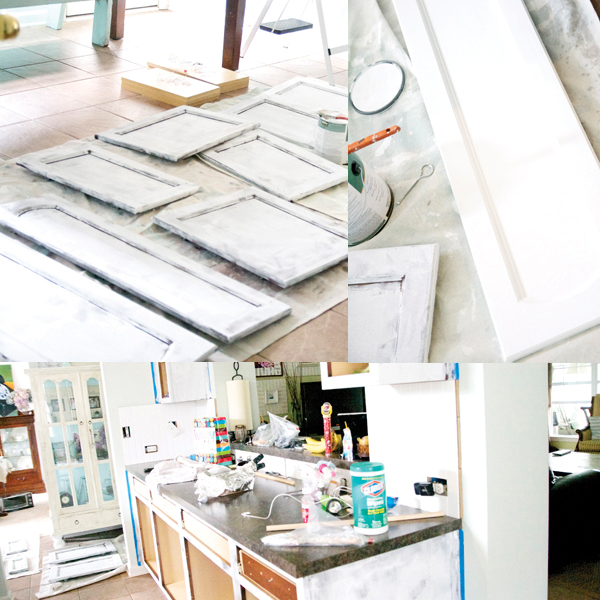
What brand of primer/paint did you use? We busted out the Killz Oil Based Primer {odorless} I will never use another primer again, {unless I can spray it on for a smaller project.}Killz oil based is simply the best in my book. Amen. We also brought out the higher grade brushes, {they sell them in different levels of specialness :)} to cut down on bad brush strokes. And we put one coat on the entire thing. We put on the first coat of primer with a roller, and then got to those tough angles with a brush.
After that was dry, we brought out the paint.But I have a dirty little secret.
I stated in the original post that my paint color is Benjamin Moore’s Chantilly Lace. I happen to love their colors, but not their prices. But as I’ve said here before, we’re on a budget with a family to feed. So, while some believe in the “high-grade” and stuff, I happen to not be. 😉 I simply took the paint swatch to Home Depot and asked my fave painter mixer who works there to match it. And he did. For 100 dollars cheaper. Call me crazy, but I used latex and after it had a few days to cure a little more {It takes a month for it to COMPLETELY cure} it was all we needed.
We put on three coats. Yes. Three. Those cabinets were DAAAAAAARK. Yes, Jamin did want to kill me when all was said and done. Some of you may scoff at my wrecklessthriftiitis, but I’ve done nothing but this on MANY a piece of furniture, and it’s all held up great. The kitchen is the same thing, so we saved a pretty penny and just did it rather than fretting over the quality, namebrand, etc.
There were a few dripmarks. That’s just going to happen. And I went through a freak out session, where I was all, is this what we’re supposed to do? Is this a mistake? Am I doing this wrong? But I trusted my instincts and pushed through it. I think it pays to trust your instincts. 😉
Here’s a helpful hint: we worked in sections, and I went back with a slightly wet brush, {with water} to go over any semi dried drip marks we almost missed. This smoothed out those unsightly places, and for the most part, saved us from a major near calamity. {did you know that if you’re painting your toenails and you mess it up, its the same principle? Just go back over it with spittle on your fingertip.= smoothness} SO, if you’re doing this, brush strokes and drip marks will happen. But no one has been checking out my cabinets up close since they saw them, and my good friend who gave them a look, commented that it looked as though they’d been done professionally.
Go. Us.
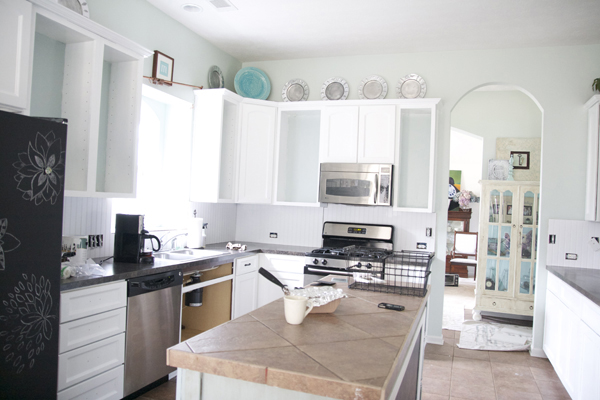
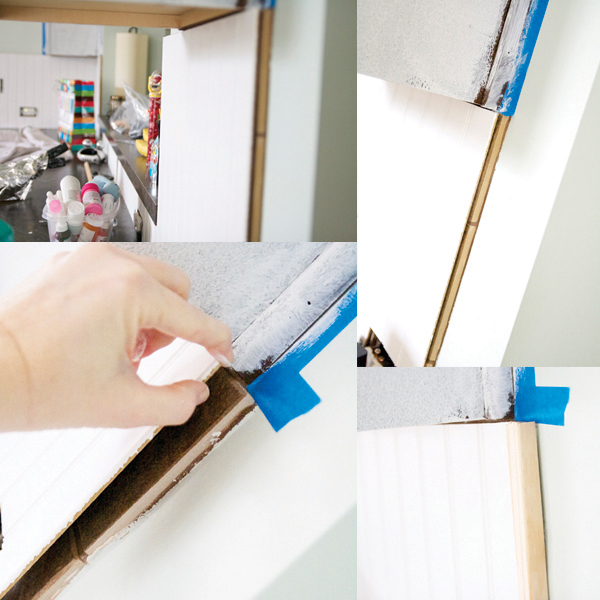
And another thing: I will never ever ever ever EEEEEVVVVEEERRRR use painters tape again. In some of these pics you see the walls taped off. Unless it’s for the floor, and unless you want it to pull up all your paint because you were exhausted and didn’t think about it, and unless you want to start crying…and say bad words…don’t. do. it. It’s worth it just to touch up. Because with all those layers of paint, you won’t pull it up while it’s still wet.
And then you will die. true story.
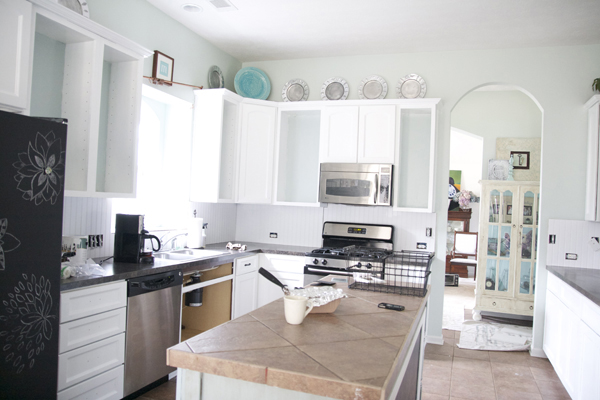
Other than that, I think that the outcome was purdy good. Of course, for the insides of the cabinets, we used a lighter blue. Read more about colors and such, in my original post here.
How did you put your backsplash on over the tile?
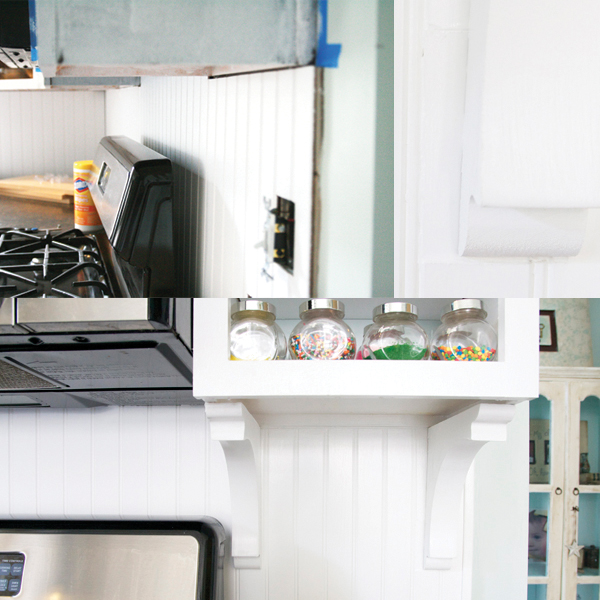
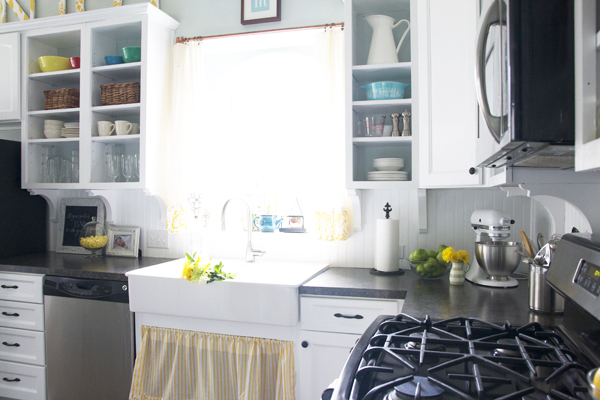
I knew that taking down the existing tile could be a lot of potentially exhausting work. Especially when there was perfectly good tile underneath. So, piece by piece, measurement by measurement, allotting for plugs, and switches, and dips and rises…we cut each piece of bb and joined them at the grooves for a seamless look. This was the time consuming part. Allow a day, just for this. PS. purchase the primed bead board. You’ll thank me later.
I was inspired by the nester’s post about changing her renter’s kitchen and decided that just in case the next owners preferred the {tuscan} look, all they had to do was pop it off. Brillz, Nester friend, I must say.
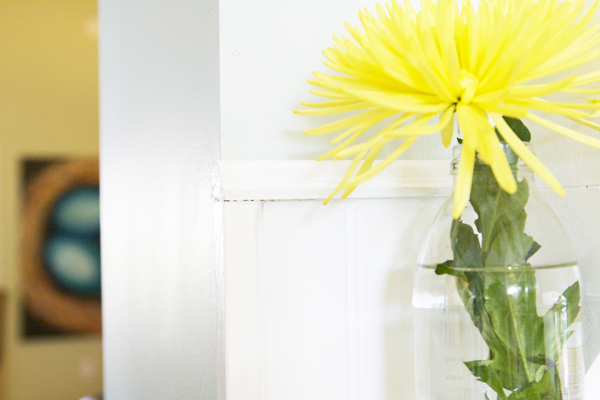
We then measured out two pieces of trim, without cutting them at an angle…because I think it looks fine, and I refuse to spend hours trying to get an angle right. We used one side, corner piece (to cover the tile) and one top piece (in a more decorative finish)
We hot glued them, as well. {I know. I’m going to kitchen hades for this one.}
I still have to fix a few of the little seams. And it’s not going to be perfect. Nothing is ever perfect, much to my high strung chiuaua-esque dismay. I then went back over all the seams with my fingers {do it like you’re finger painting} and wood filler. I worked in sections, pushing it into the large grooves that were left underneath those cabinets. I went back, before it dried with a wet rag, and smoothed it out. No. Sanding. Necessary.
Water is our friend. 😉
Where did you get your corbels from? How often did you space them?
First of all, muchas gracias and many props to our fave people Layla and Kevin for inspiring this one. I knew I was going to do corbels, but wasn’t sure which ones exactly, and we were having a hard time finding purdy ones. And then I stumbled across this post on their blog. If you check over there, you’ll see that they were from Home Depot. You should also read their take on the kitchen. Different things work for different people, and {if you haven’t see it already} you’ll love their inspiring insight.
Props, guys. Props. 😉
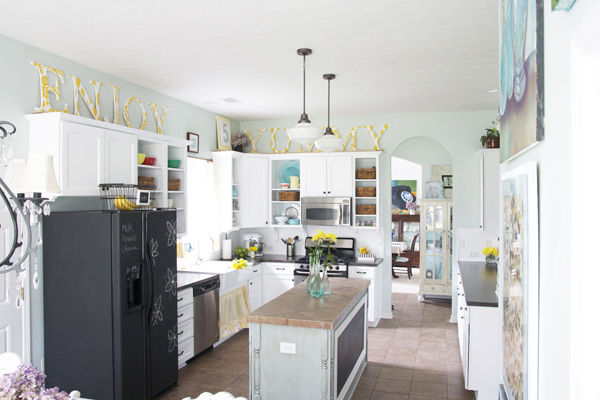
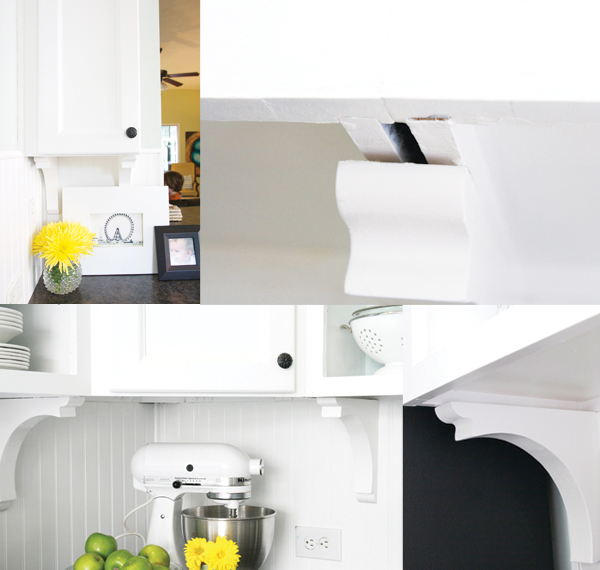
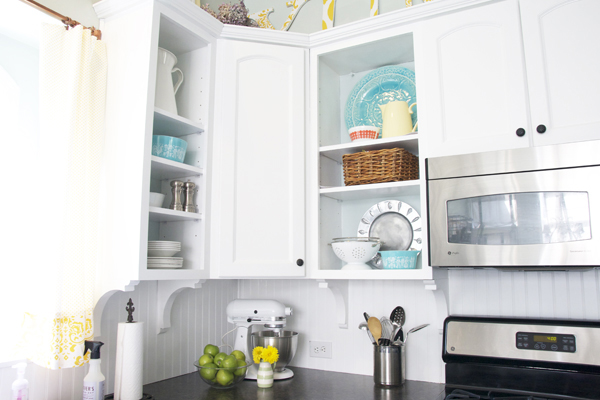
We simply adhered them as shown in the photos, at the basic base of every cabinet. We just did what we felt looked natural, and we did it at the bottom of every cabinet, so that it was flush against the outside. Naturally, it would jut out a little on the inside. Every kitchen will be different. We made sure to paint around each one again, to fill in the small seams. Those suckas aren’t going anywhere. Unless I’m form tackled by a football player into my countertops.
Then, I think they just might budge.
Remember that 100 smacks we saved on paint? Yeah. It went to the corbels. Because we had to have like, fifteen. And those things are pricey. {8} But well worth the architectural element they give. Worth every penny.
TADA!
Did you make your curtains? Yes. You can read more about those fabrics, in my original post here.
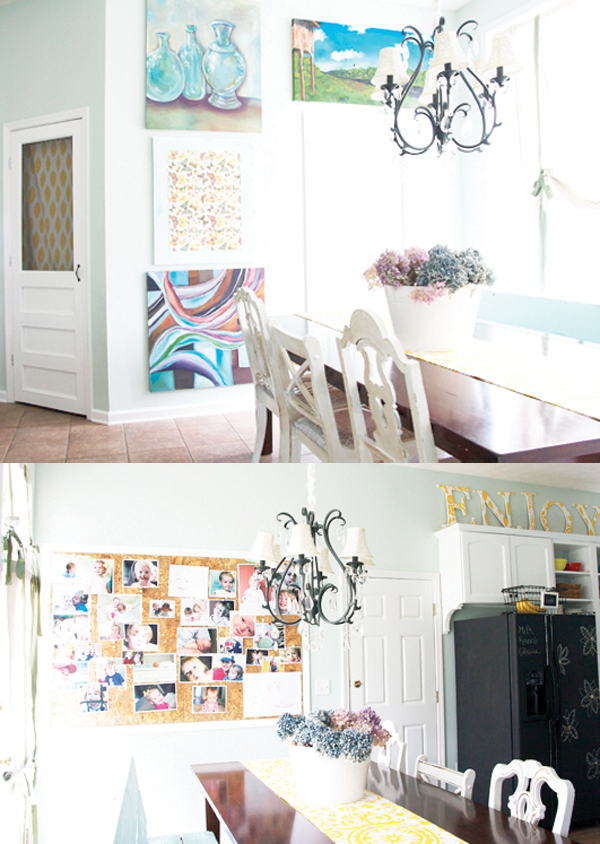
For the curtains over the table: fabric com: I didn’t really use a pattern. I simply knew what I wanted, measured and went for it, because that window/door/window combo were a little awkward. Fabric source :here {the blue/green fabric I do not think they carry anymore, but it was like a silk satin combo, that I simply sewed into ties}
What are the dimensions of your sink? How much did you pay for it?
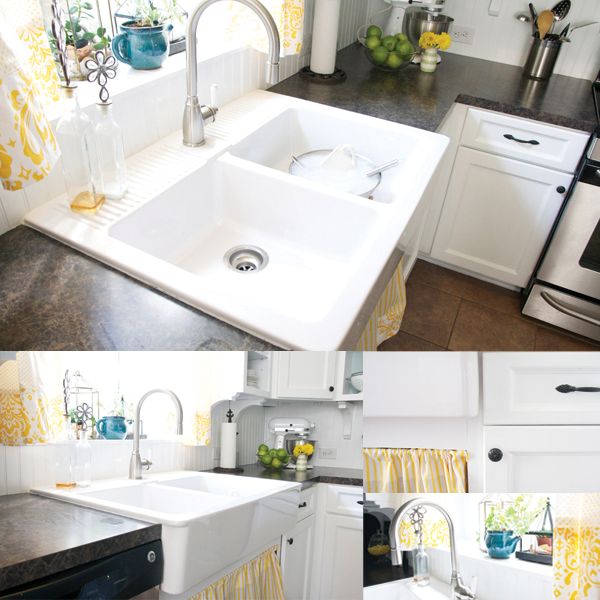
Keepin it real with the soap-filled dishes: Why load the dishwasher when it holds everything I need it to? Our friend Brad called it a jacuzzi.
The dimensions of our ikea farmhouse sink are precisely: 27″d x 37″w x 12″h. With taxes and everything, we paid 300 dollars. This does not include the faucet. Again, very reasonable, if you go google farmhouse sinks or search for one online. So, we highly recommend.
Why can’t I find it online?
You can’t find it online, but they do carry it in store. Simply walk up to the little sink people in Ikea and ask them to help you. They will let you fill out a form, and you take it straight to the check out. Then pull your car around and they help you load it. Easy. Peasy.
Why did it take so long for you to install it?
As far as the time it took to install: installing things just takes time? 🙂 I think that professionals are paid for a reason, so we had a brilliant plumber friend come to help us, because again, we didn’t want the house to explode, and I could not lift the sink, so Jamin was going to need help. That porcelain is quite heavy, and I’m a smaller gal. {read: wimpy} We had to cut into the cabinets to install it, and then hook up all the pipes and other whatnots. It was just a big official process. A lot of the parts were foreign and didn’t fit our parts. The instructions were a little vague for the non plumbers out there. So, it just took a while. But totally worth it in my book.
Also, rather than buying new doors for under our sink, we simply finished it off with a piece of MDF painted in the same color, and put it underneath. I then sewed a little curtain for the all out farmhouse look. I prefer it that way. You may not have noticed it, but I am going to add a liner to that skirt. 😉 Oops. Now you’re looking.
I hope this helped answer some of your questions! Let me know if you have any more, and I’ll do my best to answer them! Have a FABULOUS Friday!




Fabulous! I love it all!
Your kitchen looks fabulous! While the before was nice, it just pops with the white cabinets and blue walls. The corbels really give it a nice finished look. My kitchen looks just like your before. You've inspired me to make a change.
What a beautiful place to enjoy a morning cup of joe! I am so impressed and inspired! I envy your cheerful and relaxing space :)…my kitchen is dark…but aside from being dark, our kitchen IS beautiful, and high-end, so for a while it must stay. Alas, maybe one day…. 🙂
Wow that is beautiful! You did an amazing job! You have such a talent and a wonderful hubby to help you with it. Love this!
I have particleboard cabinets – mine are flat. No detail. Any suggestions on how to give them some? Your kitchen makes me happy and able to see that I have thrifty possibilities that don't look thrifty! And I can't get the IKEA sink out of my brain. I wasn't even planning on replacing the sink. Now I want to. Gee thanks 😉 Seriously though- my favorite kitchen EVER.
Thanks guys for the sweet comments! 🙂
Christina: have you thought about framing yours out? with a skinny trim piece or even a bigger one on each door? With some of the moulding stuff they have at Home Depot? You could use the fat stuff we did our chalkboard and corkboard in, but smaller around each door. Just a thought?
A little scoop on Home Depot brand (Behr) paint: HD brand paint has higher amounts of titanium in it. Paint dye (the color) bonds to the titanium, so the higher the titaniun the more the paint adheres to it. Meaning, the HD paint will will stay "true" in color longer.
Ashley, it looks amazing!!!! Love everything, especially the corbels and the sink! I am so getting those… And having just been through cabinet-painting hell, I know how much work you put into everything. Kudos!
Oh. MY WORD. YARNISTA 😉 The sad part is, I just knocked out my laundry room. That has half as many as the ones in my kitchen. Which means its the size of the average kitchen as far as cabinets. So I just did another. "kitchen" Again. {laughs deliriously} It's right off the kitchen so I HAD to go ahead and do it. {wrist fatique!} {woeisme}
Oh my goodness! Your kitchen is gorgeous. We've been planning to paint our cabinets white and replace the paneling in our kitchen and you have really inspired me. You are a woman after my own heart! I believe that anything can be fixed with a hot glue gun and my husband thinks I'm crazy. Now I'm going to be saying, "Honey, if YOU will paint the cabinets, I'LL take care of the walls and the trim. So, there's really not any problem with using a latex paint over an oil-based primer? By the way, I love your chalkboard fridge!
Your kitchen is beautiful! So bright! I have a question. Are your corbels still holding up with the hot glue? I tried it in my kitchen a couple of months ago. And day they came crashing down. What did I do wrong??
Hey Beth!
That's a really good question! Maybe I should learn to shut my mouth until I've had them up for a good year with no problems. 😉 But I secured the top AND the back, and only a couple of them will actually be exposed to any heat. Exposing them to great temperature changes could make a big difference, because of the nature of hot glue. Does that make any sense? I hope it helps. I'll let you know if mine last…and if people come knocking at my door angry they followed my advice! 😉 But so far, so good. No budging at all.
I could look at the pics of your kitchen all. day. long. It's simply beautiful! I've always loved your kitchen, but this? This takes it to the next level. It's amazing what a difference paint makes! Kudos, Jamin & Ashley. Kudos.
Looks so awesome! Thanks for answering the questions!
Good night, lady! This is amazing – beautiful pictures. But maybe don’t wear yourself out writing out such a long post. You have so many great tips and pics to share, you could really break it up – it’d make it whole lot easier to digest your fabulousness. 😉
I am ready to take my doors off underneath my sink and install a skirt…love yours. I have to find me some fun fabric.
Did you sand the cabinets at all before you painted? We painted the cabinets in our previous house and was told by a professional “handyman” friend that sanding was necessary. Man, that was a pain in the butt the worst part. I’ve thought about painting the cabinets in our current house but I’m scarred from all that sanding. I could handle the painting, but the idea of sanding prevents me from even entertaining the thought of a cabinet redo.
Hey Marissa! I gotta say, sanding is not always necessarily necessary. 😉 We certainly didn’t do it, but our cabinets are also not super glossy. I find that a good coat of the right primer kind of does that for you. I was afraid of all the gritty stuff that would get into our paint, if we tried it. Because you can wipe and wipe and wipe and wipe…but you never get rid of all the grit. So we just opted for a coat of primer, and they’re holding up beautifully. I’m sure they’ll need touchups here and there, because that’s just what you do. but no sanding necessary, here. 😉 Hope that helps!
So how many gallons of paint did you end up needing? This is going to be a big project for me… I also don’t have a HD within an hour of where I live so I was going to go with Ben Moore or maybe Valspar from Lowe’s… Is the price difference really that much?
Hey Erika! Our entire home, when it was originally built, was finished in Benjamin Moore paint. So, when we had the outside porch re-finished, I had to go pick up a gallon at our local store. 50 dollars. For a gallon. I almost had a heart attack. So after that, I decided to start choosing the BM swatch cards (they sell the swatch packets at their store} and take them to HD to have them mixed. I just love a lot of their colors. Our kitchen probably took about 3 gallons of paint, at half of that price. 24 dollars a gallon. So, I chalk it all up to the fact that we did save a good amount by not going the Benji route, and the Valspar will probably be around that same price range. We use Behr because there’s a HD right beside our house. As in, five minutes away. I think Valspar is a great route, too. I just don’t make a fuss over expensive paints, even though I’m sure they’re great, but we can’t afford to, with the painting we do, with everything from a new room to re-coating a piece of furniture, to building frames. 😉 HD, {and I’m sure Lowe’s} always has big sales on their holidays. The kind where you can go pick up the paint, and then send in a rebate card for 5 dollars or 25 percent off…it changes every time. You don’t even have to get the paint mixed…you can just buy the basic cans, and have them mixed later, once you figure out what you want to to with it. They mix it for free. Just a little FYI. 😉 Our garage is stock piled a-la rainbow brite. Via Behr. We approach things from the practical side. 😉 Hope this helps!
Thanks for such a fast reply, Ashley! Wow, FIFTY bucks for one gallon! I just got TWO gallons of BM at our local store (and when I say local, I actually mean 35 minutes away…) to paint my living room and girls’ bedroom and paid a total of 61 bucks and change. I’m still going to check the price of the Valspar, since Lowe’s is going to be our second home in the coming months. Our cabinets are so cheap and ugly (well, actually everything that was “updated” in this house is) it’s not even funny – your before picture of your kitchen looked like heaven compare to mine. Okay, mantra: Slowly I will get there!!
By the way, I just found you today through Nester and love what I’ve read so far! Sigh… I might just have to start a blog (again) soon – even if it’s just a place to keep up with all these great blogs I’m finding.
Okay, so this was just a really long way to say thanks, and I’m going to have to back off the coffee for the rest of the day 😉
Wow! I just ran across your blog and had to laugh as we just did our kitchen very similar to yours ! Please tell me your cabinet doors have brush strokes, mine do and it’s freaking me out but Mr.Vintage says everyone has them. Anyway please come over and tell me what you think. Allthingsvintage88.blogspot.com
I LOOOOOOVE your kitchen. We too have a dark kitchen. Cherry cabinets & black granite… I hate it.. we just moved in and I had a “kitchen guy” come by to give us a quote on refinishing and he told my hubby he wouldn’t touch them because they were brand new… I was so annoyed. And of course my hubby is thinking $$$$ and doesn’t want to mess with them. I just showed him your before and afters though and I think he may be warming up to the idea… It is just so much lighter and brighter. LOVE it.
PLEEEEASE tell me there is SOME way to paint my horrible dark cherry laminate cabinets (that are white on the inside)!!!!! ?? Is there ANY primer that will make paint stick??? A local decorator says no…
Hey Amy, well, ours were laminate on the sides. “nice laminate” made to look like wood, but laminate with mdf underneath, nonetheless. So, I say read up on it, and get a good balanced take on it all, and then, if you hate it…go for it. It won’t hurt to try, right? if you can find a hidden part of your cabinets to test it out on first, I would. But I would try the killz. oil based primer. just like what we used. try it. 😉 But then don’t beat me up if it flakes off. {ha} remember, it takes paint months to completely cure, so you will have a few bumps and bruises along the way. But that’s what the paint is for…we had a few mess-ups and you can’t even tell! it sounds like you want to anyway. I say try it.
I have a friend that just redid her kitchen cabinets. They look amazing and feel sprayed. She used a rustoleum kit called cabinet transformations from Home Depot. It’s around $80 for the smaller kit. Her kitchen is quite large and she used 3 kits. It wasn’t a small job and took a while, but they look great. She had laminite sides to her cabinets and it’s still looking great after about 6 months. Happy improving!
Hi, I love your kitchen. In fact I love it so much that my husband and I are in the process of doing something similar to our cabinets. We’ve actually already painted our walls the Woodlawn Blue and our cabinets the Chantilly Lace.
If you don’t mind, what was the exact color that you used for the backs of your cabinets? Was it the same woodlawn blue or did you use a lighter shade of blue for that?
It’s always to have such a great source of inspiration from this wonderful blog you have! Thanks for sharing.
I love your DIY-creativity! PLUS…it looks perfectly beautiful, too. So, we painted out built in desk/bookshelf in our study similar to the way you mentioned (excpet we didn’t use the kilz primer, but we DID use HD Behr paint)…but our desk is still to this day (3 years later) a touch “sticky” If anything with some weight sits on the desk for a couple days, it kind of “sticks” to it when we pick it up. Same with the drawers…they kind of stick to the desk when we try to open them. I am told this is because of the latex paint. Do your cabinets “stick?”
Also, I thought you weren’t supposed to mix oil and latex?? So, how come your paint didn’t get all bubbly weird chemical reaction-y with the oil based primer and the latex paint??
Thanks for you wise advice! 🙂
Your kitchen looks great! We are having ours painted and trying to pick a countertop. I think I have one of the chips that might be yours….is it a wilsonart laminate? Bronzed fusion? Thanks!
You have my exact countertop, and maybe even my tile floor! What do you think about how the countertop meshes with the rest of the room? I am painting the cabinets white and hope to do the beadboard and corbels, and I worry about how the whole thing will come together.
I was originally going to change out my countertops for butchers block, but I love the way the black contrasts with the
White, so we left it! I was very happy with the outcome! Hope that helps!
I LOVE your blog/website. I just came across this post today. . . a week after my husband and I started our first home re-do. WHY did we choose to do our kitchen first? While it is tedious, I am loving the change…even if it is taking a long time. =)
Can you tell me if you rolled or brushed your cabinets with the actual paint? Our doors have some intricate “curves” to them. We are trying to figure out what will give us the best end result!
Thanks for always being so upbeat with each of your posts! It’s so inspiring. I can’t wait to take on my next project!
Renee
Hey Renee! Thanks for the sweet comment! We actually rolled on the first coat, for a good base, and then brushed it afterwards. I decided I didn’t like the texture the rollers were leaving behind. Hope that helps! 😉
Hi Ashley! First if all- I love your blog. I read it everyday and am inspired by your work and appreciate your honesty and your ability to laugh at yourself. I need more practice on that. And- my hubby is a youth minister too!
I’m finally taking the plunge on painting my cabinets. I was wondering about the details for painting both sides. How long did you let it dry before turning the doors over, etc. Thanks!!
Hey girl!
so sorry for the slow response. we have been on vacay! I actually have not painted the back sides of our doors yet. {awful confession} It was simply too much at once with all the doors we have. I am actually putting that on my to do list, soon. since the sides are already painted, and the fronts, of course, I will go back and lightly sand the back where the paint may have glooped. Then wipe. Then prime and paint a few coats as I go. I will leave them up to paint them…it will be the easiest option for us. It will be a slow process because we need the kitchen, but a door a day will be doable for me! Hope that helps? 😉
I have a couple of questions: My cabinets are exactly like yours (my house is a new construction like yours in Alabama so very similar style). My kitchen is very large – I probably have double the cabinets in your kitchen so painting is not an option. At least not right now since I am pregnant and have a 14 month old and my husband would not help since he hates painting LOL. But I would love to paint the island. The back of it is like yours. Where did you get the chalkboard? Did you have to sand it (I think the back of the island is laminate, isn’t it?). And I like the decoration you put on the sides of the islands (don’t know the name but it looks like legs), did you get those at HD? I am thinking I could paint my island a creamy off white and it might look good with the dark cabinets and the dark (almost black) granite tops. What do you think?
hey vanessa! I hope these posts help a little!
https://www.thehandmadehome.net/2010/08/island-redo/
https://www.thehandmadehome.net/2010/11/diy-how-to-make-your-own-framed-magnet-boards/
https://www.thehandmadehome.net/2010/11/spindle-spruceups/
I’m sure you can get spindles at home depot, as well! And we did not sand anything. I started out with my island, and then talked Jamin into the cabinets about six months later. 😉 so start out with that, and something tells me you’ll love it so much, you’ll try it with the whole kitchen once things are feasible in the kiddo department! We’re never going back to construction grade. 😉 Let me know how it goes!
Hello, I love your remodel, I also have the same exact cabinet color that you previously had and am itching to paint them but hubby isn’t too excited about it. I have a question about the sink, was it hard to put in the farmhouse since you already had the granite in? I want a farmhouse sink that is undermount but read online that its practically impossible. Can you give me some tips?
Hey Anastasia. That is not granite in our current kitchen. It’s actually formica. So we cut into it and installed the kitchen sink. Our house is on the market, and I love this sink so much, but the house we are looking at building comes standard with granite. No other options. That’s it. Very cookie cutter, but I want that sink and I’m honestly not too fond of granite. Not in the colors they’re offering, anyway. That granite is coming up. ;} I’d probably ask a plumber, if you can cut into it, if you want to keep yours. They are the ones that do stuff like this. I am not sure I would try it without some major research. ;} I know that probably wasn’t much help, other than for me to say I’m sorry-and you’re probably in good company if we move!
I absolutely love your kitchen. What a fabulous job!!!
I’m so happy I found this post- I made an offer on a house that has new cabinets in the kitchen but I hate the color, counter, floor and want to paint it but was afraid it wouldn’t work. Thanks to you, I’m going for it!
Wow. I know this post is older but I just did my 1990’s oak cabinets white. I sprayed my with lacquer (husband pro painter). They look like they are made out of white, shiny,Abba Zabba taffy. Dreamy! Trip out on your kitchen girl. Im doing everything you did. Corbels, beadboard. Plus you just answered the question I had ‘how on earth will I be able to afford an apron sink?” Im so going to Ikea now for my butcher block countertops and the sink. I love your blog. Thanks so much for clearing up some lingering questions I had on what to do. Love this site.
I love this! I’ve been looking for pictures of minty green walls — what color is this? It’s absolute perfection. (my apologies if you’ve already answered this)
Hey Tracey! our kitchen is actually a really light blue…here’s a list of all the colors in our home! I hope that helps! ;}
Hi, When you say hot glue, you mean with a glue gun using the glue sticks?
yes. ;}
Love your kitchen! I was wondering – do you have any advice about painting the insides of cabinets? I am considering removing some cabinet doors and having open shelving. Were your shelves melamine or wood veneer? I had a cabinet person tell me we couldn’t paint melamine? Also, have you liked the open shelving or would you have gone with glass doors? I’m a little worried about the dust issue. Thanks!
Hey Brooke! The insides of our cabinets are made of melamine. Or wood veneer. One or the other, because we aren’t sure, but we definitely painted them and the two coats of primer beaded up until the third one and it freaked me out. But by the time I got my second coat of paint {after three coats of primer} it stopped, and took well. We’ve had a few little issues, but if you pad the bottoms of the cabinets and don’t claw at them with your fingers or anything, they hold up wonderfully. ;} Just like any house, I’m sure there is dust, but I haven’t really noticed it. If there’s a plate higher up that we haven’t used for a while, I always just rinse it off. But I would do that any way with closed cabinets. It just isn’t really an issue. I hope that helps!
Hi there! Wow….I can’t stop looking at your talent. I feel so very inspired! My house has never been any kind of “eye candy”. However, it’s filled with lots of joy and laughter. I have spent the last 16 years having children and homeschooling them. Seven children. I’m finally at a point where the baby is about to be 4 years old and I want to start some home projects. My kitchen is HUGE and very very outdated. My cabinets are very glossy. My guess is the old owners put an extra coat on them when they put the house up for sale to make them in “better condition”. So can I just put a primer on these or do I need to sand them. I have a LOT of them. Sigh….. I want so badly to have a pretty kitchen that feels like a HAPPY HAVEN for our large family!
Hey Christine! Wow! You are super mom!!! ;} I tell you what… that’s a hard call to make from here on your cabinets. I always try to skip the sanding whenever possible. You may want to try {in a not-so-obvious-area} a test run. Maybe with the killz primer and then the layers of paint and give it time to sit for 30 days. Then see how “durable” it seems. If it peels then you know you probably need to sand first. I know that’s a lot of work! Also, once you paint something, I think it’s normal to always need to do touch up painting like once a year. It’s time for us to go back and touch up a few places… with three kids (+ all of yours will be the same) it’s inevitable. ;} I hope that helps!
what sheen paint did you use on the cabinets?
thanks
Hey Marisa! They are a high gloss. I hope that helps!
We are working on doing this to our kitchen. We have a window much like yours. How did you do the bead board around the window? Did you use some sort of corner trim? Also, did you trim out the bb where it meets the countertop? Thanks so much for the lovely inspiration! Best wishes! -Stephanie
Hey Stephanie! We used corner trim on that area, and where it meets the counters, we just left it, without trim. I hope that helps! ;}
Ashley,
I’m happy to read this post about painting cabinets: I’m gearing up to do the same. Ours our lighter than yours, but will require as much effort and energy. I’m just worried about taking the leap because once you paint them, you can’t go back. Yours look fab and way better than the dark ones–I’m just worried to try! Also, our kitchen is part of the giant rectangle that’s our downstairs. Each room is connected to the next, so I need to figure out how it’ll jibe with the entire space. Eesh! It’s overwhelming to consider.