
board and batten how-to

Since I posted on our laundry room redo, I’ve received quite a few questions about the project from you guys. So, I thought I’d post a few more photos, and cover a few of your questions.


When we completed our kitchen, it became glaringly obvious that it was time for a makeover in the very next room. We knew it would be next on the list anyway, but we didn’t know how next it would be. I sat, enjoying the next few family dinners in our light and bright new kitchen…but the dark blah laundry room beside our kitchen table mocked me. I thought we’d have a little bit of a “labor break” but when something bugs you that bad, you just have to go ahead and knock it out.

That happens a lot, with the whole inanimate objects and various spaces mocking me bit.

So knocked it out, we did. {to read more about how we refinished our cabinets (the same process we used for our kitchen) go here.}


1. Did you put actual board on the wall? I’m not seeing any bead board.
Nope. Call me lazy, but the only thing you see behind those skinny boards is the actual wall. We saved money and time this way! A lot of fabulous women from all around the web have already tackled this project, so I simply let them be my board and batten mentors. I basically read up, did my homework, and took what I felt was the best approach for us. See some of my favorite links to their projects, here. And click on the photos to go to their actual blog, and go to even more links once you’re there.

2. What did you use?
• pre-primed planks of wood {we splurged for the good stuff for the sake of saving time with the priming-highly recommend}
• whatever trim pieces you choose
• (paintable) caulk + a caulk gun
• a level + nail gun {or hammer and nails}
• a saw (you can have yours precut to size at your local home store)
• wood filler
• paint colors + paint brushes
• hooks

3. How did you do it?
First things first: I did my homework. I wanted to wrap the small space, and knew I wanted a board and batten backsplash to continue around the countertops, but didn’t know if it had been done before. As it turns out, upon searching the subject, of course it has. The talented Donna from Funky Junk had taken this on, and I loved her look.
I also wasn’t too sure about removing our existing baseboards, and was inspired that very week by the clever Sarah from Thrifty Decor Chick’s take on it all-leave the baseboard and go for it…And I actually really loved the cool look + effect it gave to the space.
So from there, I broke out the pencil and drew a design straight onto the wall, to get a good idea as to how it would look, at the height I wanted. We then measured our space, and figured out the frequency of vertical boards around the room. From there, we purchased our wood, {you may purchase yours precut-ours was not}. We cut, straightened with a level, and placed it with nails. {Our nail gun that we borrowed went kaput, so we were old school with hammer + nails, and it wasn’t that bad, given the size.}

4. Did you caulk it?
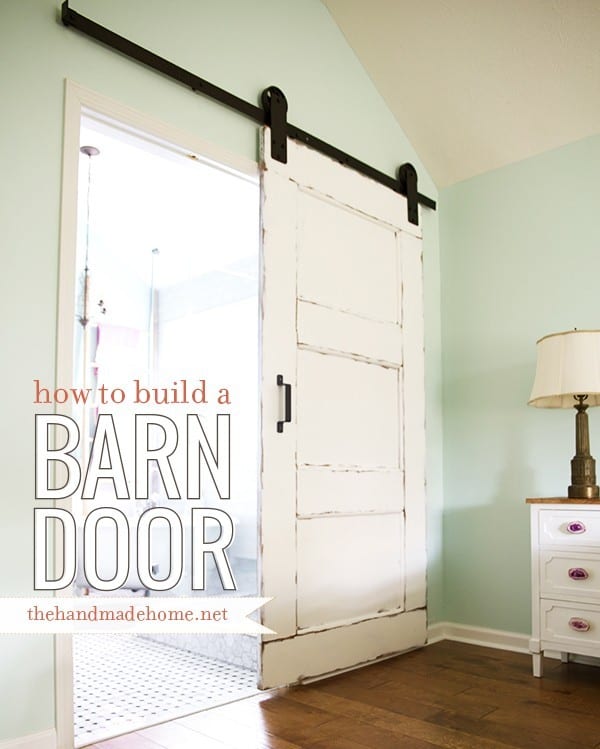
Once all the boards were placed, we used wood filler on all the nail holes. While those dried, it was time to caulk. This was where the project got a bit tedious. But sometimes I’m OCD, so I actually enjoyed it. This was my first time to attempt caulking, but there’s a first time for everything. I wish I’d had time to take more photos as I went, {my hands were super sticky} but this bottom shot, in the photo above, is the wall with it’s first coat of paint.

The caulking process simply includes moving the gun while you press it, at a steady space, over all visible crevices. Follow quickly behind with a wet cloth or finger, to smooth out as you go. {watch for glooping-I glooped in a few parts} but in the end, it gave it a smoother, more completed, built-in look.


It took about three coats of paint, but after sanding the nail holes and painting, the room was finito. And well worth the labor. 
I hope this helps for any questions you had. If you have any more, send em my way!


Love it. I just started this type project in my powder room. Doing the one wall that has nothing on it, in front of it. Wall painted white, now time for the boards.
Love that laundry room! I’m planning to do my family room like this and have a couple more questions. (sorry) Could you tell me what width boards you used?
The big question is…one of my walls is a staircase wall. There are six steps down so do I angle the board and batten down along the handrail (ack!) or just forget that wall entirely? I’m so at a loss about this one! None of the other tutorials I’ve seen have done this.
We actually did our stairs with board and batten! It was not as difficult as you may think:) Here is our tutorial if you are interested: http://imperfectlypolished.com/2011/03/01/board-and-batten-part-2/
And, Ashley, I love the look of yours! It’s such a calming room for something that isn’t so fun. Love it!
what a great tutorial! I say definitely go for it! 😉
thanks bunches!!!
Love it! You have a great laundry room! So spacious! Mine is like a shoebox. 🙂
I love the board and batten and seriously considered it for our bedroom, but now we are putting our house on the market so I think I will wait for the next house to try it out! Saving this post for when that day comes!
Hi! I have to say I just love this and have a couple more questions…what color are the walls? I love that color. I am trying to figure out if I want to paint my oak trim to get this look. I love this and my laundry room has been half painted for 2 years now and I want to do this but not sure as I have oak and painted oak throughout my house but the door into the laundry and the trim is all unpainted oak. Do you think it would look ok to leave the door unpainted and paint the rest of the trim?
LOVE your laundry room!!! I’d love to know what color that is on the wall! Love that cool and calm green/mint/sage color!
It looks amazing! And good call on the caulk. 🙂
This looks so amazing. I’ve been inspired to start my own laundry room board and batten project! I’m to the caulking step, and I can’t tell from yours or anyone else’s tutorials where to caulk… Is it just between the boards where they meet? Or is it literally between the boards and the wall itself too? Help would be so appreciated 🙂