Hello all you wonderful people. TGIF!!!
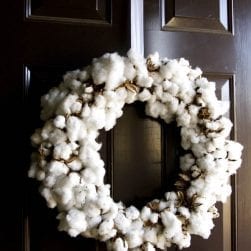
 Recently, we’ve been getting quite a few questions about our door wreath, since it was front and center on Nate. That wreath is a year old, and I realized I’d never featured a how-to on it at all. In this photo, it has absolutely no embellishments, but its a nice, simple, classic shape that can be quite versatile throughout the seasons with a few additions here and there. I’m pretty sure I was inspired by The Nester a.k.a. the wreath queen for this one. I thought I’d share my process today.

Ruffles, as we all know, are kind of a big deal right now. I think that’s part of what makes this wreath so appealing. It’s made from some simple fabric: the same kind on Duncan, on our kitchen windows, and our veranda. It’s my go-to for basic, classic fabric. It holds up fabulously, is nice and hardy. You can get it, here. I HIGHLY recommend this fabric as a nice, affordable, awesome piece of fun.
 And today, I’m going to show you a simple how-to on this little wreath.
 I made a small one for this lil tute, but the best part about this wreath, is that it was a whopping three dollars to make. Start with this: these basic plastic wrapped hay wreath thingies they sell in the floral dept. of your local craft store. And I used a pile of scrap fabric from what I already had, to make it.
 I cut a small slit, and tore it into strips. {That’s the fun part, because you get to pretend like you’re the hulk, ripping through stuff because you’re aaaaaannnnngggggrrrrrryyyyyy. What? I mean, I don’t play pretend when I work on crafts. And I didn’t just write that…} But seriously. It is a bit empowering.
 Before you start with putting on the fabric, warm up your glue guns and bust out some fat ribbon. This is how you’ll hang it later. Secure it with your glue, and then move on to the first fabric strip.

Starting on the side, crinkle your fabric, eyeballing it as you go, and secure with glue.


 If working on the wreath in sections, work your way to the inside, and lastly, do the front. This was a smaller wreath that I used to demonstrate, so it basically only took one top layer. The larger one took two, but you basically just play with it as you go. One word of advice: watch your fingers. And watch the metal on your glue gun, because it will scald your fabric and leave brown spots.

Once you’re done, embellish and hang. {I simply adhere the ribbon with a touch of hot glue, and it pops right off when you’re over it.}
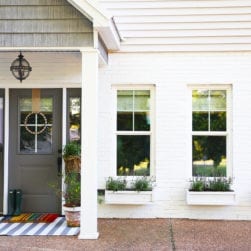
 I basically leave the same one up, year round, and change it out as needed, with embellishments. This summer, it was plain and simple on our door. Sometimes, less is more. I’m thinking this christmas, I’m making a gargantuan one. Just not sure how, yet. Pool noodles, anyone?

And there you have it. A simple wreath that’s super fun and easy to make. It’s very rare that I want to make more of the same thing, but this has a not-so-trad, versatile look that I just love for our home.
As usual, let me know if you try it! I love seeing what you guys have done! Happy weekend, lovely people!

Seriously love love love this wreath!!!!! And the feathers are an awesome touch! Stealing…….
Glue gun is my tool of choice. Love this idea. The feather is perfect.
NICE!! Somehow I thought there might be sewing involved… which totally scares me to death. Glue gun? Totally can handle that. I love how it’s interchangeable with the seasons if you pick a neutral fabric too!!
I love this!! It’s super cute with the feathers. I want to make this! xoxo
Thank you so much for sharing this. I was afraid it was pinned in place and I’m so glad it works with the glue!
Love you on Nate!
Beautiful!!! And so do-able…thanks so much for sharing and happy Fall!
That is such a great idea. I need to make a wreath!
Love this!! Think I’ll give it a try. I love wreaths but can never find one I like that is us. This is perfect! Thank you for sharing!
Fun! I will try this I made one similar to this out of paper and displayed in a chalkboard too for my shop!
How did you know that after the Nate Show I was wild to find out about how to do that wreath! I have a ocean blue front door and I can’t wait to make this.
I made a ruffle wreath just this week and posted it yesterday! It’s a bit different than yours, but I feel the same way about embellishments, they should be easy to take off so you can use the wreath year round! For my embellishments I use a hair clip, and hot glue the foliage or whatever onto the clip and then clip the hair clip onto the ruffles! If you’d like to see what I mean exactly, my post and tutorial are here: http://mooseandbug.blogspot.com/2011/10/ruffled-fall-wreath.html
You know, I have a load of scrap fabric but do not yet own a glue gun. Yes….yyyyesssssss….the time has come….
oh girl. you most DEFINITELY cannot survive without that glue gun! 😉
I love your wreath (and everything on your blog, i saw you on nate)
So my husband was getting rid of his bicycle, and I made him give me his rims. He took off the spokes and I think I will make a wreath. any ideas?
Hey Cassie! thanks for stopping by! I think you have a good start, for sure! you could always wrap it in burlap and see what happens from there! I love that idea!
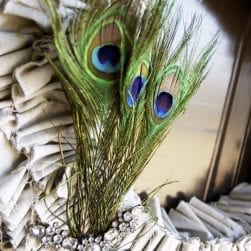
Thank you for sharing this! I had saved a picture in hopes of trying to replicate something similar so the this will definitely make my life easier! I especially love the pheasant feathers…perfect!
As for a larger wreath, I found this idea on pinterest…super-inexpensive foam tubing from the plumbing department cut to length and ends duct taped together.
I’ve been searching for a simple wreath! Thanks for this idea! Awesome!
Beautiful! I love it.
I’ll be breaking from databases, research models and economics to make this craft. I was in need of a project were the details are pointless, thanks!!
This is my first time on your site. You were great on the Nate show and looked beautiful. I will be returning to your site often and subscribed via e-mail. Just love the wreath.
I live in Seattle and at this time of year it’s more rainy days than not… I’m concerned that if I put a fabric wreath outside, even though my porch is covered, it will mold over time. Could I use outdoor fabric or would it still mold?
I searched your site over and over and over after you were on Nate! I HAD TO HAVE THAT WREATH! But since I couldn’t find it I gave up. I just found this on pinterest and I am SUPER SUPER EXCITED!! You don’t even know. Thank you so much for posting this.
Yay! So glad! 😉
Love the wreath! Just wondering, how many yards of fabric did you use? Thanks!
i linked to the fabric last week & found it, this week the link just goes to the main site. sad day because it was PERFECT! do you remember what the fabric is called? i’d love to search for it… i’m in dire need of it for some pillows 🙂
what kind of fabric is that? luv it!
I’ve been wondering the same as those above me, which fabric did you use?
hi Annemarie, just some basic linen from fabric.com!
Hi! I’m reupholstering my sofa and I wanted to use the same fabric as you used for “duncan.” Could you let me know what it is and what color? You said basic linen on fabric.com, but there are so many to choose from and I know NOTHING about fabric! What weight should I get in the linen? Medium? Heavy? THANK YOU SO VERY MUCH GIRL!
Made this today and LOVE it! It was so easy….thanks for posting this how to! Love your blog, i visit it often for inspiration!!
Love this project and the fabric! Can you provide a name a possible link for the fabric? The link listed only takes you to fabric.com.
You could gather the fabric on your sewing machine first and then just glue it on.