
simple outdoor light installation
Hey Guys! We’re back today with another installation in our backyard bliss series, and a simple lighting solution for your back yard.
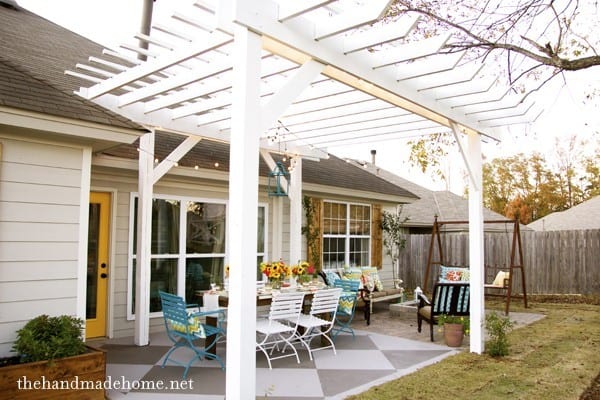
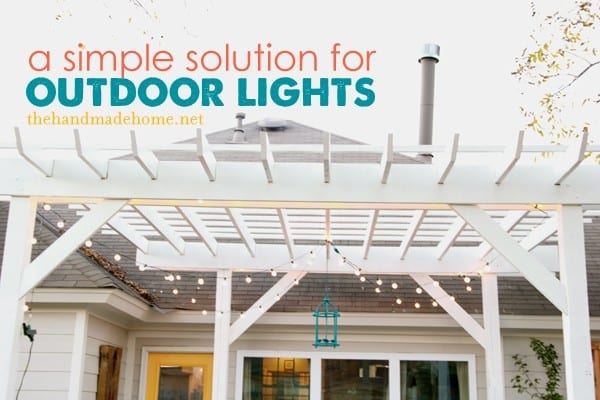 When we first revealed our back yard redo, a few of you had questions about the lights in our pergola. I called it an installation (even though a friend of ours promptly laughed) I was proud of myself for
 climbing on a ladder in the freezing tropics of Alabama cold while the wind threatened to knock me down at my every move making it all work. No, I’m not being dramatic. Thus the heavy duty word, ‘installation’. I was all, “I installed them myself.” And everyone else was all, “Want a cookie?” And I was all, “Chocolate chip double doozie, please.”
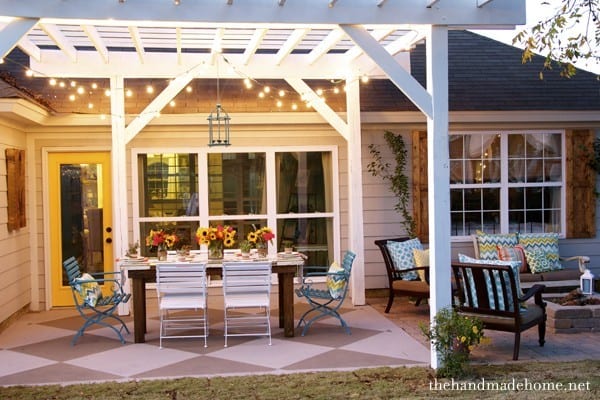
When we purchased our home, they had just finished construction. We didn’t get to pick a thing out. It was what it was. That being said, whoever built said house didn’t really bother to put lights on the back of our house. They were all, “Meh. Lights, shmights”.
Apparently they’re overrated. Do you know how paranoid I get at night without lights in the back yard? Hello. Zombies. Someone dropped the ball in the lighting department, and it’s a serious transgression in my book.
We plan to eventually install some, which will include the need for an electrician. Who knew back yard lights are such a luxury? But in the meantime, we are kind of in love with our own little solution.
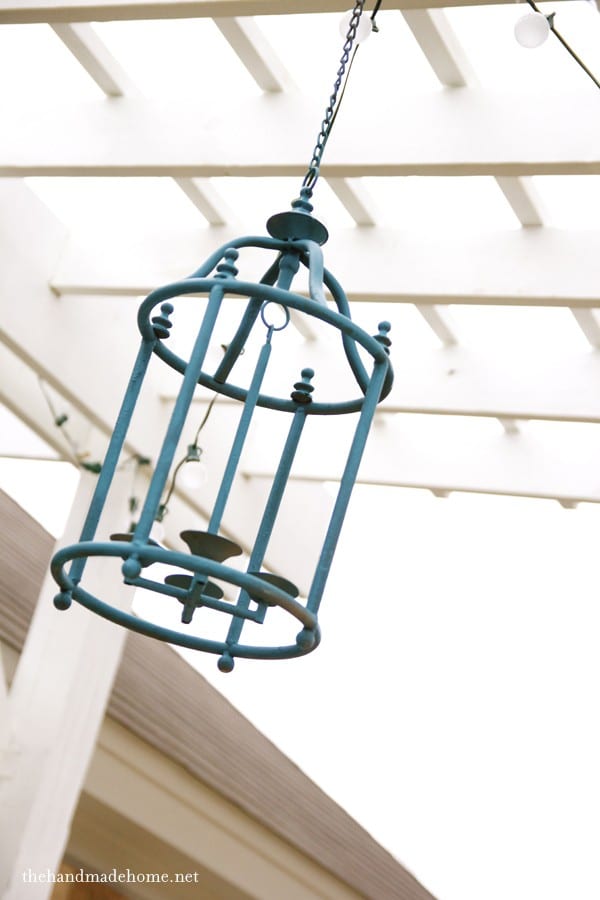
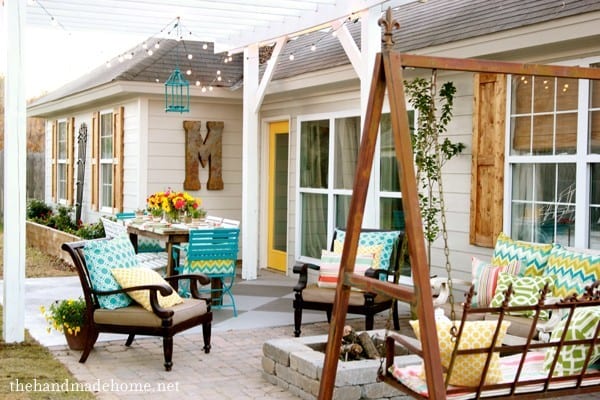
First things first, we placed our table under the pergola, and decided where our center (blue) light would hang. I purchased this metal candelabra from decor steals and later spray painted it to bring out some more of that fun blue in our back yard. We placed it with a screw-in hook.
From there, we decided how our lights would hang. We chose a post of the pergola that was closest to an outdoor outlet for the beginning cord. Since we finished off our porch into an indoor room, (the veranda) the nearest outdoor plug was around the side of the house. We started out with a darker cord, and eventually replaced it with a white one since it runs up the post where the lights begin. We just keep that post close to the house and run it around to the outlet.
For our lights on this project, we decided to use Target’s Frosted Globe Lights. They were affordable, useful and practical. They also carry them all the time so if you break a bulb, just go buy another cord of lights and use that as your replacements.
Now I must warn you that it only says to connect two strands together at once. I hope your area is either small enough, or you have multiple outlets to cover it in the correct number. To cover the total area of our pergola, we… wait for it… connected three. We were evil and bad and I know someone will send me a hate message about my three light connection rebellion and I’m sure I unknowingly killed three bottle nosed dolphin babies in Mexico and then danced on their graves with my blatant disregard for safety. But this is the part where I’m being completely honest, because I would be amiss without mentioning this to you. This was our personal decision, and I know it’s a slippery slope to complete disregard for all warnings and tags. Before you know it I’m cutting the tags off of everyone’s mattresses and they’re sending me to federal prison so I can hang with Mr. Bates.
I must add that we never leave it on for more than a few hours at a time, and we’re always home. Please squelch your angry mob torches. This is a standard warning placed on all string lights, so we must also add proceed with caution. Always use your outdoor lights responsibly. This is a total do as I say, not as I do moment… One of the few instances you will see where we bent the rules. I assure you I am a total rule follower. I kind of lose sleep at night over skipping the levels on Mario Brothers. But we couldn’t tell you to do two, and then you’re all, “Dude. This doesn’t reach. Bummer”.
Step by step, here’s the order of connection that worked for us:
Here’s a little helpful hint: People were complaining about bulbs breaking when they installed them on the Target website. Take out all of your bulbs, first. String your lights where you wish for them to hang. Then screw in all your light bulbs. Tada! We have suffered, to date : zero bulb casualties.
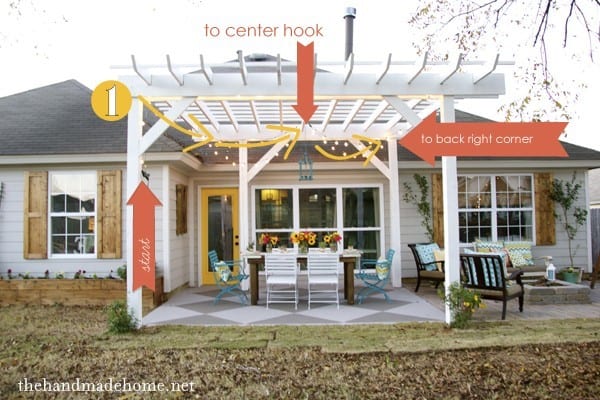
In the front left corner, is where I began. (I started with more screw hooks to support the corners they drape from, but ended up breaking out my staple gun. The photo below is the extension cord + light source running up the first post.) I ran it from the front left corner, to the center hook, then draped it diagonally to the far back right corner.


From there, in between the 2 x 12’s that are sandwiching the two 6 x 6’s, I (carefully) stapled each light above the wood, on the upper posts all the way across, so that at night, all you can see is the light in those areas shining down, and not the bulbs. I ran the lights in between, all the way from the far right, to the far left.
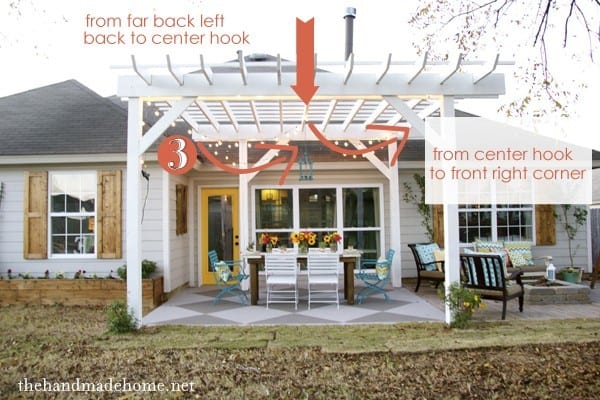
After that, I repeated step one, but on the reverse: Far back left to center hook, center hook to front right. Diagonally. Diagon Alley.
Secure it with a staple at the corner, and for step four: all the way across again, sandwiched in between the boards above and out of sight. At night, the lights shine, but no bulbs are seen in this area.

Shine bright like a DIAMOND! – Sorry. The temptation was too great.
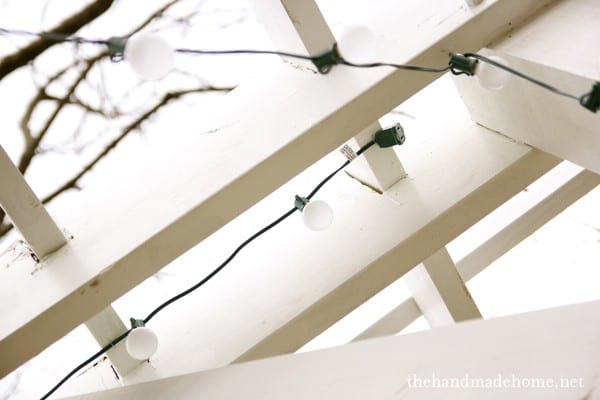
This is what the secured cord looks like, straight across, looking up and underneath on that last step. I was very careful with my staple gun to staple it in without hitting the cord with the actual staple. It simply secures it. (NOTE: Do not have your lights plugged in while you do this. Bad idea.)
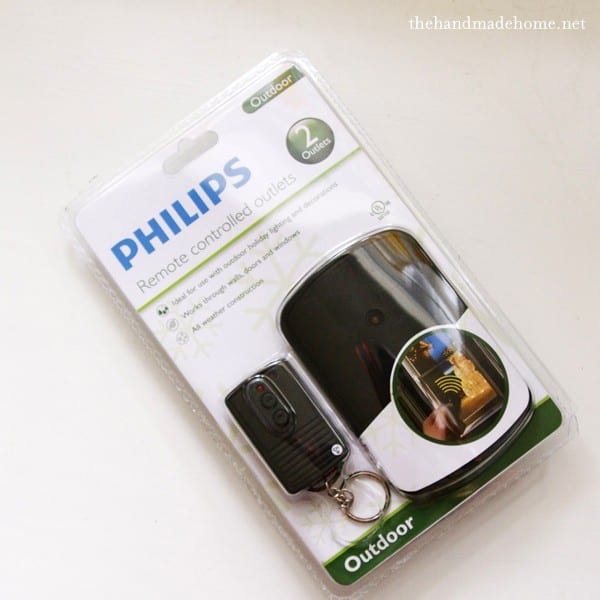
Our favorite part? Once all the light bulbs were screwed back in (I recommend placing them in a basket and climbing up to do each one afterwards) we used a remote control like this at the outlet. This way, we’re not always scrambling around outside to turn on the lights. A simple push of the button, and you have (cue angel voices singing in a glorious choir after five years of scary zombie vulnerable darkness) ambiance.
Or a bottle nosed dolphin murdering fire hazard. Whatever works for you, friends and angry mobbers.
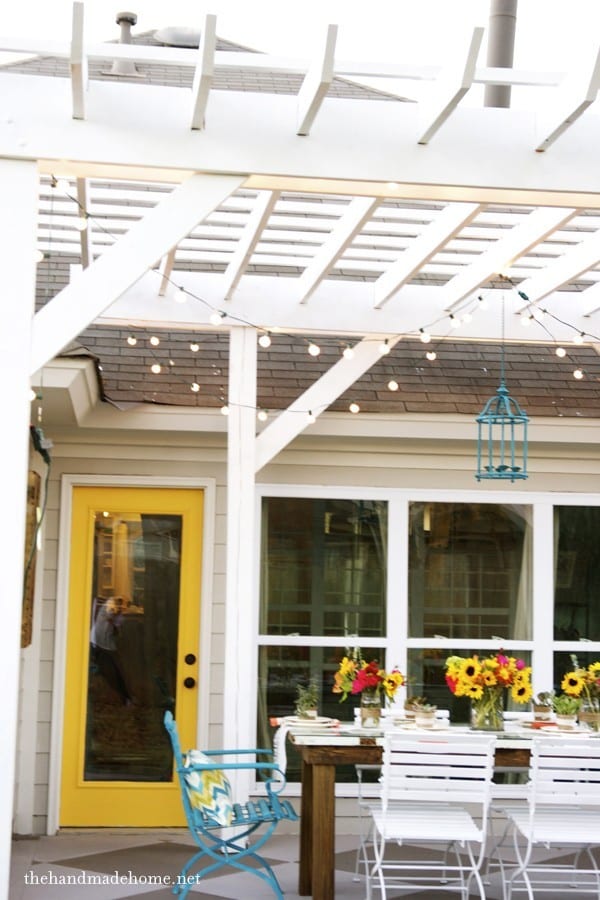
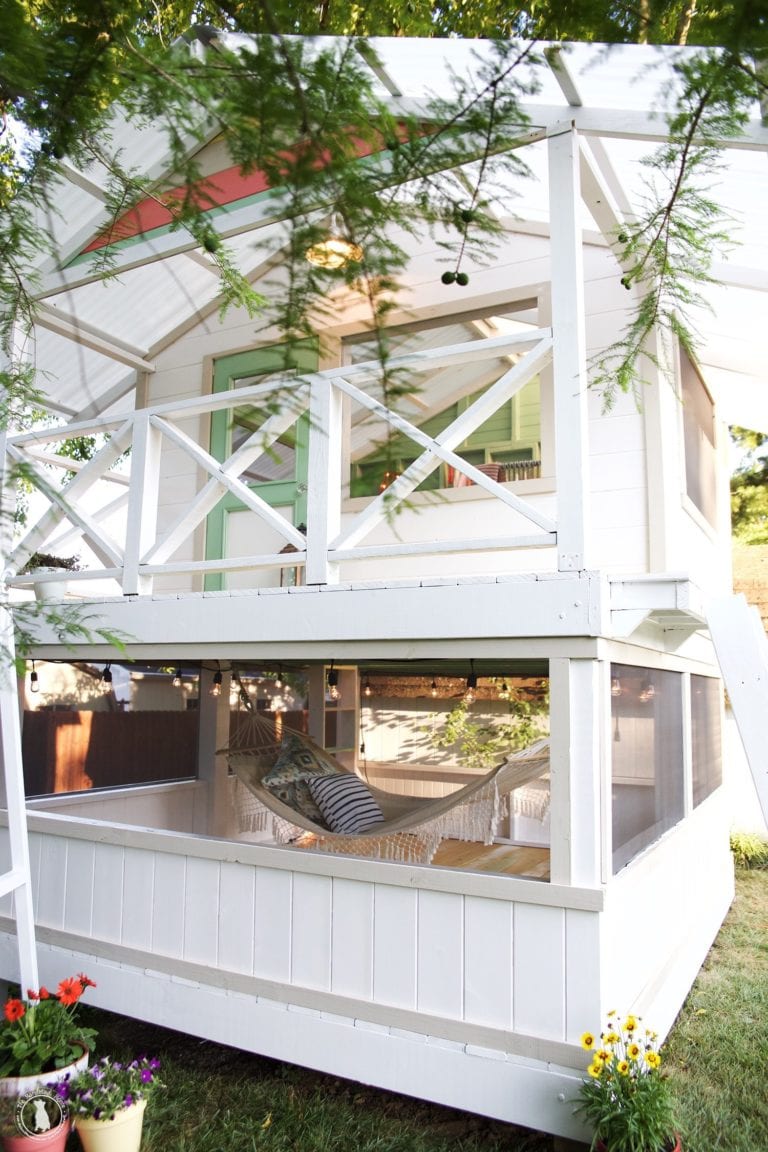
A simple, cost effective solution to plenty of light at night. We also ran lights into our Handmade Hideaway (when we built it this last summer) so the kids can play for hours at night, with plenty of light.
 Tada! A simple, affordable solution for a formerly lightless yard.
Have an inspired day, everyone!

pretty! LOVE the oversized initial, too!
This is by far my favorite outdoor space I have seen in a long time. I just looooove it!!!!!
Please tell me. How is it that you are explaining how you guys installed the lights on your pergola, and you have me in hysterics? Every single time. Even reading your tutorials is a treat.
I love it…so much that I may be stopping by said Target store and picking me up some of those purty lights 🙂
ps: we forgive you for the dolphins
THANK YOU for forgiving me. I was kinda torn up about it. ;}
It looks gorgeous!! I want to see a night picture. We installed lights on our back porch, too. I mean really – zombies! You never know, haha.
Great alternative … Sival Lighting (www.sivallighting.com). On their site you can purchase strings by the foot. I purchased a 100ft and a 50ft string, one for each of our pergolas. With the 150 lights I thought it might look like Vegas, but the wattage is perfect! Having purchased in 2010, we have not had to replace one single bulb! Just had to share my great find. And you keep up the great work–we all love it!
Jo
this looks so pretty! i love the lights. actually love the whole outdoor setup…big M and all. well done & hopefully you got to eat some cookies…!
Great idea!
Dude,I’m totally ok with you connecting 3 strings of lights. lol. Looks great!
When you get a chance can you explain how you built the raised bed next to your house in the back?
Your back looks great!
Hey Pam! You can find that tutorial here!
Love your backyard bliss! I think lights on a pergola are beautiful.
Leslie
Our next door neighbours have a HUGE floodlight in their backyard to blind the people that try to break into their shed, so we don’t really have to worry about zombies. In OUR backyard, we have one hideous wall mount, and something like this would do a lot to add character to the current lighting situation.
I *love* your tutorials!
The zombies don’t bother me. It’s the possums! My backyard so wants to be like yours when it grows up. And your hideout is my 10 year old daughter’s dream space!
haha Amen to the possums! ;} Thanks, Laura! Our back yard was a late bloomer/ugly duckling for a loooong time! ;}
I love the large initial! Where can I find one for my backyard? What is it made of? We have been looking for something to decorate outside, and that looks great!
Your back yard is gorgeous. We added lighting to our deck stairs a couple years ago which has made a huge difference at night. I still want to add some overhead ones and these look great- pinning!
thanks for the guide. i’m going to do this in our back patio when the weather warms up. love the idea of the remote outlet. much better than plugging and uplugging the lights all the time.
p.s. i officially love you for “Shine bright like a DIAMOND! – Sorry. The temptation was too great.” i simply can not get that line out of my head lately! total earworm. i even sing it to my little baby because it makes her laugh.
haha! I think in real life, we would totally be friends. ;}
Hi, thanks for sharing! I love it soooo beautiful and cozy. I had one built on my front yard,you think it would be ok to light it up too?
Hey Susan! I would definitely add some lights! It makes it so much more fun at night. Our kids love it. Just always keep an eye on them and never leave it alone like that. ;}
I’m curious how you got electricity to the playhouse out back. I love it and am hoping to build our own this fall and would love to use the same lights you did. Our house will be far from our house–too far for extension cords.
Hey Angela! We used extension cords. ;}
Hi Ashley – what happens if it rains? Water and electricity aren’t a good mix. Love your backyard – I’m hoping mine will look as good as yours when it’s done.
Hey Jennifer! Well, the lights are outdoor, and the cords are weatherproof because they’re outdoor, too. We haven’t had any problems! I would make sure the connector doesn’t sit in a puddle or anything, but it has been just fine over here. I hope that helps!
Wow! Very informative and impressive lines. Landscape lighting installers did a fantastic job highlighting our outdoor space, adding ambiance and security. Highly recommend their expertise for enhancing any property’s aesthetics.
Thank you for bringing such topic into light, Your blog has become my go-to guide for all things related to outdoor lighting. It’s like having a trusted expert at my fingertips! Investing in high-quality outdoor lighting not only adds value to your property but also enhances its overall curb appeal.