

remember this post, from a few weeks ago when I was going to build a crate for lil man and his hoarding problem growing collection of outlandish toys?

we made this bad boy a few days ago, and Aiden couldn’t be more excited. We decided to go for a super fun, rustic look, and for now, it will be stashed at the foot of his bed until I get ready to revamp the boys’ room this summer. But for the time being, a little storage…

certainly will go a long way.


wanna know how we did it, step by step?

This part of the story would include us being THAT family at Home Depot, complete with screaming, running, laughing, climbing children.
But I measured the space where the crate will go. {At the foot of Aidens bed for now, and then underneath the window, once we move his twin bed, and install the bunks.} The initial measurements were an estimated 38″ x 18″ x 22″h. The finished measurements are 38″ x 19″ x 16.5″h. We fudged a bit, and ran with it, since we aren’t sticklers, and the completed crate was gargantuanely huge at it’s finished size.

we started out with planks, {I didn’t want knotty ones} and then realized that grand total was going to tally up to more than 100 dollars. I wanted a plank-ey look. So we decided we could do better.

wo we settled on one of these giant pieces, and had the Home Depot guy cut it vertically into strips at 7 inches wide.

1. + 2. once we were home, we recut them into two sets of 38, and 18. {we ended up having an additional inch on our depth (original measurements intended for 18, but were 19} once we joined the wood together. The thickness of the other planks made it thicker.
3. + 4. the wood was joined together in a rectangular shape with screws on the ends.
5. + 6. we then built the bottom, and realized we had some overlappage. The end plank was trimmed, and placed in the middle.

1. To make the panels, I began the search in our garage through our plethora of paint cans, wood remnants, and toddler shoes galore, for that perfect handle shape. Who knew it’d be a stripper?
2. I centered the stripper, measuring them out, on each piece of wood that I intended to place at the top of the crate.
3. + 4. tracing the can, we then cut the shape with our jigsaw, to give it that “older handle” look.

We actually built this thing early in the morning, so we had two sleepy/curious/excited little helpers, while no. 3. snoozed away in the back room.

We built the bottom layer, as shown above, and then started on the top, when we realized it would be tall enough for a rolling toy chest. So, we simply repeated the initial framing steps, including the handles on the sides. I didn’t join the bottom and top layers yet, because I knew they needed to be painted.

1. + 2. I used a thin layer of dark stain on the outsides and insides.
3.-5. once that was dry, I applied a dry brush loosely to the outsides of the crate. {I chose to keep the insides brown}
6. When all of these were dry, we stacked the two separate pieces, and joined them with metal hinges on the outsides. I liked the look of the hinges, but if you decide to, you can always put them on the inside.

since we have three kids 5 and under, we decided it would be a smart idea to reinforce the bottom. {cue all three hurtling down our steep driveway a-la little rascals} We then attached the casters, and it was time for the fun part.

I had two shades of yellow, and neither one was floating my boat in terms of yellow, so I mixed both to get a nice in-between shade.

Using the projector as my guide, And tape on the edges, I filled in most of the area with my brush, and left some incomplete for a time-worn look.

I decided this wording would be cute, since the boys share a room. Jamin was born in 1975, and he has a brother. I like for things to have double meanings. That’s how I roll.

After that was complete, I decided I wanted to see a little more red, so I placed some more painters tape…

and loosely filled it in. I also went back on top of the intial mixed yellow, with my lighter yellow in some areas, to give it more of a painterly, time-worn feel.

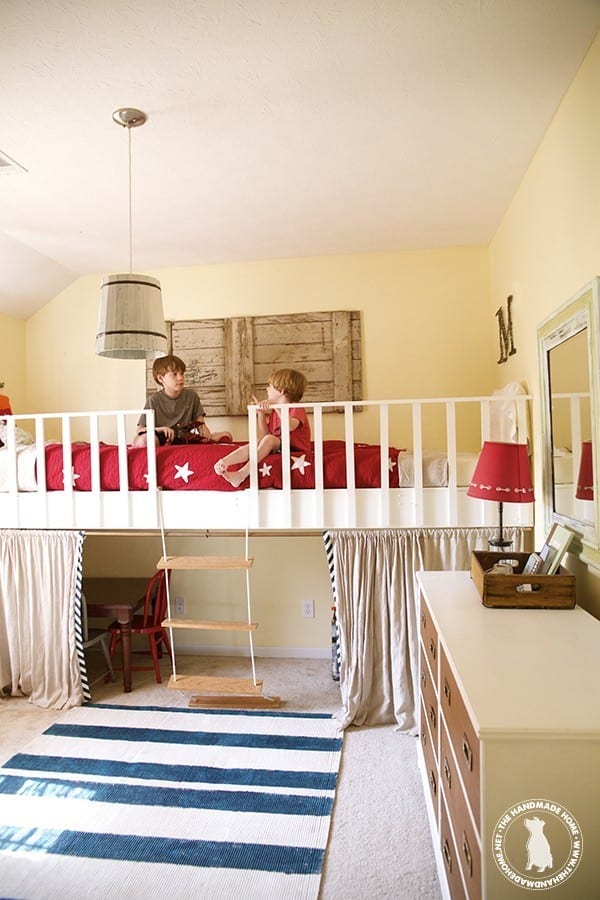
TADA! A custom look for the boys room!

a vintage-esque crate, without the risk of tetanus. {win} I think this will be super fun in their completed big boy space this summer.


In retrospect, I think I’d like to replace these with red wheels in the future.
It is what it is, for now. Hurray for vintage crate redos!
With supplies, this project cost about 45 dollars. {we already had the paint, etc.} It certainly beats over 100 for a vintage one…and it’s custom in sizing and paint, to boot. HURRAY for handmade. As always, let us know if you give it a go. We’d love to see!
Pssst… see it in the boys’ room here!

I really love everything about this project, including no tetanus risk. So fun, cute, and practical.
This is AMAZING!!! You are so talented and creative!!! I want to make one for each of my children!
You really are so talented. I love your paint job. We have an old toy box in my son’s room that I may just have to try your technique on – after I finish my daughter’s hutch, the new chair, the mantle…
i love this. i have been in love with the wooden toy crates in the pottery barn catalog. you have inspired me to create something for my boys room. thank goodness for husbands who are handy with the saws!
It’s so fun, I love it! It’s amazing how well you and Jamin work together to create these wonderful projects.
Hoping everyone is okay after the storms last night.
haha thanks oona. perhaps I should post a video of us arguing over what kind of wood to use? 😉 we are fine, well out of the line of storms. Just rain and strong winds here. A sobering reminder of how much we truly do have to be thankful for.
I swear you’re psychic because I was just thinking how to do this the other day because of all the
outrageous uncontrollable hoardingcollections I’ve got going on around here.Looks great!! LOVE IT! I love wooden crates. =)
This is so cute! As soon as I find out whether the bebe I’m baking is a boy or a girl, I may have to dream up something like this for the nursery. I love it!
Very cute! Love all your ideas!
Thanks,
Debbie
this is gorgeous – I absolutely love it! the final red outline you added just completes it perfectly. so jealous!
I LOVE this! Very cute! I must ask… Wheredo your buy your artwork from?! I love the painting of the Chevelle in the background! (and the old trucks in your living room!) Where do you find such awesome pieces?
awe thanks brooke! I majored in graphic design/art in college. they are created by me. 😉
i still NEED MUST HAVE a blue egg painting…u did it right? can you do another??
I love these! We are just going to be starting to re-do our boys’ rooms so this is perfect timing. I am so happy to have found your blog – it’s beautiful and I can’t wait to spend more time here!
love it – great job on the paint!! we’re actually getting ready to build a few crates in the coming days so this caught my eye – thanks!
I’ve never built anything ever, but I’d love to be able to do this! That’s not why I was compelled to comment though, I gotta tell you. Those are the cutest kids I’ve ever seen (except mine of course)! So cute and sleepy and cuddly. Had to tell ya!
haha thanks Jeannie! I tend to be a bit biased, however. 😉
Ashley – can you tell me what font you used for your lettering? I’m making a homemade sign and the font you used here is exactly what I’m looking for. Thanks!
I have the same comment as Jody, can you tell us what font you used? I have my crate painted and ready for Shepard bros. just wondering what font to use. Will send u a pic of my finished crate. Thanks!!!
I am so sorry guys! for some reason, I thought I answered this. I guess I just imagined I did in my head. 😉 I can’t remember the exact font, but I just typed it out, and I’m pretty sure it was filosofia regular. If you can’t find it for free, a nice classic garamond would probably also do the trick, with classic serifs. I hope this helps!!! SO sorry I totally just never answered that one! For shame. 😉
I just found your blog via pinterest and I LOVE it, beautiful. Your newest follower. I love this crate, beautiful colors and finish.
The rolling crate turned out beautifully, brava! You should be really proud of yourself, I know I would be! Love your choice of a soft yellow w/a red border, too… It all just works perfectly!
thank you! ;}
I love re-purposing unused items! This is a wonderful way to re-use and recycle! And the children look like they really enjoy their new accessory too! xxx