
how to make a dollhouse kitchen
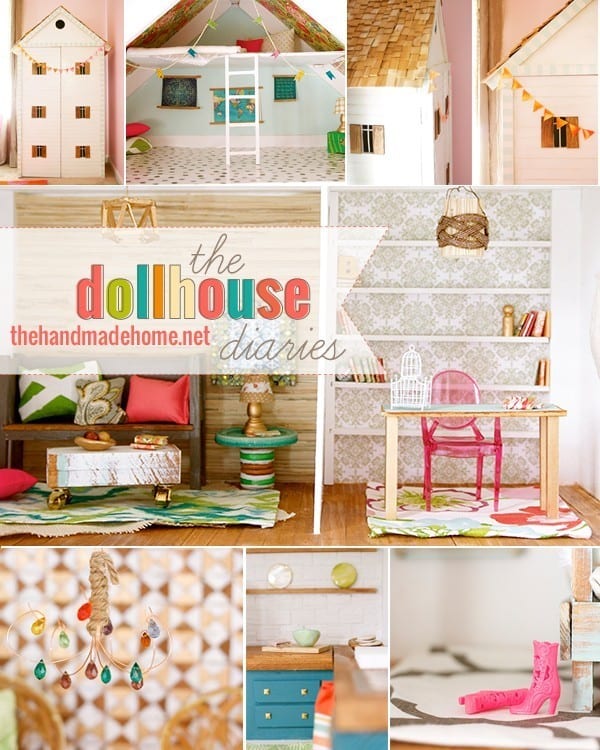
Hey guys! We’re back today with another installment of The Dollhouse Diaries.

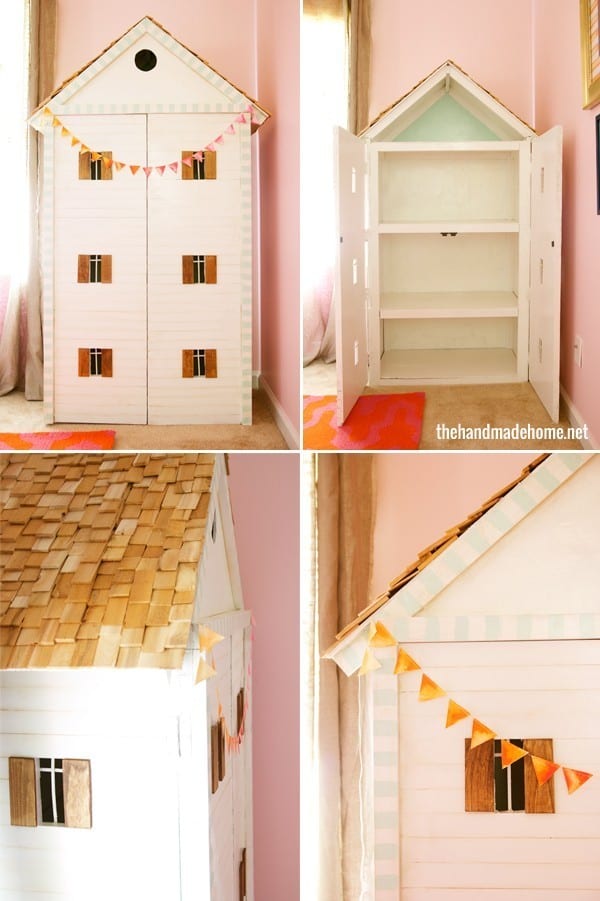
If you missed our first post, this was a little project we took on with Emerson for her 6th birthday. And today we thought we’d cover how we – I mean, Barbie!- took on the kitchen.
We were tired of the limited options out there when it came to dollhouses that were Barbie scale. And if they were different, they were kinda pricey. {Sound familiar on real-life human scale houses?} So we ended up creating most of it from what we had around our home. {I realize that we probably have more sitting around than the average person because we’re project weirdos, so not to be completely unrealistic…}
I guess my point is, when you look at things in a different way, you never know when that scrap of fabric, old shirt or paint stick can be something else.
The kitchen was the most detailed space in the entire house, and I know some of it’s silly. This was just something we enjoyed doing. I wanted to share for the sake of inspiration if you want to take some of these ideas and make them your own. We just knew this was our “chance to make it special” so here we are: 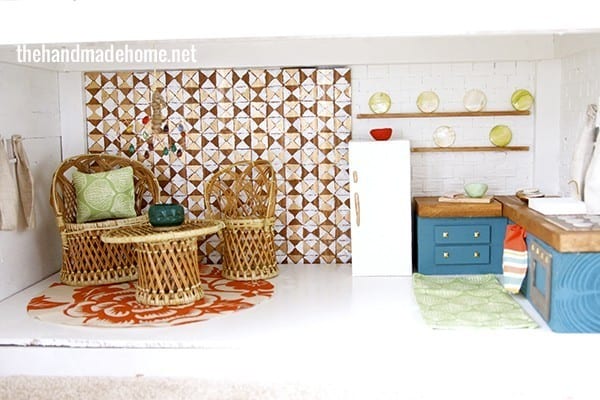
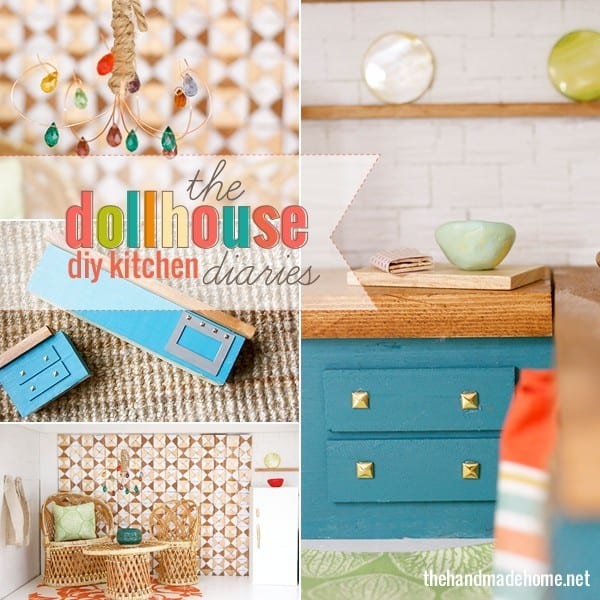
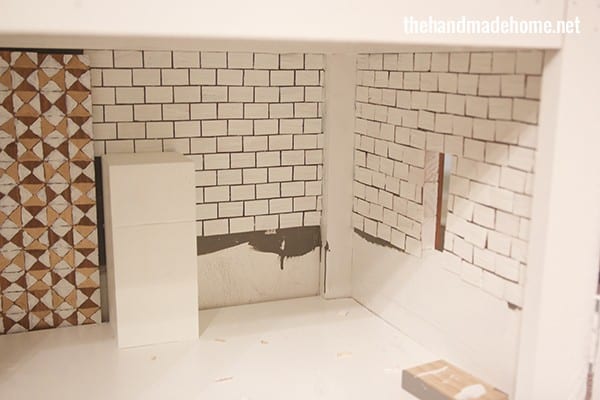
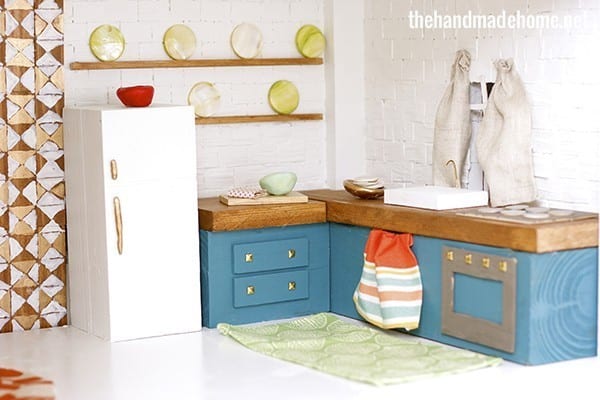
For the tiles above the cabinets, we started with a grey “grout” look, and I painted all the little wood pieces (grabbed from the dollhouse section of Hobby Lobby} The idea was a modern kitchen with grey grout and subway tile… yeah. Good story. Because it wasn’t working {All the little pieces ended up being slightly off} and I realized I hated myself for trying this because it took forever and a day. I used a glue gun and nearly burned every last end of my finger off while propped on the floor in awkwardly compromising positions. Sometimes it’s a learning process, so I gave up and painted all white over it.
And consoled myself by acknowledging that the kitchen would have been a little busy whilst nursing my burns and rocking in the fetal position. Jamin told me it looked like old world tile that way. He’s totally right. I need to get out more. We rolled with it.
For the “cabinets” we took some 4 x 4’s and trimmed them down accordingly. Once they were painted, we added little pieces of thin balsa wood on top for drawers with brass hardware from old beads. The same with the oven door… a hole cut in the front, painted a contrasting color and glued it on. The beauty of balsa wood, is that you can cut it with an X-Acto blade. It worked perfectly.
For the countertops, we trimmed down some more wood to a 1 x 1.5 inch, and stained it. The stove top was another piece of balsa wood and little round pieces on top.
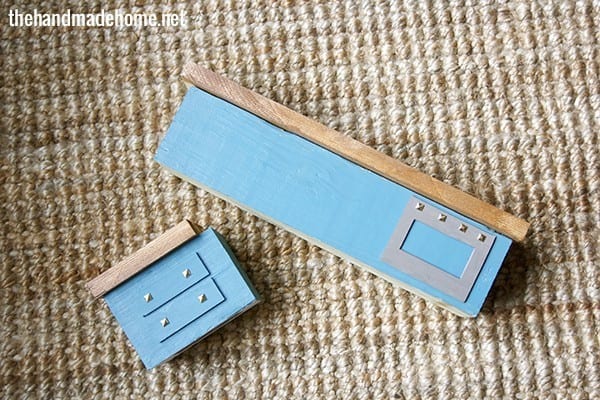
The fridge was from another 4 x 4 with a groove slightly scored for a division between the fridge and the freezer section. We painted it white, and then added handles from clay {painted gold + glued on}.
The little pieces of wood are leftovers for a cutting board and farmhouse sink. I even glued a little brass wire to the top for a faucet. The little cookbook {You’ll see more of these in Barbie’s study} were little wood tiles glued together with a piece of scrapbook paper wrapped around it.
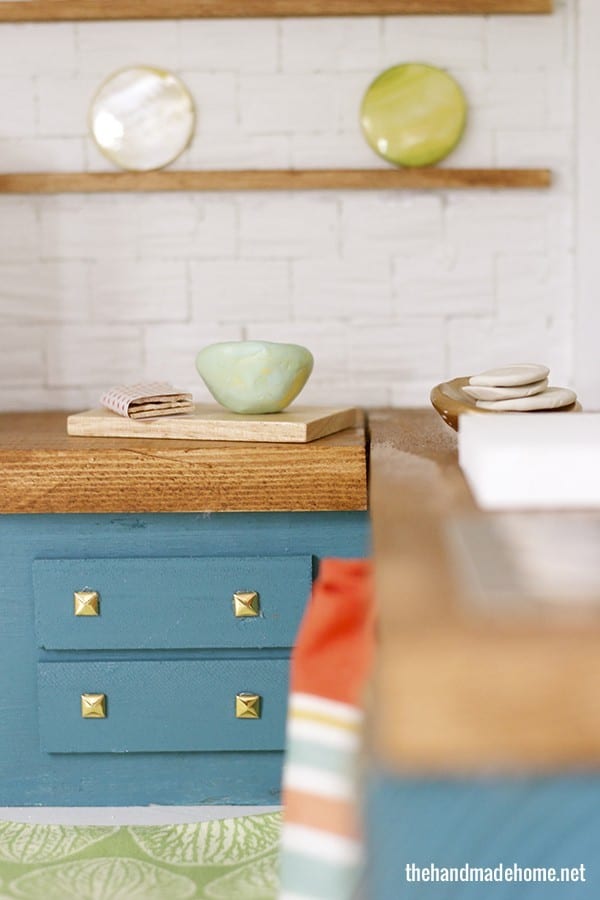
The plates are beads I’ve had for a very long time and I never knew what to do with them. A real case for craft hoarding, if ever I saw one. The little bowls + white plates you see on the counter are pinch pots I made with her, and painted.
The shelving above the cabinets are more scrap wood stained, and glued to the wall.
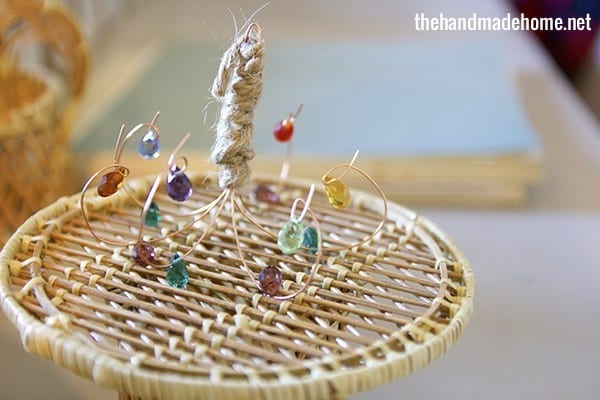
The chandelier is one of my favorite elements in the entire house. Emerson picked out the beads herself {what can I say, the girl loves color!} and added them to some medium gauge wire. I simply twisted them together at the top, and then wrapped some twine around it (leaving a loop at the top for hanging) securing with hot glue as I wrapped it. Then she helped me add the beads, and I turned each one up, and around as I went with my fingers.
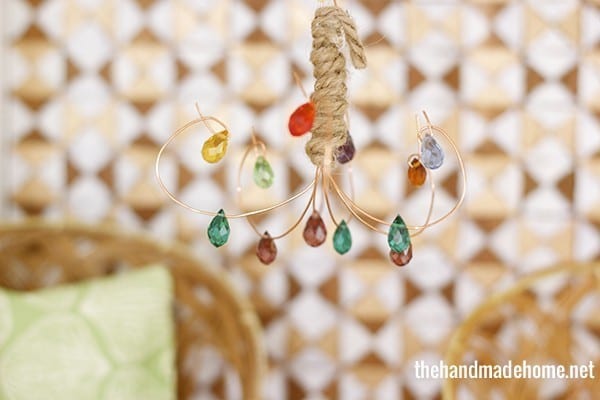
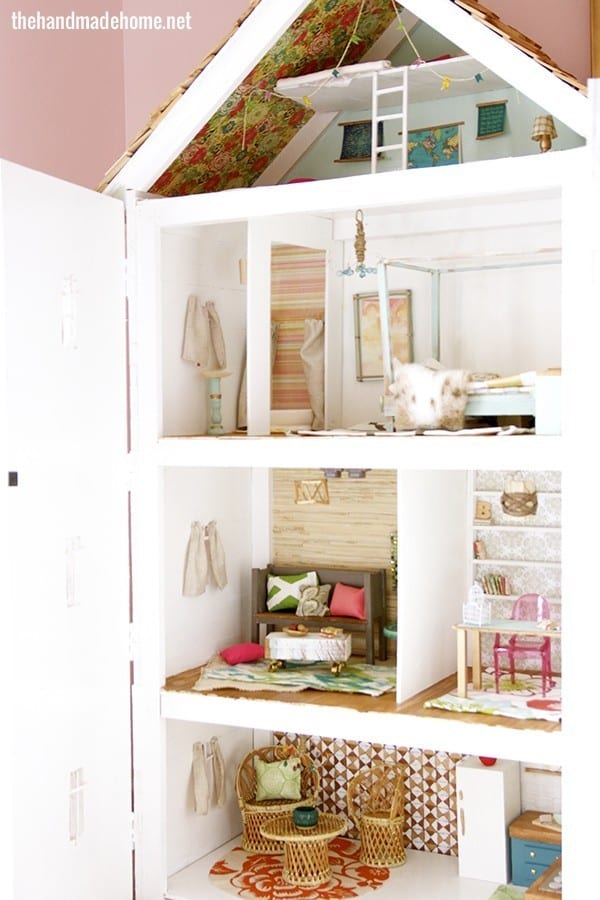
Each light fixture in the house is placed with tiny hooks we grabbed at The Home Depot + a tiny piece of baker’s twine so it hangs down more like a real chandy. {We snagged these when we were stalking the paint section for the awesome paint sticks. See: all that flooring}
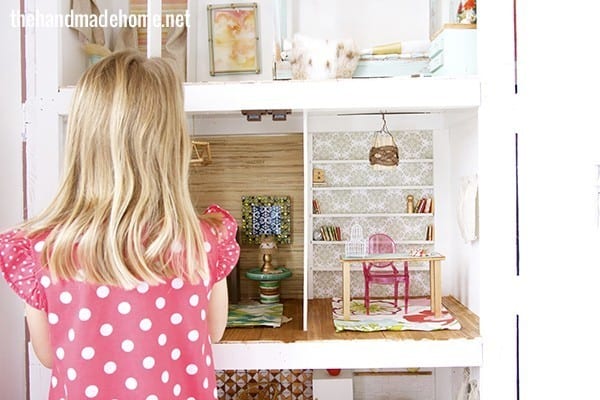
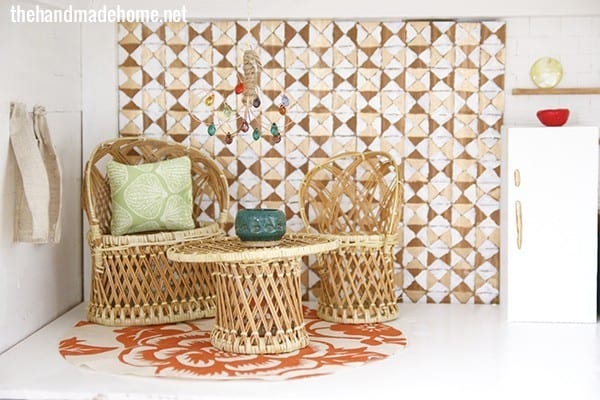
The kitchen furniture is one of my fave elements and one of our few splurges for the house. It’s a little vintage set we found from this shop here. I had this thing secretly pinned for a year when I knew we wanted to build her house, and then forgot about it. When I went back to check it out, I was thrilled to see it still there. A super nice seller who shipped right away. Their store has some fun little vintage finds.
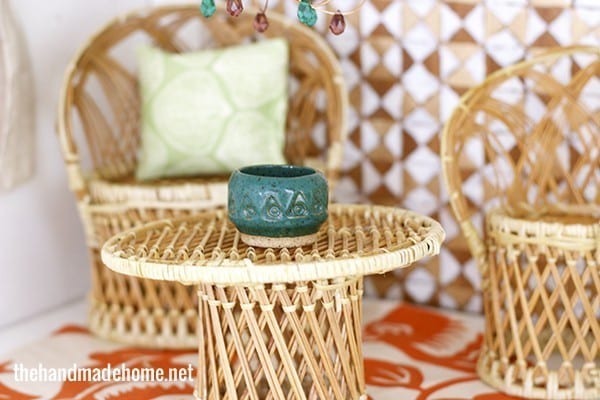
The rugs are just little pieces of fabric. As well as the curtains + pillows. Emerson is the best stuffer – point noted for our next project. ;} The little pillows were the only things sewn for this house, and it’s amazing how fast they can go when they’re miniature. If only it were that fast in real life…
For the accent wall behind the eat-in area, we used more home depot paint sticks, and stained them. I connected them in the back by gluing them to a piece of card stock paper, and just made sure they were cut to length for the wall height. Some of this meant we staggered the straight parts {most paint sticks have a curved part for grasping} just like with the hardwood floors. It made sense to stop it at the fridge for a natural breaking point so I only took it that far. I simply measured and then drew little squares, and from there, an X in the middle of each one for little triangles. Here’s the original tutorial, here. Emerson didn’t help with this part, but freaked when she saw it. And it was worth every second.
The little “bowl” on Ken and Barbie’s table is something I picked up this fall at the local fall festival to throw my wedding rings in since I’m always losing them.
Now I can’t seem to find my wedding rings…
I think that covers the basics for this one – I hope it helps anyone who wants to do a dollhouse cheaply… Someone wrote me recently that it helped with inspiration for their own home, so there’s that, maybe? Or the more likely option C: simply enjoy watching us make weird, tedious things and then listening to me complain about burning my fingers off…
She loves her little gift, and we hope grand babies will be playing in this thing for years to come. Let us know if you have any questions – Have an inspired day!


Super-cute! I love it. I was obsessed with dollhouses when I was little & now my girls have one that could use some good decor. Maybe one day we’ll find time to get to it!!
Love it.
I have to say this is the most stylish doll house I have ever seen.
When I was 2, my parents and grandparents gave me a home-made dollhouse for my birthday, which is 5 days before Christmas. They hid it in the bathtub to keep it a surprise! It was built by my father and grandfather and I played with it for YEARS! They used scraps of wallpaper and carpet and wood from our house to construct it. It started out with Fisher-Price people and furniture and then as I grew, I added people and furniture from dollhouse stores, etc. I had it in my 2nd apartment for a while, but after I married and moved into my current house, we didn’t have the space to even display it, so it went back to my parent’s basement, where it lived until this past Christmas, when my sweet parents brought it upstairs for my oldest daughters (6 and 3) to experience. Nothing brings me more pleasure then to see my beloved dollhouse being used again! Now if only I could find some better dollhouse people that didn’t cost an arm-and-a-leg for my girls to use (they are using little block Lego people right now, and Barbies would be too big for it).
This is so sweet, Jeanne. I love that you have such a cherished heirloom! ;}
I think this is great inspiration for many things. This actually made me look at my dayghter’s bookshelf a little differently. She has large cubbies at the top and we’ve made it into Barbies country cottage using some of your ideas. We used foam core board cut to the right deminsions and covered in scrapbook paper for wall paper. I’m thinking we can do lots of different wall treatments on the foam core and that way it won’t hurt the shelf at all and can eventually be removed. My daughter and I have had lots of fun with this.
Love love love these ideas, Mary Claire! Isn’t it fun? I’m ready to do another! Kidding not kidding. ;}
*dimensions* and *daughter*- sorry and I wanted to add I think we could do some fun floor treatments on the foam board as well. We haven’t gotten around to it yet though! That is fun too -adding little touches over time. Making it as simple or detailed as you like!
Emerson’s dollhouse is insane! And I mean that in the most fabulous way. After your original post, I made my husband look at every single feature while gushing about how amazing it all is. I think the chandeliers may be my favorite. We have a fourteen-month-old baby girl and I am definitely going to make her a doll house in a couple of years. I hate all of the generic-looking furnishings so your dollhouse will be a huge inspiration for us. Job very well done, guys! Lucky girl.
Thank you so much for the kind words, Melissa! We’ve had a great time with it. ;}
Great job! The dollhouse looks awesome!
Wow this is truly inspiring. I am on the hunt for a more ‘natural’ looking barbie house and this is just beautiful x