
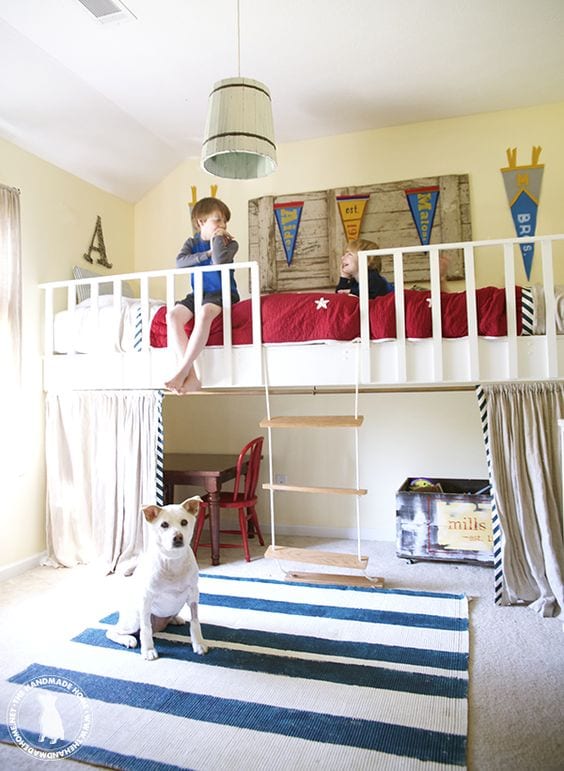
how to build a loft bed
Hello all! Our post today, on how to build a loft bed(see the fun filled transformation here) for your little ones.
Jamin and I sat down together once we dreamed up this concept, and he came up with the design behind it all. So, I’m letting him take this one by the horns today. Feel special. I only had to twist his arm a little.

So, without further ado…

Think 1 box on 4 posts. It’s that simple.
Jamin here today, and let me dispel any false notions up front: I’m not sure my dad ever passed on to me how to hammer a nail. I’ve learned it all on the fly. So trust me – you, too, can easily build a loft bed for your kids to love. And two, remember, your kids are only small once, so whether jumping head first into building a loft bed or going all out with some kids decor, it’s totally worth it.

how to build a loft bed – the size
With that out of the way let’s just jump in two feet first with a list of supplies that you’ll need. However, keep in mind that this loft is 131 inches in length, by 39 inches in width, by 49 inches high . You can make the loft any size you want, just make sure to adjust your supply and cut lists.
Helpful hint: when buying your wood, remember that you need to buy untreated wood, because pressure treated wood does not paint or stain well. You shouldn’t have any problem finding untreated wood at the local lumber yard or home depot. The only pieces that will be hard to find in some places are the untreated 4×4’s. You might be unlucky like we were, and have to buy a more expensive type of wood, to find any untreated, as options were limited in our area.
Here are the supplies we used for our design. (All wood is untreated pine, except for the hard-to-find 4×4’s, which had to be Poplar.)
2 – 4 x 4 x 8 cut at 4 feet each (these are the post that hold the loft.)
2 – 2 x 8 x 12 cut at 131 inches (These run the outside length of the box for the loft.)
2 – 2 x 8 x 4 cut at 37 inches (These run the outside width of the box for the loft.)
1 – 2 x 4 x 10 cut to 37 inches (These will be the inside supports for your loft box)
2 – ¾ inch MDF board cut at 65.5 inches
2 – ½ inch or bigger eye hooks (depends on rope size)
3 – 1 x 2 x 12 cut at 2 feet (giving you a total of 18)
1 – 1 x 2 x 10 cut at 55 inches
32 – ¼ 4 inch lag screws
1 box of 2 ½ inch wood screws
at least 14 feet of rope (choose this based on your weight-bearing desires.)
Another helpful hint:
You don’t have to cut a single piece of wood, the great workers at your local Home Depot will do it all for you. Just take them the cut sizes.

Lay it out.
Once you get home with the wood, lay it all out in the room you plan on building the loft in. It is much easier to build it in the room than the other option of attempting to bring it inside after its built.

Start building
1. Lay out all four outside pieces (all pieces that are 2 x 8) and form a rectangle box with them. Make sure the box corners are square then use your lag screws and screw all four pieces together securing the outside of your box. Use two screws for every corner.
2. Next take the 2 x 4’s you had cut, and space them evenly throughout the inside of the box you have just made. We spaced ours at 26 ¼ inches.

3. Once you’ve spaced them evenly, screw them in with lag screws at the top edge of the box. Again I would recommend two lag screws on each side. (Total of 4 per board.) Make sure the 2 x 4’s are flush with the top edge because they will help support the deck (MDF board) of the loft.

4. Now that your box, with inside supports or 2 x 4’s, is screwed together, lay your MDF board on top and screen it in with the 2 ½ inch wood screws. I recommend at least 5 screws on each beam and 2 in between each beam. (However, in my book, there’s no such thing as too many screws.)

Your box should be complete with decking.


Lift it
5. Next, find some friends, or people that owe you favors. In my case I called on the minions. {Affectionately known as our youth ministry kids} Ashley couldn’t help me-it was all kinds of heavy. You’ll need help in lifting the box and placing it on the 4 x 4 posts.

Once you have gathered your work crew (props, Mark) lift the box and place a 4 x 4 in each corner. {This was Ashley’s job. To say she was nervous was an understatement. She made me promise not to drop it on her, but I assured her I’d upped her life insurance :)}
6. Make sure to push, knock, or flat out beat the post flush into those corners. Then take a lag screw and screw in through the top of the MDF down into the 4×4. We would have a photo of this, but that included us knocking it into position while Ashley screamed at us not to crush ourselves.
Attach it
7. Next, take a lag screw and screw into the side of the 2 x 8 running both ways of the corner. In total, I would have at least 5 lag screws in each 4 x 4:
1 coming from the top
2 coming from the long edge of the loft box (in my case the 131 inch sides)
2 coming from the short edge of the loft box(in my case the 37 inch sides.)
*Repeat the above step for all four 4×4 posts.

Before you know it, your platform is done. You’d never know from the finished photo, that this is a simple box on four posts. My mom saw it in person this last weekend, and thought it was built into the walls. The beauty of this plan is that it disguises well with the curtains that Ashley made, for this space to double as an alcove/play area. Also, when we decide to move, if we move it with us, the only thing we have to do is disassemble it just like any old Ikea bed.

The Railing: because we wouldn’t want anyone falling…
You will need all the 1×2’s you had cut at homedepot.com.

1. Take all the 2-foot pieces and nail them to the 2 x 8 loft support, spacing them at 5 inches. Put 2 nails in the bottom of the 2 x 8 and 2 in the top of the 2 x 8. Repeat this 9 times then start the process over from the other end of the loft. The goal: is to have a 22 inch space in between both sets of 9 1 x 2’s spaced at 5 inches.

2. Then take your two 1 x 2’s cut to 55 inches, and nail from the top down into each 1 x 2 cut at 2 feet. We decided to make the inside edge flush, leaving the lip on the outside of the loft. You can do it, either way, it’s just preference.

unexpected issue
The tricky part for us, came when we realized our foundation, of all things, was not level. We had to readjust a little, from the bottom, up, when it became apparent as we installed our rails. We leveled it out with the top rail, once they were readjusted from the bottom. You could tell, because they were uneven at the top, even though they started at the same place from the bottom. It all became better camouflaged after it was painted.

The ladder
Your loft is done except for the paint and ladder. I would recommend painting the loft before attaching the ladder. That’s just my personal preference.

Lawyer disclaimer…
First, some legal jargon: We were unable to find any rope at the local hardware store that didn’t contain some semblance of the following phrase. “do not use this rope to bear human weight.” I choose to ignore this phrase. However, on the recommendation of our lawyers, I think this is a poor choice on my part, and do not advocate nor condone anyone else ignoring this phrase. In fact, I think you would be downright silly to not heed this warning and am questioning my sanity in not abiding by the advice given. So in plain terms in no way does the handmadehome.net, its affiliates, writers, creators, sponsors, children, pets, random friends, readers, web hosts or inanimate projects condone the use of the aforementioned rope. But it worked for us.
Now for the fun rope ladder……
Now that we have that out of the way, we can get on to the simplicity of building a rope ladder with the approved rope that you found, and I couldn’t:
1. I had a piece of 1 x 4 x 8 cut into 22 inch pieces. This gave me four.
2. Next I drilled a ¾ inch hole through each side, about 1 inch from the edge.
3. Starting at what would be the bottom rung I fed the rope through and tied a knot, any self-tightening knot will do. (Find a local boy scout to assist you, if need be.) Move your way up each board with more knots. I spaced my boards at about 10 inches.
4. Once you have done both sides, not forgetting to make sure the boards are level you will be ready to attach the rope ladder. Take your eye-hooks and screw them into the MDF board about ½ to 1 inch back from the edge. (Drilling a hole first will make this easier.) Make sure that they will screw into not only the MDF, but the 2×8 as well.
Now that it is screwed in, feed the rope through the eye hook. Tie it off, and cut the excess.

how to build a loft bed: the curtain
We used this method to create the ‘alcove’ by simply placing one pipe into a smaller one, and extending it all the way across. This served as a makeshift “curtain rod.” For a how-to on these curtains, take a look here. We minimized drooping in the middle by screwing in a hook in the center, to support the rod.

And there it is. (Yep. We do need to touch that hook up. We spray painted it with copper spray paint to blend nicely, but some of it came off when we muscled it into the wood.)
The total cost for this project was a bit more than we originally anticipated, at about 250. Our posts at the bottom alone, accounting for half the cost. (Ouch.) But we sold the old furniture that was in the space to fund this one, and if you purchased a plain old bunk bed, it would be much, much more than this amount. So all in all, we say it was a great, price-efficient project.
Once all the paint has dried, and the fabric + bedding has been placed…step back and enjoy your new loft.
**** For the bed, we used a twin-sized mattress, and Malone’s crib mattress, as he was still small enough. We simply put a body pillow on one side to fill in the gap. It still works, but we will be ordering a custom mattress to fill that spot, soon.
And be sure to tour the entire room, here!

As always, let us know if you try this. We want to see your photos! Hope you found this useful, and that you enjoy building something that will create some great memories for your kids! And see it really was easy to learn how to build a loft bed.

Ours certainly love it!


I just love this! If I hadn’t just bought bunk beds I would give this a try! Maybe an idea for the playroom? A miniature loft for watchin tv and playing!? OOO you just gave me a great idea 🙂 Thanks!
Hey Jessica! yes, I think that’s next for us-a smaller one for the playroom. They love this one so much, and it saves so much space. 😉
I can have two in my home, right?
How much can the bed hold? And is it twin sized?
Hey, yes it is a twin size mattress, but you can build it to any size you want. As far as weight, I’m afraid I can not put a limit on it.
We were inspired…well I was inspired, hubs not so much lol. I figured out the cuts for a twin twin loft bed using your tutorial. The “box” is built and ready to go up on its legs but I feel like adding some support in the middle would probably be a good idea… what do you suggest I do? Also thank you for this tutorial!!
So that is really up to you as far as adding support, obviously, we didn’t, and to give you some context to help you with your decision in construction you calculate load weight by multiplying the width of the lumber by 1.5. So the load-bearing length of a 2 x 8 would be 12 feet (8 x 1.5 = 12). Now that is for construction weight on 16″ centers, not kids on a bed. If you feel that won’t support what you are doing, by all means, add more support or even lag bolt the back 2 x 8 into the wall framing. I hope that helps some.
Hey! believe it or not me and my hubs were so inspired we made this loft !! NOw, to be honest the ladder and cute curtain are still waiting for us…. But one quick question— did you use a special primer for the wood? and what kind of sheen did you go for?
Also, I painted the walls a two tone green– olive-y and a brighter and sub dued leaf-y color. What do you think…. a red loft bed? keep the green on it? or how about a brown, andthen dow red and blue pops of color…. I am stumped each one leads me down a difft. motiff for the room and besides my little boy- who keeps alternating between brown and red I have no real direction. Help thanks!
We built a loft in our son’s bedroom as well. I’ll show it when we do our room reveal posts for our new house. Aren’t they the funnest things ever? How was the first day of kindergarten?
Hey Catherine! Awesome-can’t wait to see! It was actually great! He has a BFF and everything. 😉 thanks for asking! How are yours getting along? 😉
They’re only little once! I know they love this room!
This is SO great! my 6yr old was sitting with me just now and was smitten… i’m sure my husband will be delighted that i’ve found a new project for him! 😉 thanks for the how-to with all the pictures. awesome!
This turned out so great!! I am definitely going to pin this picture so that in a few years when our family grows, I can have my hubby build this=)
Thanks for sharing all the details!
-Adriane@ fruitfulhomejournal.blogspot.com
Love this project! Hopefully some day the husband and I will move out of base housing (he’s in the Navy) and we’ll own our home and we can do something like this!
Amanda, we live on base (Army) and we just built one =] The movers HAVE to move it if you decide to move =] It was pretty easy to put together as well! We have 6 kids so it saves a LOT of space!
I love this!!! I want one- now I just need more kids 🙂
bwah! hop to it, then! 😉
maybe someone asked already, but about dimensions: did your room (and hence the loft) just end up being EXACTLY the width/length of two twin mattresses end to end–or was that luck? Because that’s what it looks like, and I can’t imagine the project being the same/as cool if the room was 1 foot wider or narrower, and you couldn’t accomodate the mattresses in that “snug”/built-in-look way. IOW, did you get lucky, or did you “fudge” it somehow that you can share?? i’d love to do this, but my dimensions aren’t the same! tia!
hey! I mentioned it in the original post, but the first plan was for two twins. However, the room was NOT wide enough. So we have a toddler mattress, and a twin mattress. We totally faked it. I think if you adjusted your widths enough, and played with the idea, you could get it to work for any room-you’d just have some extra space in the width. Am I making sense?
We are planning to build this for our play/tv room. The plans say 37″ wide but a twin is 39″ wide…I’m sure we are missing something??? I had figured out that we could use 2 “youth” mattresses which I understand are 33″ x 66″ but now I am finding it difficult to locate a place to buy these kinds of mattresses! Help please
thanks,
Pam
Pam, no you are right on all your measurements, the thing that you have to remember is that you are screwing into 2 2×8’s, which give you an extra 3 inches of space equaling 40 inches across on the top. Make sense? Let us know if you need more info.
I know I’m a little late chiming in, but I had an idea for a window seat using 2 toddler mattresses end to end for the cushions. It just so happened the next week I saw the mattresses at Walmart for only $38ea. They weren’t the firmest, but what do you expect for $38? I’m sure they’d last the few years young, lightweight bodies would be using them for. Of course, BabysRus and most department stores carry them to.
Thank you for sharing this! We are hoping to buy a house soon and I want to try this! Awesome idea!
We are going to build this next week. Due to all the craziness with COVID and my daughter’s university of choice assigning her to all remote classes, she made the decision to stay home for the first semester(which could easily turn into two semesters). My husband suggested we should turn our partial basement into a “dorm” room and study space for her. And so we have turned her disappointment into a fun project. And she will have a lofted bed to sleep on after she finishes all her classes. Thank you for the clear instructions.
Hey Kim. I absolutely love this comment, and think it’s the best idea ever. We’ve decided to do virtual learning this semester as well for our three, just for consistency’s sake, {and many other reasons} since school isn’t even starting back here when it’s ‘supposed’ to. We realize this may very well be for the year, as well. We feel you. We love that you decided to make this into a positive experience, and hope it’s so much fun for her.
Just fabulous!!!!! I will be tackling this in our playroom. Quick question though, does a standard twin bed fit up top? It looks much larger in the picture.
Looks like you have some super happy kiddos! 🙂
Silly me I just read your reply above…. You answered my question on the bed sizes 🙂
no problem Jennifer! and I really think you could adjust this plan, according to your room size to make it work! I hope that helps! 😉
Hi, did you use two mattresses? If yes what size mattresses did you use?
The legal disclaimer: soooo funny!
Love this, thank you both for sharing. My 8 year old has a very small room, if I can get Hubby on board this would give her tons more space and maybe even the desk she begs for.
This is great and I know the kids love it!
Love the legal jargon! We will definitely be doing this whenever we move! Thanks for the tutorial!
we have an attic to refinish, and i’m totally pinning this so we can tackle the project up there someday. 🙂 between windows and radiator and door placement in the boy’s bedroom it wouldn’t work in there or I’d do it in a heartbeat! thanks so much for tellin’ us how it’s done!
We ran into a few issues with baseboard heaters and a window. I put a bed guardrail in front of the window in the back of the bed( we talked about the railing going all across the back but we will try this first) Its covers most of the window fine. We doubled up the end piece and one side to give us clearance for the baseboard heater before attaching the legs. I made a book ledge at each end for the boys to have a shelf for a book and some treasures. Now if I can get them to sleep in it………
WOW!! This is amazing! I’m going to have to show this to Mark and his Dad and see if they can build this for my boys. What a GREAT boys room!!
For the rope issue: Instead of the hardware store go to a sporting goods store that carries rock climbing supplies – like REI or something similar or order online. That rope is made for bearing human weight. I’m sure Amazon would have lots of options, that might be cheaper than a specialty place.
BRILLIANT, JENN! DUH! Why didn’t we think of that??? 😉
Fabulous – we are planning on building a loft bed for my tween as many of the commercial made ones are too high we want one that has just enough room to fit a dresser under but weren’t sure the best way to go about building a loft – we will be using your instructions and modifying it for a regular sized twin bed
I’m so gla to see you’ve put up the tutorial! I’ve been patiently waiting! I’ve been needing a space saver bed for my 3 & 4 year olds’ small bedroom, but close enough to the ground that I won’t worry too much about them. Question though: If the 4 posts are mostly hidden by the curtains, is it really necessary that they be made of untreated wood, if I’m not going to paint them anyway? Trying to cut costs wherever I can! Thanks!
Hey Rachel! So glad you can use it! No, not really. I just painted them because I thought it might look funny when the fabric is pulled back. I’m picky like that, so we did. Because they play underneath, I knew I’d be looking at it a lot, and it just may drive me bonkers if they weren’t painted! So to each his own. 😉 I don’t blame you for wanting to cut costs! I just wanted that option for down the road.
Just a heads up, I recommend sticking with untreated wood. Treated wood is soaked in chemicals to make it highly weather resistant. It will leave a residue on your hands and often has warning labels on it saying you should wear gloves when handling. You wouldn’t want your kids bed made of this stuff.
Couldn’t agree more, Gavin!
what did you use for the bedding? what size mattresses and how old are the children that are using this?
Hi! I am sooo excited/relieved that I came across this today. I have been obsessively scouring Craigslist in search of an Ikea “Kura” kids’ loft bed for the past month, with NO luck! This tutorial is a perfect alternative!!
I have 2 questions, and I hope they weren’t already answered and I just missed them:
1) Can you give me an estimated cost for this project? Just for the most basic parts (the wood and main hardware, not the “extras”, such as the curtain and ladder)
2) Is this incredibly sturdy? In more specific words: Would YOU sleep underneath it without worrying about it falling and crushing your face? (I apologize for my horrific anxiety-driven imagination.) My vision: I want to put a queen mattress on the floor, poking out from under the loft. My 4 year-old would sleep on the loft, while my 2 year-old and I sleep underneath on the queen mattress. Our heads and chest would be under the loft, while the rest of our bodies would poke out. So back to my question – would you personally feel safe sleeping like this given the construction of this particular loft? Of course I would NEVER consider this LEGAL advice (lol) – just friendly, parent-to-parent advice.
PS- I feel like I should explain that I believe in co-sleeping, that’s why I want to do this, not because my kids and I are living in squalor 🙂
I love the half loft, I want this for my twins and have been searching for ideas. How old are your kids who use the loft? Mine are young, they are two now and still in cribs but I imagine they will be close to three by the time we do something like this. I am hearing mixed reviews on loft beds for toddlers. I would probably use a different type of ladder initially but do you think a 3-year old could handle a loft bed?! Thanks!
Hey Wendy! We are actually about to build a different ladder, so right on with that one. ;} The rope has proven to be much to wiggly. My 6 year old can navigate it but it’s just not suitable for their ages, particularly when sleepy. My son was 2.5 when he started sleeping in it with his big brother. Aiden was almost 6. However, we line both sides with pillows to protect them from the railing because they are crazy sleepers, and we close up the opening for the ladder with one big body pillow so hopefully, they won’t go through it. That being said, it’s not completely fall proof, but it helps. Our youngest has gotten used to it now, but I may have waited a little longer if I could have! I’m a huge proponet of keeping kids in cribs as long as possible. ;} It does have its benefits, as in, its still like a crib for our youngest. Once he’s in it, he doesn’t get down until we come to get him. I hope this helps…I think it just all depends on the children!
Thanks Ashley! I have to give some thought to the ladder so that it does not take up half of their room! My niece and nephew were in cribs until they were 3 so I’m keeping fingers crossed! I like the body pillow idea. My kids move around a lot in their sleep but worse than that, they love to bounce in their cribs. I like that your youngest thinks of the bed as he did the crib, hopefully mine will react the same way when we do this! They are pretty laid back and wake up playing with each other through their cribs so I think they will respond well. I love the idea of a stair ladder with drawers or shelves as I’ve seen on some other blogs via pinterest. At least it is still functional space!
Hey Wendy-really quick-as far as ladders go, this is what we intend to add to the boy’s room. The same ladder you see on our hideaway, here. It’s built with a stair-like tilt so its easier to climb, without taking up much space. Just a suggestion for what we plan to do! Hope that helps!
I’m not seeing your latest reply here, but the ladder for the hideaway is a great suggestion and you’re right, it would not take up much room at all. Thanks again! Now I have to (not so patiently) wait 6-12 months for my kids to be ready to say goodbye to their cribs! I LOVE the hideaway too! lol
Great tutorial . . . thanks so much for taking the time to share it!
And, fwiw, you can double up 2×4’s to make a 4×4. The combined support strength of 2 2×4’s is something like 1600lbs, so just put a few screws through one and into the other, and you’re good to go. (And at $1-2 each, using doubled 2×4’s makes the price hard to beat. ;o)
Keep up the great work!
Thats a great suggestion! 😉 we actually debated that, and decided we didn’t want that seam. 😉 nice to mention it though, if anyone prefers it!
This is awesome and we plan to do it because my twin girls sleep together and I wanna make something fun for em and also their Lil brother and them play fort all the time so this is perfect. Just one thought you said it is 131 inches long, dis you use basic twin mattresses? Cause my husband and I measured our twin mattresses and it will be bigger. They are 6’2 long. I just am trying to figure it out. We don’t want to do a corner loft straight across would be better. Thanks!!
4×4’s aren’t THAT hard to find, are they? Don’t you have a Home Depot or Lowes nearby? I mean, there’s no way those should have been half of your cost. Am I understanding that correctly? You said the bottom posts were roughly half the cost of $250. Is that right? Am I missing something? Because that seems insane unless you live on an island…
Mike, you may want to go back and re-read the post. 😉 They were not treated, because we wanted to be able to paint them. So yes, untreated wood in that size IS that hard to find. Thanks!
My bad. It just seems that a local lumberyard would have something like that and not be $75 a piece. Either way, when I build a loft, if I paint the posts, I’ll make sure I pressure wash the surface of the 4x4s and then apply an oil-based primer before painting. That’s the tip for all of you other DIY-ers. Here’s a link to show you how to do it right: http://www.ehow.com/about_5402678_can-paint-treated-wood.html
Great Mike! best of luck to you! This was just the best choice for us. We don’t regret it because it is holding up beautifully. We considered that, but were afraid it would cause problems down the line. Thanks!
treated lumber and “pressure treated” lumber are not the same thing. pressure treated is covered in small gashes all over it. not something you can “remove”.
Perhaps a cheap alternative to 4×4’s would be to combine two 2×4’s and use metal straps and then bolts to keep them together.
I looked into this a while back. in areas of the country it IS available. if you live in a wet climate (Seattle here!) your only choice is pressure treated or furniture finishing work type of grade lumber = $$!
I’m wondering how you were able to get screws into the end pieces through the 4×4 posts. With the unit being the width of the room, how can you pull this off without knocking a hole in the wall?
Jeff, I was wondering the same thing? Did they screw the short ends from the inside?
Yes, if you do not have access to the outside edges the best solution is to come from the inside edges and one from the top as well. This will give you enough to support it and make up for not being able to screw in from the outside edge.
Hope this helps and answers your question.
loved this project!! for her 12th bday, our daughter asked daddy to build her some kind of loft bed for her room. he happily agreed and then looked to me to find some plans/inspiration for the project. when i came across this post i knew it would be perfect. we made a few measurement adjustments.. a little longer to fit her room. a little wider to accommodate her full size mattress. a little taller [because she’s 12 =)]. and voila! we LOVE it. its
adorablewicked cool [she’s 12 ;)] we only have one teeny tiny issue. daddy completed the rope ladder yesterday and its VERY difficult for her [and her very-agile-i-can-climb-anything-brother. he’s 5.] its swings a lot when they are on it. daddy thinks they will just learn to navigate it with time but i am not so sure. any ideas? is your ladder anchored to the floor?wonderful! so glad it’s working out! I would have written something about it sooner but with all the craziness, we haven’t actually come to a solution/conclusion on this one yet. 😉 It’s a great idea in theory, but I’m still working it out in my head. At first we thought it would come with time because they are so young. But now we’ve been thinking about doing a different ladder. Which pains me, greatly. I liked the idea of a rope, because you can remove it when I’m not in the room so my smallest one won’t try to climb up, unassisted. But we haven’t really tried to climb on it much, either. Almost wondering if stiffer rope would help. but again, I think its an anchoring issue, like you said. So long answer short: we’re still fine tuning this solution, but our home hasn’t really settled from all the craziness yet!
I love this idea, do you still have the measurements to fit the full size mattress?? I am going to build one for a full size but I don’t know which measurements to change… Thanks! 🙂
Hannah, no we do not have those measurements. That is entirely dependent on the size you want the platform/decking to be. Generally just measure your mattress add an inch or two for wiggle room and plug those numbers into our plans for width and length.
thanks for your quick reply!! glad to know that we arent alone. =) we, too, loved the idea so that i could make sure the ladder is put away whenever our daughter isnt home. and she LOVES the idea of escaping her little brother by pulling it up with her when she wants to be ‘alone’. we’ll keep working on it too. if we find an answer i promise to share if you do!! 😉 thanks again!
Jammi,
While reading your post, as well as others’, I came up with a pretty cool idea which may work as a replacement to the rope ladder. If there is enough room on the side near the foot of the mattress, people could assemble an “attic” -type of ladder which can be raised and lowered. Now, I really haven’t developed all the mechanics behind it yet, but it could involve springs like an attic door, simple pulley/counterweight system, or just a simple rope that the kids could pull up or let the “ladder-hatch” down. To secure it in place when it’s up, you could use two large bolt latches on the top that would be able to support a decent amount of weight. This way, the kiddos could “get away” from the younger ones. Now, for those that have smaller ones on top, you could also put latches on the bottom side so that they can’t release the latches on their side and fall out.
Also, by doing this, you could put a guard rail ALL the way across, reducing roll-out potential and negate having to put a pillow or other obstacle to block the rope-ladder top entrance. Let me know what y’all think.
-S
Love this idea but, am wondering….this bed is so much larger than a typical twin……what did you use for a mattress? Thanks!
Hey Jenn! Ideally, they would be two mattress butted together. but because it ran the length of the room, that would be too long. so we used a crib mattress at the end for our two year old.
what about the comforter ? it looks like one big one ? and we have a toddler mattress and a reg. twin ..it about works but there is still lots of room on the sides of the toddler mattress?
Hey Stephanie-we use pillows on the sides of the toddler mattress and it works fine. We also put two down comforters, and two blankets on each side, and then put one big quilt in the middle, for the look. I hope that helps!
great idea! Can I suggest a couple things? deck hangers would have worked great for the middle supports under the MDF. they can be found with decking hardware and are a better way to support the weight of the deck material (and kids).
As far as the “legs”. for a cheaper option you could wrap them in fabric or leather vinyl so painting the Pressure treated stuff would not have been a concern. make sure you cut an X in the material of choice where you plan to screw through. a washer will give a finished look to the interior corners. this step should cut the cost of the project significantly.
great idea. we love it when people make projects their own! 😉
Love this!! I have been wanting to update beds for my kids and the loft bed is the way that we want to go. My question is this: we already have box springs for our beds. If we added in a few more cross supports and made the side railings taller, could we eliminate the need for the MDF? It seems that they only support the mattress from sagging.
Thanks for sharing your idea.
Jess
*Pinned it*
Does anyone know how long a twin bed is?
When you put the corner posts in, how do you get the 2 lag screws in at the ends, the short side of the 2x8s?
On the ones that you cannot come from the outside of the 2×8’s into the 4×4’s you can just come from the inside of the 4×4’s into the inside of the 2×8’s with longer lag screws. Make sure you have a good drill, with good torque to do this though, otherwise you’ll never make it through.
I love this idea! We are planning to build one for our boys’ room this weekend. Are the measurements that you listed for the “cuts” for a twin and a toddler mattress or for 2 twins? Let me know! Thanks so much for the fabulous idea.
Twin and toddler 😉
I am hoping to make this bed for a twin twin loft bed. I know you have probably listed this already, however this will be the VERY first DIY project for my husband and I. Can you please list all the wood and lengths we would need to complete this for that? I’m really nervous about doing this, but I know the kiddos are going to fall in love! HELP, we need all we can get! Lol
Hey Stacey,
All you need to simply do is measure the size of the 2 mattresses and sub that length in for ours. Also depending on the length you might want to look at adding some support in the middle.
Hope that helps!
I have a question about the lag screws holding the 4×4 to the frame… you suggest putting 2 in from the long side and 2 in from the short side… if you’re building it in place, how on earth did you have clearance to get the screws into the short sides (nearly flush with the wall)? I can’t imagine the tight fit with the drill and 4 inch lag screws between the wall
Come from the inside, not the wall side.
Looking for a simple plan for building my daughter a loft bed. Her mattress is a full size and I need to know if this plan will be strong enough to safely hold that size mattress. Would any adjustments need to be made? Thanks so much.
Yes you would need to adjust for the size of the mattress, but other than a little extra lumber it would work great.
Love this bed. Want to make one for my daughter’s room, using a white picket fence as the front rail. My question is: how did you get a mattress to fit the length oof the bed?
We used a twin and a crib on ours, but you can build the bed to whatever length you need.
Love this! I’m wondering about the stability of the loft resting on only 4 posts though. Now that your project is done, does it move at all? Do you ever think about securing the 4 posts to the walls or does the weight of it keep it from moving? Thanks!
jump on it, wrestle, leap….even though they’re not allowed, the kids have still done that. It’s completely stable. totally fine. never moved. thanks!
perfect! We’ve been tossing around this idea for our 10 year old, he wants a record listening station underneath. Well, last night his bed frame broke! So glad I found this today, we’ll be off to the store soon.
Anyone have suggestions for a full size bed? Would greatly appreciate it!
Hey Valerie! A full sized bed should work fine with this-just expand your measurements. I hope this helps! Thanks
I have a question on the MDF board…the instructions don’t mention the MDF board getting cut to width. Does it come in a standard width? If I’m reading the instructions correctly it would have to be 41″ wide (37″ to account for the inside supports and the 2″ for each 2×8 for a total of 4″) Is that right?
Kevin, Yes it comes standard at 4 feet and will need to be cut down to 41 inches. (2x’s are actually not 2 inches in width, but 1.5 inches in width) So 38 to account for the inside and 3 inches to account for the 2x’s, make sense?
Jamin – thanks for such a quick reply…aren’t the inside supports 37″ though based on your list above? Plus 1.5″ on both 2x would make a total of 40″ wide, right? I’m guessing I’m looking at something wrong though.
Kevin,
The inside supports really need to be determined by the width of your mattress, plus any extra space you may want, minus the width of the 2x’s.
So really they can be any size you want them to be or your mattress calls for them to be. Make sense? Feel free to email me directly, [email protected]
Jamin – one follow up question…if I’m reading the plans above correctly the spacers are 37″ plus the 1.5″ on each side makes 40″ total, right? Not 41? Please let me know what I might be missing…thanks so much…this is my plan for this weekend! Very excited.
what a fabulously simple concept! i have 5 kids spread out in 2 rooms and all the bunk beds i can find for sale will not fit in their rooms with the stupid built in ward robes we have! so going to try this one out! a little higher off the ground with storage for clothing, toys and maybe a desk underneath. thanks for the idea!
This is fantastically inspiring! I’ve been wanting to build loft beds for my girls for a few years now but my husband and dad keep talking me out of it, saying it will be too expensive. Their room is too small to do end-to-end, but I just KNOW that I can do this where they meet in the corner and after reading your tutorial – I am sure I can do it affordably. Thank You!!
Also, I love the writing – especially the legal disclaimer! Too funny 🙂
Just curious, do you have to put this loft between two walls?
I just wanted to say thank you so very much. I have spent two years dreaming of doing something similar for my boys, but I have absolutely ZERO knowledge of carpentry and design. This post here was the starting point for the creation of a twin size loft, four feet high. We even added a Home Depot playground slide for extra fun, and Ikea stairstep bookshelves instead of a ladder (since the littlest one is only two).
http://sphotos.xx.fbcdn.net/hphotos-snc7/426745_3298544269512_1445045127_3419365_2136381174_n.jpg
Regarding the mattress sizes, you could easily have a piece of foam cut to the appropriate size to fit all the way across. Foam can be cut in any width and length, and also you can pick how hard or soft you want it. Then it is wrapped in a fabric covering. For kids, a foam mattress is great.
Great suggestion, Linda. May be using that one sooner than later. Thanks!
where would you but foam at? thanks!
buy* sorry! great idea btw!
Hey Marjie! You can buy foam padding at any upholstery store, or sometimes at walmart. I hope that helps!
awesome thanks so much!
I LOVE this, I have wanted to get a loft bed for my boys (7 and 5 … soon to be 8 &6) since their room is on the smaller side …. but just could not bring myself to buy a bed that looked like it would break =/ … my daughter saw your picture up at the top and loved how it looked and now wants one also .. lol … I do have a question though, for my boys room I would like to make it a L shape (since the back wall falls just short of long enough for both twin mattresses ) how would you suggest supporting the corner of the L ? I hope this makes sense … I’m so looking forward to do this, and will definitely post pictures of both when they are completed 🙂
Also where could I get foam at for their beds ?
Try the local fabric store first, they might have it or be able to order it. If you know an upholster in your town they might be able to give you a lead. And of course there is always my favorite, “google” you might be able to find what you want online at a cheaper rate.
The easiest way would be to build two boxes, butt them together and use a 4×4 in every corner using a total of 8 4×4’s. (You can secure the two lofts together with some lag screws.)
If you have some basic building skills you could lose a couple of those 4×4’s by building one of the boxes and placing a 4×4 in every corner. Then build the second box using a 4×4 in each of the corners not butted up to the 1st box and screw the side without the 4×4’s into the 1st box. Keep in mind you will need a few extra hands to hold the frame/box up and keep it level. (also make sure you use big enough lag screws and enough of them. At least one every 3 inches, alternating top and bottom, because I like over kill.)
The first way will provide a lot more stability and with older boys I’d probably choose the 1st route.
Thanks! I think I’m going to do the 2 beds and just butt them together that way if we ever give them their own rooms they will each have their own beds still 🙂 I will post pictures for you when I have completed the project(s) 🙂
Thank you for sharing your project. Very Inspiring & with the detailed instructions, this actually seems possible for someone like me. I have twin girls (8) so I am thinking L shaped lofts are the way to go since we are always running out of room. Elizabeth, if you were able to complete that, please send advice! Thank all of you!
Elizabeth,
You asked the question that needed. Thanks! Our room is not big enough to even have their dresser, let alone two beds end to end. I need them L shaped as well. Do you have photos of your finished product?
Thanks,
Lelsie
Thanks for this fantastic idea! I’m working on a platform idea for one of my daughters and my mom sent me your link. I like this idea a lot. One question I have for some advice is: in the cubby hole where I would build your idea, there is a window off to the left. Would you still do this? And how would you place the 4×4 posts?
Pete, That all depends on the size and the function you are after, plus what you want the overall look to be. Honestly it is hard to say without seeing the space and understanding what you envision for it. Feel free to snap a picture and send it to me via email [email protected]
My loft has a window in it. The picture is in post #50. I built the loft to be just below the window, and I added a wooden beam in front of the window to discourage little children from attempting to access the window. Plus, it doubled as a mast for the pirate ship.
My dad actually built a loft for my daughter at his house. She had a small room with a twin bed and there was no room for her toys. He actually put a shelf up in the loft at the foot of the mattress for her tv and books and such. Instead of the rope he made a little staircase. That was about 5 yrs ago. Seeing your ideas with your loft inspired me to make some decor changes to hers. So thanks for sharing your idea!
I wanted to say a big THANK YOU! Your loft was exactly what we were looking to do in our 4 year old son’s new room. We were moving him because we are expecting a little girl this September and wanted to use the same room as a nursery. However, we didn’t want our son to feel displaced, so we really wanted something to make it special. This was just perfect, the only adjustments we had to make is our room width was only 122 inches, but otherwise the cut list, etc were great! Since he won’t be sharing the loft, one end has his bed, and the other end has his bookcase and pillows to cuddle and lay on as a reading nook. We decided to forgo the rope ladder (it made me a little nervous if he got up in the middle of the night) and we just did a simple leaning ladder with 2x6s so they are wide steps. Anyway, I really just wanted to thank you for sharing your plans and making them so easy to follow and all the great pictures that really helped during the building process!
Yay Jennifer! So glad you could use all this! Please send us a pic-we’d love to see!
hey! i am making a loft bed for MY 4 year old a la the Handmade Home design, and I read your comment about how you add a bookcase to the end for cuddly pillows and books to read! Great idea! We are facing the same issue and were wondering what exactly to do with the leftover space at the end of the mattress. We’ll have approximately 23 inches of leftover space based on our room and loft length. Did you custome build a bookcase? How many shelves or what height was it? I am bad at imagining/designing and that is why I pretty much stuck to the book on this bed deisgn, but I am trying to imagine how you did yours so we can duplicate! Another funny similarity, our 4 year old daughter is having a baby brother added to her room this July, and that is what inspired Me to look for a special bed upgrade as well! How odd! Anyway, please send me a picture of what you’ve got I would be so so grateful! — Mindy
I recently made a loft very similar to this for my son (age 9). However, I made his really tall and put two levels beneath it. One level is for his race track and one level is for his train track – this saves a LOT of space in his small room. When I first saw your photo, I too thought you loft was installed on the walls. I’m pleased to see that you built it the exact same way that I built mine! I love this lower loft idea for my daughter’s room (4).
Thanks for sharing the how to!
Leigh
with adjustments would this be stable enough for 2 adults and a queen bed?
LOVE, LOVE, LOVE this!! Plan to built one for our son’s room AND our daughter’s room!! Tweaking the idea now! Questions:
How much headroom from the ceiling to the mattress?
If I use the mattress and box spring, would I really need the MDF?
Can you post (or did you) instructions for the second ladder (the playhouse one)?
Thanks!
Hey wendy! the space between the ceiling and the mattress all depends on the height of your own ceiling, but I guess it’s about three feet. I can’t imagine making this without the MDF, as it seems slats would be dangerous for broken limbs and falling parts. See this link here for a ladder. hope that helps! ;}
Our ceilings are around 9′ (111″) so I was thinking of doing 4′-5′ posts (from the floor) to utilize the space the best. Makes me a bit nervous for the bed to be so high. I see what you mean about the MDF. Thought the box spring would cover, but I could see items falling down through the crack. Thanks!
I love this idea SO MUCH…we are moving soon and I’m saving this idea for our new house. My girls would be in heaven with this loft! Thanks for sharing!!!
How well would this fit a 130 pound, 5 ft 5in teenage girl?
My husband and I built this bed over the weekend for our boys. We LOVE it! We made it taller so that my oldest can stand upright underneath and have a few inches for growth. All of our kids (ages 12 – 2) love playing in that room now. Thanks for sharing your idea and the plans!!
I was wondering how much weight this can hold? If I want to crawl up in bed with my 10 year old (95 lbs.) will it hold me too? I weigh approximately 140-150.
Hey Tristin! We climb up there all the time. At one point, it was me, and my three children, but Jamin does it with them, as well. He’s around 200 lbs. Plus the children = rounding it up to another 100. I climb up there all the time to make the beds. You should be absolutely fine. Ours never budges.
Great plan….Correction in supply list
4……(4x4x8) Post that hold the loft…not (2)
Hey Ed! DUH! Not sure how we missed that. Silly us. Thank you!
Fantastic plan. I’m building a version of it this weekend for my 18 year-old daughter (she has a really small room and wants more space), so will be making it a bit higher to accommodate her as well as place it in the window better.
One question: it loos like the way it is constructed, the weight of the bed lies where the box is laying on the posts. I know there are lag bolts from the legs to the sides, but the weight is being born by the MDF where it sits on the legs, right? Or am I over-thinking it?
Frank, yes you are over thinking, Ha! The weight is actually being born by the lag bolts, the MDF just butts up to the post and is screwed down to it.
we were fortunate to have a guy that makes rustic lawn funiture lives by us. I took my plans that look like yours and picked up 4″ logs and made the loft out of them. It kinda looks like a tree house. the grandkids love it. I was going to the local craft shop and get fake leafs ,drill holes and really make it look like a tree house!! hey it’s just a slight change. I should sell it as a kit!it’s that kool!
Thank you for a great plan and easy instructions! My husband and I built this bed for my son over the last two weeks and surprised him with a whole new room for his 5th birthday. His reaction was priceless and he loves his room (his sister is a tad envious as well). The bed only took about 4 hours to build, 2 hours for the ladder (we went with a ladder more like the one on your outside tree house plans) and then 4-6 hours to paint everything. We modified the railing a bit too. Here is our version.
Chase’s Bed
Thanks again for showing us how easy this can be done! My son loves it!
Yours looks great! So happy you were able to take our idea and make it your own. And so happy for the little guy and his new room!
Building a version of this as I speak! Not sure how I will post pics, but I hope it turns out well. I would still be working now, but the drill battery died!
Finished building, still painting and curtains to do…
My son’s room doesn’t have a wall on both ends, just on one. I did a straight “ladder” by screwing 4- 1×3’s horizontally into the upright 4×4’s. This has me nervous, since it isn’t super easy to navigate. He just turned 6 and I am afraid he will fall if he tries to climb out sleepy. There isn’t much room on that end for a ladder that angles out since the door is right there. Suggestions?
Also, any secrets on changing the sheets up there? That wasn’t too easy!
Where/How to post a pic? Thank you!!
So I’ve been thinking of making a loft for my living room, but one a little bit taller so it can fit over my couch. I’ll want to put some pillows and stuff up there so more people can come over for movie nights and stuff like that – I wouldn’t expect more than two or three people up there at a time.
That being said, do you think there are any structural/weight concerns I should adjust for if I make essentially the same loft you made, but maybe a foot and a half taller?
Thanks!
Jasmine, As long as there isn’t wrestling or any shenanigans like that going on I’d think that it would be fine. If you wanted a little extra measure of security you could always bolt the beam closest to the wall into a wall stud. I hope that helps and as always don’t forget our disclosure.
Jasmine, Did you end up making this over your couch in the living room? I’m thinking about making one over the couch in my kids playroom. Just curious how high off the ground you made it to account for the couch?
Jamin & Ashley, Great job! Thanks for the great idea!
I want to build this for my daughter…just curious what size mattress fits…it looks longer than a twin….also if they cut the wood for us at Home Depot…is a drill the only real tool we will need?
Kallie,
Yes a drill is the main tool you will need. If you don’t own drill accessories you’ll need to pick those up as well, it also never hurts to have a hammer around to knock a piece into place. The mattress is a twin and a crib, but you can have a mattress custom made or cut another twin down to size yourself.
I love this bed! My hubs and I were going to build a hanging loft bed for our son, but I think this will be better. I am glad you posted this. Your house and style are so great!!! Btw what color paint do you have in you veranda the light teal/aqua/turquoise color??? I look forward to talking with you in the future. I would love to show you my recent coffee table I built:-) blessings always Laura
Hey Laura! You can read all about colors in our home, here! Go for it, on the loft! And I would love to see your coffee table! ;}
Loved your loft!!! Thankyou for your great how-to info!!!!
Hi Ashley, I’ve been looking everywhere for a set of Bunk Beds for our 6 and 4 year olds, but I’m so glad I haven’t purchased any because I LOVE the loft idea!!!! My husband and I were just talking about making our sons some bunk beds our selves, but this is even better. Can’t wait!!!
Thanks
Thanks Divina! I hope you can use them! We LOVE ours. ALL three sleep up there every night. (it’s going to have to end soon because they’re running out of space, but they love it!)
I love this! I am just curious, what size mattresses did you use? Do two twins butted up next to each other work?
Thanks!
Andrea
Hey Andrea! For our bed, we used a crib mattress and a twin, because that was all we could fit into the space. Malone, our youngest is now three, and outgrowing that mattress fast, so we may get one custom made or we’re also thinking about cutting one twin we already have, down to size. ;}
do you think this can be made for a teen?
Absolutely. My husband and I are both on it all the time, making the bed, etc. It’s perfectly stable!
This looks cool, I wanted to do somthing like this for my little one but wanted to ad a slide… any ideas???
I love this and thank you for sharing. I just have a quick question, do the HD people cut everything for you for free or did you have to pay for it? If so, how much?
and were the woods’ measurement accurate too???
They will cut the big pieces for you for free, the 1×2 you will need to cut yourself. I suggest picking up a RYOBI skill saw or Miter saw.
Thank you guys so much! You guys are uber cool!!!
I just have another quick question. I just need to convince my om to buy the materials for me and build it myself. I’m 14. Never done anything like this. Beginner here. My mom seems to not like it though cuz she think that I am too big for it and I might just ruin the whole thing once I get into the bed. I feel like I am too fat and I am using full size mattress, should I be concerned with some weight limits? I also want the bed to be higher so i can have a space under. I am 5’6”. Thanks, please respond back!!!! :DDDD
what kind of mattress does this loft fit?
Do you think you could help me to figure out the measurements to make this for a standard twin mattress?
Hey Amanda! Just measure one twin mattress, and multiply it by two for your size. That’s all you have to do! Ours fits snugly.
Curious how did you connect the loft to the floor?
Gravity! ;}
AWESOME JOB!!!!!!!! My 12 year old son said could you build me a loft in my room, I had it already laid out and pictured in my head. I even knew exactly what kind of material I should use, but when I seen ur page, I thought NOOOO WAAAYYYY, he is doing it EXACTLY like I knew I should……GREAT JOB!!!!!!! Also thanks for the help with how many of each I will need.
I love your house!!! I wondered if you know the color of the slipcover you have on your scroll puff rocker. I have that rocker and am looking to order a new cover. thanks! Your house is amazzzzing!
Hey Michelle! I am afraid I do not! I found it on ebay about four years ago, and it was just a light linen color. Sorry! ;}
How strong are your railings?
I had to make my kids bed taller to clear a radiator we don’t use and i’m afraid they are going to break the railing leaning on it. Once I get it up I’ll test it myself but since yours has been us for awhile I wanted to know how it was going.
Also for anyone trying to do this alone I was able to screw in small pieces of MDF in the corners to mount the posts and bolt them in and then removed them to put up the MDF. When I attempted it with the MDF on the base it was too heavy to lift.
We built this tonight! We edited the measurements a little and made it so it fit two twin sized mattresses. LOVE IT! Going to buy the hooks for the curtain rod we got and fabric to make some curtains tomorrow morning!
I love this! Just sent to my hubby 🙂
This would be so fun for our almost 4 year old.
We have 10 foot ceilings so ours will be about a foot or two taller.
Thanks so much for this! Love it 🙂
thank you ,wil use this well photograf progect to do one myself
Thanks so much for this terrific inspiration! I used your design as the foundation for a loft bed for my daughter. Pics attached.
https://plus.google.com/photos/100469547735206899015/albums/5853527274574701777?banner=pwa
Well, you clever person, it looks great and has inspired me to have a go for the sake of my lovely grandson whom I know will love a loft bed.
thank you! ;}
Thank you so much for your ideas ! I have learned a lot after reading this. I hope I can do one for my sons !
What did you do for mattress? is it long enough for two twins?
Thanks!
This looks so neat – thinking it may be our summer project
Hey Stephanie! Our room was just long enough for a twin, and a crib mattress. I made up for the width with a body pillow on the other side and for the most part, he stays on his mattress. It has worked perfectly for our boys’ ages. I hope that helps!
thank you! i hope our summer project comes together – yours looks so cool. I don’t want to show him pictures until we get ready – he will be SO excited!
Thank You so much for sharing all the details for this plan. I love it!
We are almost finished replicating this beautiful loft, and to our luck, the space we have fits your measurements to the T!
(Just have the ladder and curtain to take care of.)
As I am putting the mattresses up, I am noticing the difference in the width of the toddler mattress leaves a lot of space on the side. Did you find a special mattress that fits well or just let the extra space sit?
Thank You
Just noticing your response in the post before mine : >
We are thinking about making this bed for our son. I was stumped how you attached the two 2 1/2″ screws into 4×4 posts on the short side of the bed since it is flush with the wall. I wasn’t sure how you got the screw driver in that short side with rage wall in the way.
Thanks.
Come from the inside, not the wall side.
What would you suggest if someone were wanting to convert their full size bed into a loft be? So my question would be-would the base you made here work the same way if you wanted to attach a already made full size bed to the base?
Sasha,
You would need to widen the base, but the basic plan should work for a full size mattress. Of course remember, we aren’t engineers. (;
Could you make a loft for an almost-teen (me)? I’m redoing my room this summer, and would like a loft, but I also like the idea of having a small space under it, the only problem is: I am tall for my age. So, would that be possible?
Hey Grace! I don’t know why the same design wouldn’t work. You could always make it a little taller. I hope that helps!
Thanks!!! My bro is also redoing his room, and I believe he would also like the idea. Thank you so much!
Doing this this week (hopefully)!! Gonna customize for a full size bed and for a corner alcove but same idea! Thanks!
If I wanted to make the bed taller in order to fit two twin beds underneath it what measurements would I need and materials?
I suppose that would depend on the height of your beds and how much room you would want under it.
Hi…we are making a loft bed this week for our twins. You said you used a toddler mattress. Is that the same width as the twin? We have a crib mattress and a twin mattress and the crib mattress is not as wide as the twin. Just curious how you worked this out.
Thanks.
No our mattress widths are different sizes. We just placed a body pillow on one side to keep the little guy on the mattress.
I’m planning to do this and starting my dwgs.
For the foot posts, you have (4) 4x4x8’s, cut into 4′ pcs, but I only see (4) legs… so wouldn’t you just need (2) 4x4x8’s? Or am I missing something?
Thanks!
PS – for anyone w/ doubts, I had an engineer / literal rocket scientist at work look at these plans and he says they are “solid”. 🙂
Ha! Yes only two, Not sure how that made it through. Thanks for pointing that out! And thanks for the rocket scientist shout out.
Hi, Im not sure if this was answered in any other questions or not. Can this hold a lot of weight? We like to have story time in bed and Im wondering if this would be able to support an adult or if its for smaller kids? Haha, thanks! Great plans!
Absolutely! We climb up in it all the time. I wouldn’t jump on it or anything, but it’s doable.
This looks amazing, just a few questions please: How did you find a mattress long enough for the space.. are there two toe to toe. And how do you guys make the bed? Here is the biggie, how would I convert the measurements from inches to millimeters any ideas?
Absolutely stunning and I think would work perfectly for my 4 year old twins as a space saver.
I am so excited to do this. Thank you very much for your post!
I love this! Great job, I am wanting to make one for my 2 little girls. What size mattresses did you use???
Hey Kristen! For now, we have a crib mattress, and a standard twin. Our room was not big enough for two. But now that Malone is bigger, we’re about to move him below deck. ;} They have custom made mattresses that can be resized, but right now our boys use it as a play space above and below. ;}
Hi there – so glad I came across this – I have been scouring the internet for a bed for my three year old but could not find what I wanted. I want to do this but on a smaller scale about 180-190cm in length, just enough for one bed and I plan to have steps at the side and a painted plywood front to make it into a cottage type play house underneath. I also wanted to make the space underneath higher – about 100-110 cm high so she can stand up inside for some time. I was wondering if whether you think it would be stable enough considering the increased hight and decreased length. I would very much appreciate your thoughts as I have never attampted to build anything before but you made it look so easy lol!!, Kind regards, Sarah 🙂
Sorry just to clarify – I mean to have actual stairs going up at the side so will enter the bed at the back if that makes any sense and I was thinking the plywood (or whatever material) front with door and window could be high enough to be instead of the rail if that is at all possible lol. The loft and the stairs at the side will be wall to wall :o)
Sarah, the stability will depend on what you have it braced or attached to. Will it be braced or attached to anything?
disclosure.
Hey there! I happened to stumble upon your blog here and I love this idea! In fact, the whole reason I arrived here was because I was searching on how to do this very thing, well at least something similar. My teenage boys share a room and now that they are in high school they need more space for desks and such than the 2 twin beds on the floor provide, so enter the loft bed. A couple of questions though, for starters I am actually building 2 of the sides and lag-bolting them directly into the studs in the wall. This way, I only need 1 post for the free hanging side. I am assuming that you did not do it this way as you did not want to tear up the walls? Are there any reasons I should not do it the way I was thinking? Also, why the 2 x 8s on the length supports? Was there merely for looks or because it was so long? I ask because I had just planned on using 2 x 4s for the box iteself, again with the lag bolts on the 2 walled sides, with perpendicular 2 x 4s for the “shelf” support, spaced 12″ apart and I would attach those with Perlin brackets (think joist brackets but for 2 x 4s and they wrap over the top). Any concern you could see with this? I had read somewhere that a 2 x 4 over a 4 ft span has a vertical crush weight of something like 20 tons! Maybe I am wrong. Anyhow, our length is going to be shorter than what it looks in your project so I am thinking it might be ok. Thanks again for the interesting post!
Mike
Yes you can screw it into the studs, we choose not to for stability reasons. It is stronger sitting on 4 x 4’s. Same thing with the 2 x 8. The price difference between a 2 x 4 and 2 x 8 really isn’t much, we choose the few extra dollars for safety and look. I hope that helps and always remember our disclosure about projects.
I appreciate the idea and plan. I decided to build mine in my garage, then hoist it up to my sons room. My loft is much smaller and my sons room is also smaller, so it seemed building it in the garage was the best course to take. I have someone coming by later to help me assemble the posts onto the platform. My sons room is in the shape of and “L”, so I built the loft to snuggly fit into one part of the “L”. A little nervous it’s going to be too big. That would not be good. Still deciding wether my 10 year old son needs the railing. His loft is for reading and play, not sleeping. I’m going to make your rope ladder as well. I’ll try to send you pictures when I’m done. Thanks again!!!
We look forward to seeing it Stephen!
I love your design! Looks like just the strength and simplicity we are looking for. Can you tell me if this would work well for two twin platform beds for my two teens? I would like to adjust it to a lower level and nothing above the main frame. Would you make it bigger than a twin mattress? We won’t be using walls for support. Do you think we would need a cross support at the bottom of the legs to keep it sturdy? Any advice?? Thanks!!
Jill,
Yes it should work for two twins, just adjust the wood lengths to fit two twins butted together.
As for cross support, test it out and see. You can always add that at the end, but if you aren’t bracing it to a wall I’d guess yes you will need 4 similar to the ones we used on our pergola, here.
Hope that helps and as always don;t forget to read our building disclosure, here.
Thanks but I am looking at two separate twins. We have two older girls who need space underneath and they have to share a small room. I thought the strong support would help with the height and weight.
This is so awesome!!! I am a complete beginner and this will be my first project, and your instructions make me think I might actually be able to do this. Here is my question: I found these plans for a hanging bed at Home Depot and the frame uses corner brackets and joist hangers
http://www.homedepot.com/p/Simpson-Strong-Tie-Z-Max-Double-Shear-Hanger-LUS24Z/100375190#.UgxBHT9aCCI and
http://www.homedepot.com/p/Simpson-Strong-Tie-Z-Max-1-1-2-in-x-2-in-x-2-3-4-in-Angle-A23Z/100375310#.UgxBVD9aCCI
Do you think these would be strong enough for the loft bed frame also?
Thanks
Heather,
The only difference between a hanging bed and loft are the four corner post, so if they are using them in the hanging bed I would think they would work with a loft. However, if you are just doing a loft, I see no real need for them. Send me an email if you need more help.
(And as always guys and gals be sure to read our full disclosure on building, here.)
Jamin
Hey folks, don’t fret (or even consider yourself unlucky) if you can’t find 4×4 lumber: you can always stack two 2×4’s together (on the “4” face) to achieve the same. Glue, drywall screws and putty/wood plugs should work fine for most applications.
Granted, depending on where you use them, you may need some additional trim, and yes, it will add a little extra time to your project. However, you may even save some cash!
Hi! I saw this and couldn’t resist trying to make one! It turned out beautifully. Although my room isn’t as large as yours, we made some measurements and it looks amazing! We have a little alcove in my daughters room that perfectly fit a twin bed so, we thought why not a loft bed? LOVE IT! I am grateful for the step by step instructions, they saved my life. Thanks !!
I’d love to see pics! Send them our way! WAY to GO!
Trying to do this this week for my daughter’s college apartment bedroom. First time with lag screws. I’m thinking I should predrill?? What size and how deep do I do those??
Yes you do need to pre-drill The size and depth depends on the size of the lag screw. The width should be slightly less than the screw and the same depth as the screw.
Hope this helps.
Thanks for the help! We ran out of lag screws-miscount and misplaced, so tried to use a little larger size, which is what was available at WALMART when the home improvement stores are closed for the night! It was good to predrill and we didn’t get the new ones in, so we had to go back the next day, but the bed loft was completed – tiny college apartment bedroom with the wall only 95″ , made the platform 90″ for the 75″ mattress and a shelf for the phone and clock and laptop? We measured numerous times to make it just nicely higher than the dresser we painted from home to slide under. Painted both black before we got there and everyone that matters is happy.
Hi I’m Paige I’m 10 years old and I want a loft bed like your I was wondering if you’d help me make it I know it’s problably too much to ask but I’m available everyday until sep. 3 past sep.3 I’m available on weekends thank you
Paige
Hi Paige! Thank you so much for thinking of us.. you are so kind to ask. We unfortunately aren’t doing that kind of work right now, as we have to focus on our ongoing projects for this site + our family. It’s all we can take on right now. But thank you so much!
So what size mattress fits in this? Such a great idea!
Hey Bethany! It can be built to fit whatever size you wish, but here you see a twin + a crib mattress. (our youngest was old enough to sleep like this, with pillows on the side for added support)
Hello, I am building this and got a little lost on the number 7 lag bolt area. It says to put two legs pulled in the long piece and to let bolt into the short piece. How do you get them in the short piece when its butted up against the wall? Thanks Bonnie
Bonnie,
You can screw it in from the inside of the leg into the 2 x 8.
Hope that helps.
How much would a loft like this support in weight? I really want to build a loft like this for reading, but since its made for children I am kind of nervous that it’ll break underneath me or my husband. How would i increase the weight capacity?
Hi Sondra. I do not know the weight limit, but We (the adults) get on there all the time. Jamin weighs about 200 lbs + our 8 year old… I get up there, too. We are not engineers, and don’t jump on it or anything, but it’s been just fine. All that being said, please use caution and see our disclosure, here.
You have inspired me! Crib is up for sale to pay for the materials and extra goodies. My girls are going to love this. We have they same layout with the window so this will be perfect. Thanks for posting and sharing this.
So glad we can help, Jennifer!
what do yall do for mattresses? standard mattress is 75″….you are at 139″ overall right? custom mattress or what?
Hi. I love the loft bed and am going to attempt to build one in my sons room.
The room is 12 ft in length. Were your dimensions for an 11ft wall?
Close to an 11 foot wall.
Hi, we are about to move to a new house and we just love this idea and project and looking forward to building this awesome and cool loft. Thank you for the easy to follow instructions. One question we have is the weight limit…what would you say would be the weight limit it could support?
Thank you kindly,
Barbora
I can’t speak for an exact weight limit as that is not my specialty, but as long as there isn’t a barrel of dancing monkeys up there I think you will be fine. (: I, along with all three kiddo’s have been on ours, without any issues.
Do you think it would be do-able to screw two 2×4’s together in place of 4x4s? I think I would paint the wood before assembly, so only touch-up was required in place. Your explanation was excellent!
Yes, I think it would be doable to secure (2) 2 x 4 ‘s in place of a 4 x 4. I hope that helps.
What size mattresses did you use? I so want to do this, but my twin mattresses are too big. Thanks!
Quick question… I plan on doing this in my girls’ room. We are in the process of building right now. A standard twin is 75 inches, so it equates to 150 inches. Did you use an odd sized mattress for the length to equal 131 inches? Or am I totally lost? Help!
Nevermind. Just strolled through your comments. I guess we will have to adjust to fit 2 twins. Thanks!
Thanks, Carrie!
Could you use 8-foot 4×4 to make the bed taller? I’d like a sitting desk underneath.
Thanks!
I would think you could, Obviously you would need to adjust for making the bed more top heavy. You could anchor it in the wall. I would also be mindful of the ceiling height and there leaving enough room for sleeping in comfort. As always read our full disclosure on construction here.
My wife and I based our daughter’s loft bed after your design with a few changes. We made it to fit 2 twin beds, used wood for the ladder, and gave it a headboard divider.
Here’s a link https://skydrive.live.com/redir?resid=61F2E362187EF69D%21583
LOVE it, Micah! Thank you so much for sharing! ;}
Hi Ashley!
We’ve now used your plan to build two lofts in our home – one for our girls beds and today we build a reading nook in the playroom. For the girls beds, we did a sturdy wood ladder for safety reasons. For the loft, we attempted the rope ladder, but the kids can’t climb up it! I read through the thread to see if anyone has found a fix for this, and it looks like not so much. Were you able to find a good solution/modification to make it work, or did you convert to something else? Thanks so much for your blog!! <3 Allie
Hey Allie! How exciting! I hope your girls love their beds! How fun. The climbing of the rope came with time for our kids, and they’re older now. However, we still plan to make another ladder, because we’ve never been happy with it. 🙁 I know. Such is the problem with making things up as you go. We kinda stunk in the ladder section. So sorry! If you want to try another one, this should work just fine with your loft bed, adjusted for height. Hope they enjoy! ;} And thank you so much for checking in and letting us know! We hope to remedy it soon.
This is so great. Easy instructions. I’m going to try and do this for my room with high Victorian ceilings. Going to make the bottom half a closet area. Probably make it 5’5 or 6ft high since I have 12 ft high ceilings.
Do u think wood pallets would work rather than mdf boards? Or perhaps wood pallets over the mgf boards?
anyhow, i am very excited and hope this works for my little room as well!
Thanks!
Jane
Hey, Jane. Either would work, it all depends on how you brace everything underneath. As long as you properly brace the pallets it should be fine. Hope that helps.
i would like to do the same thing in my room with high ceilings. did you ever get this to work? did you have to do anything different from the original plans ?
Please i love what you have done for the bed of your kids and i really want to do the same.Is possible for you to send me all the info and pitcures at my email address please so i can follow all step by step.Thanks a lotttttt
I am wanting to build a loft in my girls room, only problem I’m coming across is the ceiling height is 7’5”. Can I make this still work even though their ceiling isn’t the required like 9” I think. I understand they wont be able to stand up on the top but I don’t find that to be a big problem. If you could give me some advice I would appreciate it very much. This loft is really a must in their room at this point. Please help me out with some suggestions if you can.
Thank you very much,
Eden
Absolutely, you can make any size work. You can simply cut your legs shorter if you need to compensate for height.
how did you do the mattress? I love this idea, but is it two twins?
Our room was only wide enough for one twin and one crib mattress ;} Hope that helps!
Thanks so much for these plans. Used them to make loft for kids and worked great. Dimensions were quite a bit different, but turned out great! I’d recommend that anyone building secure the beams to the wall studs for added safety and security. Also, they make lag screws with a spider head (drill bit included) so they lag screws end up flush with the beam. Not a huge deal, but looks better.
TWS
Love this bed. We have spent the last 4 days making it for my son. Not sure how, but we have too many screws to have a railing post next to the walls so I’ll have to mock something up so I can get the curtain rod on there right.
Thank you so much for doing this tutorial. It’s genius and easy. My son’s room is so small that this will help him get more space. He’s so excited building with me too.
I’ll post pics when we are done.
I can’t wait to see, Angie! ;}
I made one! Thanks for the ideas.
I did modify it a bit.. not just the dimensions to fit the room, but I also changed the design slightly, to adapt it to our houseboat:
– Firstly, I didn’t use a board of MDF on top. On a boat we need to be extra careful about damp and airflow, so I used slats – just thinner planks cut to the width of the bed, and screwed down into the main side boards.
– Secondly, the walls of the bedroom are not as solid as those in a house, so I added an extra side plank on the three ‘wall’ sides to further stiffen the bed, so it stands by itself.
– I found that the head and foot end planks were easier to affix, and looked neater from underneath the bed, if you bolted them to the INSIDE of the bed rather than the wall side. You end up with a blank wood surface with just bolt heads (looking rather like ship rivets) showing.
– And finally I built a solid step ladder. The rope ladder just wasn’t cutting it – partly because the boat moves; and partly because ours is a bit taller. It was very difficult to climb up – and a heavy person would actually tilt the bed over.
The side rails for the wooden ladder are two long pieces of 2×4 with the bottom ends cut at a slight angle, so that they rest flat on the floor and lean at a slight angle against the bed. For the rungs I cut a long sturdy 2″ dowel, into five equal sections. I used a hole saw to dig 2″ holes in the 2×4 at regular intervals – the crucial part here is to not go all the way through.. you want your dowel embedded about three quarters of the way through the side rail – then after you put the dowel in, screw in from the outside to secure the end of the rung.
The whole ladder is then leant against the bed and screwed into place with big 5″ screws. We used two on the feet as well, to secure them to the wooden floor. It helps keep the whole bed in place.
The structure is incredibly strong and stable, and is now part of the fabric of the boat. It can easily support the whole family – although our 6 year old complains if both Mum and Dad get in with her 🙂
Thanks again for the great design ideas!
Alan
Thanks Alan! It sounds lovely! ;} So glad you could use it!
I know I’m finding this late but I’m so happy to have found it. We are building a version of this tomorrow! We just move to TN from FL and the boys room is smaller than we are use to. We are making an L shaped version using 2 platforms to accommodate 2 twins. We are all excited for the outcome and I’d be happy to share the end result if you’re interested.
I would love to see, Amy! thanks for letting us know!
We are currently in the planning process for a set-up very similar to this.
I found the image on Pinterest, & your awesome handiwork has become
our inspiration. Since you only had 131in in length, what did you do for a
mattress? And bedding?
I love the full-wall loft! I think I’m going to do this for my 10 year old son. Should still be awesome when he’s 18 🙂
Might make the following changes to the plan:
1. Will circumvent the unlevel posts by resting the box on rails screwed into the wall, rather than 4 posts.
2. Horizontal rails — taking my inspiration for that from Pottery Barn Teen: http://www.pbteen.com/products/guys-sleep-and-study-loft/?pkey=cenvsb-sleep-study-finley-bedroom&
I love that he’ll have about 45″ of space at the end of his twin mattress. We can put a bookshelf and a lamp up there, and he’ll still have some space for his “stuff.”
Thanks for the idea and the plans!
Thank you so much for this post! I’ve been looking all over the internet to find plans for a loft bed and this is the best one I’ve found!
I am going to build mine for just a twin bed and I’m going to make it a little bit higher (around 56″). Also, mine won’t span my whole room, so only 2 sides would be against walls. Do you think there would be any structural/weight bearing issues if I did that? Also, do you think I would need a railing considering I am much older?
Thanks!
I once saw a grown man roll out of a bunk bed, it looked liked it hurt. I think the railing issue is a personal choice. If you are only using two walls I would add a 3 support or make sure you are ending at a stud to drill into for support on the non post end. As always though please read our disclosure about building.
I love it.
I love that this design allows for more than just the mattress up top.
Its a loft – and not just for the bed. Thank You.
What size mattress(s) are you using to accommodate the 131 length?
Very simple design…Thanks!!!
Hey Keith! We have a twin and crib mattress, butted up end to end. You can also have custom mattresses made. Hope that helps!
Just thought I would throw this out there as a solution for those wondering about the mattress situation. Ikea sells ‘adjustable’ mattresses that we are planning to use, so we will basically have two of the larger adjustable mattress pieces (crib length with twin width) and add however much of the additional length pieces we need to fill in the space.
I really want to build this loft but I am not sure what type of matresses to get. I cant find any that would fit your measurements. Please help!
Hey Sarah – I think it will be different for everyone, unless your room is the exact width of ours? We are currently using a crib/toddler mattress still for our youngest, but are now looking for other options. Build to your own mattresses – we hope that helps!
Thank you so much for this idea it worked wonderfully! We added stairs and a slide, still undecided on the ladder but it looks like fun so I’m sure it will be added soon. Your directions and measurements helped tremendously. Thanks again!!!
Would love to see, Brandi! ;}
I like what I see. I look forward to more. Right now we are going to try the building the loft. We are leaving now to price the wood materials. We are going to do the full bed loft but we would like to try building steps for the side of the bed loft and put drawers under the steps. I like recycling plastics too. I have the little round tape holders from Christmas and I also have a bunch of the little round plastic things from calculator receipt paper. Any ideas for that those little round plastic things?
I may be a big kid for saying this but I’m almost 19 and I will make this for myself. I won’t need the railing or the rope ladder but I’m definitely going to do this. I hope it’ll bare my weight! I’m only 130.
Angel – we climb up with the kids all the time. Hope that helps!
Just curious as to how much weight it holds? it seems so long and with only supports on the ends I wondered about the middle being not having any supports. I would love to get hubby to do this in my youngest’ room. she is currently in bunk beds that my husband built yrs ago and is ready for something else 🙂
Holly,
The best thing to do would be to look up load bearing weight for the exact type of wood you will use, but I can say that for what we did I have slept up there with both boys before and get up there regularly with no give in the support. (Please read our disclosure pertaining to building.) Hope that helps some!
I’m curious as to why it cost 250.00? I don’t see the lumber needed costing so much. Can you clarify a bit? Thanks. It looks awesome!
Hey, Chuck. Yes you can get the lumber for less I am sure, but we didn’t want any chemically treated lumber thus the price of our post was significantly higher. I hope that helps some. Happy BUilding.
Hi! I absolutely love this build and will be building something similar for my boys. One question…. in the two pictures after “Your box should be complete with decking” it looks as if the MDF is inset within the box frame. I can clearly see from all other pictures that it isn’t, but did you start it that way and change your mind…. and if so why? Or are my eyes deceiving me? I actually like the idea of making the mdf inset and having the 2x4s lower to accommodate this. What do you think? Thank you! I’m new to wood working and really value an experienced woodworker’s opinion.
Hey Katrina. Ours was not inset, so it may just be a deceiving photo. You could inset it if you wanted, the only major difference would be that it wouldn’t be as strong, so I might suggest adding some joist hangers instead of just screws. I hope that helps. Let us know if you have any more questions.
Okay! Thank so much!
I thought the same thing! But what we are seeing is the side of the MDF board on top of the frame, not the top of the frame with inset MDF:)
I am wanting to have my husband build this for our teenage son but want him to be able to be up there with friends to play video games. What do you think the weight limit would be on something like this? I want to put younger brothers beds underneath and am certainly concerned about safety. 😊
Erika. I am not sure of the exact weight limit, but if you are concerned I’d simply add more 2 x 4’s and use joist hangers instead of just screws. You could also make the ladder a part of the structure and build it as a support, then screw the bed into the wall studs. I hope that helps some.
Thank you!
I’m going to be building this for my daughters. I like the idea of having the ladder part of the structure. Can u give instructions on how to do that? I’m new to woodworking so it would be greatly appreciated. Thx
Hey, Steve. If you want to have the ladder as a part of the structure and not a rope, then I think the simplest thing would be to follow the tutorial in our Hideaway 2.0 post for a stationary ladder. Here is that link. https://www.thehandmadehome.net/handmade-hideaway-2-0-building-screen-door-ladders/
I hope this helps and happy building.
Did you countersink the nails in the 1×2’s for the rail? I don’t see any nailheads. Also, what do you think about counterboring for the lag bolts on the front side? Would probably have to counterbore a little less than 1/4 in. or so. Does that do anything to the strength of it bearing weight? Thx Steve
Hey, yes the nail heads are simple finish nails that did drive below the surface and then you can cover with wood putty. I’m not sure I could speak with certainty to the strength of the bolts being driven in further, but I don’t see why it would change it. You could use another brace on the inside if you are concerned.
8 feet long? Where did you get a mattress that long?
We used a regular size twin and a toddler mattress.
I want to build this loft bed for my daughter but I want it to be at least 60″ tall underneath. Do you foresee any problem regarding stability with 5, or even 6 foot tall 4 x 4 posts?
Hey! Great question, I think as long as you anchor it into the studs of the wall you will be fine on height.
Do you have the measurements and cuts for a full sized loft. I really want to try and make this. It’s really cute. Thank you
I love this plan! Have the railings held up with kids leaning on them or using them to climb up? I’m debating if the 1×2’s will end up snapping.
I love this plan! Have the railings held up with kids leaning on them or using them to climb up? I’m debating if the 1×2’s will end up snapping.
I’m not sure if my comment posted, so I’m trying again.
Hey! Our railings held up fine. Our children loved it and when we climbed up it was fine with our weight as well. I hope that helps
How did climbing the ladder go for your kiddo? My daughter tries, but it sways under the bed frame pulling her back and away from the bed. I’m worried about her trying to get down it half asleep. I secured the bottom to a low beam thinking it might help to tighten it, but it still sways pretty bad. Do you have any suggestions how to prevent this?
Hey Jess! I think it just depends on the age of your kiddo. They had to grow into ours. You may want a temporary ladder in place, instead… until she can grow into the rope one. ;}
Wow. Nice post. Thank you for sharing.
Thank you so much for this post! I’ve been looking all over the internet to find plans for a loft bed and this is the best one I’ve found!
Wonderful. I’m happy to read this article!
We made a loft bed based off your base design! Absolutely amazing and so simple to build. Our bed is a little larger (2m x 1.4m) and higher (1.25m) . The kids love it!
Awe thanks so much for letting us know, Ely! Have an amazing holiday!
We almost had the same loft bed, except that below ours is a wardrobe and drawers
I know this is an old post but I just wanted to say thanks for the guidance. I couldn’t find what I was looking for but found this and decided I could build it. Turned out amazing.
Oh my goodness! I can’t believe I’ve found a loft bed built to the same dimensions we have available! We’re working with 133”, so some wiggle room but my question comes to the mattresses. You mentioned you’d be getting a custom mattress to replace the crib mattress (the stage we’re at here). Any ideas where those can be found – and the bedding to go with it? Many many thanks!
Hi Erin! So much fun! I am sorry, as we did not stay in that home long enough to need a new mattress. This site looks pretty interesting. You could also consult a local upholstery company to have one made, as well. I know they usually have the resources or can point you in the direction of one who does. I hope that helps!