
the basics of stained glass
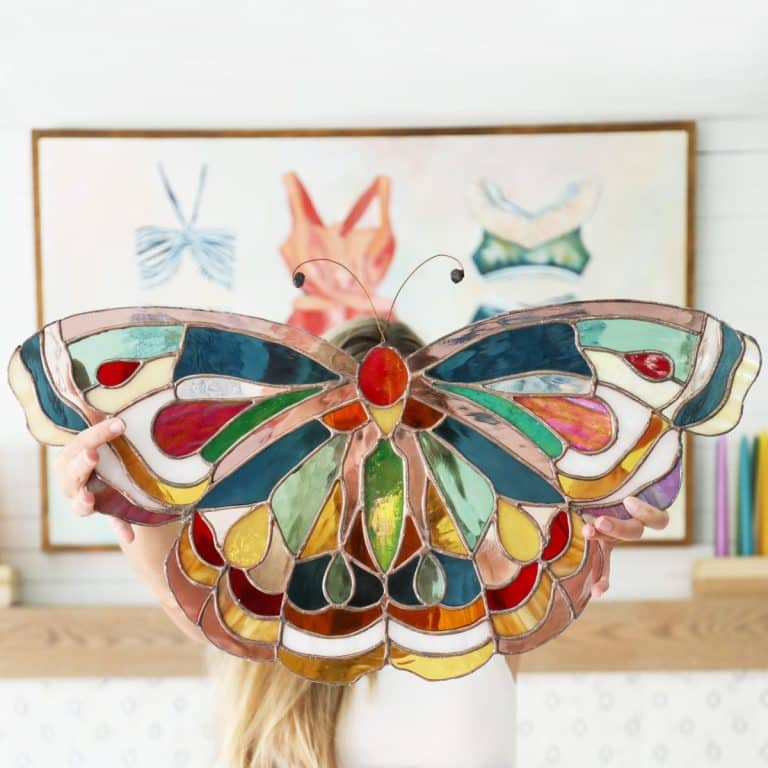
Up until now, my favorite creative thing to do, has been oil painting. I think I found a rival for that. And I couldn’t be more thrilled to be finished with these two beautiful {if I do say so myself} stained glass windows!
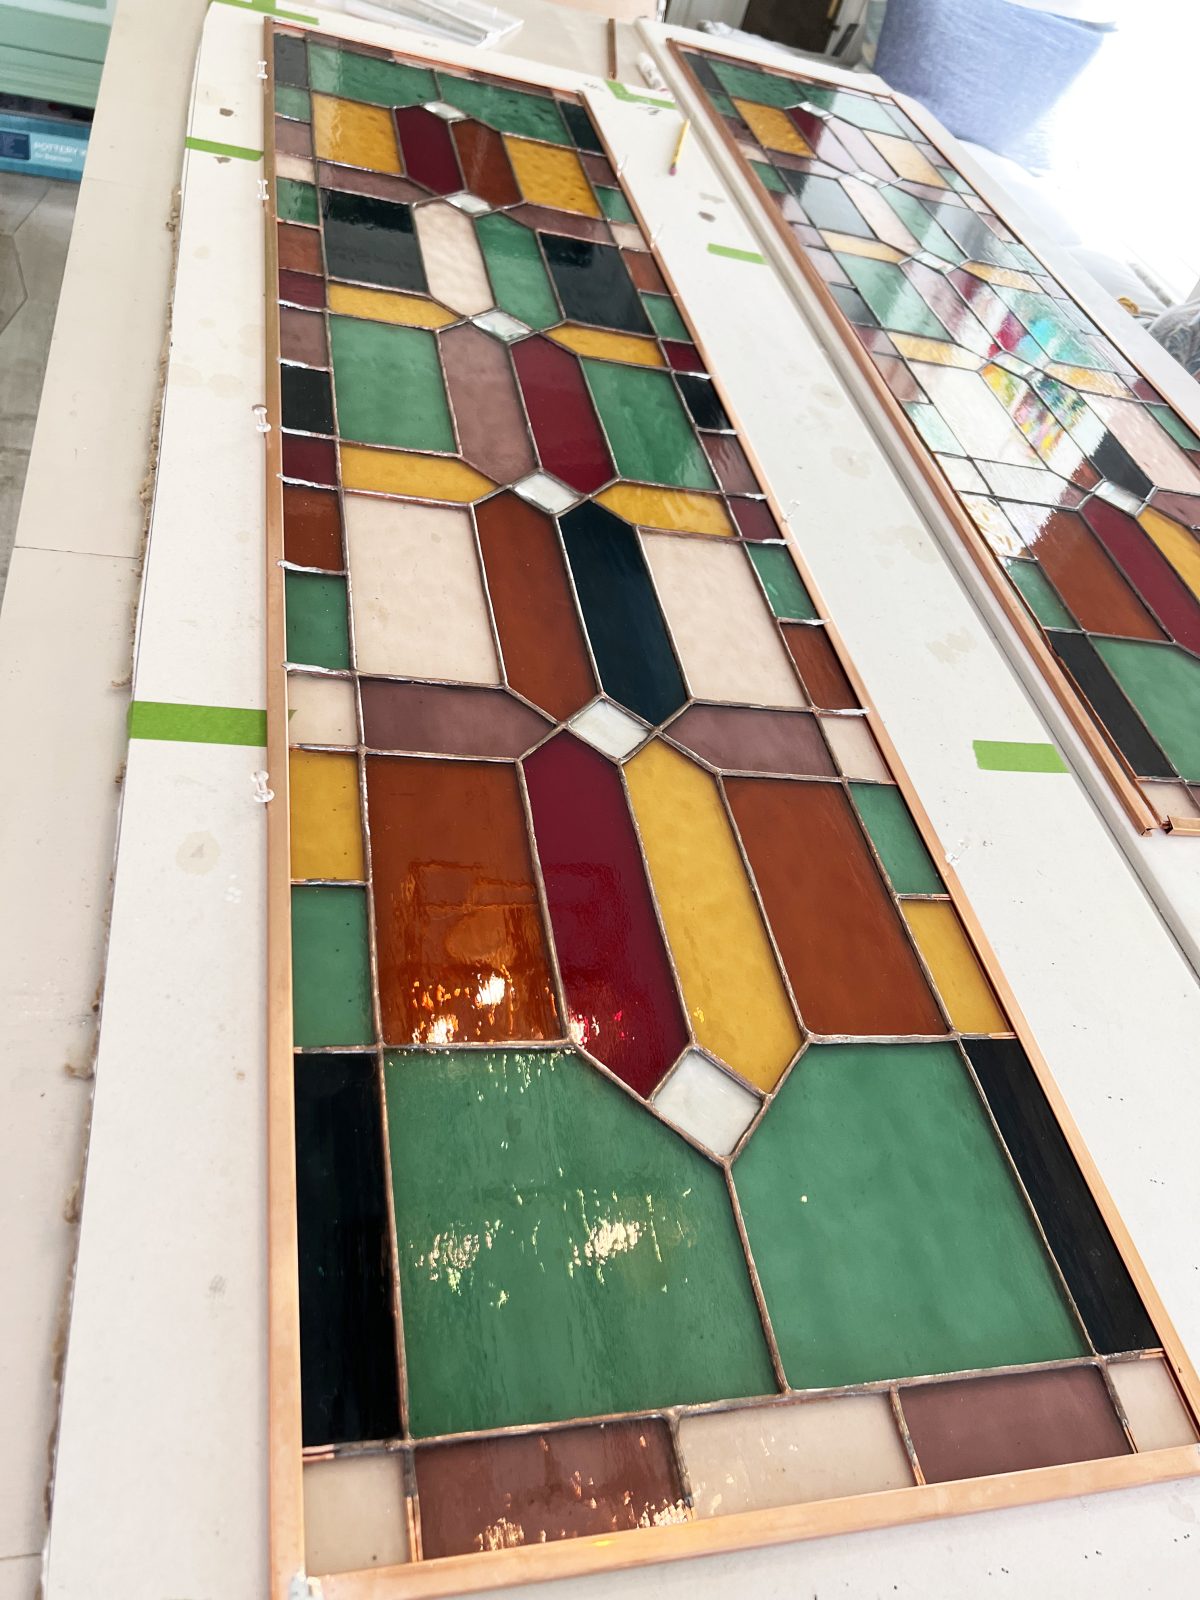
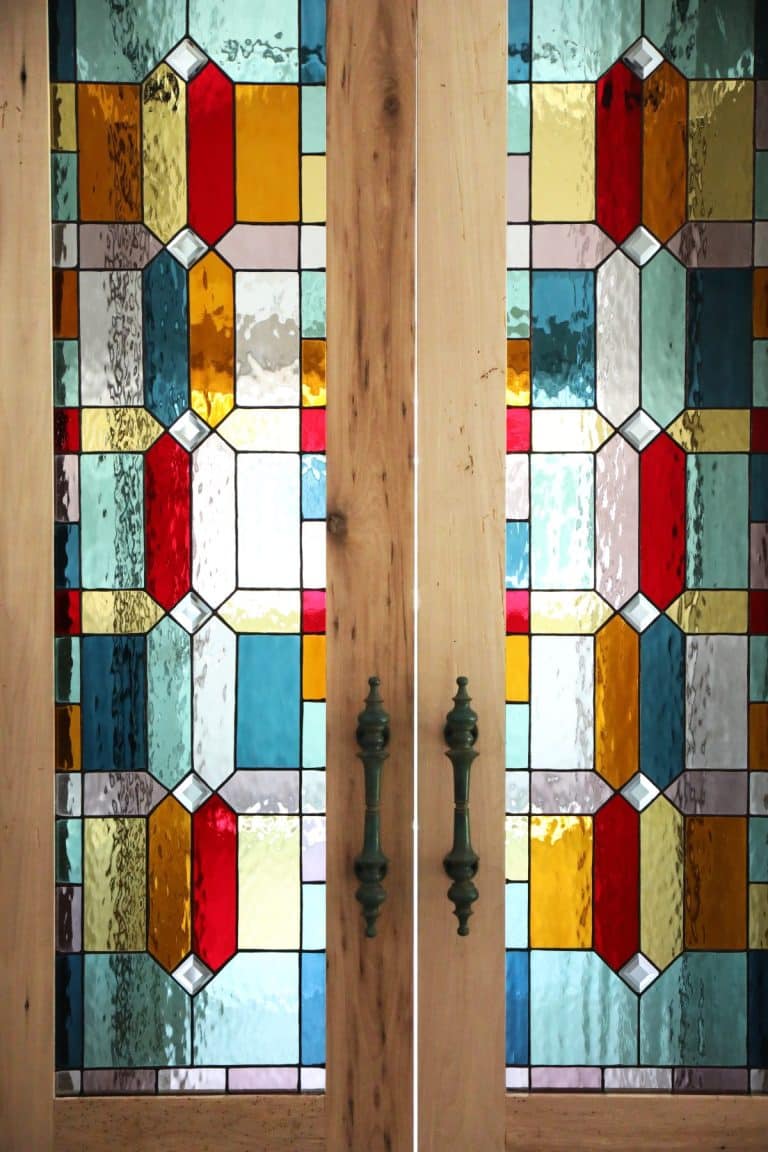
If you’re wondering what on earth I’m talking about, these guys will go in two double doors leading into our bathroom, {hopefully!} soon, in the addition. Honestly, I think I’m still waiting to make sure I don’t break them, first. These photos don’t do them justice but that’s okay, since this is just a little sneak peek. It was definitely my winter project, while managing a few other things, in the meantime. I don’t think I’ve ever been more stoked to take on a new skill and implement it into something for our home.
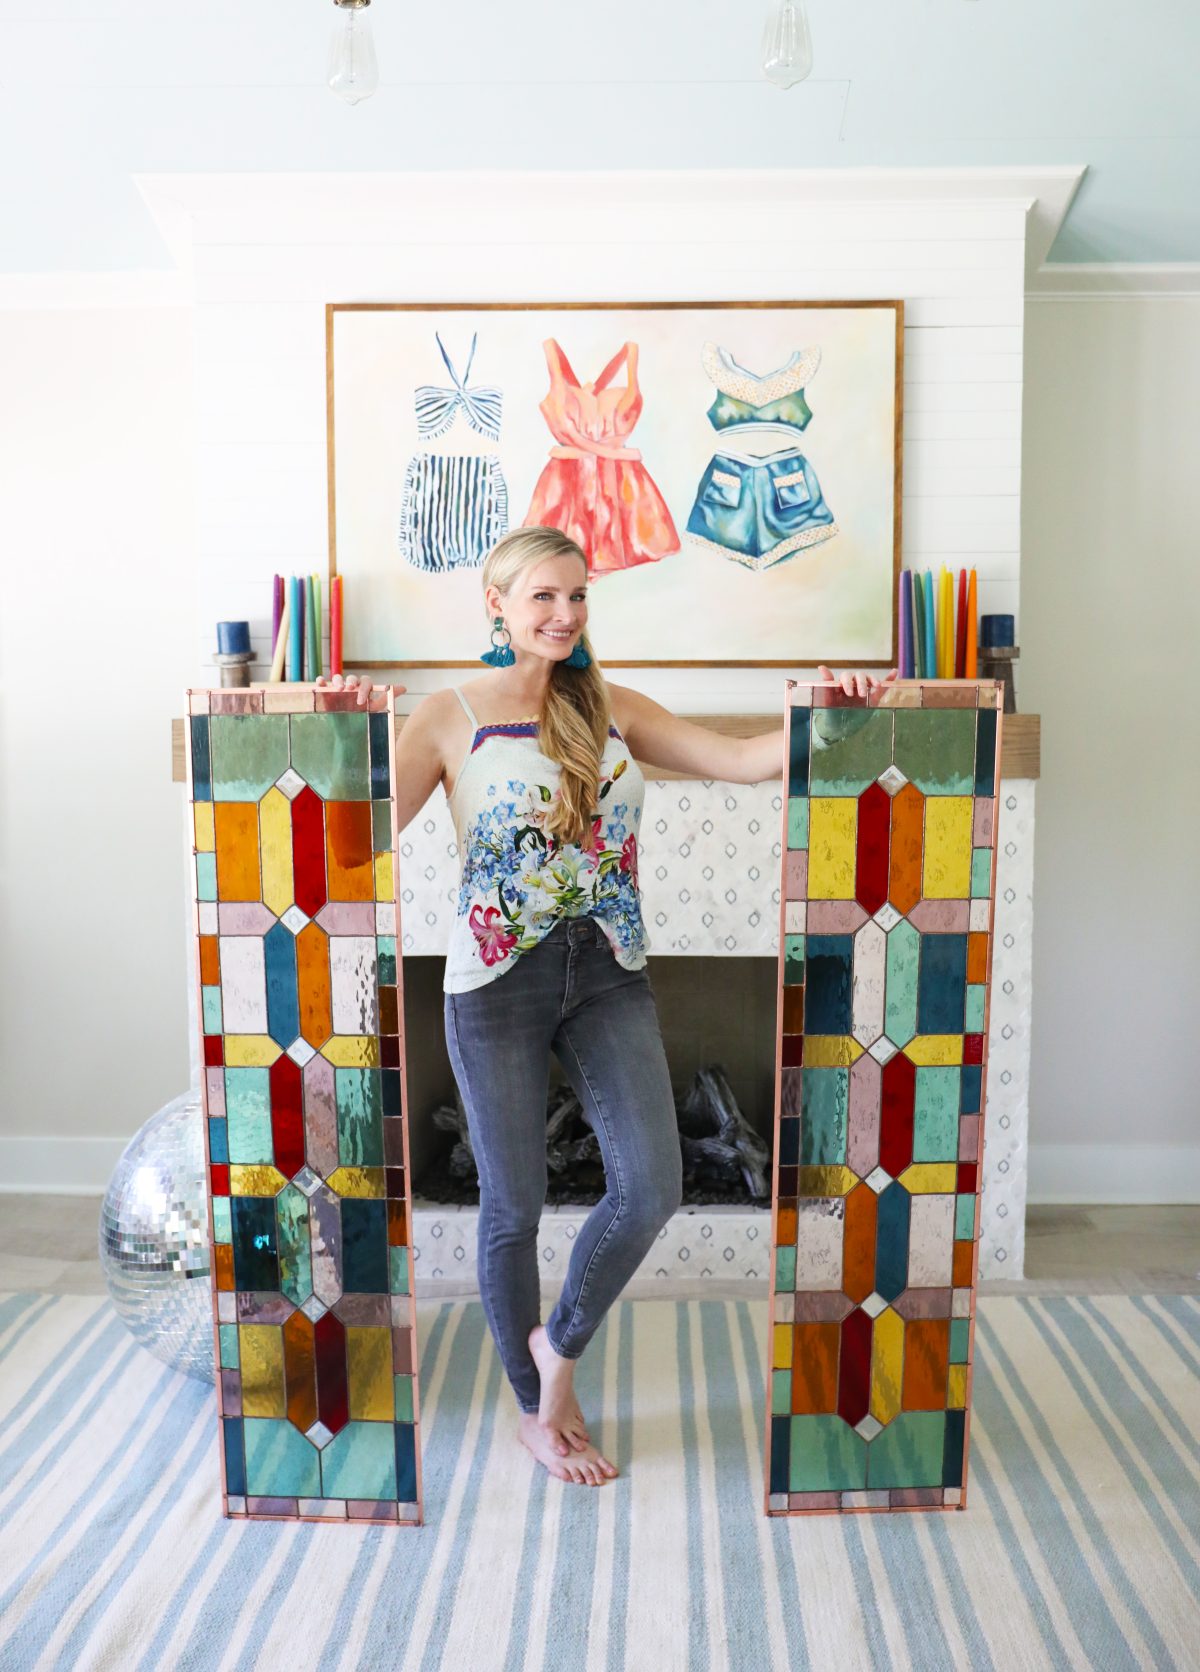
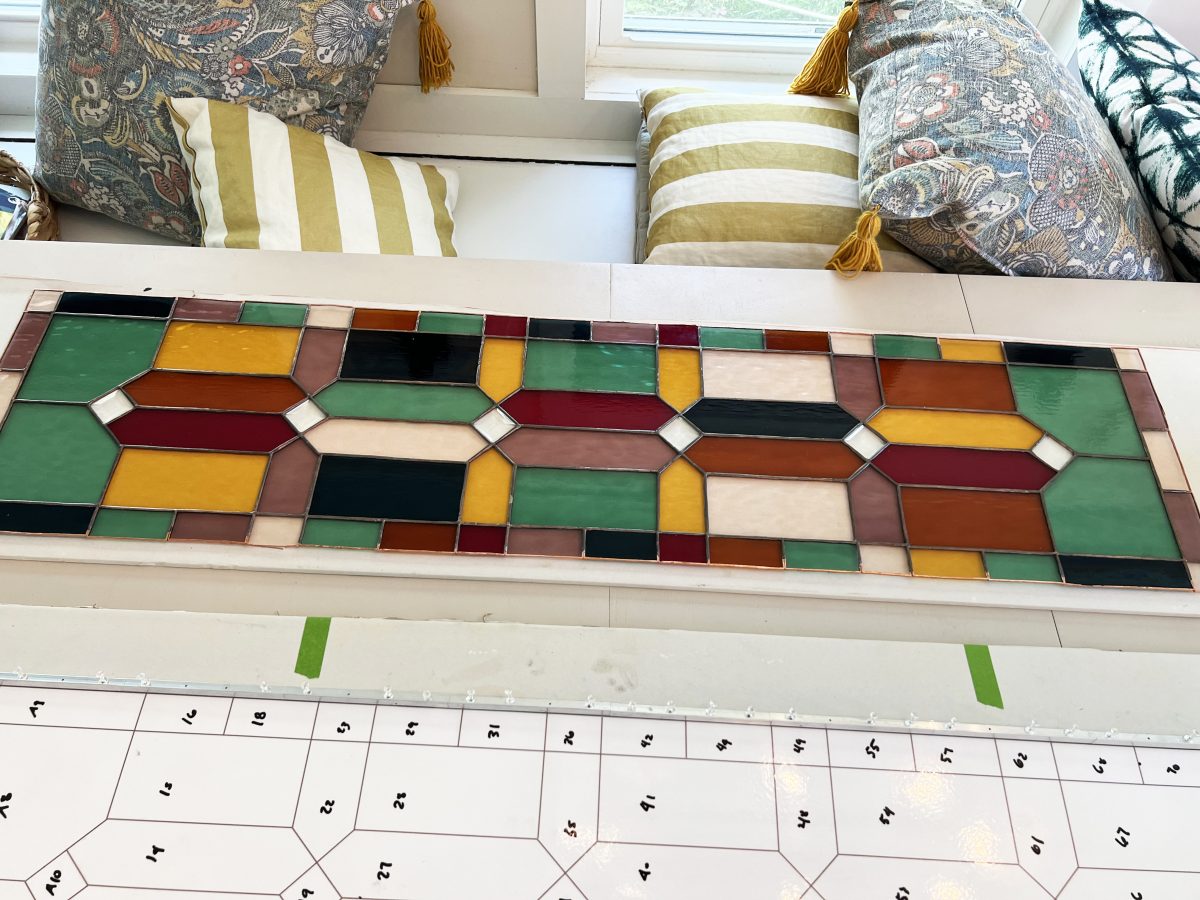
There is a giant learning curve, when it comes to stained glass. And more than just the process, with the design, too. With these windows, right when I was ready to start soldering, I decided to totally change the color scheme, removing one color all together, and incorporating two more. Then when I was ready again, I realized that the pattern was off in color, {the aqua in the center was actually off center toward the bottom because I’d changed up the other colors} and if I was staring at it in our bedroom for the rest of my life {because I’ve worked so long on this, they will stay up FOR. EV. VER.} I just may go crazy. So it really felt like piecing together a giant jigsaw puzzle and finishing again to make it work. But once I did, I was ready to go. Jamin said that he took on electrical for the addition {saving us 11,000} so that I could take up stained glass. He’s kidding, of course.
Kind of.
He loves me.
I took a class this winter with The Glass Onion in Franklin. Bonnie is incredible as a person, teacher and artist… and I HIGHLY recommend her courses if you live locally. Nothing beats the real thing with hands-on experience.
If you are not able to take a class right now, or are just a little curious, I’m breaking down the process, here. I already outlined the supplies you’ll need to get started, so be sure to check that out, as I’ll be referencing it often here. I’ll also be providing a lot of free patterns as I go along, because 1. It’s fun and 2. Why not? So stay tuned as this series grows! I can’t wait.
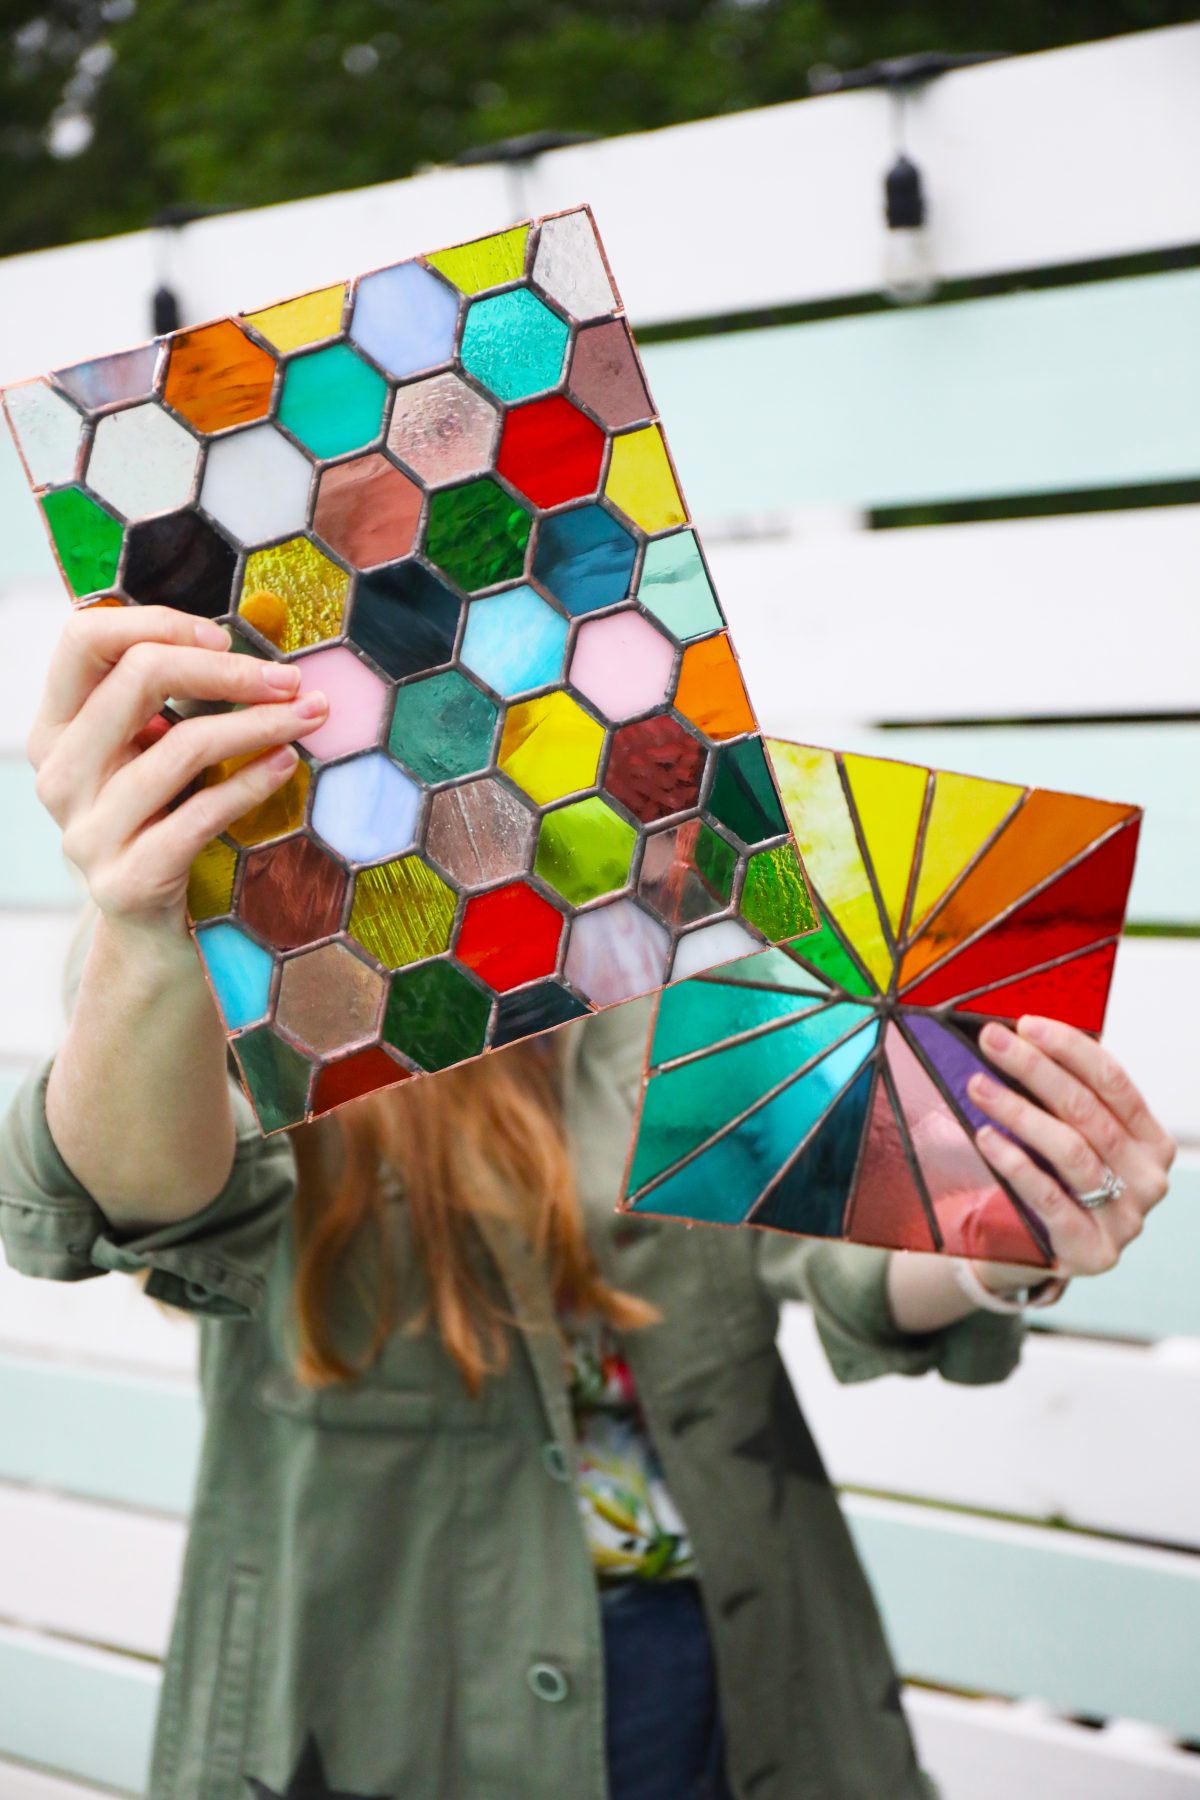
Here are the colors before I switched them out. I’ll be covering more on that in the future, but I’m glad I changed my mind.
This was more work on top of work, but switching around the colors was the best choice I could have made.
Before we start, please review all safety points here. I think this article covers it perfectly on all things to consider when it comes to your safety and stained glass.
But to my point: Stained glass can basically be broken down into these main steps.
Today I’m going to cover the basics, if you’re interested in diving in, along with my {very limited for almost 6 months} experience. I’m also linking to some of my favorite videos which have guided me along the way. But you definitely learn by doing, and I can see my skill improving every time, with every piece. It’s kind of a thrilling thing to learn, and I’m pumped to have you on this journey with me! If you’re thinking about diving in, let this be your sign. We hope this gives you a little push to try something new.
You can skin a cat a lot of different ways. This is not the only way. I do encourage you to explore all the options out there. This is just a process that I’ve learned, and really works for me.
These two initial posts in this series will serve as a check point for the future patterns that I can’t wait to share on our site. It may be edited frequently, as I learn more.
1. The Basics of Stained Glass: Planning + Design
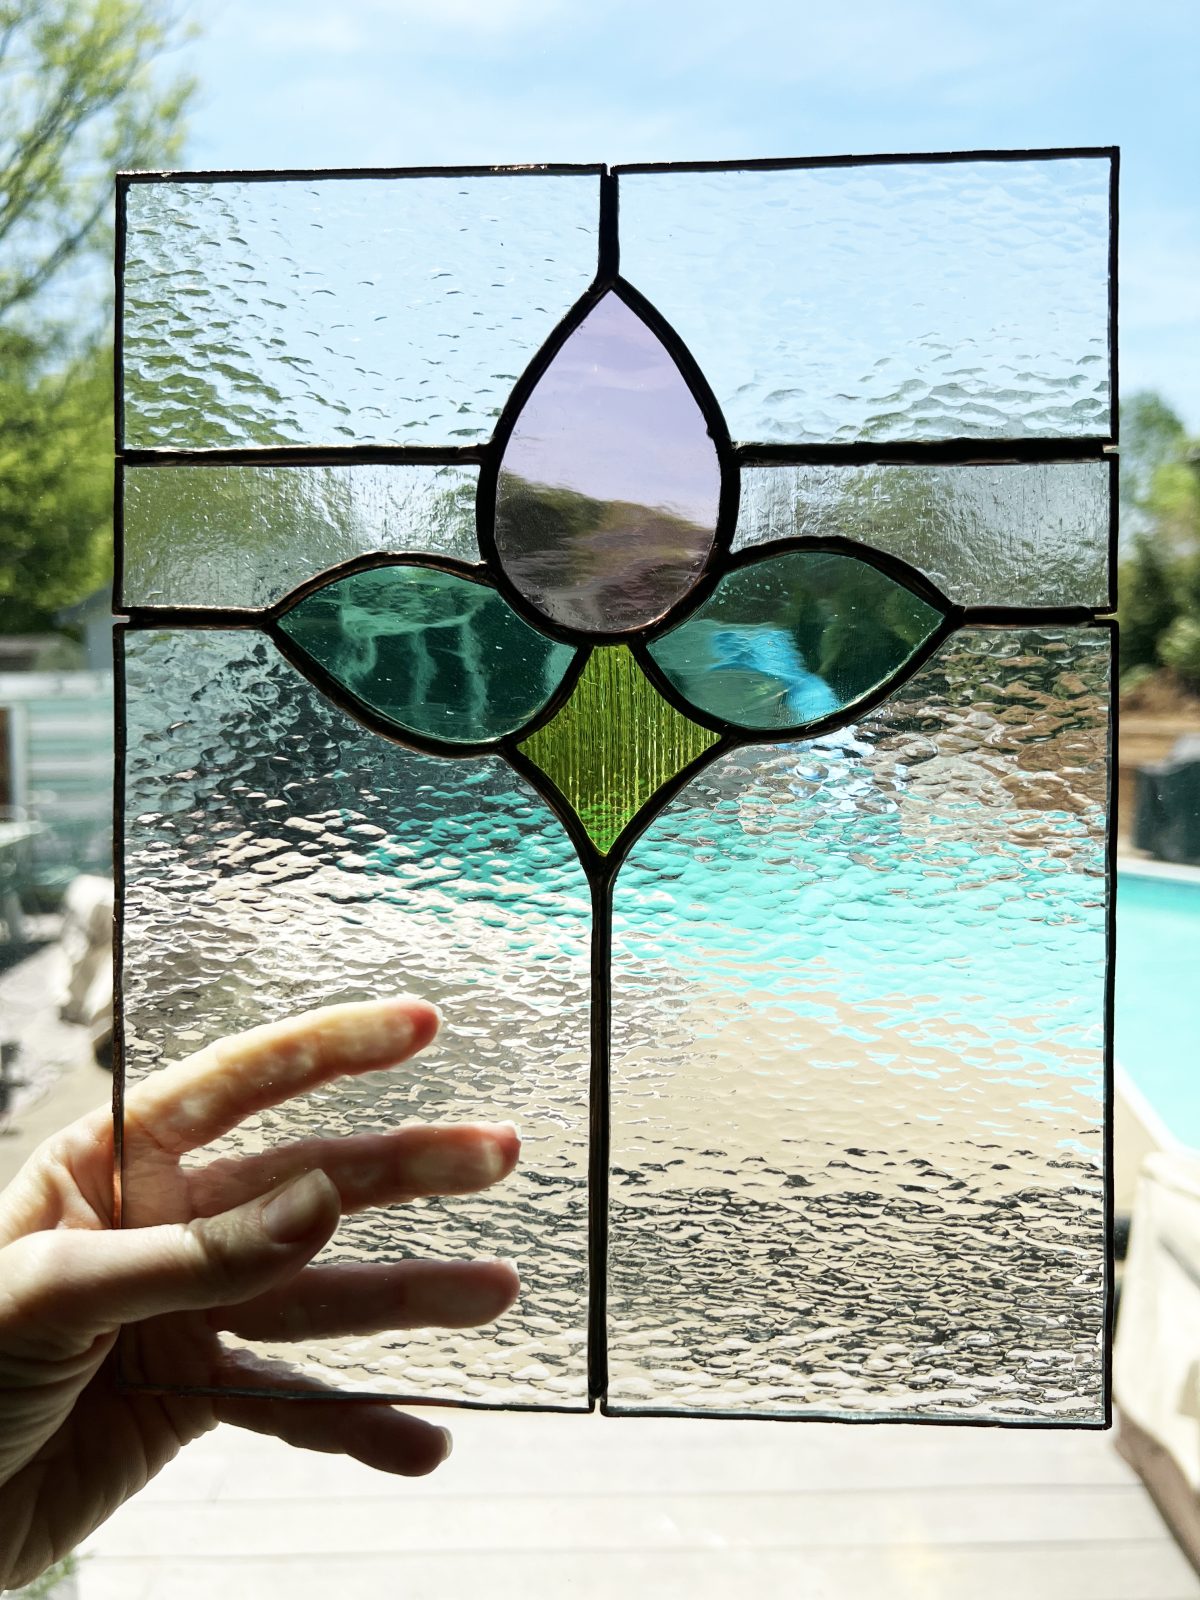
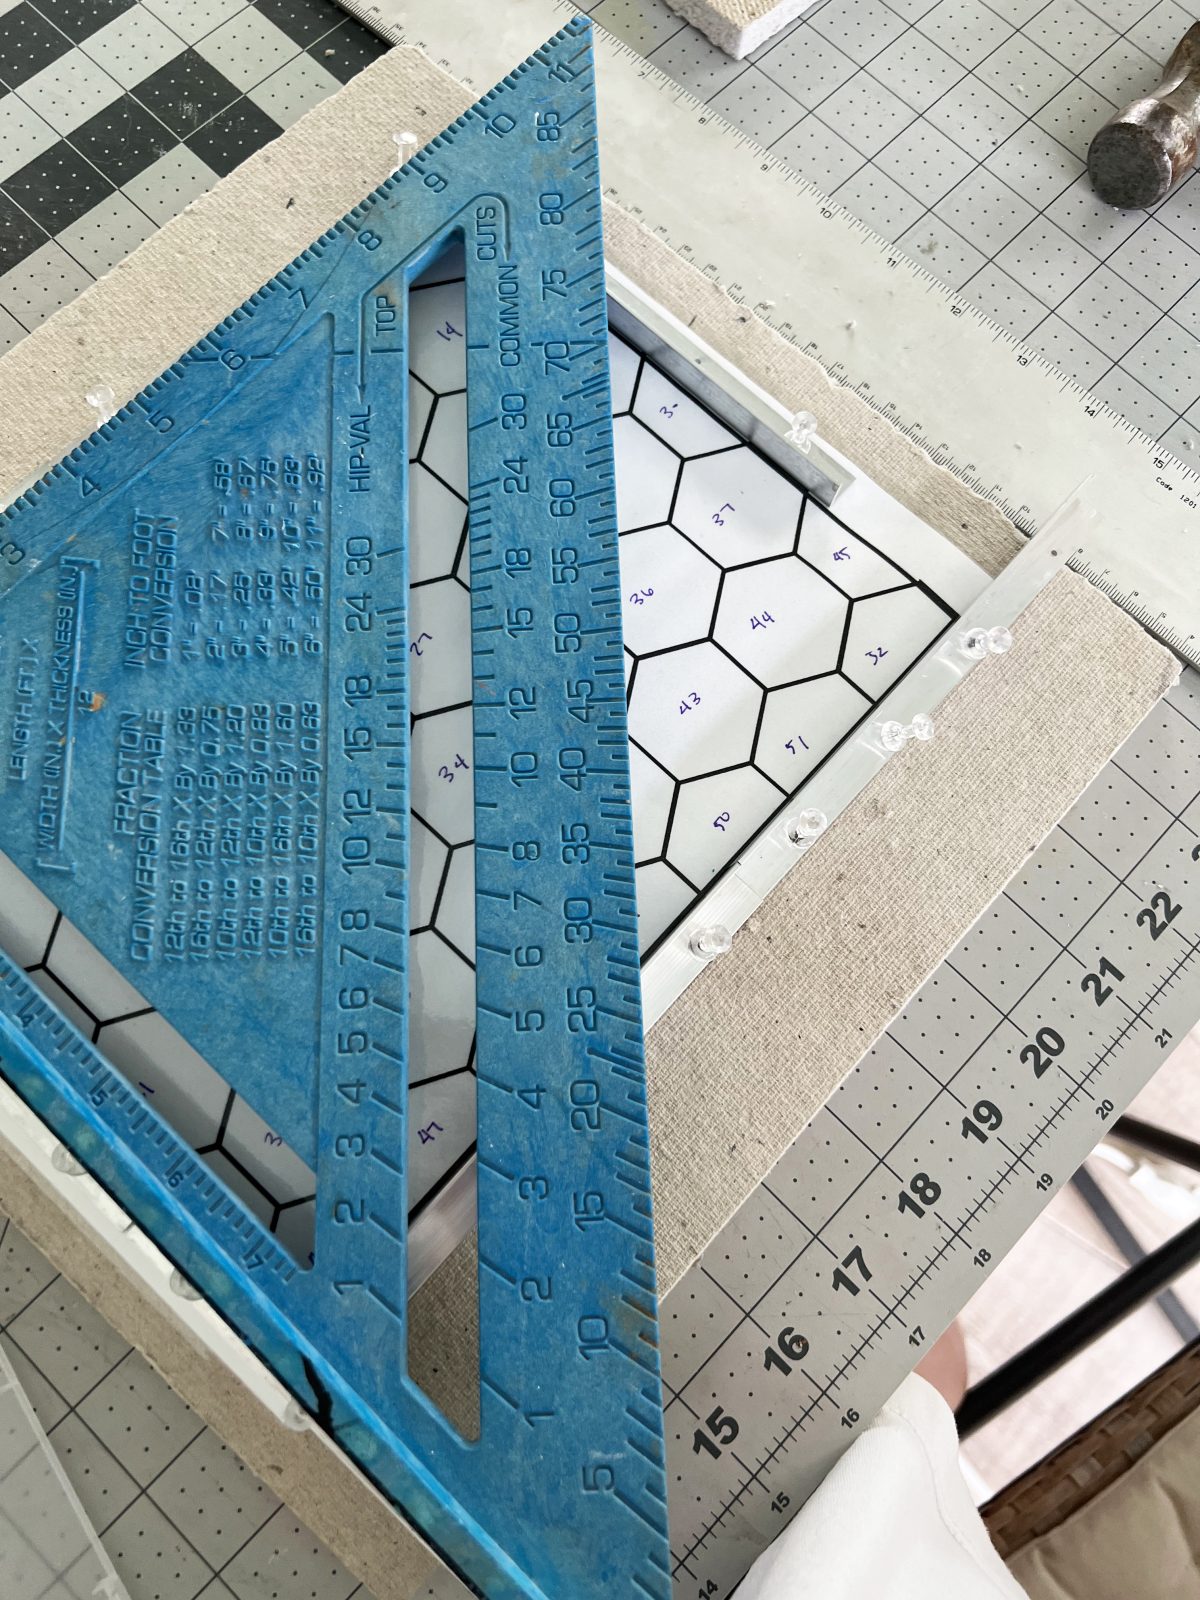
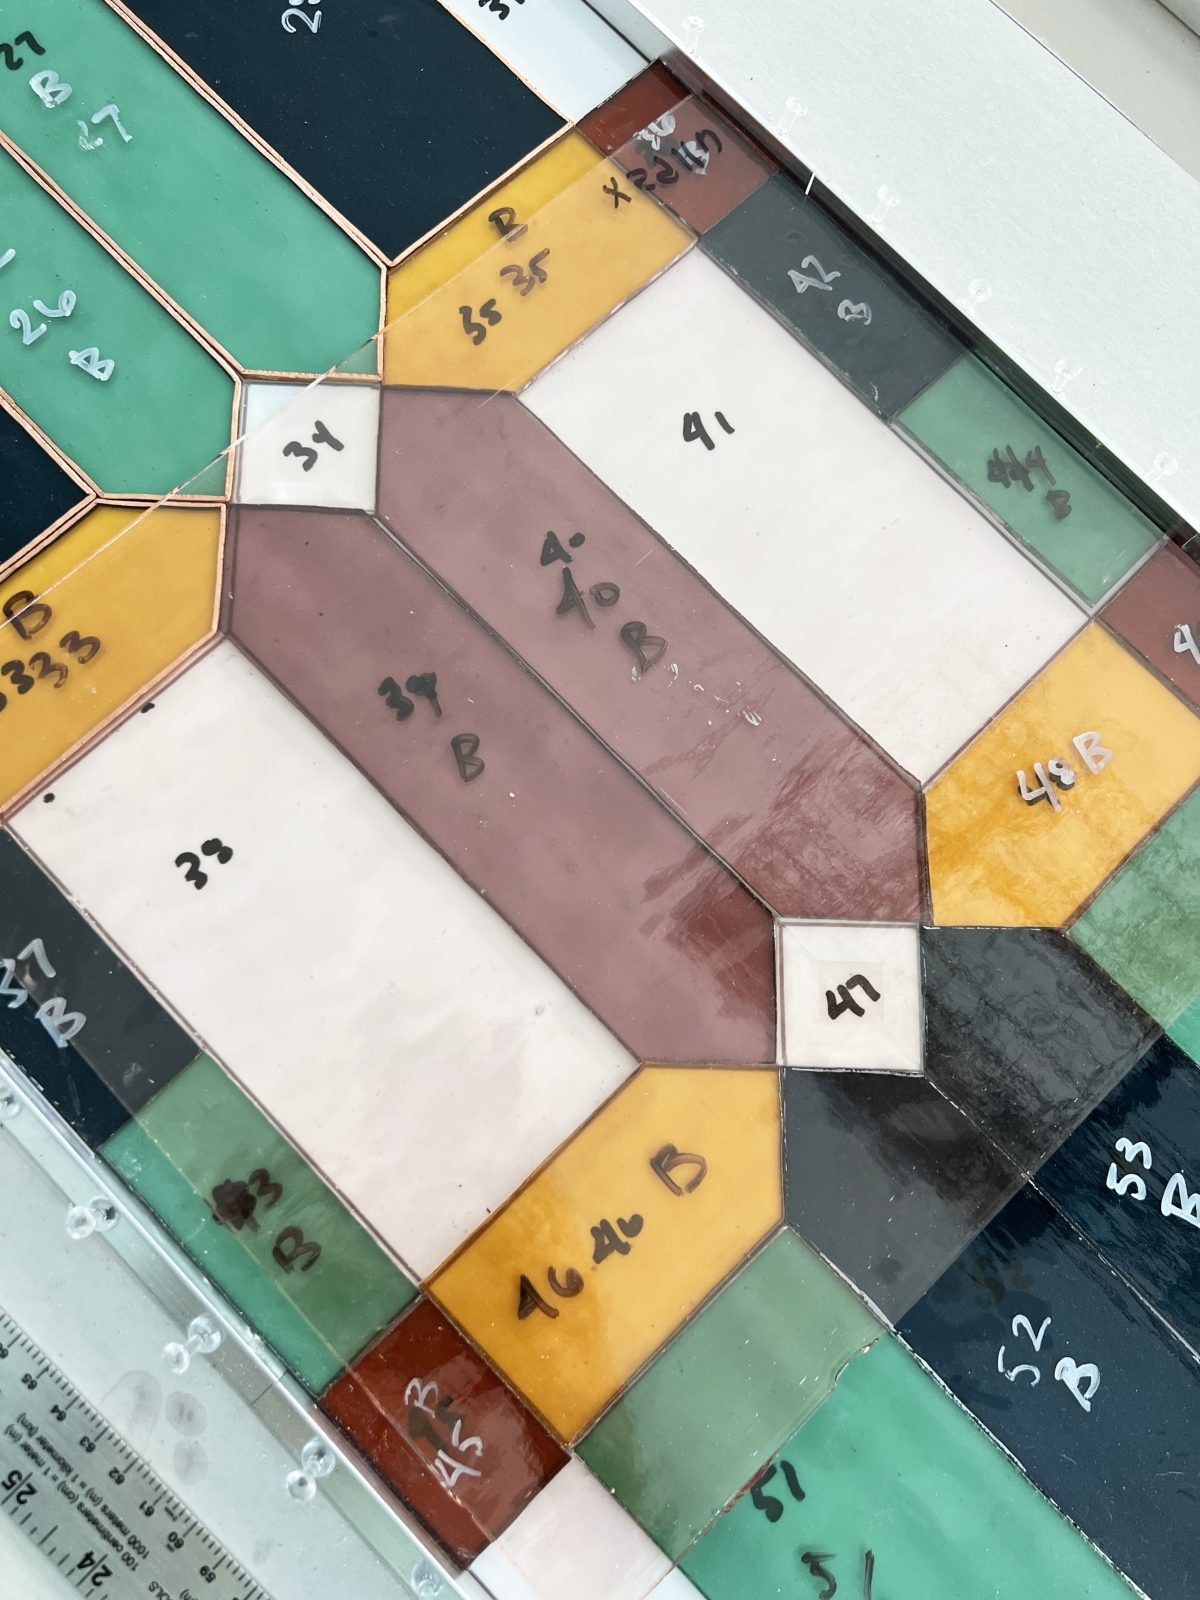
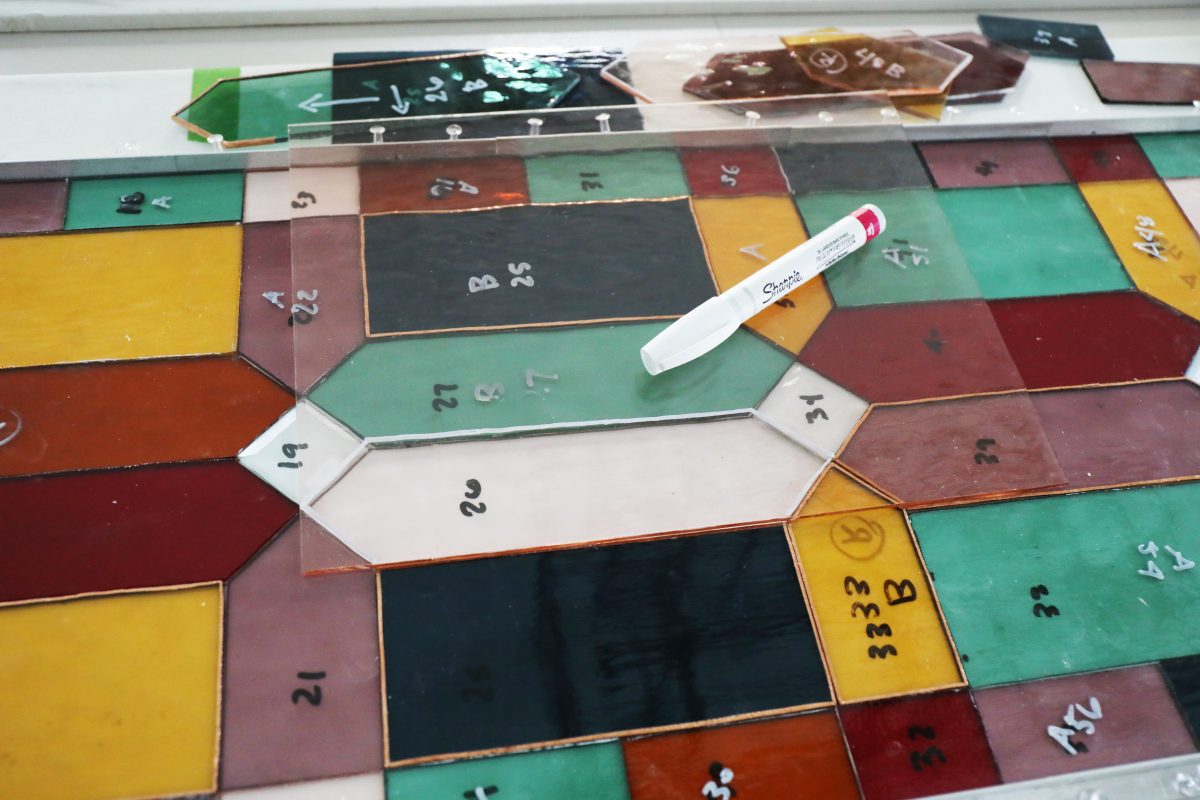
You can download any old pattern off the internet, or pick up a book or two from your local crafting store / Amazon. However, the design process with color, is what intrigues me so much about the entire thing. I have been playing around with different ideas on illustrator, to map out what I want to do.
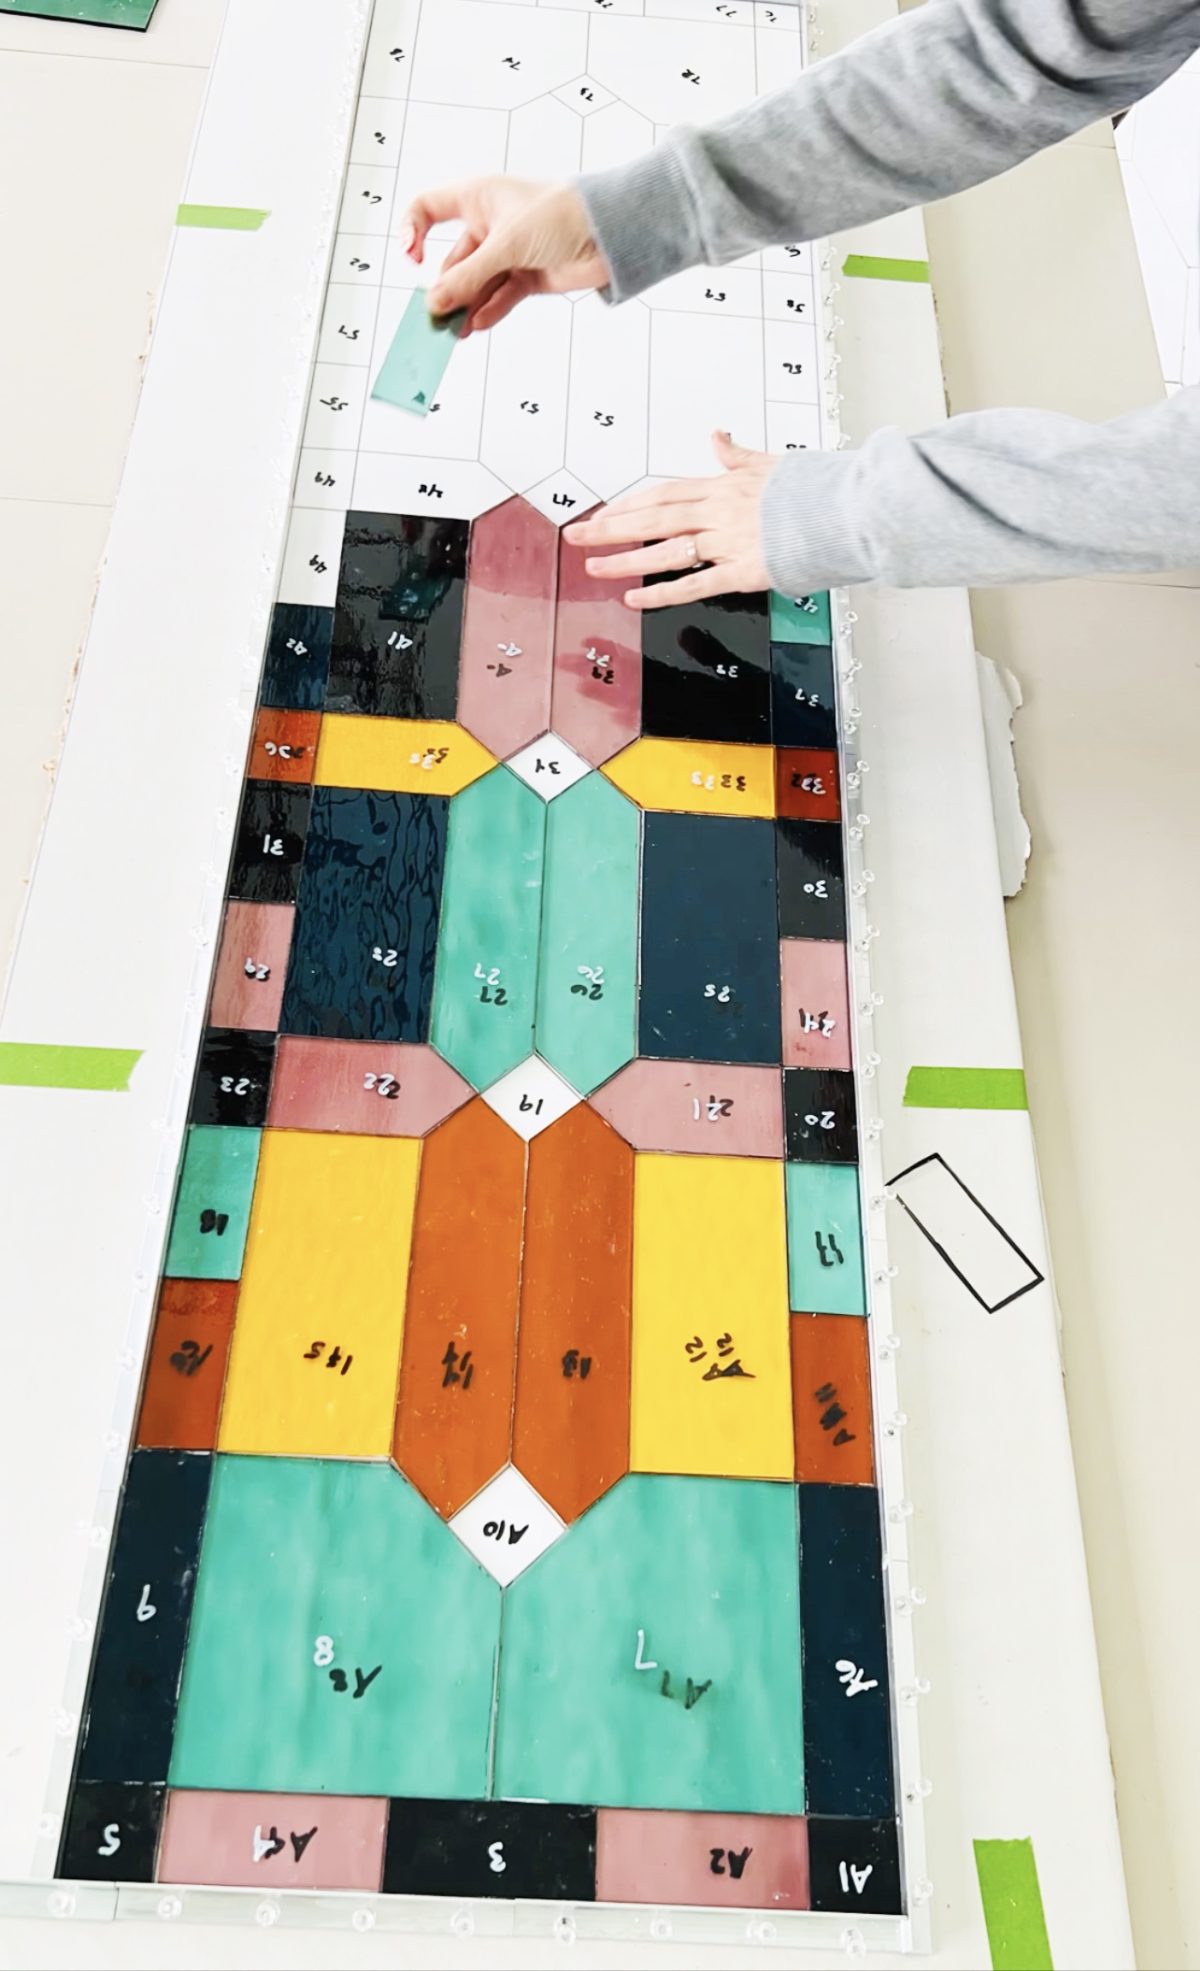
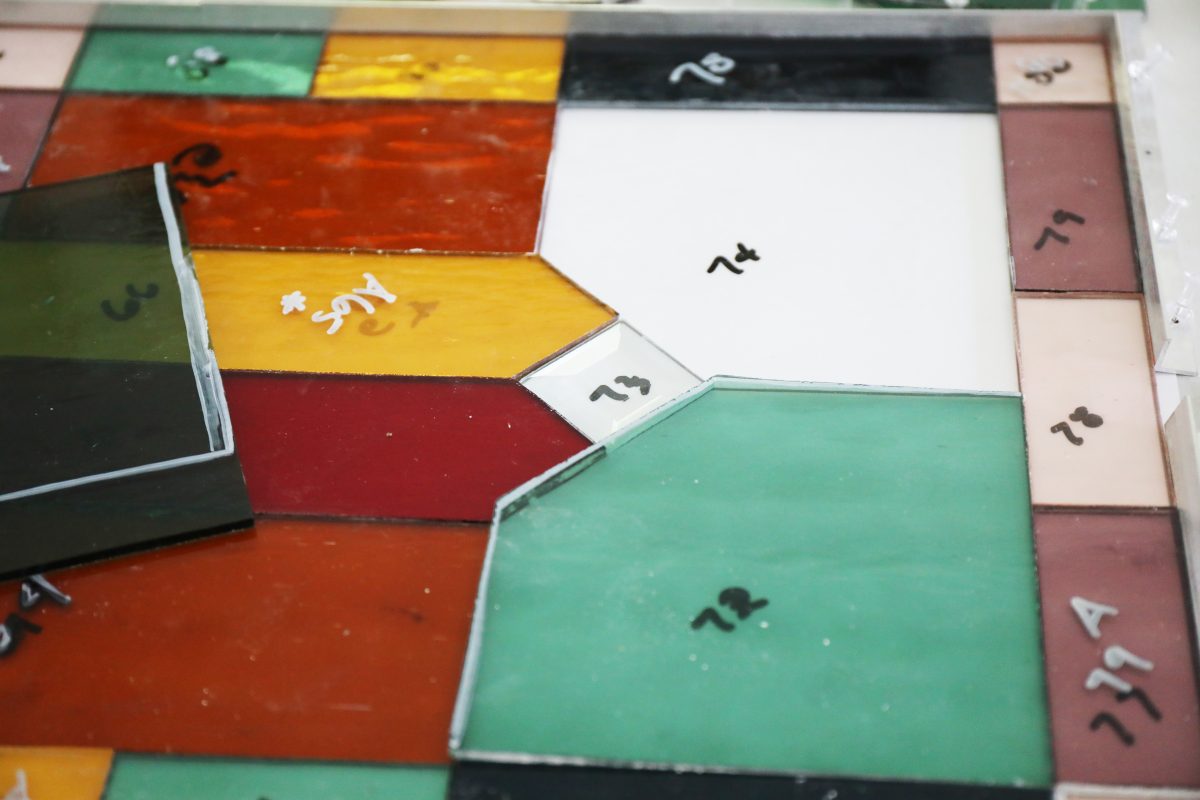
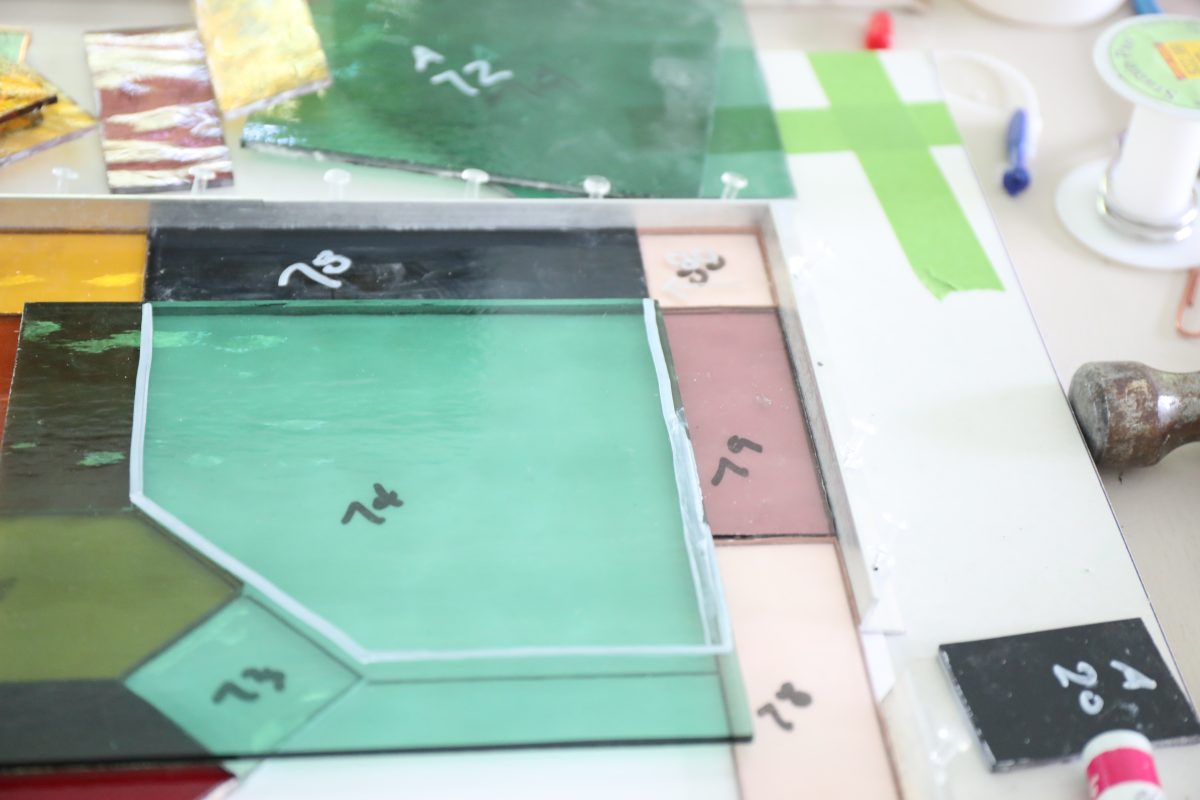
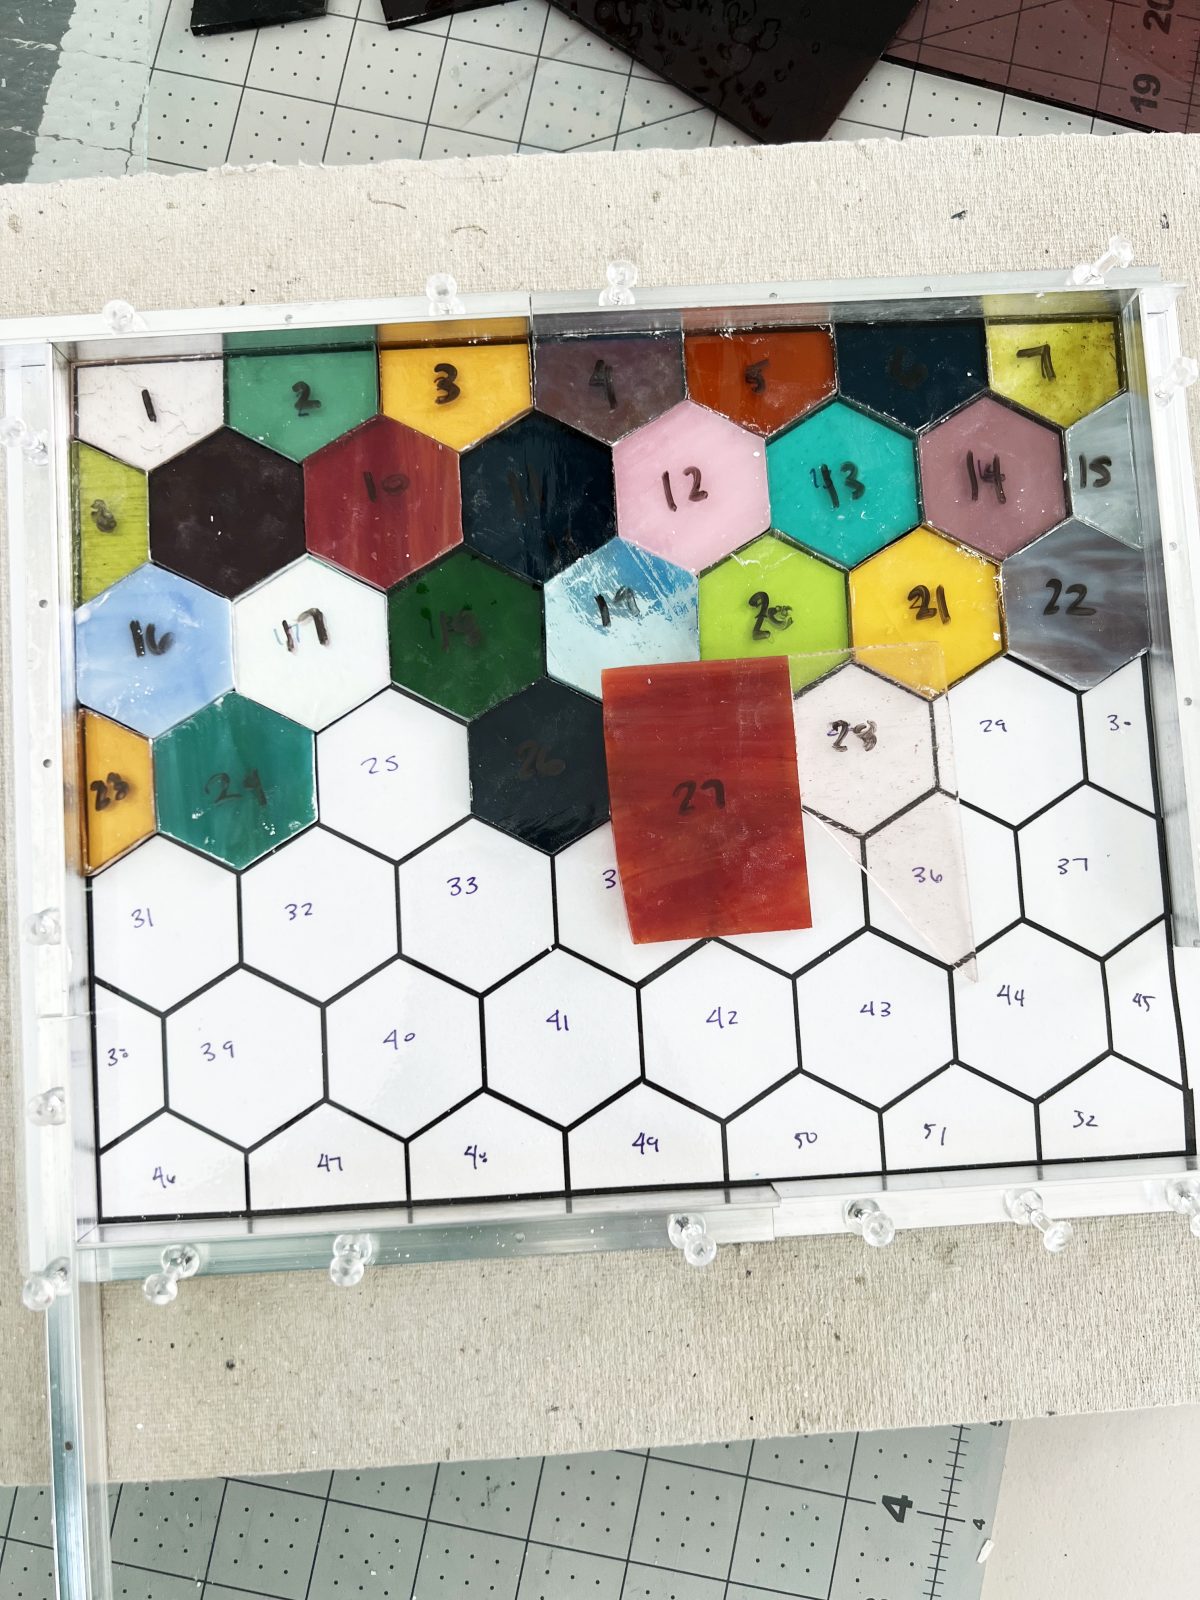
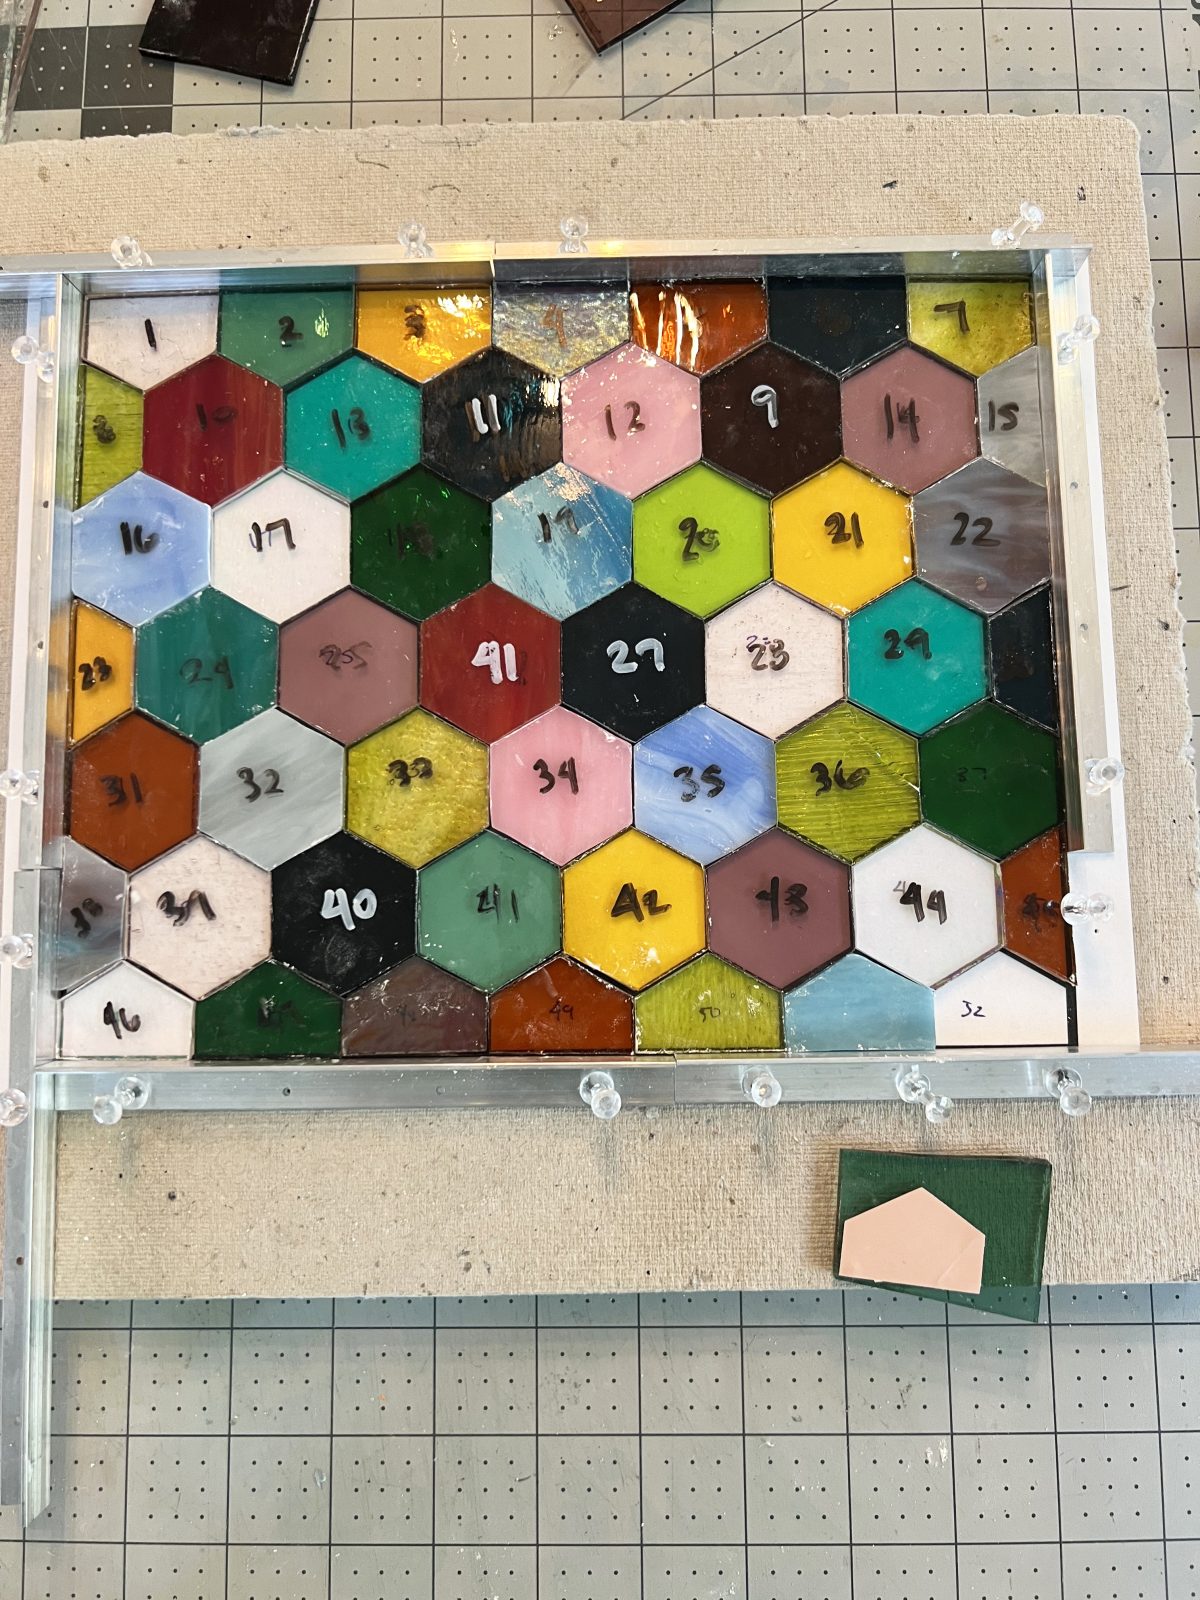
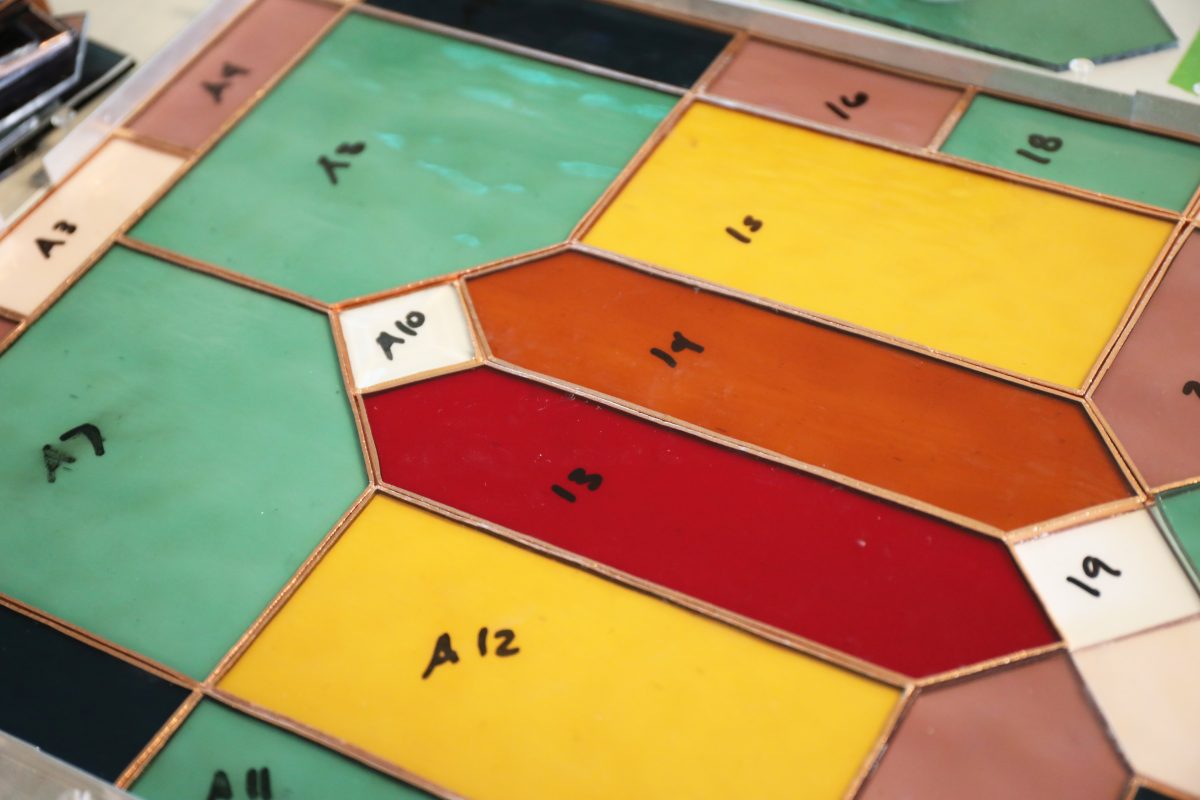
• I always recommend starting with simple patterns, {again, more coming up for you guys!} and making sure that all your pieces are numbered, so that you can keep up with them all. Essentially, you’re putting together a large glass puzzle, and you want to make sure it fits.
• You can laminate your pattern from there, and frame it up with the materials I linked in the first post, here.
• One of the most important things you can do from the beginning, is make sure it’s square. This will make your life so much easier, later.
Just a few tips with the glass for a cleaner, finished look as you plan:
• Have all patterns of the glass going in the same direction.
• Also, decide on which side your textured side of the glass, will go on. In general, {and I’ve already broken this rule} it looks best when the design is uniform on one side.
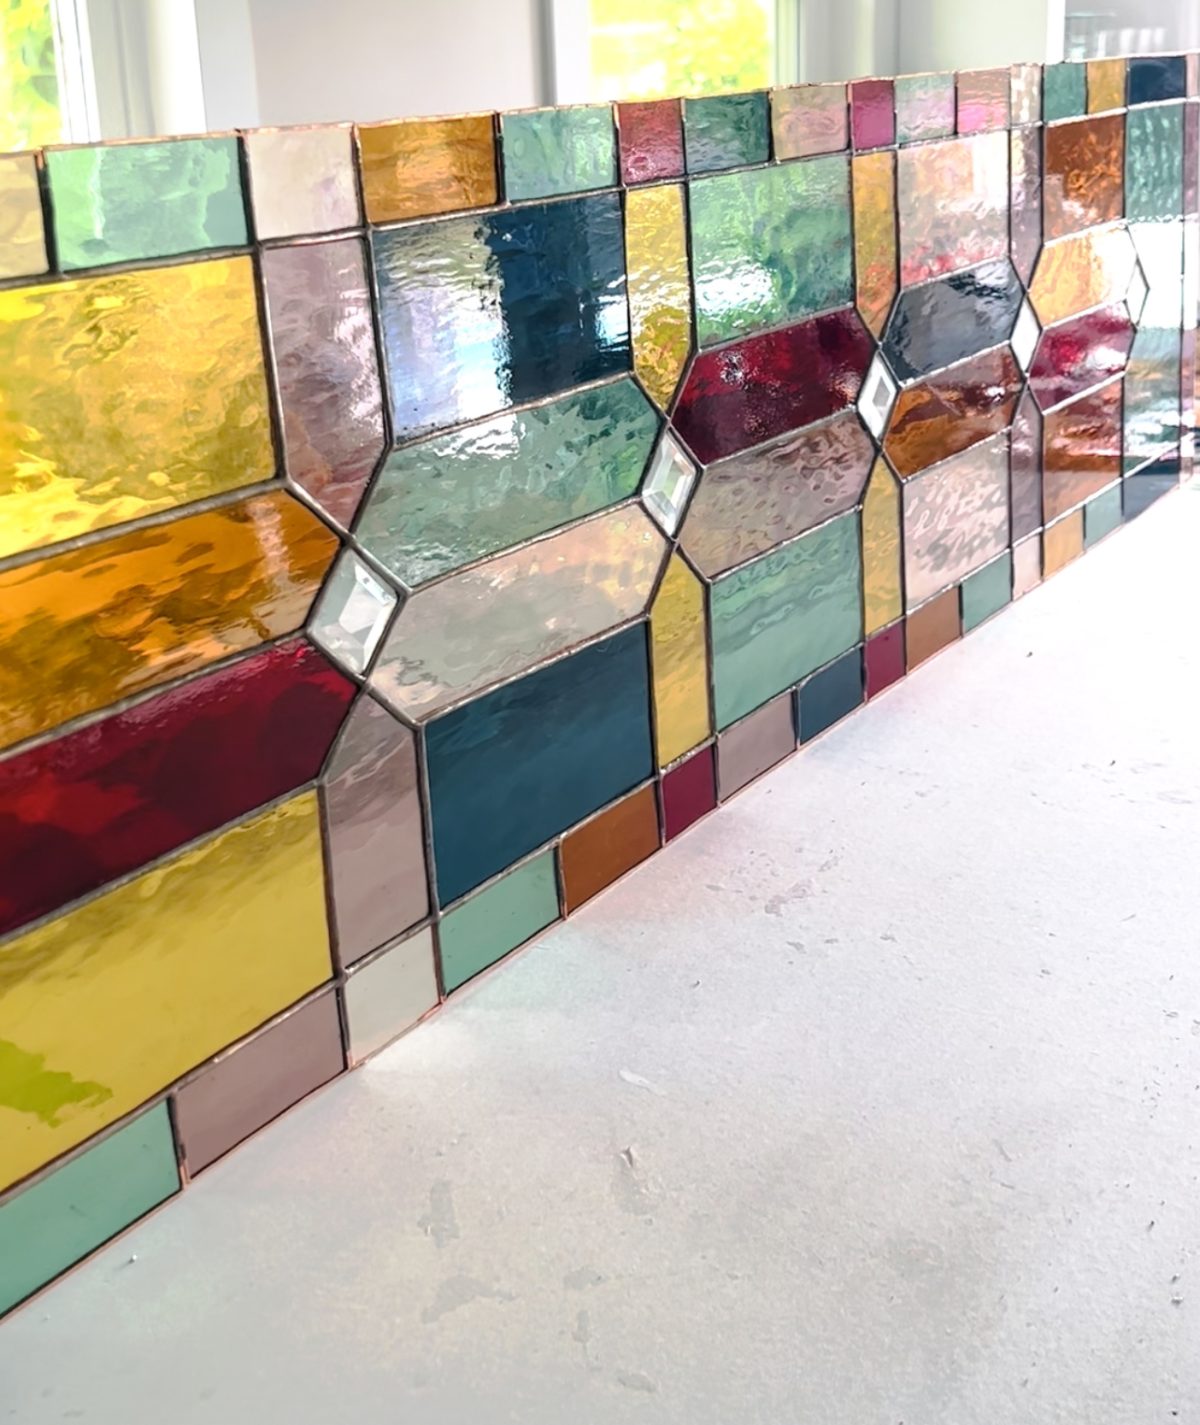
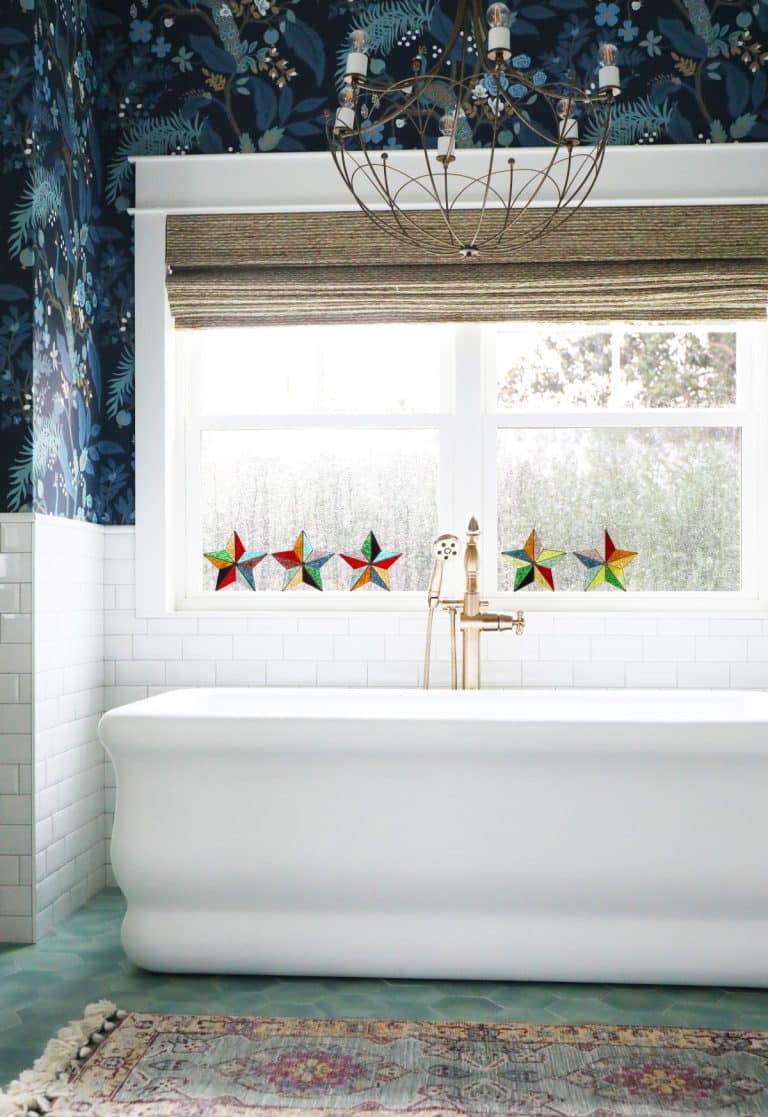
• For example, the large glass panels above, include all the waves in the same direction, with the textured side {apart from the bevels} on the flip side. That way they both have a uniform look when finished. It’s subtle, but when framed in the doors, it will have a clean, cohesive look.
2. The Basics of Stained Glass: Trace, Cut + Grind
In general, when it comes to approaching your pattern, work from the outside, to the middle, in sections. This ensures that all of your glass will fit nicely in the end.
A. Tracing:
There are several different ways to do this. Here are the three ways I have tried.
- Using transparency to trace. Then cut, + place with a glue stick on top of a piece of glass. And cut. {More on cutting below}
- Laying your piece of glass on the pattern, and tracing with a Sharpie. I’ve found that it eliminates that step and honestly saves time, but maybe it’s because I’m more confident now. Not all glass is completely transparent, so in that case, revert to process one.
- The third way is with a Cricut and I have summed it up below. But I do believe that while efficient it doesn’t work for everyone for obvious reasons.
B. Cutting
• Once you have your glass prepped and ready from the steps above, using your glass cutter and a ruler, push down and score the glass along your guide, whether it’s a line, transparency, or Cricut. Some people pull their cutter. I prefer to push down and out. It makes a satisfying sound if done correctly.
• Use your glass running pliers, line up that center line on top of the pliers, with the cut line. Gently squeeze. It should break cleanly.
• When it comes to complicated shapes, this is where your ruler is handy. Run it all the way down, to one edge. Thinking of how you might want to conserve that glass for more shapes. It tends to break away if you don’t focus on one step at a time.
• Then take on the second cut. And so on, until it’s removed. Take them one at a time and break the glass on straight lines, so you do not crack the glass.
• BTW, cracks are inevitable. It’s how you learn. The right tools are handy though. The TOYO cutter is my fave because it’s a game changer. Just make sure your blade is always sharp. A grozer is also helpful, if the cut is farther away from the line than you intended. Rather than grinding the entire thing, you can break the glass away. This video breaks it down in a nice visual way.
• What do you do with all those little pieces? Save the larger ones. You never know where you’ll use them in future projects. Save the shards of glass, too. I drop them in an old coffee container while I work, and organize the rest by color.
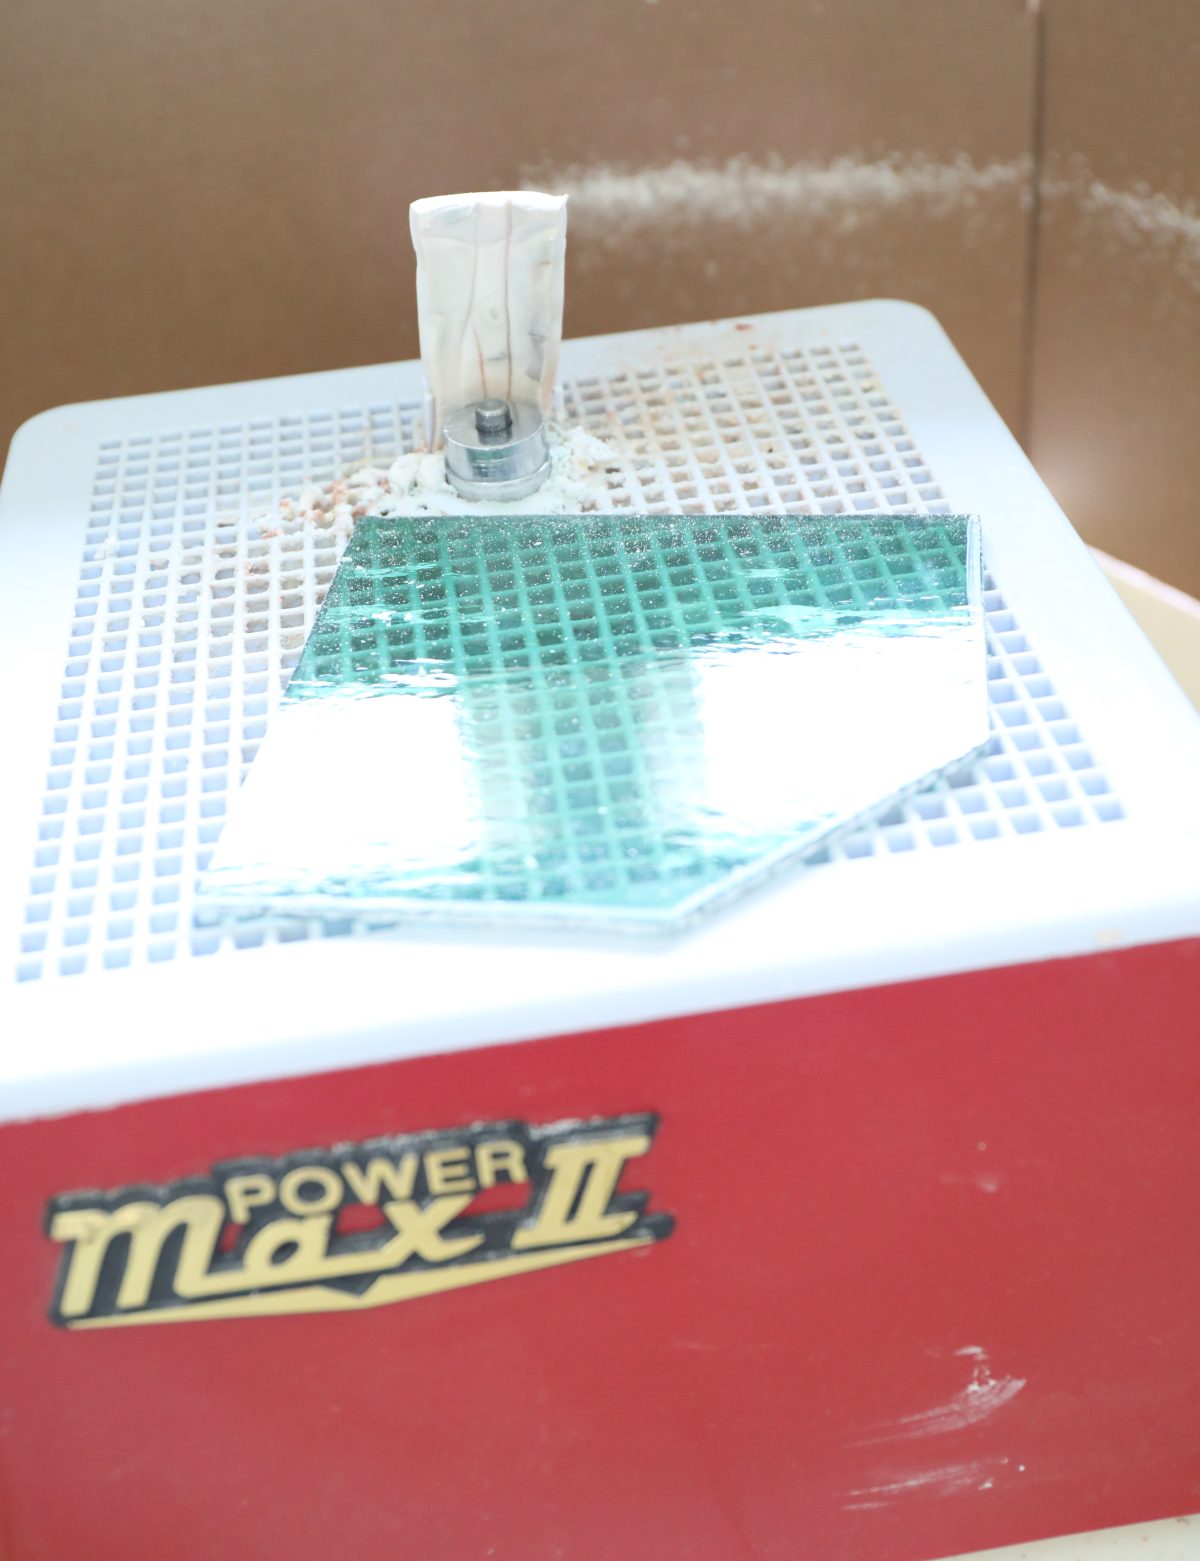
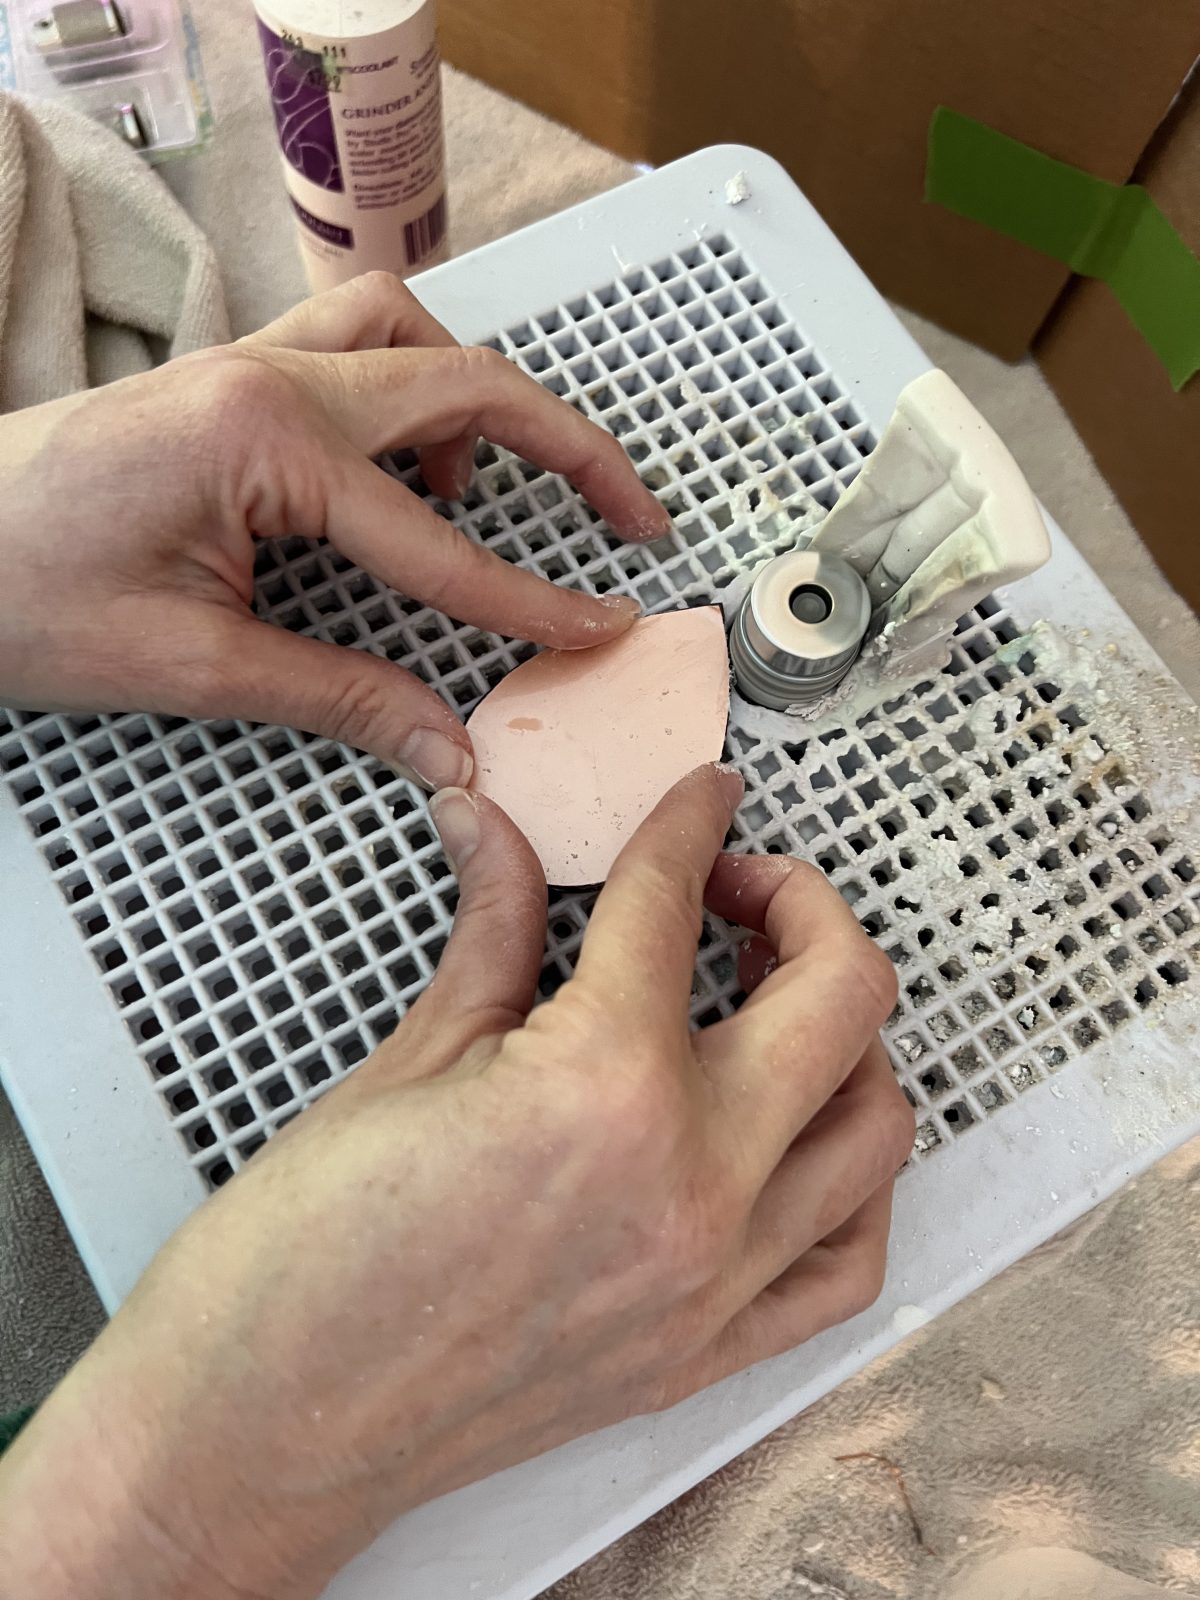
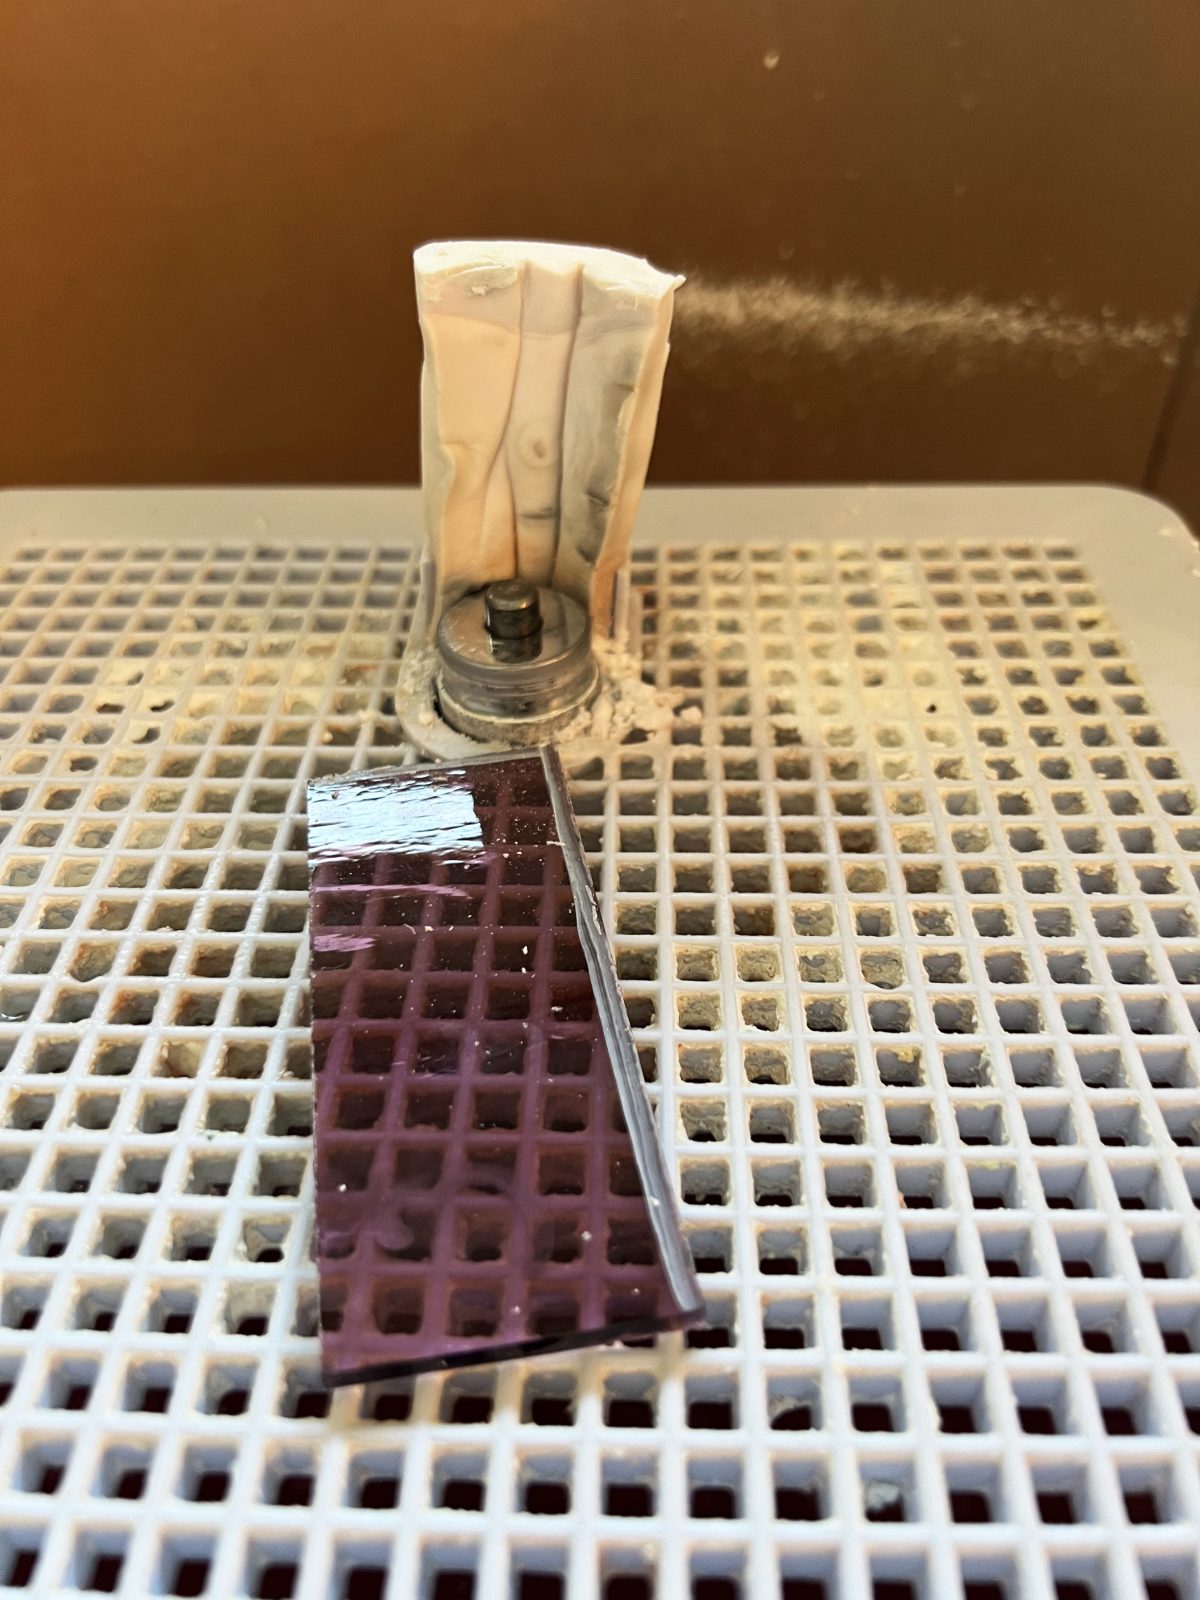
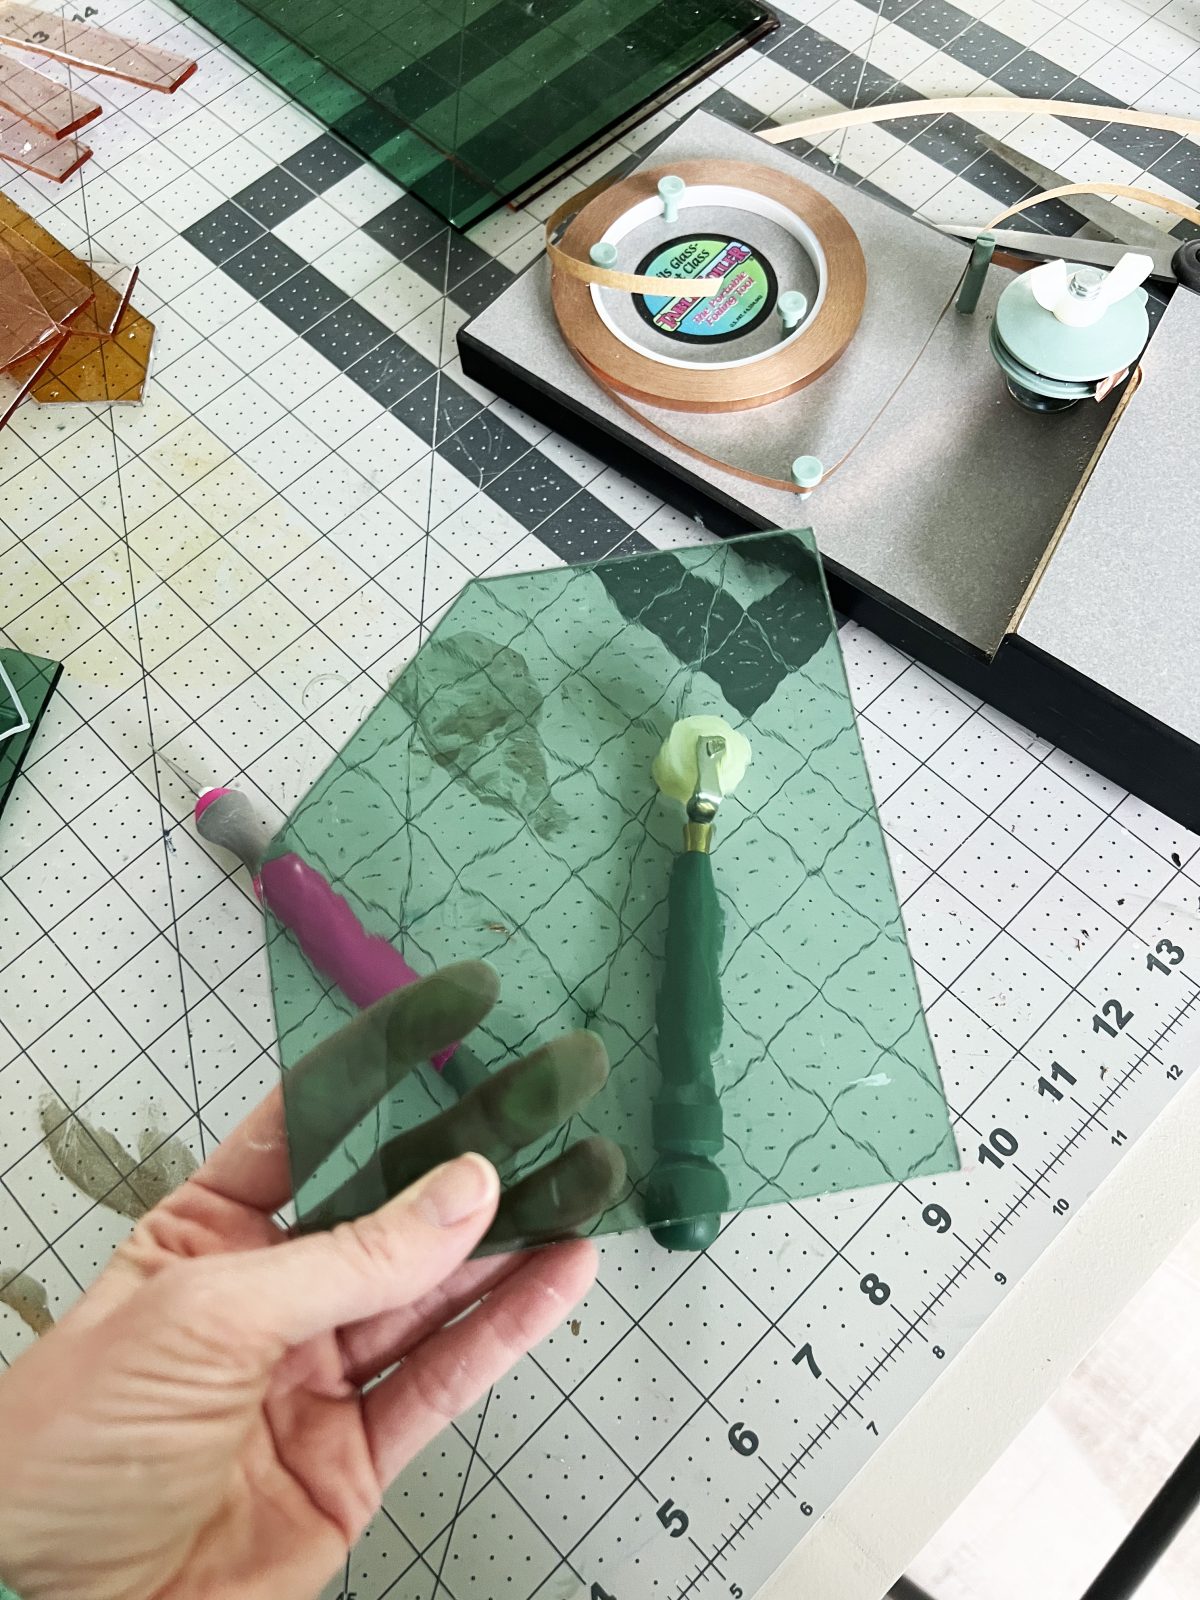
C. Grinding
• When you’ve cut your lines, your shape is ready to grind down.
• You’re basically going to grind down the edges, until it fits nicely in the space.
• When grinding, always wear protective eyewear.
• Simply grind lightly around each edge, and then wipe it down. You can clean up your original trace lines with alcohol, and place it back on the space. I find it helpful to reassess what needs to be worked on, more. Inevitably one side will need more work. Try to keep it even as you go, and mark on the edges that you need.

• This, for me, was the most intimidating part. I found that practicing removed that fear though, and I’ve gotten better at it! You will, too.
• Here’s a nice practical video for using a grinder, here.
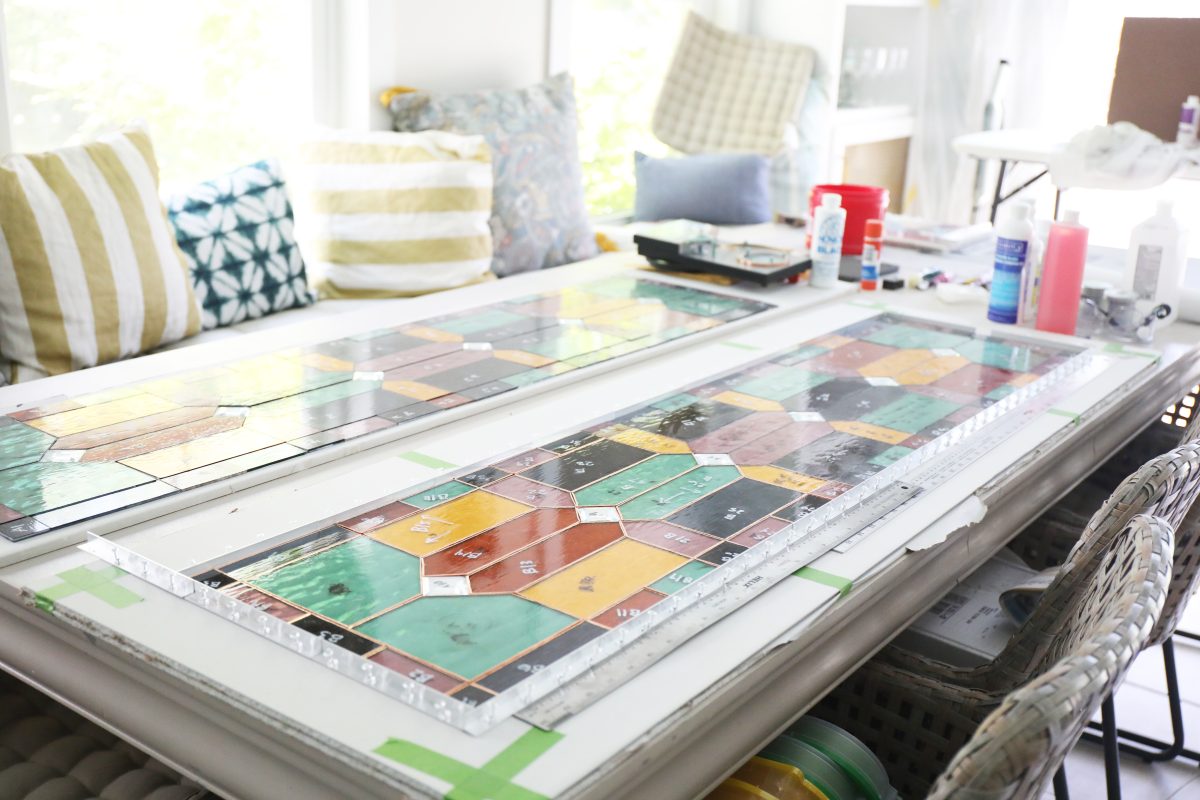
• All your pieces will ultimately work together, and the idea is to get them as SNUG as possible. This will help them adhere nicely, later.
• Try to wiggle it with your finger once in place. It should barely move.
One more time for the people in the back:
Here’s another illustration of this process, again. {The simplest, in my book.}
Lay the glass on top. Trace.
Then cut.
One piece of advice for this method {sounds technical but not so much once you get started}: know if you’re cutting TO the line, or inside the line. It’s easy to forget once it’s on that cutting mat. Also, check in between grinding {especially in the beginning} to makes sure the piece will fit, before you take away too much.
The Cricut method:
{The third option above} Another easy way to cut, for Cricut users, with smaller patterns, is with the use of Cricut vinyl. I have gone back and forth about this, and may share more about it later.
• Simply use the cut + trace pattern to an uploaded design onto vinyl.
• Then it cuts the template for you. Simply remove the vinyl and stick it on the glass. Use this as your guide to cut.
• While I think that the vinyl process is easier, it’s almost like one extra step in the beginning, to omit the middle step. So either way, it’s honestly a wash and depends on which is easiest for you. If you’re familiar with Cricut then I recommend starting here with a simple pattern. It will give you a little more confidence with using it all.
• You’ll have your Cricut vinyl to peel and stick over any piece of glass. Then use it as a template to cut.
3. The Basics of Stained Glass: Foiling + Burnishing
This is your next step!
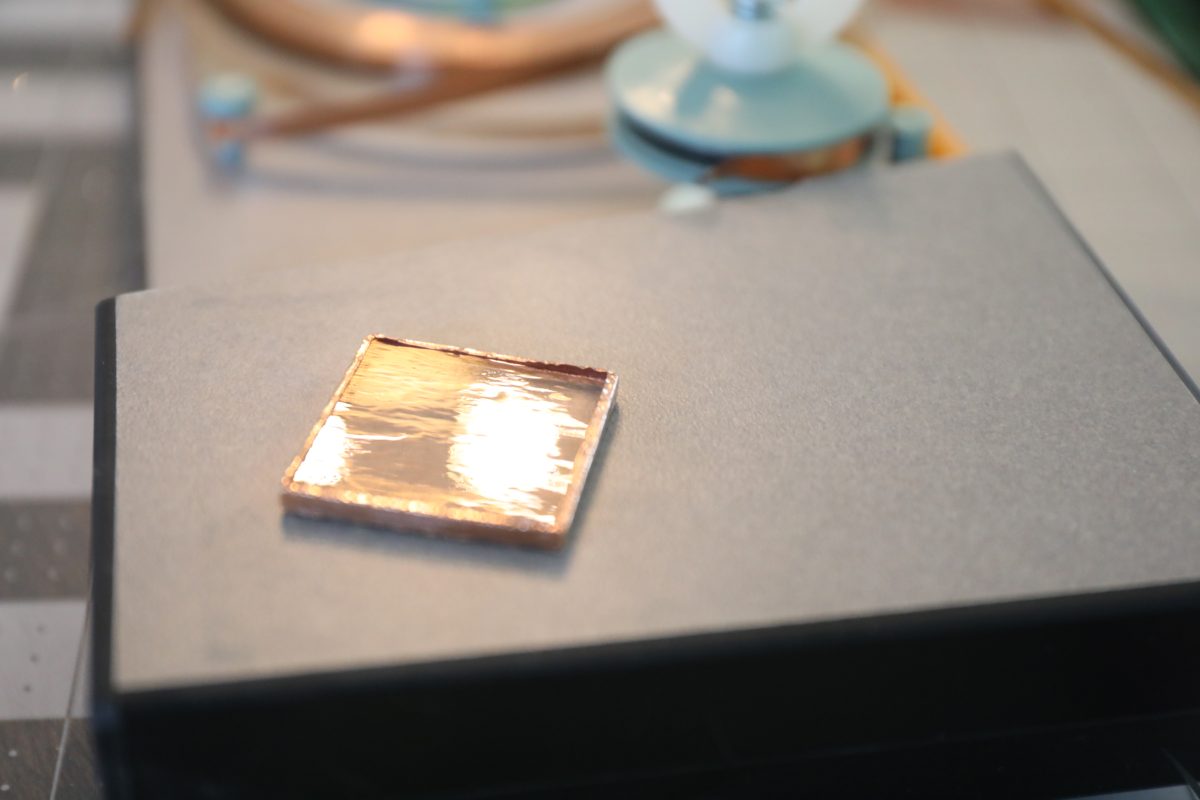
• Once all of your pieces are cut, and don’t want to budge very much, it’s time to break out the foil tape.
• The goal is to keep your seams to a minimum. So we told you to go as tight as possible as the beginning, for the reasons you’ll see, listed below.
• First, you’ll want to take each piece, and run it through each side of the grinder, one more time.
Make sure you have no shiny edges. This is also to ensure that the tape sticks, and that the pieces do not get too tight, since you’re adding an edge to each one.
• Clean each piece up, with alcohol.
• When it’s dry, simply lay the tape down and wrap it around the glass. Centered.
• Here’s a video for using tape, here.
• And for larger pieces, this table foiler is a TIME SAVER.
• Here’s a video demonstrating the Table Foiler, here.
• We recommend the copper tape listed here.
• If you’re trying it out, just know that this is a bit of a process. It’s perfect paired with mindless TV or podcasts. You may go a little cross-eyed, but lay the tape out and place the glass edge on top, equally. Wrap it around the piece.

• No matter which approach you take, Each side should be nicely {equally} wrapped.
• Fold down each edge, so that they don’t wrinkle up on you. then add the corners so it folds like an envelope.
• You want to make sure you have a nice, even edge on both sides, since this will make your soldered lines, in the end.
• Taking a pencil, burnish the edges that are on the side, first. All the way around. This is done by rubbing your pencil {smooth side} down on the foil.
• Then take each side with your burnisher, and roll it out. {This is demonstrated in the video above.}
• Again, when you’re finished, each one should be even. Look at the glass and see if one side of tape is more on one side, than the other.
• This is where your X-Acto knife is your best friend. Take your X-Acto knife, and even it out by gently slicing away at the edge that is showing too much. If one side folds up but it’s not bad, you can also add a little more tape, and smooth it out.
• Hint: the blade dulls quickly with this process so change them out often so that it doesn’t drag the tape.
• There’s a learning curve here, too. Just make sure you work with the tape. It’s always forgiving though, so if you’re not happy with it, take it off and rework.
• All of your pieces should start to look like this, with just a smidge of wiggle room between each one.
Oh so satisfying!
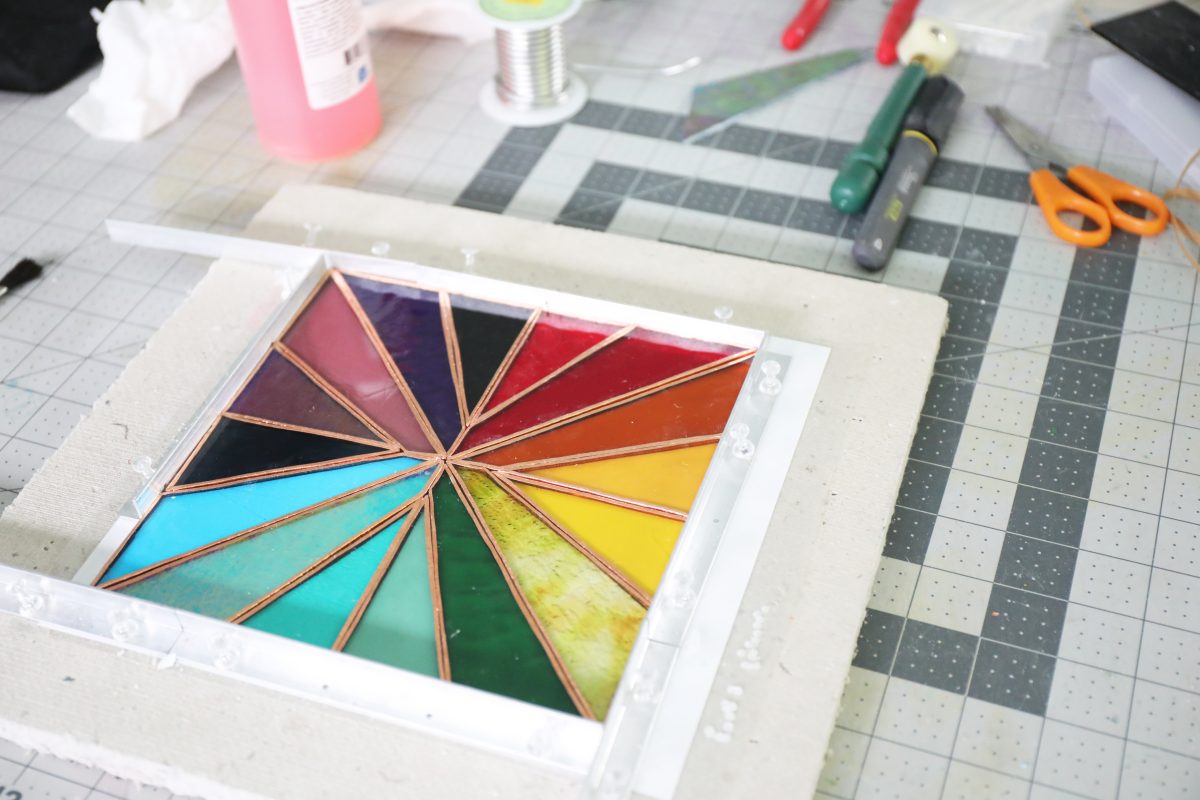
Now you’re ready for the magical part!
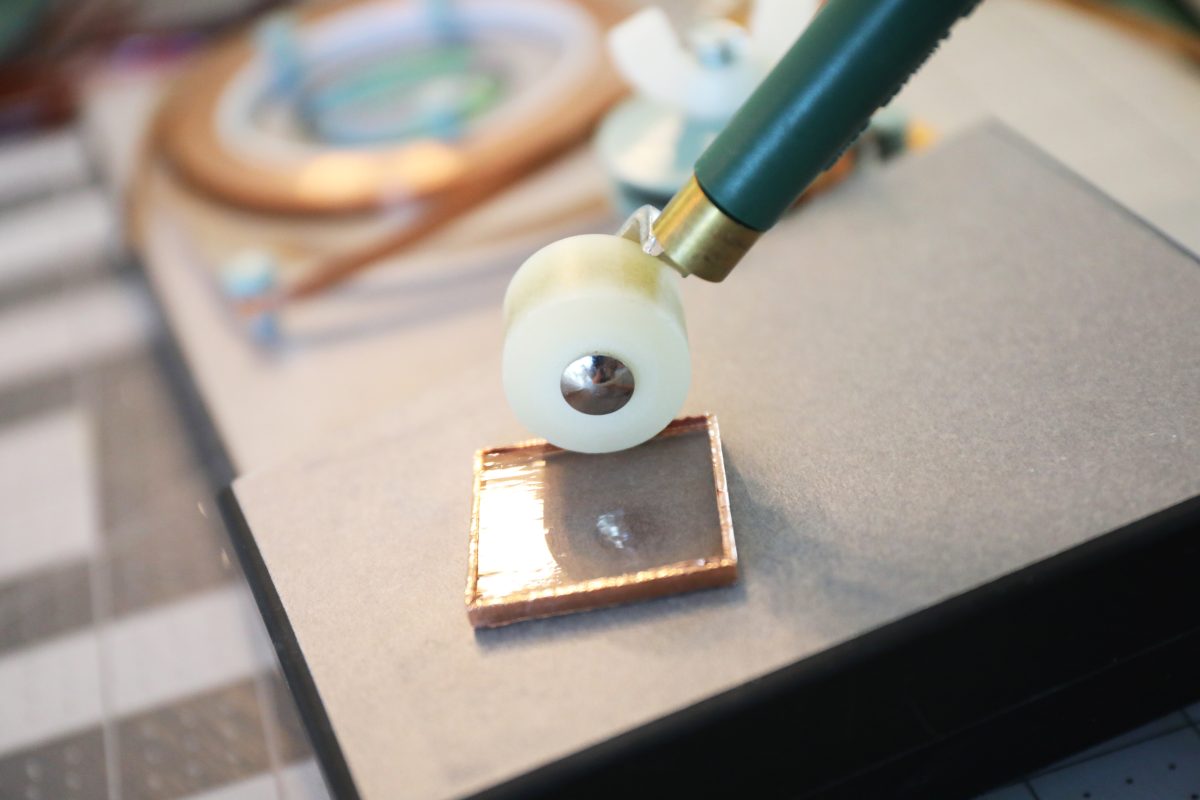
4. The Basics of Stained Glass: Flux + Solder
Note: Always use a mask when soldering, and protective eyewear. Only work in a well ventilated area. Open multiple windows and use a ventilation system. Admittedly, gloves are nice, too and I neglected to wear any in the bottom photo. It does seem to splatter more on the flip side, and can cause burns if you’re not careful. Trust me… it burns.
• First things first, pour a little into your cap, and with a brush or Q-tip, brush your Flux on the tape.
• Make sure you’ve covered the entire piece. If you prefer to work in sections, that may help you keep up with what you’ve used. Just make sure you cover that tape. The Flux is what helps the melted lead actually adhere to the glass. It’s the bonding agent that you need. There is nothing more frustrating, than not having Flux on the tape. It will not stay and is a total pain to work with.
• Don’t worry about getting it on your glass. It won’t stick permanently, and that’s what the cleaning process is for.
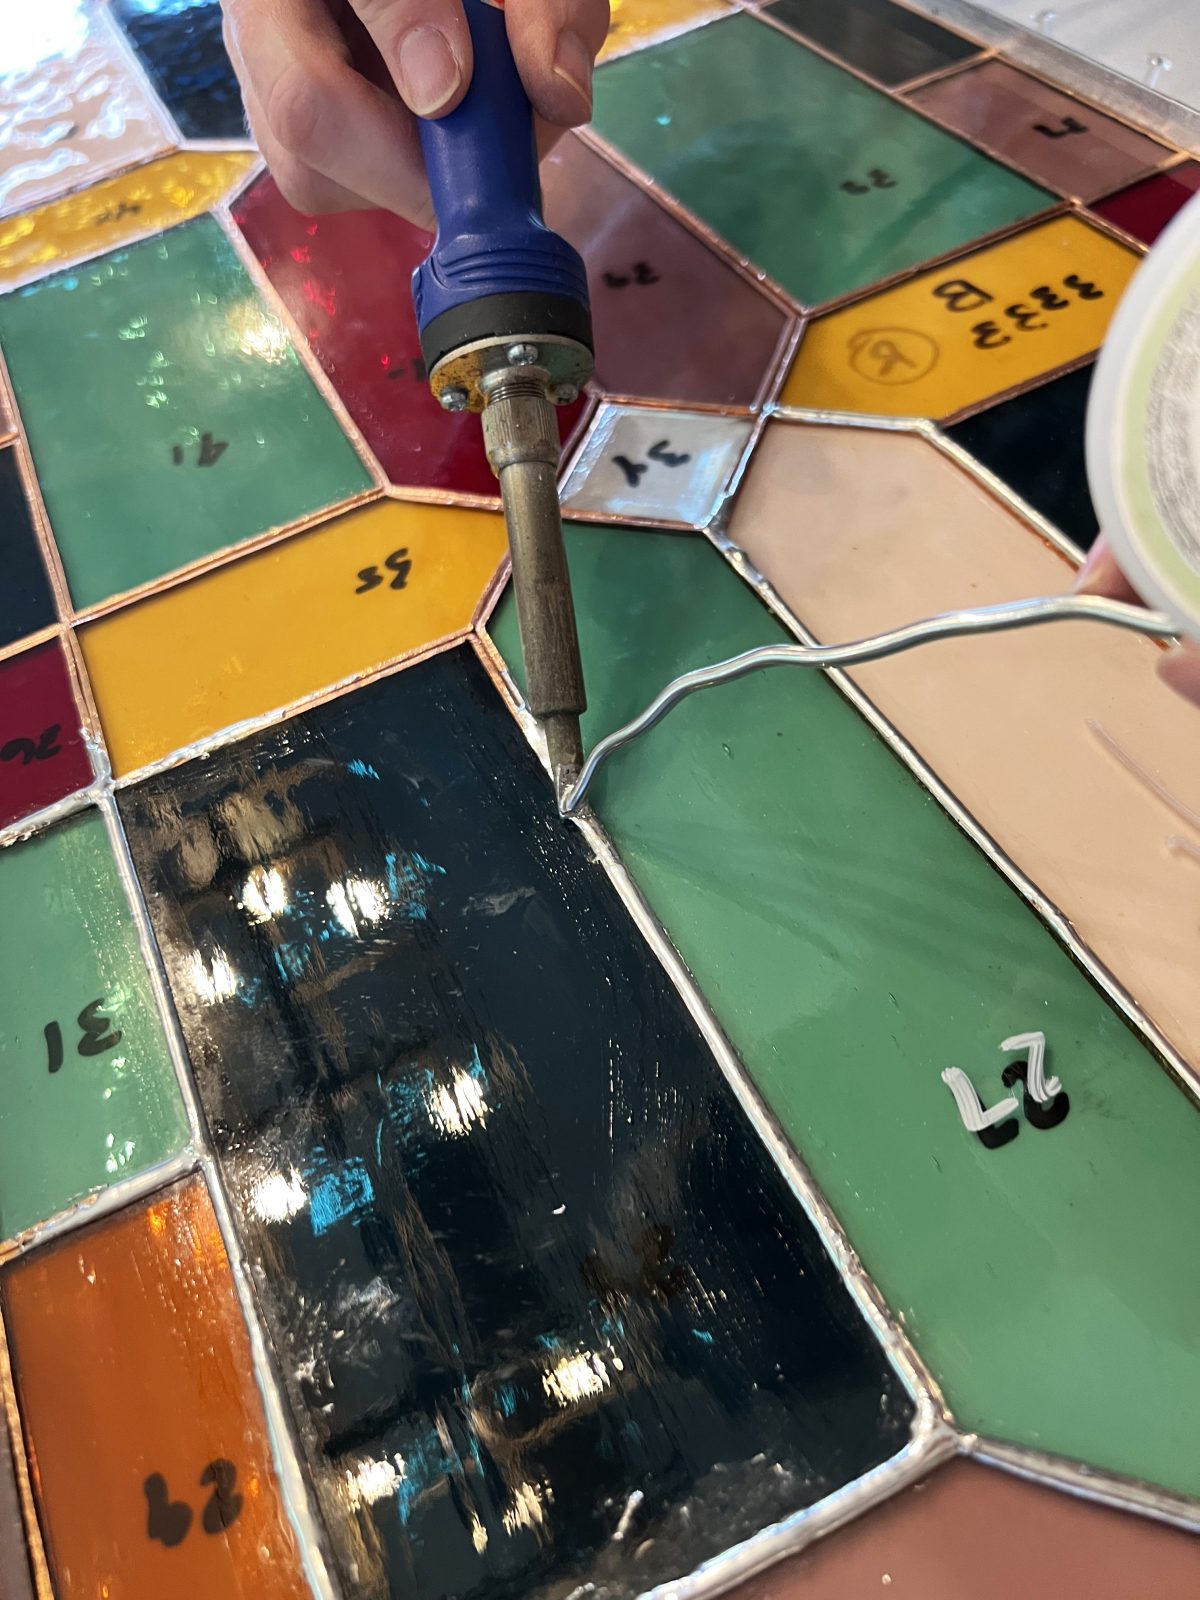
• Simply uncoil your lead, and move it against the taped edges as you go.
• Do just enough so that there’s a nice curve to your solder. Work in certain areas, and then don’t be afraid to come back, to smooth it out.
• Check the temperature of your glass often, as it can become overheated and BREAK. If it gets too hot to the touch, let it rest and come back in a few.
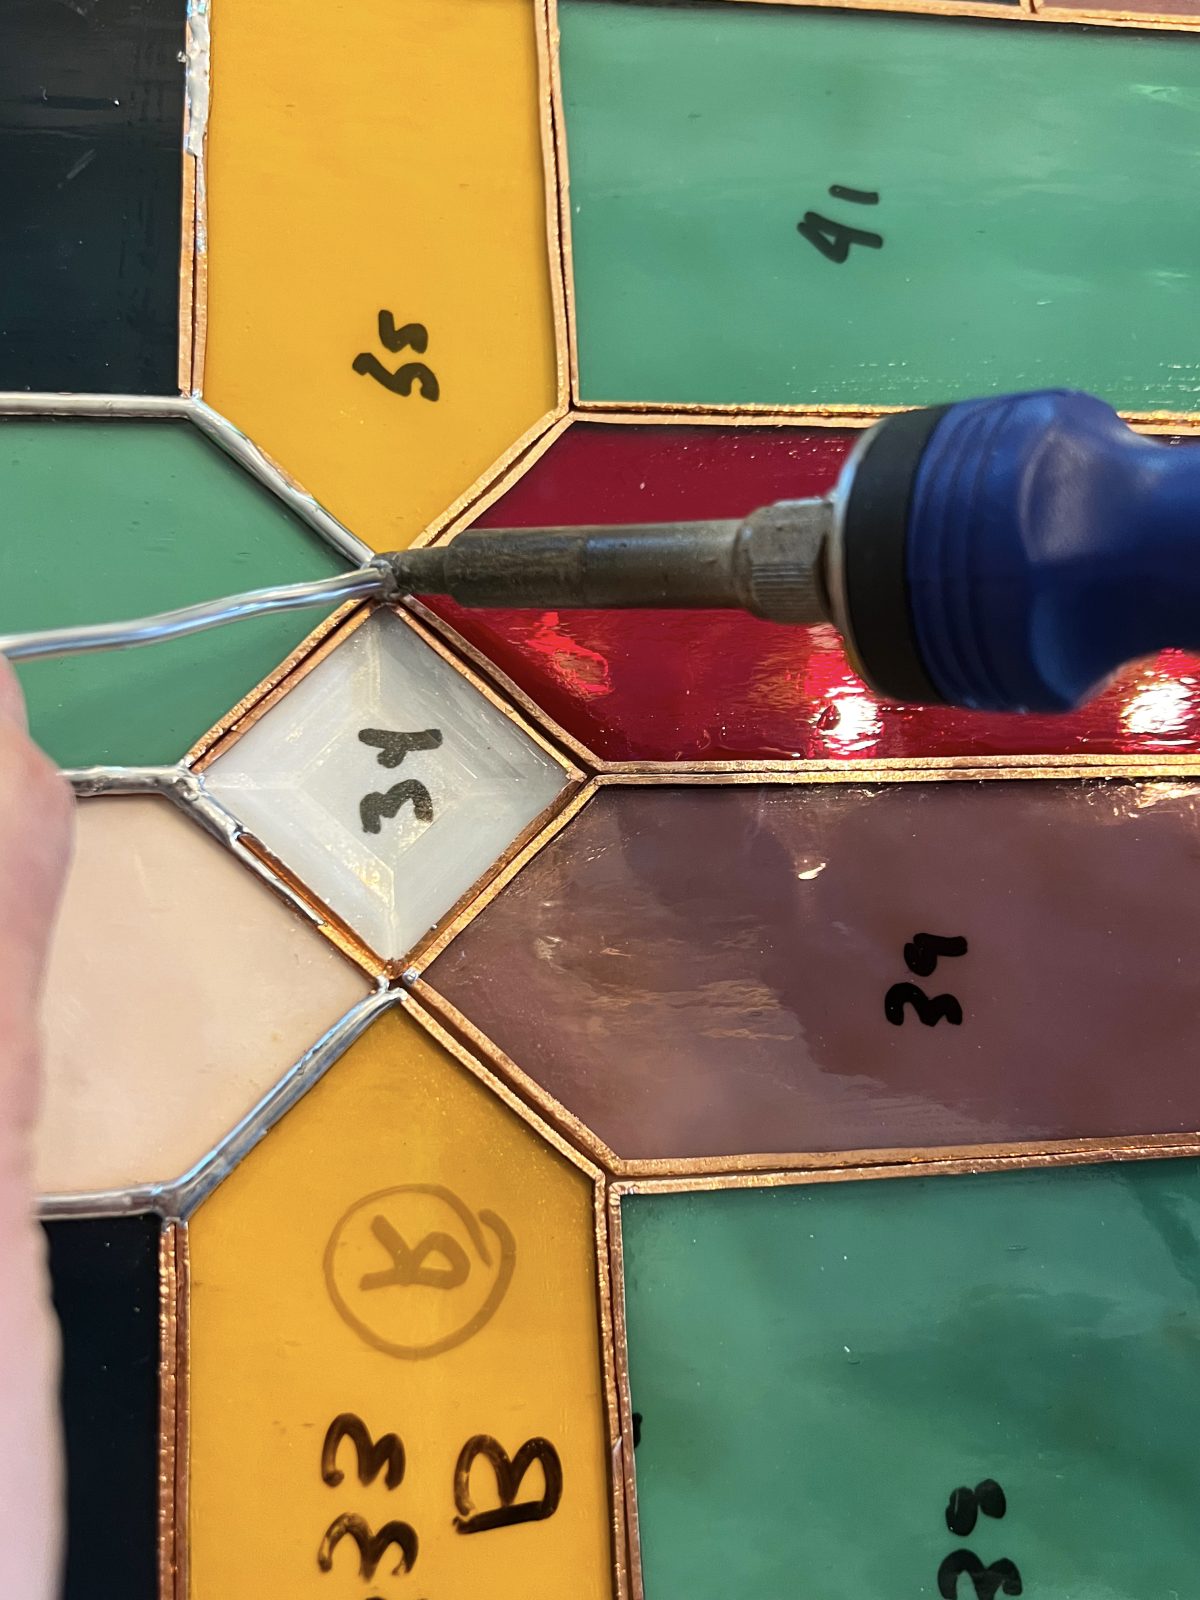
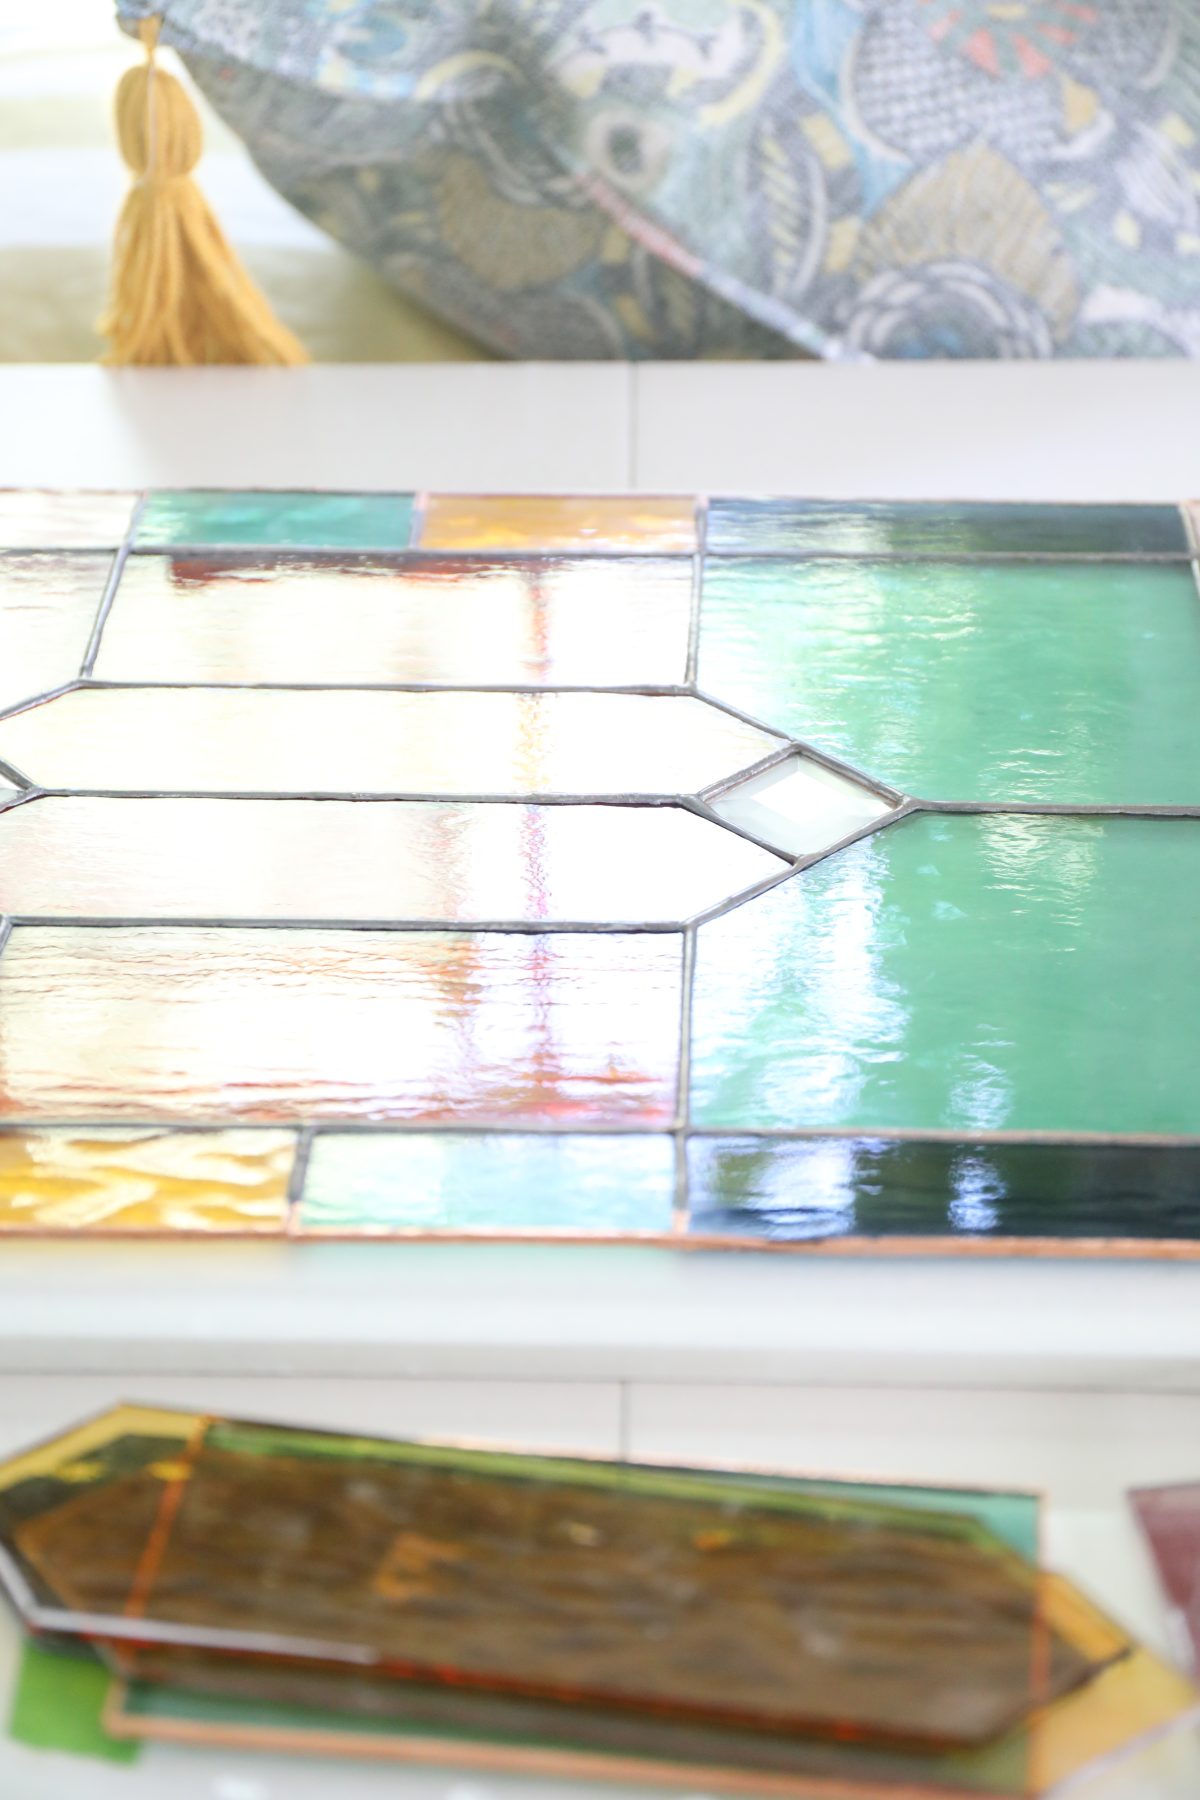
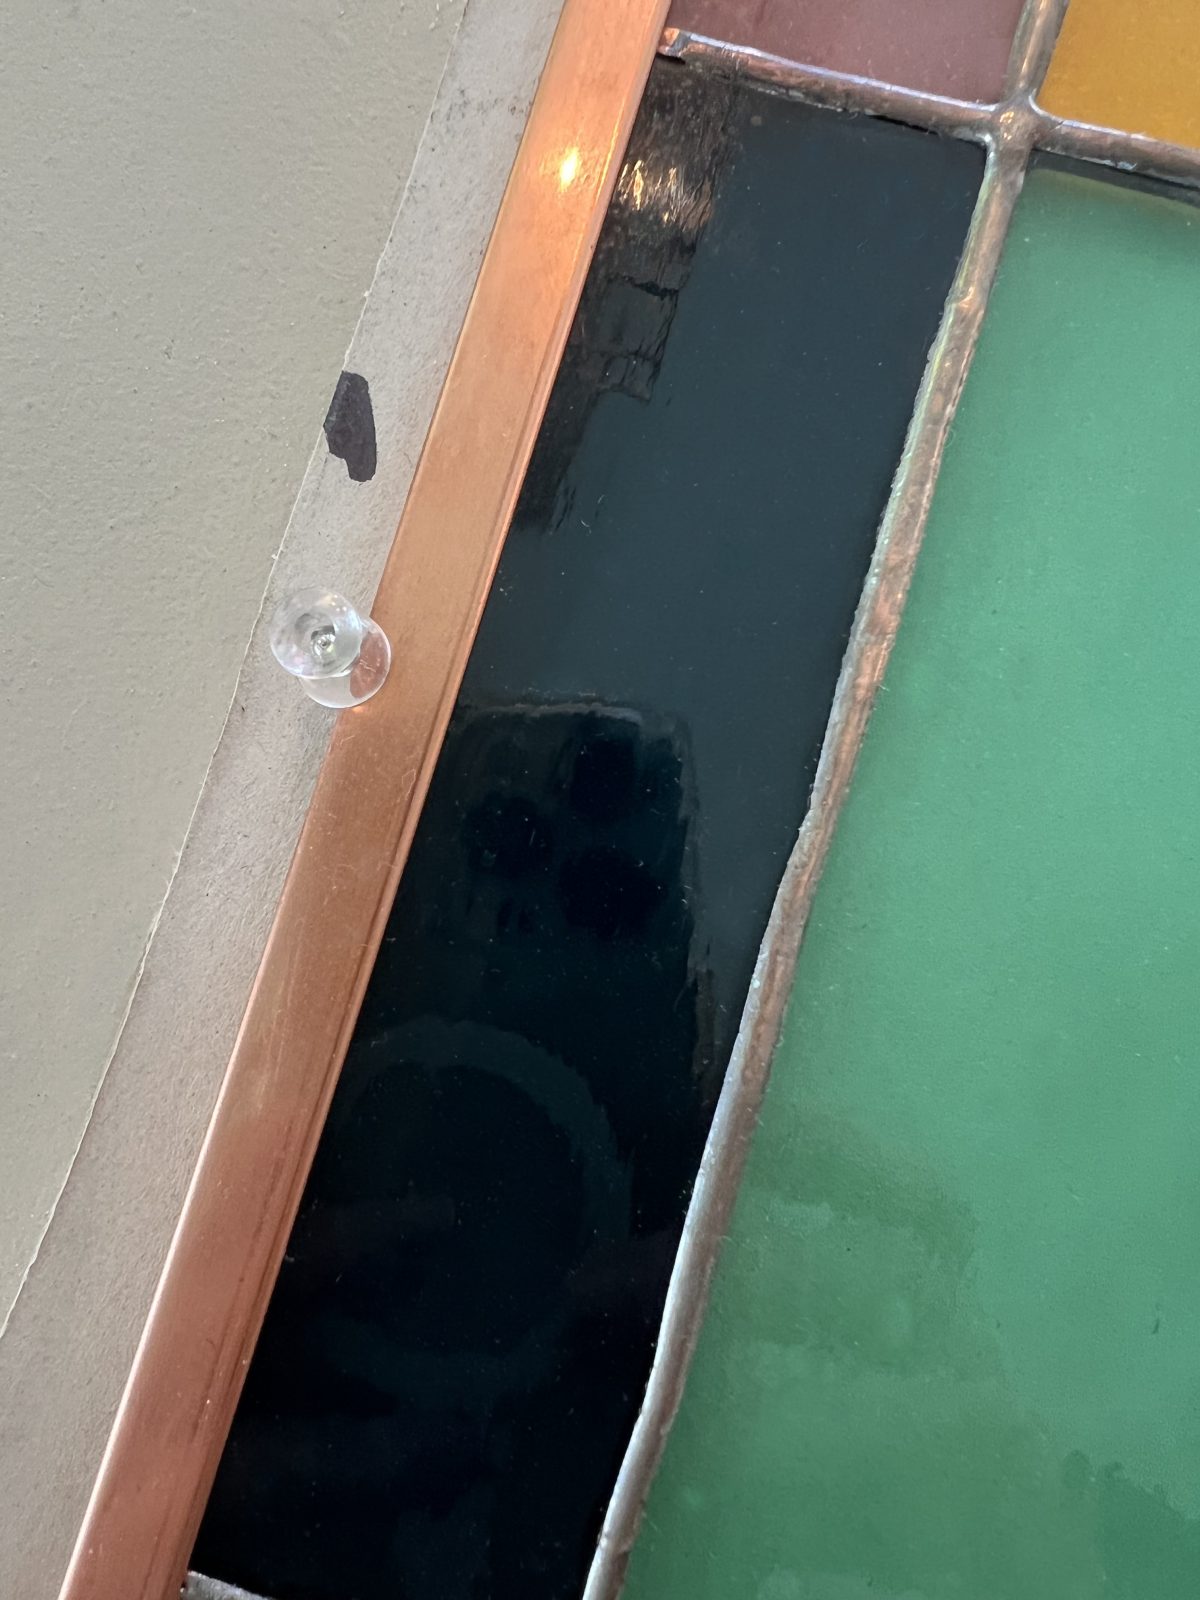
• Work to the edges, while leaving a bit of a section for the frame that will come later. You can see in my unframed pieces above, how I left half a finger’s width gap at the very edge. And, in the photo below.
• Once you’re happy, let it cool for a moment and then it’s time to clean! It’s the tedious fun part where it all starts to come together!
• Here’s a video on soldering glass, here.
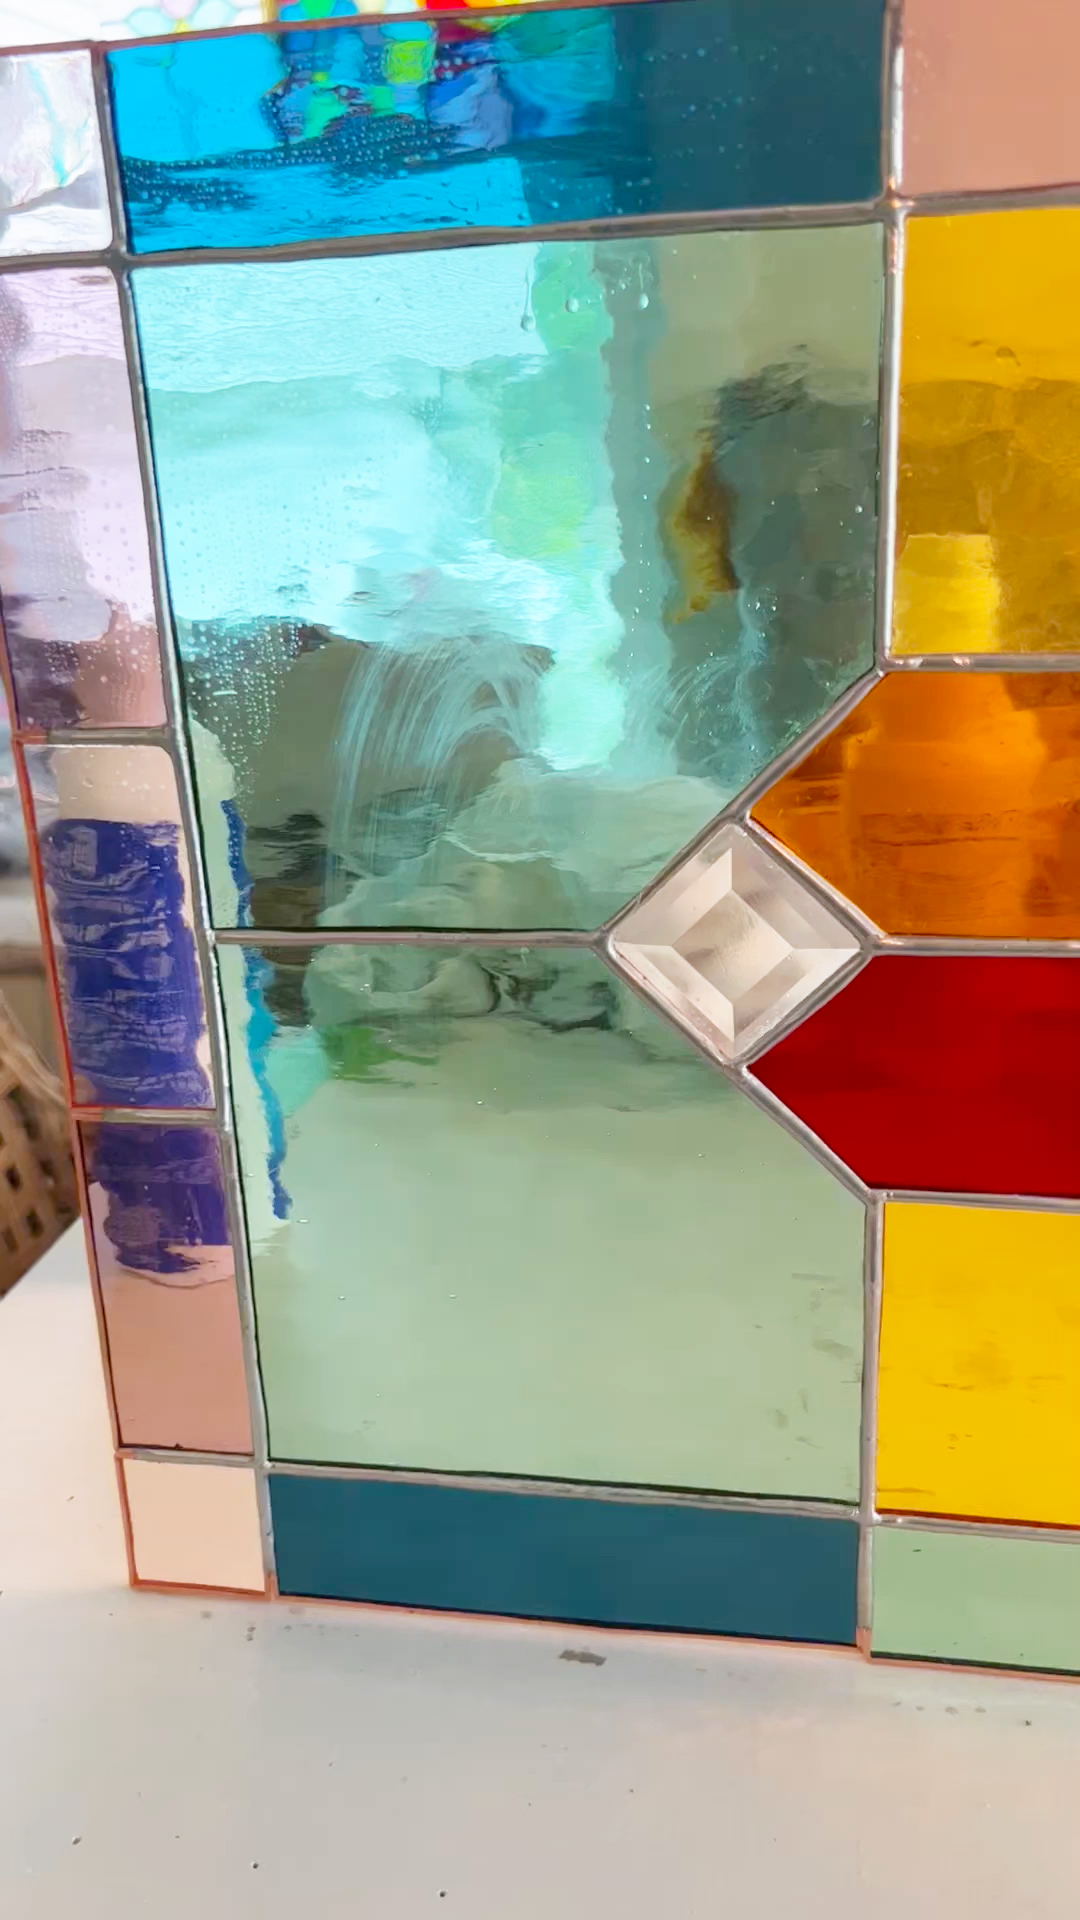
This is your most rewarding part. You get to flip it up and see all those beautiful colors!
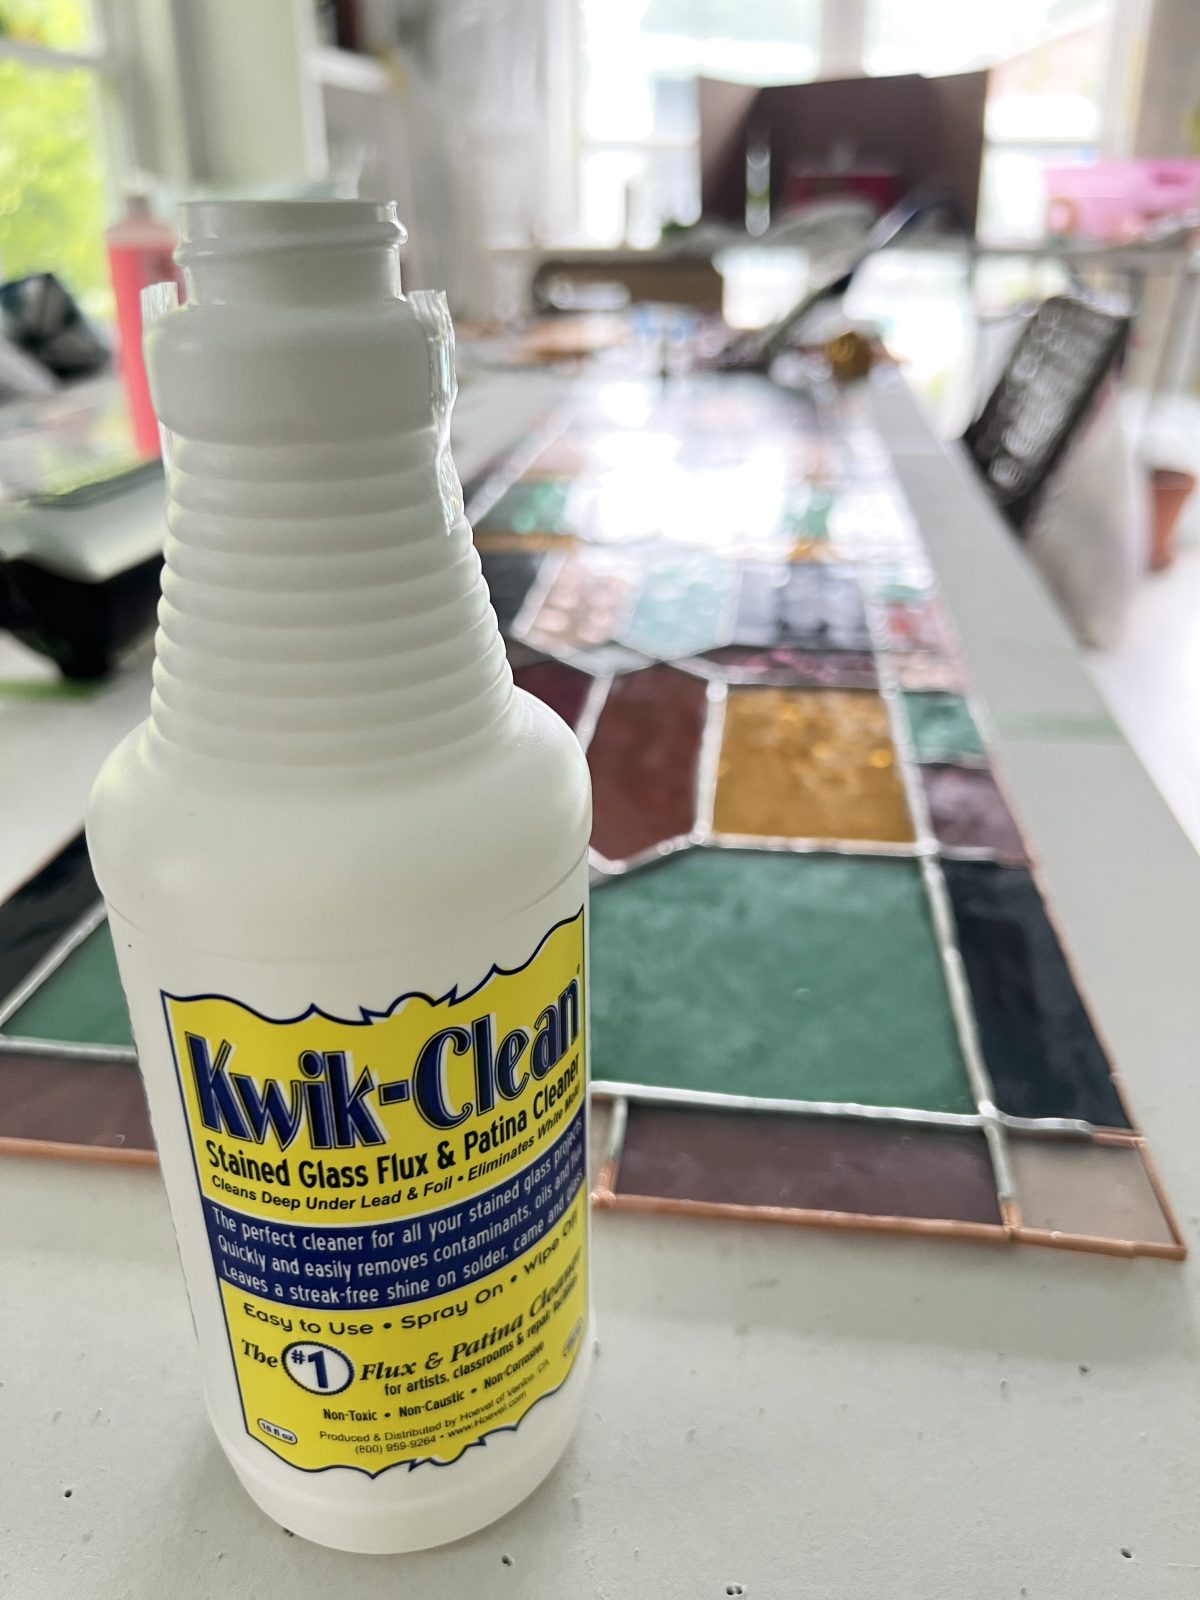
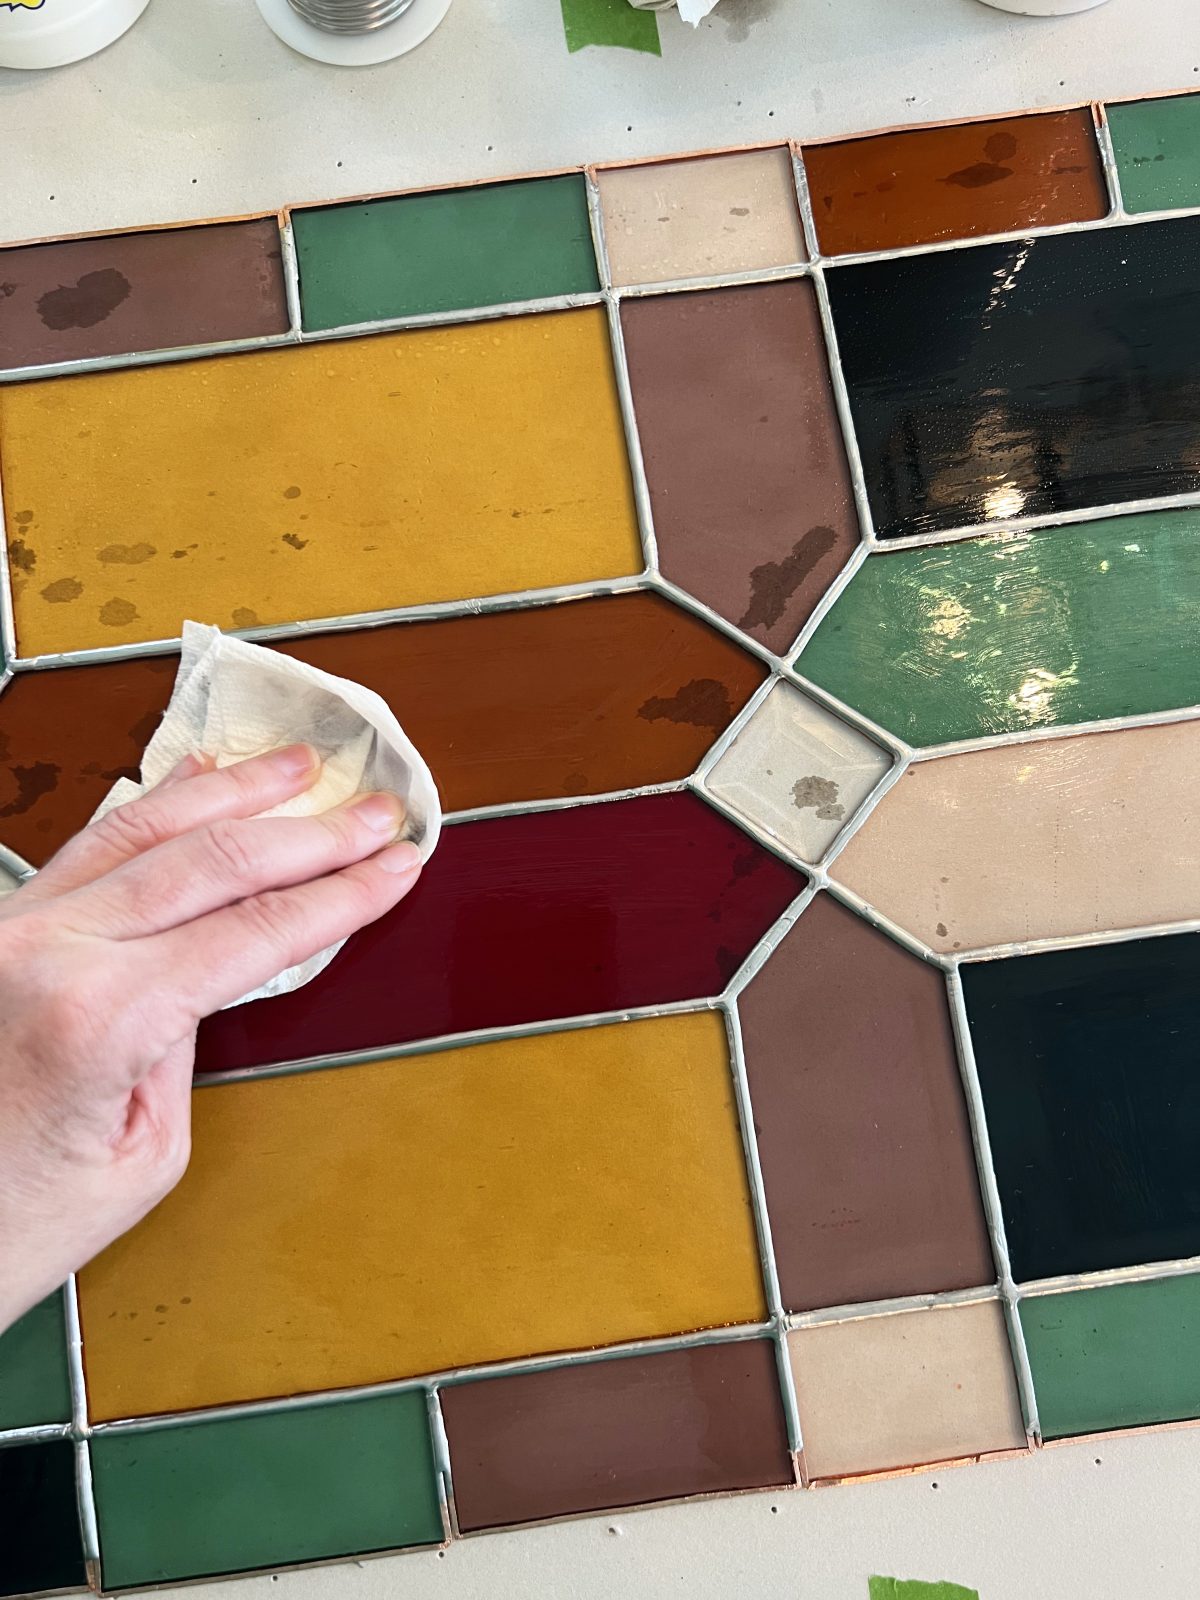
5. The Basics of Stained Glass: Clean + Wax
Breaking it down, the order just goes like this for each side:
1. Flux + Solder {You’ve already done this}
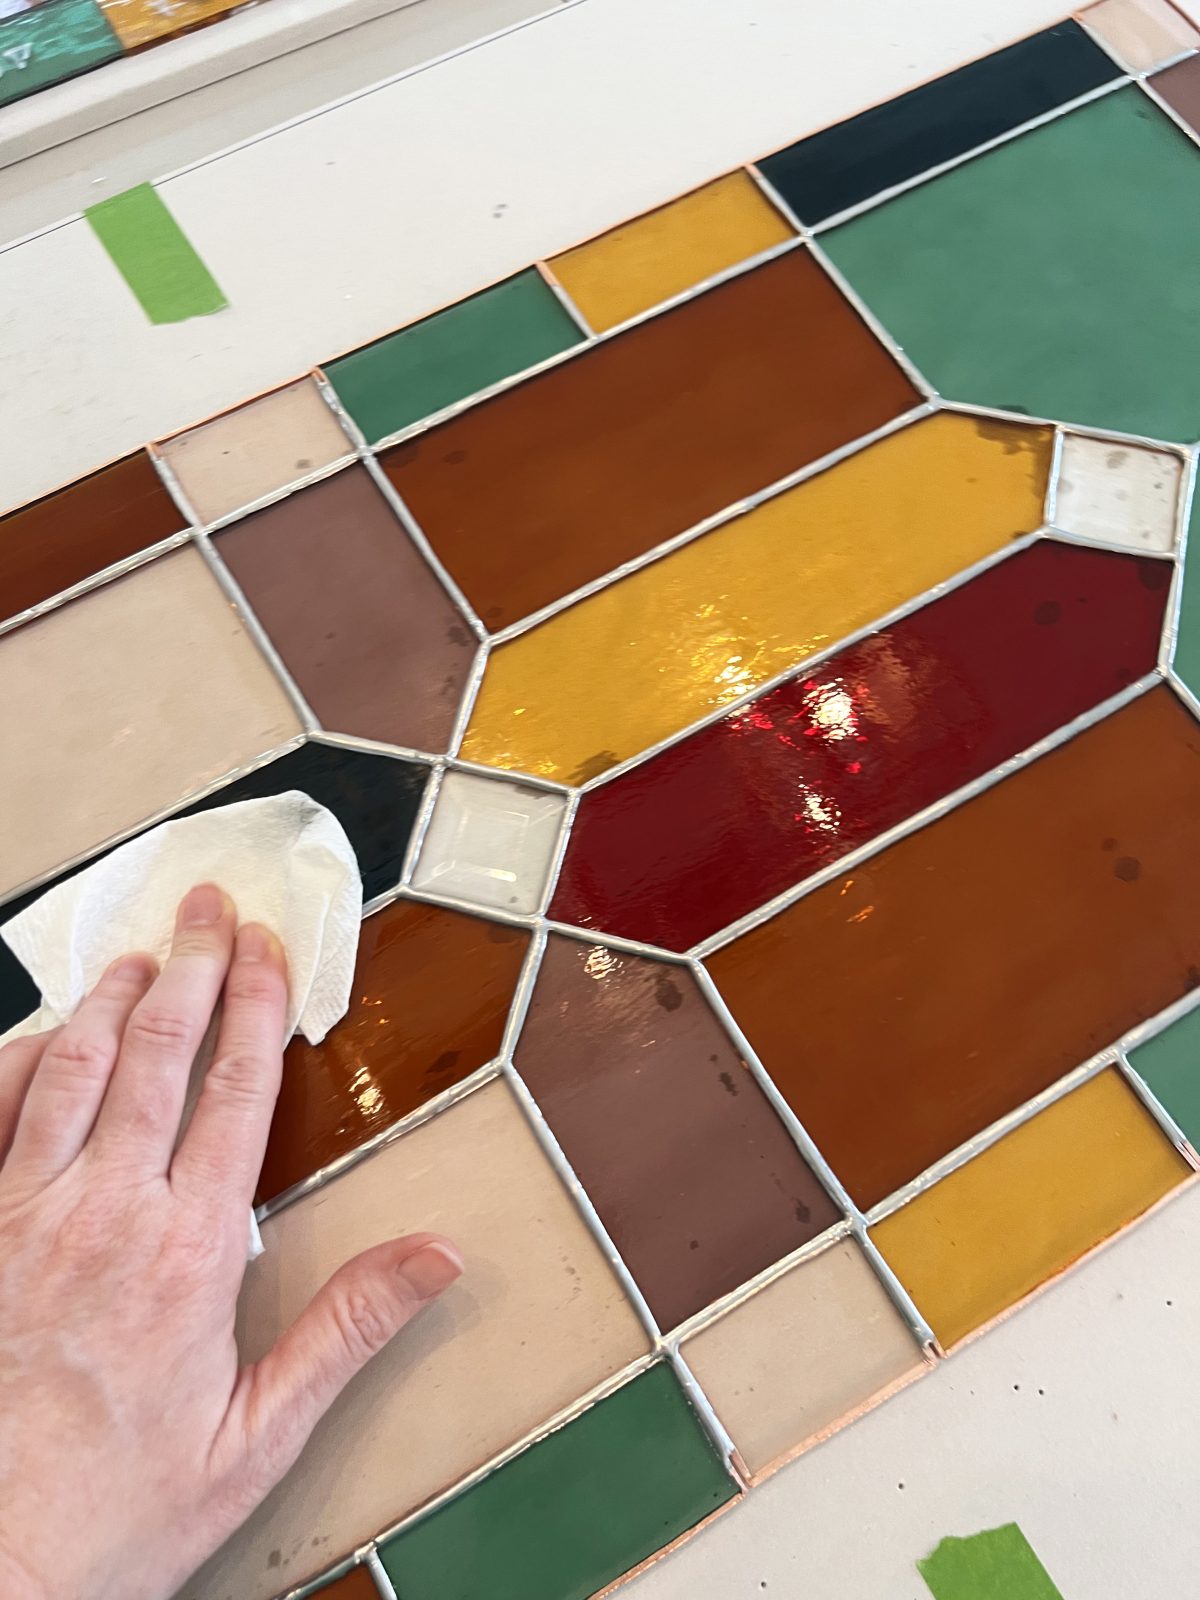
2. Kwik Clean {rub it on and clean the glass / solder
3. Clarity – It’s a stained glass finishing compound {it really makes everything shine – technically it is wax – oh so satisfying}
My teacher swore not to use windex, as this is the proper way to care for stained glass. I know other people who have other methods. This is just what works for me. {I’m a rule follower.}
6. The Basics of Stained Glass: Patina
• Then you’ll break out your Super Brite {finishes in black, copper + just leaving it silver} – I do find that the patina covers a multitude of sins.
• I use a combo of Q-tips + paper towels to rub it on, making sure to include all the sides. Remember that magic coloring book you had as a kid that had the clear marker, and when you drew on top, it made things change colors? This is that, for adults.
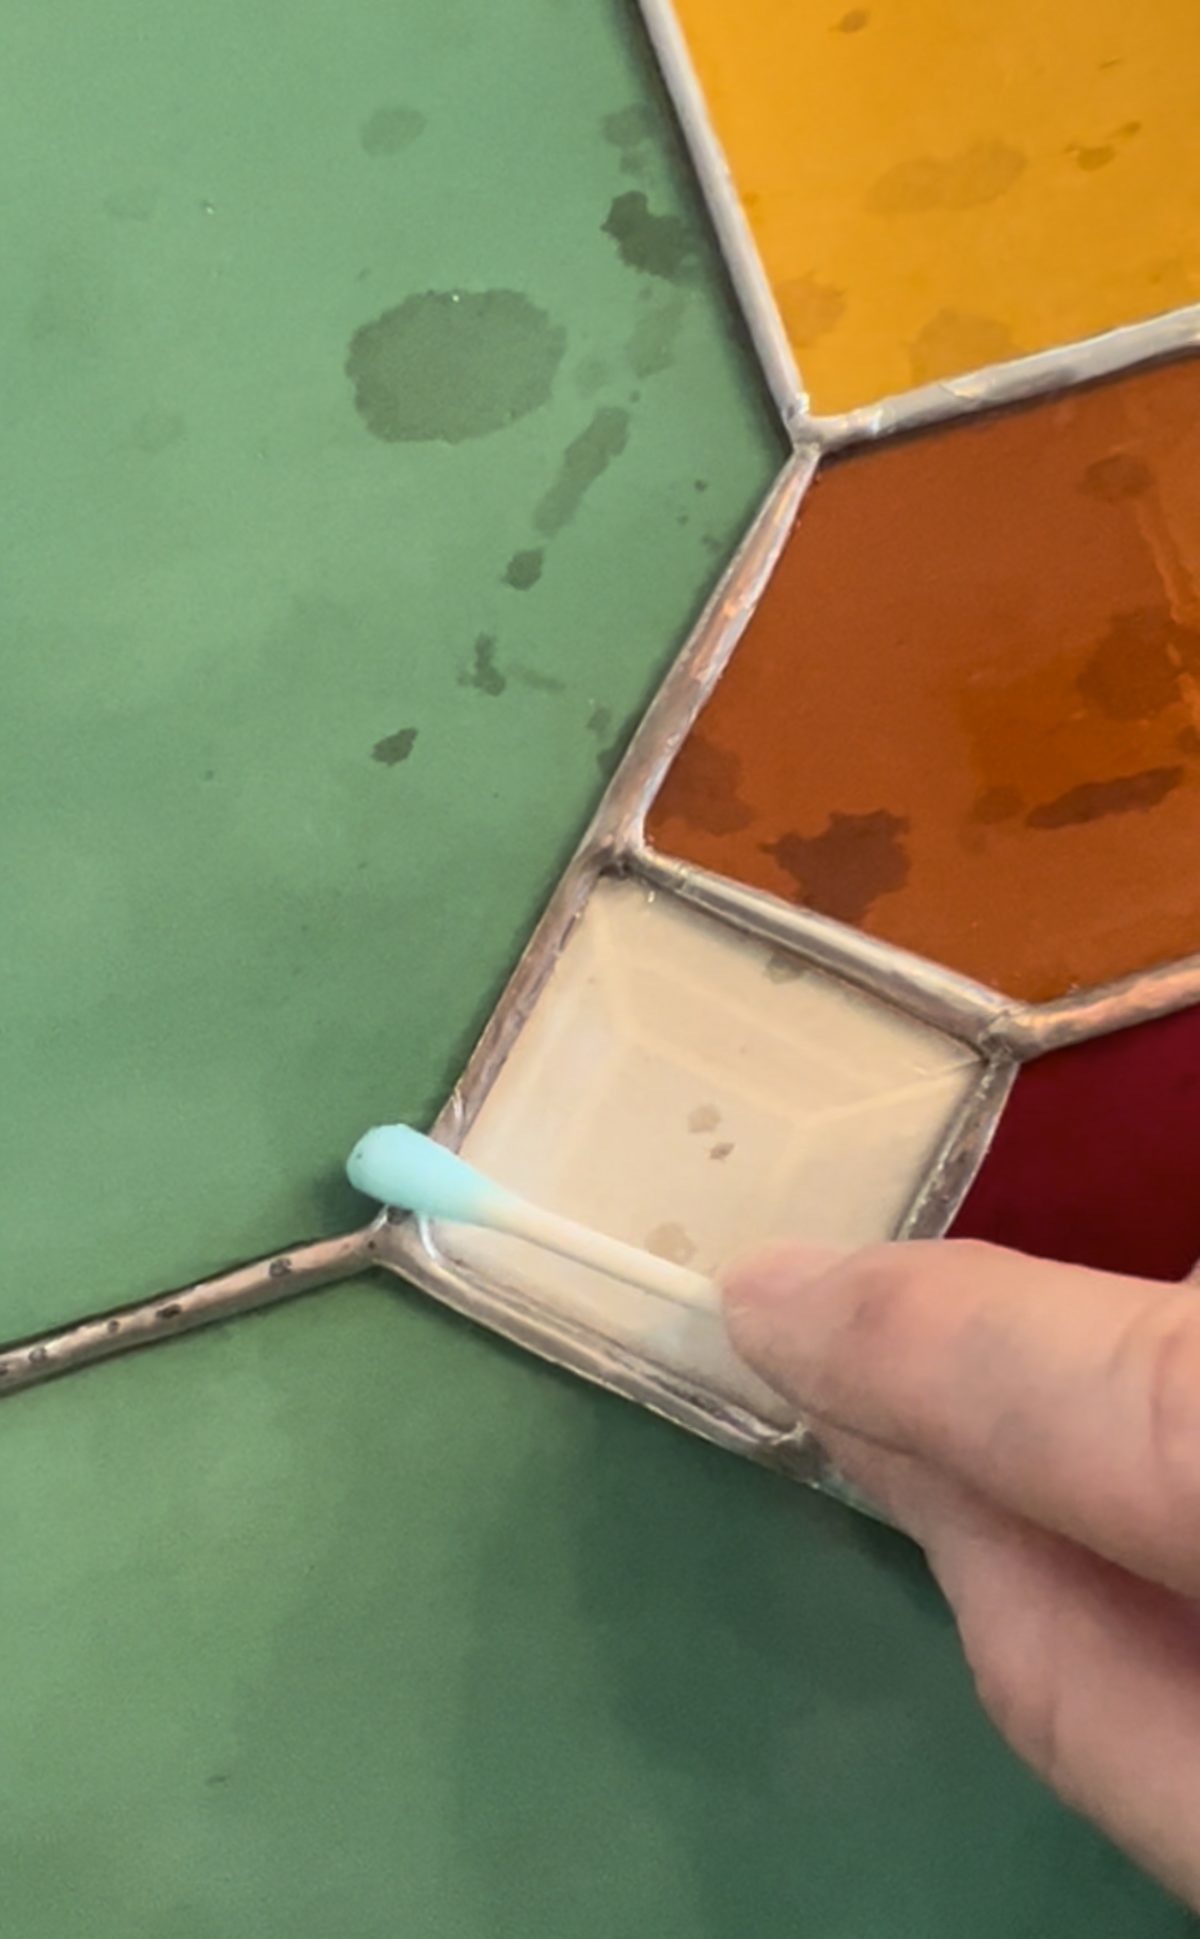
• These photos are actually in-progress from a video I was making, because it’s easier to see that way. It’s just really fun and changes more as it’s been exposed to the chemicals.
• Here’s a great video on applying patina.

Clean + polish again: Kwik Clean + Clarity again. Just rub until it shines.
• Flip {carefully} + repeat the exact steps above from that first side. These final steps {soldering + patina + cleaning} can take a full day with a large window on both sides. I’m sure I’ll speed up over time, but just know it takes some time to finish.
• Just a note on seepage: If you have a few little gaps, you may have areas where seepage of the Solder came through. I have yet to have a piece where I haven’t seen just a little on the other side, peeking through those cracks. I am getting better with each piece, though. Don’t freak. It’s usually easy to manipulate with your soldering iron, to cover it up and then move back into place as you go.
• A note on splatters: Don’t panic if the soldering gets on your glass. It dries and flecks right off. Just make sure you are aware that the second side {because you’re sealing the air into gaps?} tends to splatter a little. Thus the use of gloves for which you will be grateful. I already mentioned this above and clearly I can’t emphasize it enough.
7. The Basics of Stained Glass: Frame it
• Your piece is ready to go once the other side is complete. You can cut according to size, and manipulate the edges around your piece. Lots of people use different framing materials for their stained glass. I sourced some easy copper came here.
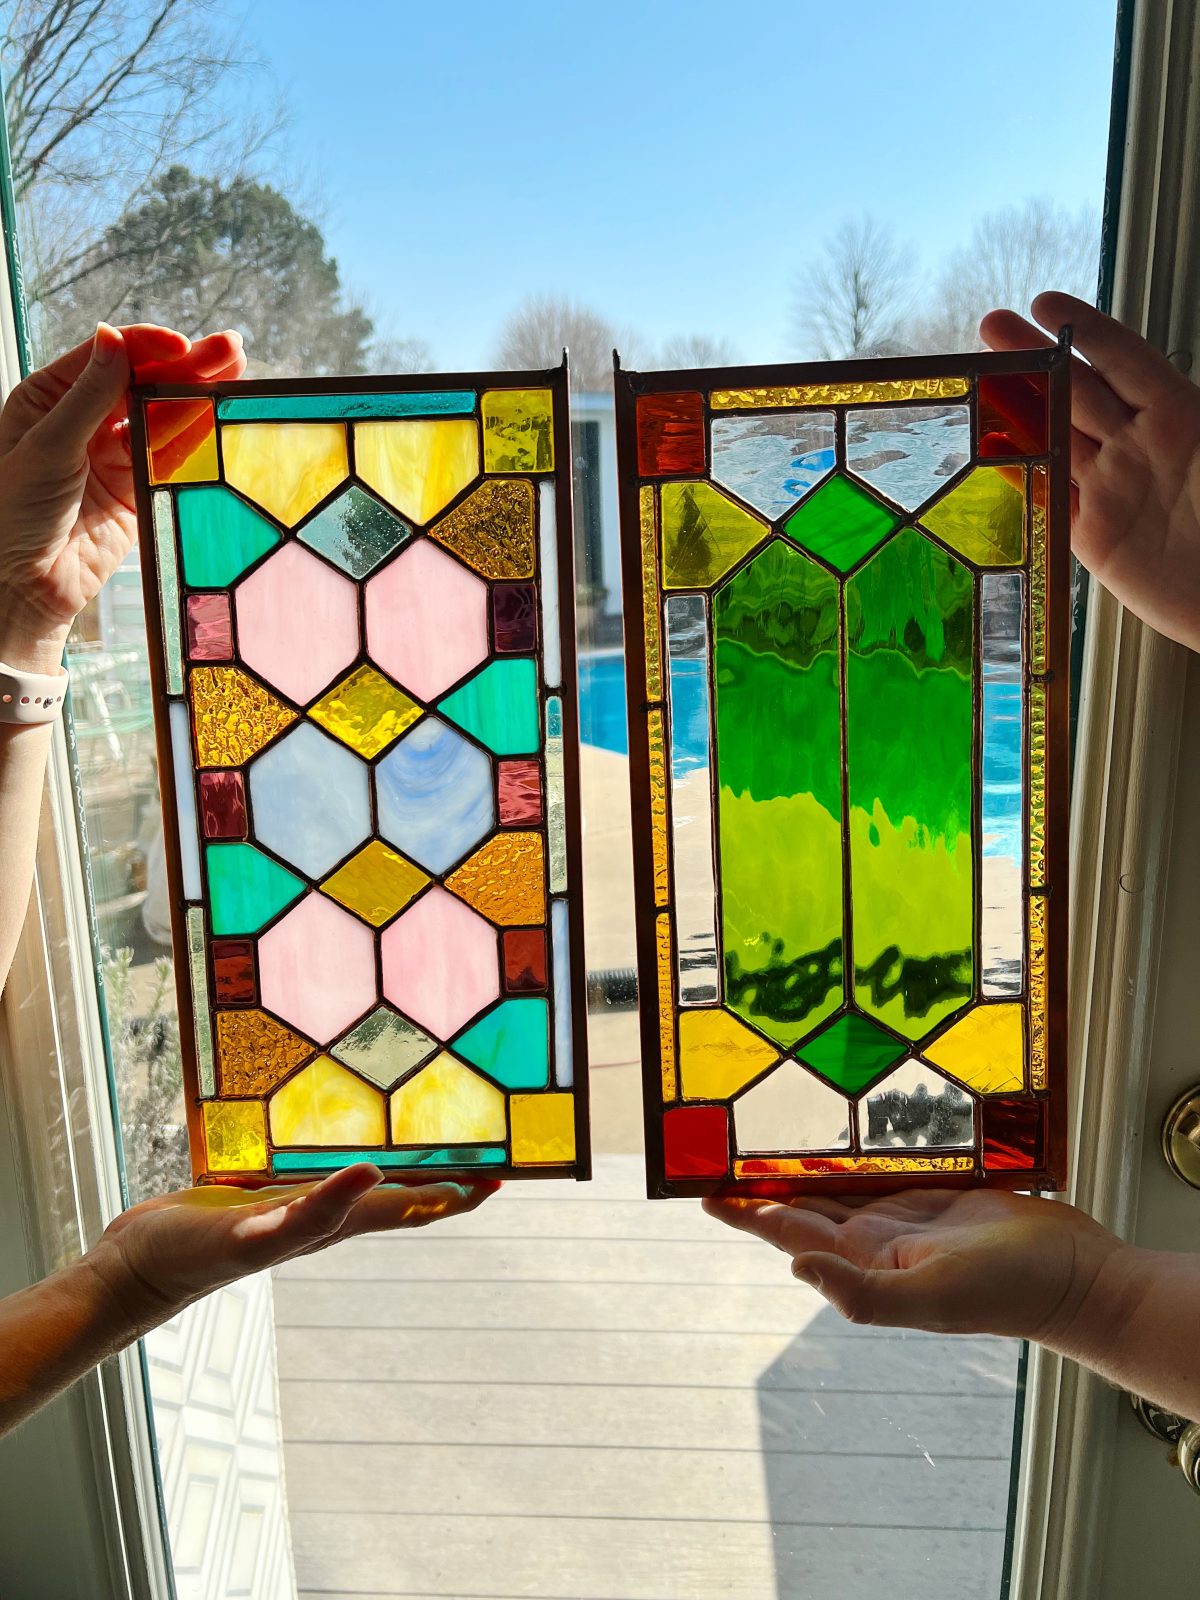
My piece {left} and my talented friend Mary, right.
• I can honestly say, the best tutorial that breaks it down into basics, can be found here.
• I found that laying it out, as he shows, is the best way to measure.
• If you don’t have a saw, you can also use a small hand saw from the home improvement store.
• We found that larger saws actually bent the metal, so we used a cordless 4.5 inch angle grinder. Again, protect those eyes.
• Once cut, use another pair of hands if you’re working with a larger piece like this, to help secure the corner pieces.
• It helps to tack the frame into place, further down the piece. Something I don’t think he covered, because it was a smaller piece he demonstrated with, is continuing your solder lines to include the frame.
• Simply apply some flux, to the edges, and work your way down as you go.
• Push the frame into place, to make sure it’s not loose.

• Then re-apply the cleaner, wax + patina so that the new soldering blends in with your piece.
• Flip, and repeat.
You, our dear friends who have stayed with us this long… are done.
Yes, to some, stained glass is a bit of a tedious project. But it’s a very satisfying process, with beautiful colors, character and designs. A little patience includes a big pay off in the end.
As always, let us know if you have any questions and I will do my very best to help. We hope this enlightened a few of you on the process of stained glass, and helps get you started!
Have an inspired day!


Simply STUNNING, Ashley! And so you! Your color sense is simply the best!
Thank you so much, Kim! You are just the sweetest. It was a beast, but lots of fun. I’m ready for the next project now! ;}
This is by far the best blog post I’ve ever seen on stained glass. Well done. Stained glass can be addicting, but I think you already know that ;). Your panels are absolutely exquisite, and it’s hard to believe you’re a beginner!
When we moved into our new build four years ago, I decided I wanted some stained glass kitchen cabinets. It was a LOT of work, but every time I look at them, they make me smile.
I no longer blog but kept the blog up anyway, so if you want to take a peek they’re on the slider home page.
Thank you so much Doreen! You are so sweet. I LOVE LOVE LOVE your cabinet doors! They are GORGEOUS! I hope you enjoy them every day!
Thorough tutorial. Been doing glass for 25 years. Keep up the good work. You definitely caught the bug😁
Awe thank you Diane! You made my day.:D
I love this pattern (for the doors). Where can I find it?What is it called?
Hi Gloria! Thank you so much! The pattern is mine and can be found here be sure to check out all our stained glass posts here! I am adding as much as I can all the time. ;} If you make it I’d love to see!
Ashley,
Beautiful door window panes!! Great job for a beginner. I too am a beginner and self teacher. Although I did take a class about 20 years ago and thought at the time I would get into it. Buying all the tools, grinder and glass it fell to the wayside because well let’s just say life happened. But now 20 years later I’m starting it all up again. My question to you is I’m making sun catchers and do you need to put cane around the edges or can I just tin them or put extra solder on the edges. Hopefully this makes sense. I’ll start with that question and possibly a few more questions later.
Thanks!
Celeste
Hey Celeste! Congratulations on going for it! I know gathering all those supplies can totally be a process. I use our back room and when I’m in stained glass mode, just setting up takes an afternoon by itself. I am actually sharing some ornaments I have made AND some sun catchers in the upcoming weeks. {My computer is currently at the computer hospital, along with all my images- so it is taking me a moment to be able to post. Trying not to panic.} For sun catchers, I just do tin and solder. Just make sure they’re well-tinned and don’t hold down your iron for too long, or it can come loose from the glass. I’ve learned that the hard way. I hope that helps! Again, I have two projects on this process coming up but check on our ornament post here, that should be a similar process. Hope that helps!