tips for organizing craft supplies
Hey hey everyone! If you caught our create room feature last week, then you know that I was finally able to get my bootay into gear with all things organization, and my job, which was all in pure chaos since working from home and the apocalypse. {It really had nothing to do with the apocalypse, but I basically blame everything on it now.} I couldn’t be more thrilled about it, because I can finally reserve my office for all things client based design, and this not-so-little area, now serves as my entire art studio.
The great part just for you: right now, Create Room is offering an amazing discount for our readers with the code HANDMADEHOME at checkout! be sure to take advantage!
This discount is good for $100 off any style DreamBox for you guys.
Also, using your code can give you $200 off if you buy the DreamBox and Sew Station together. Basically, the more products you add to your purchase, the more of a discount you can receive. Awesome, right?!
From crafting on your own, to projects for kids and school, anyone in the family can use it and we finally know where things are.
Game. Changer.
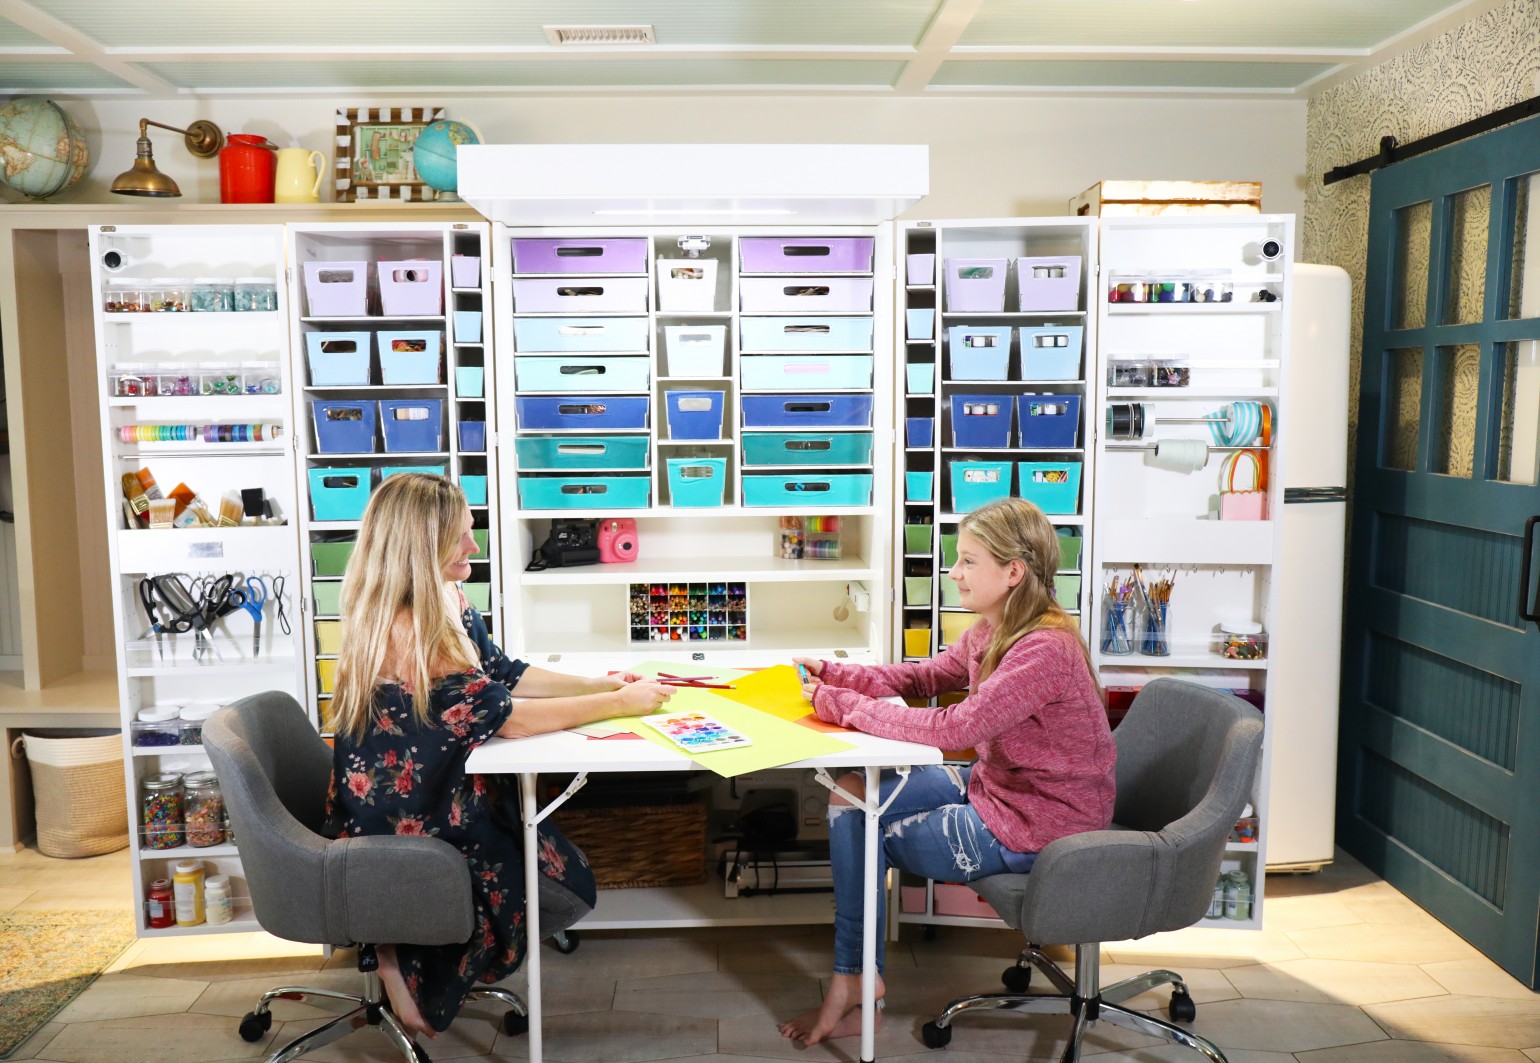
We shared more about it in the video below, or you can check out ALL our details here to see a little more behind the process. But today I thought I’d share a few tips for organizing your craft supplies with {or without – yep, these tips still apply!} create room.
Create Room makes it a lot easier, but if you just want to take some simple steps to get organized, we hope that this helps you get your motivation on. So without further ado…
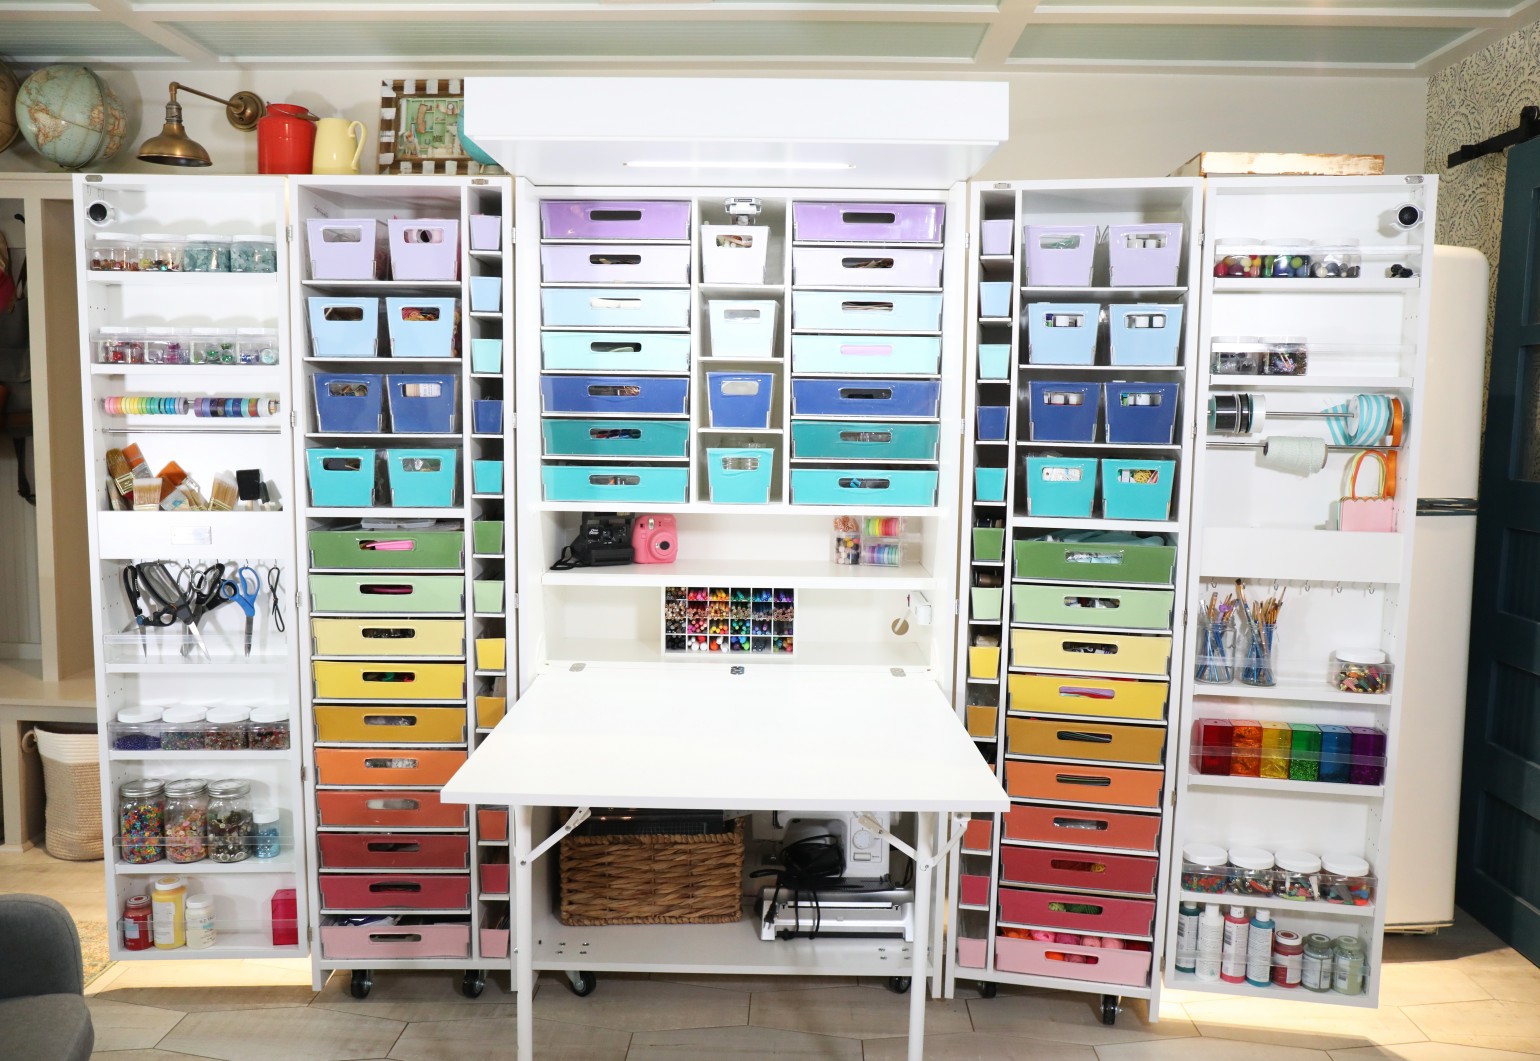
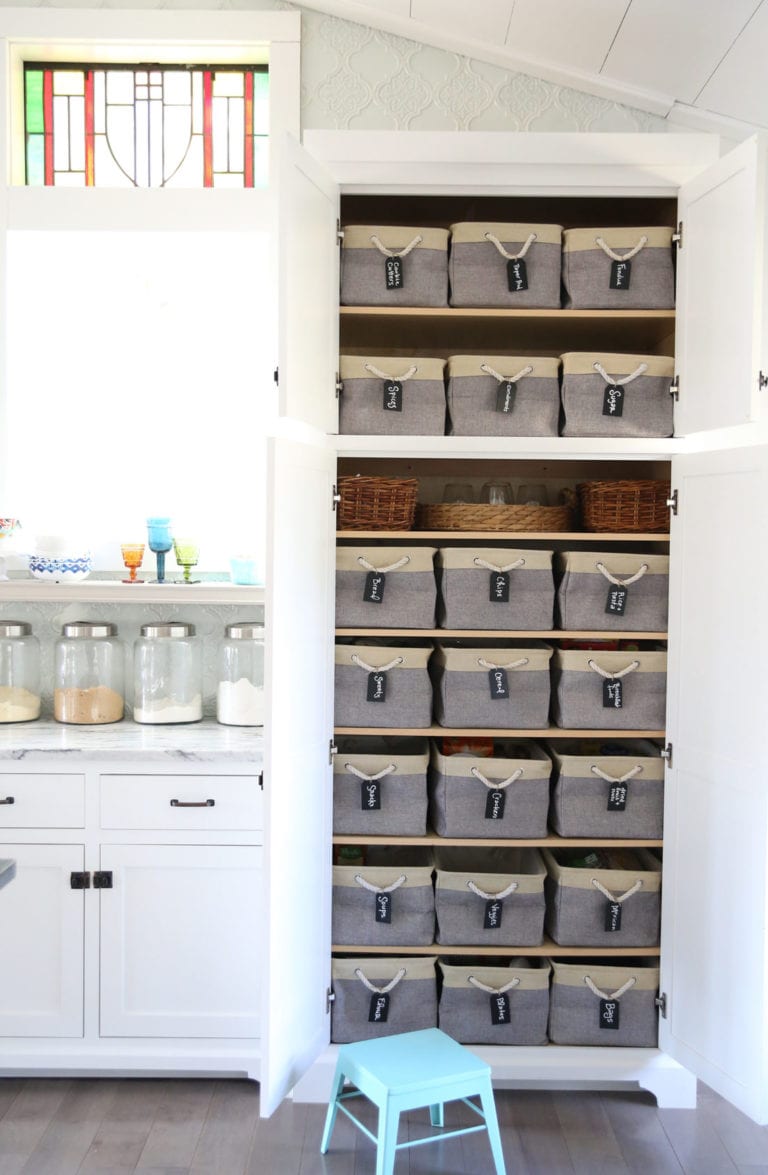
1. Order storage according to your needs.
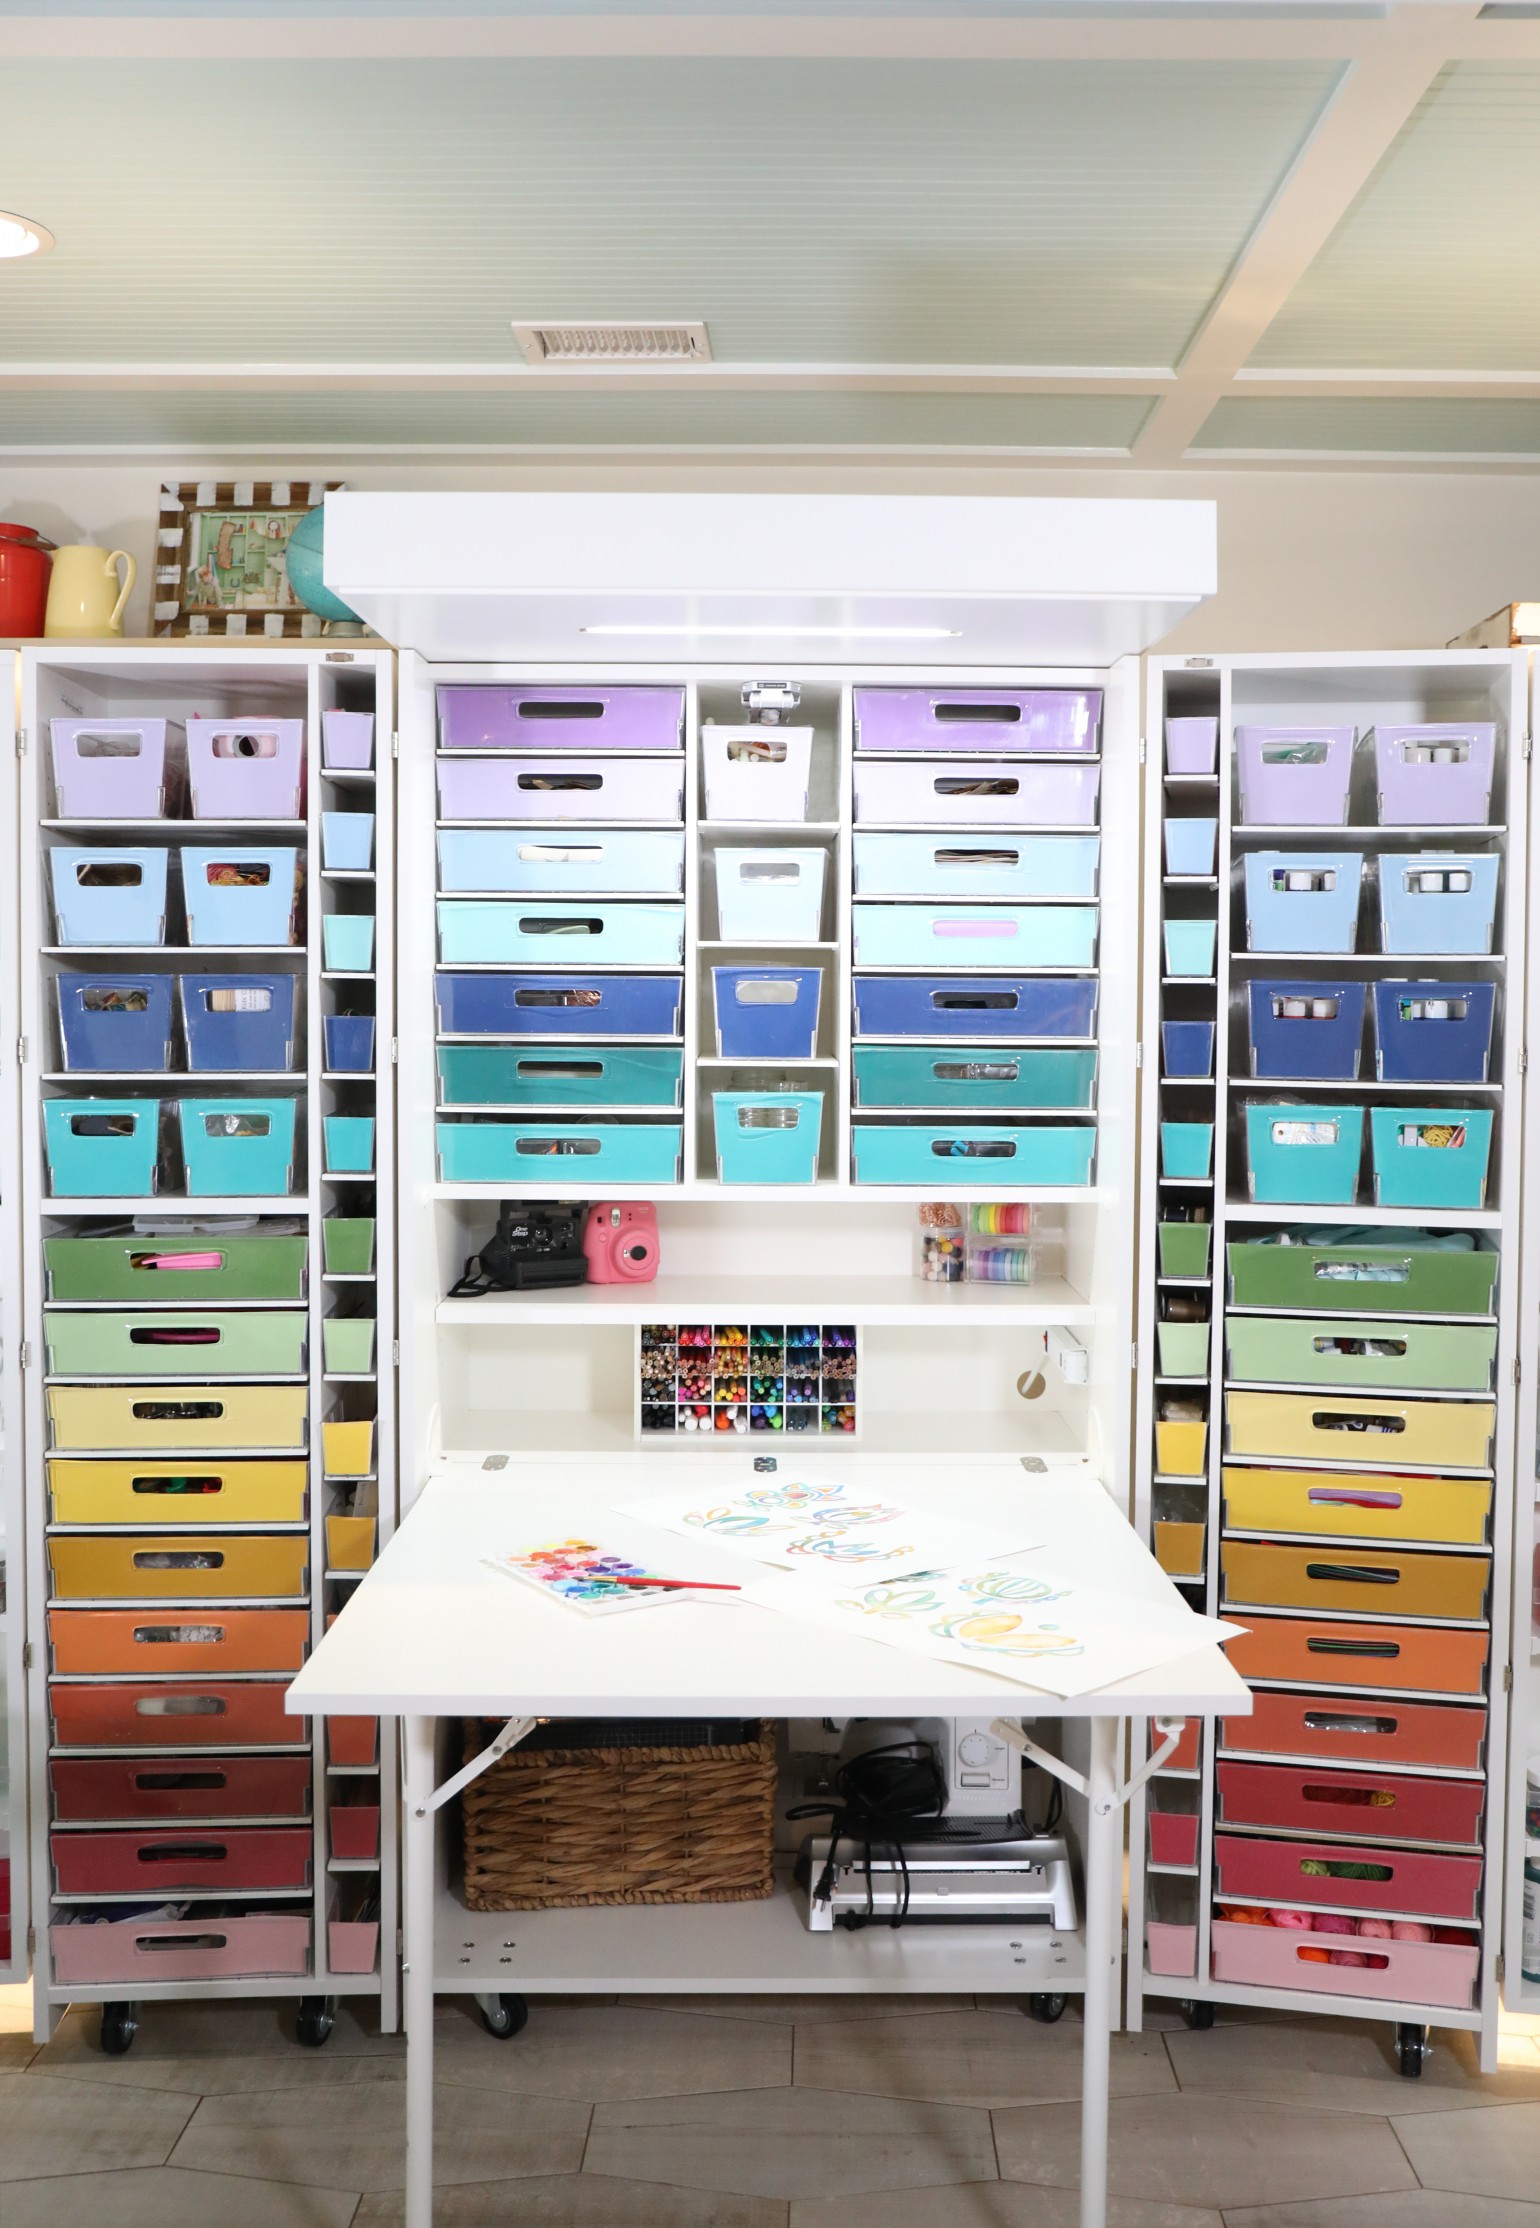
Create Room has so many options, it’s amazing that you can tailor it to your specific needs. I do recommend really investigating everything you could possibly dream up for your own order, so that you can get the most out of your own awesome piece.
For instance, if you work with a lot of paper product, then you may want more of the the larger totes, which are perfectly sized for the 20 x 20 paper. OR if you need more space like I did, order them anyway because they hold all the things. See more about what we ordered and why, here.
2. Pull everything out of your space
It’s a game changer to be able to see what you have, so you can truly think through what on earth goes where. That means that your home may be chaos for a bit while you sort it all out. Honestly, our basement was in chaos for a week, while I went through and put things back together again. It’s going to be a process when you’re storing your craft supplies in multiple places. It truly helps to see everything.
3. Purge.
You can’t organize clutter.
Because once you pull everything out… I’m basically a total hoarder when it comes to all things craft supplies. However, you can’t organize everything without whittling it down. I was amazed that even though I didn’t really get rid of a lot of supplies themselves, I had left over items from projects in the past that I no longer used, and they needed to go. I was also amazed at how many empty bottles of paint I had, that I thought were still good, but were actually dried up… you get the idea.
All in all, between my office and my other spots to stash things, I think I purged about 5 bags of trash. Sometimes paint dries up and brushes go bad. It’s time to part to make space for the new.
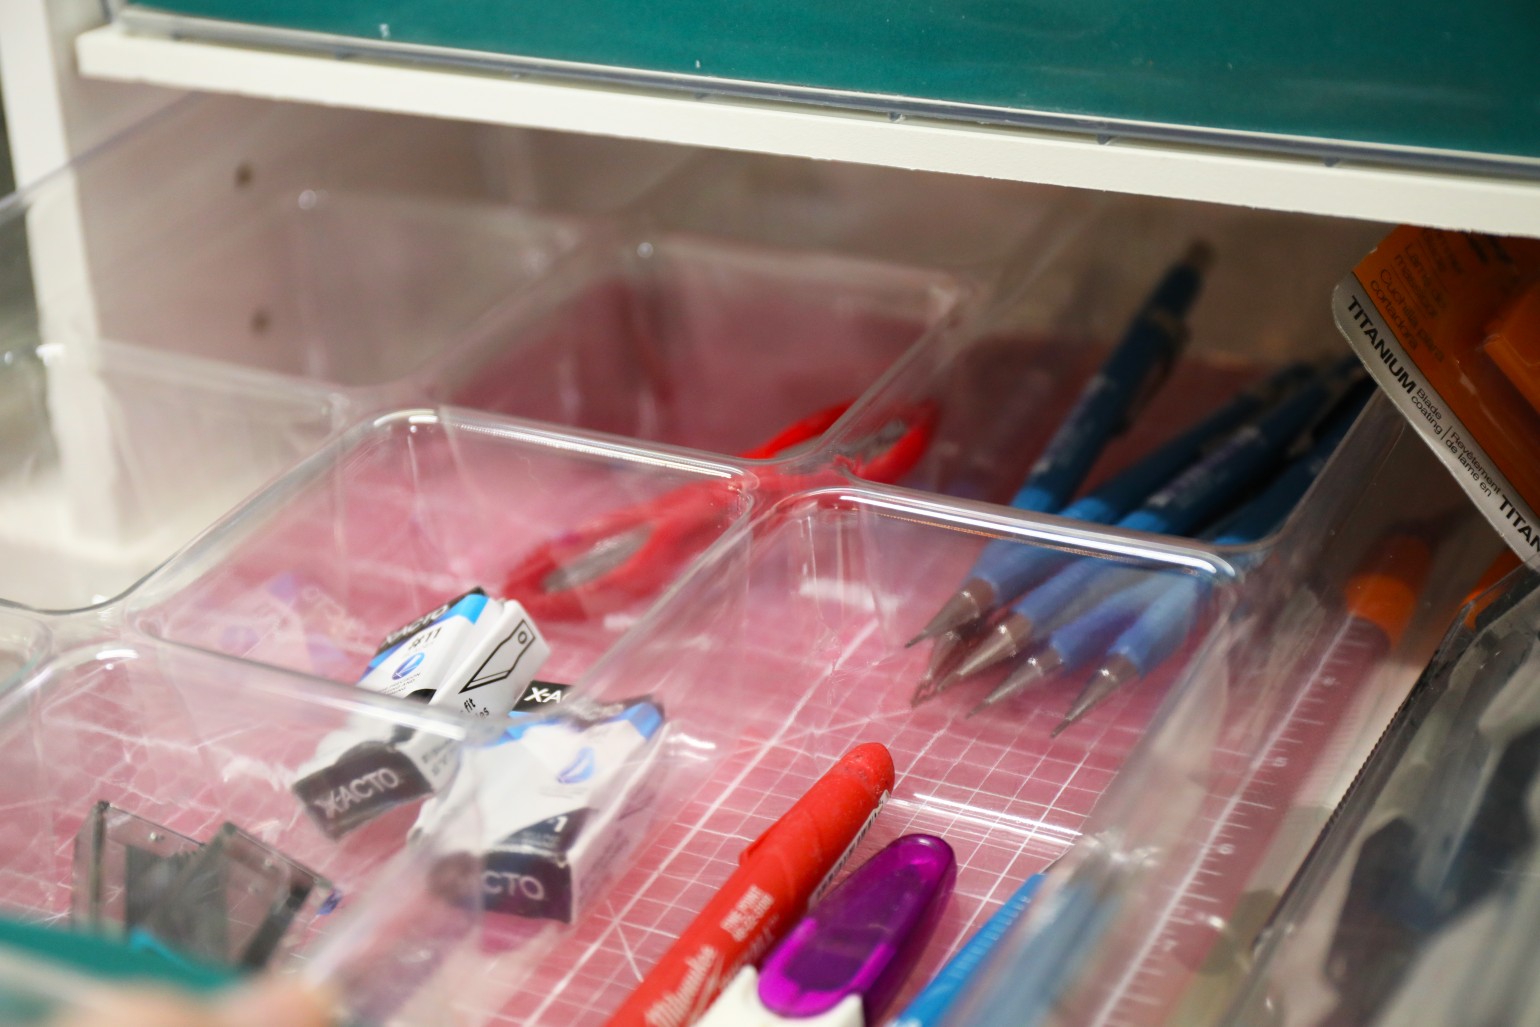
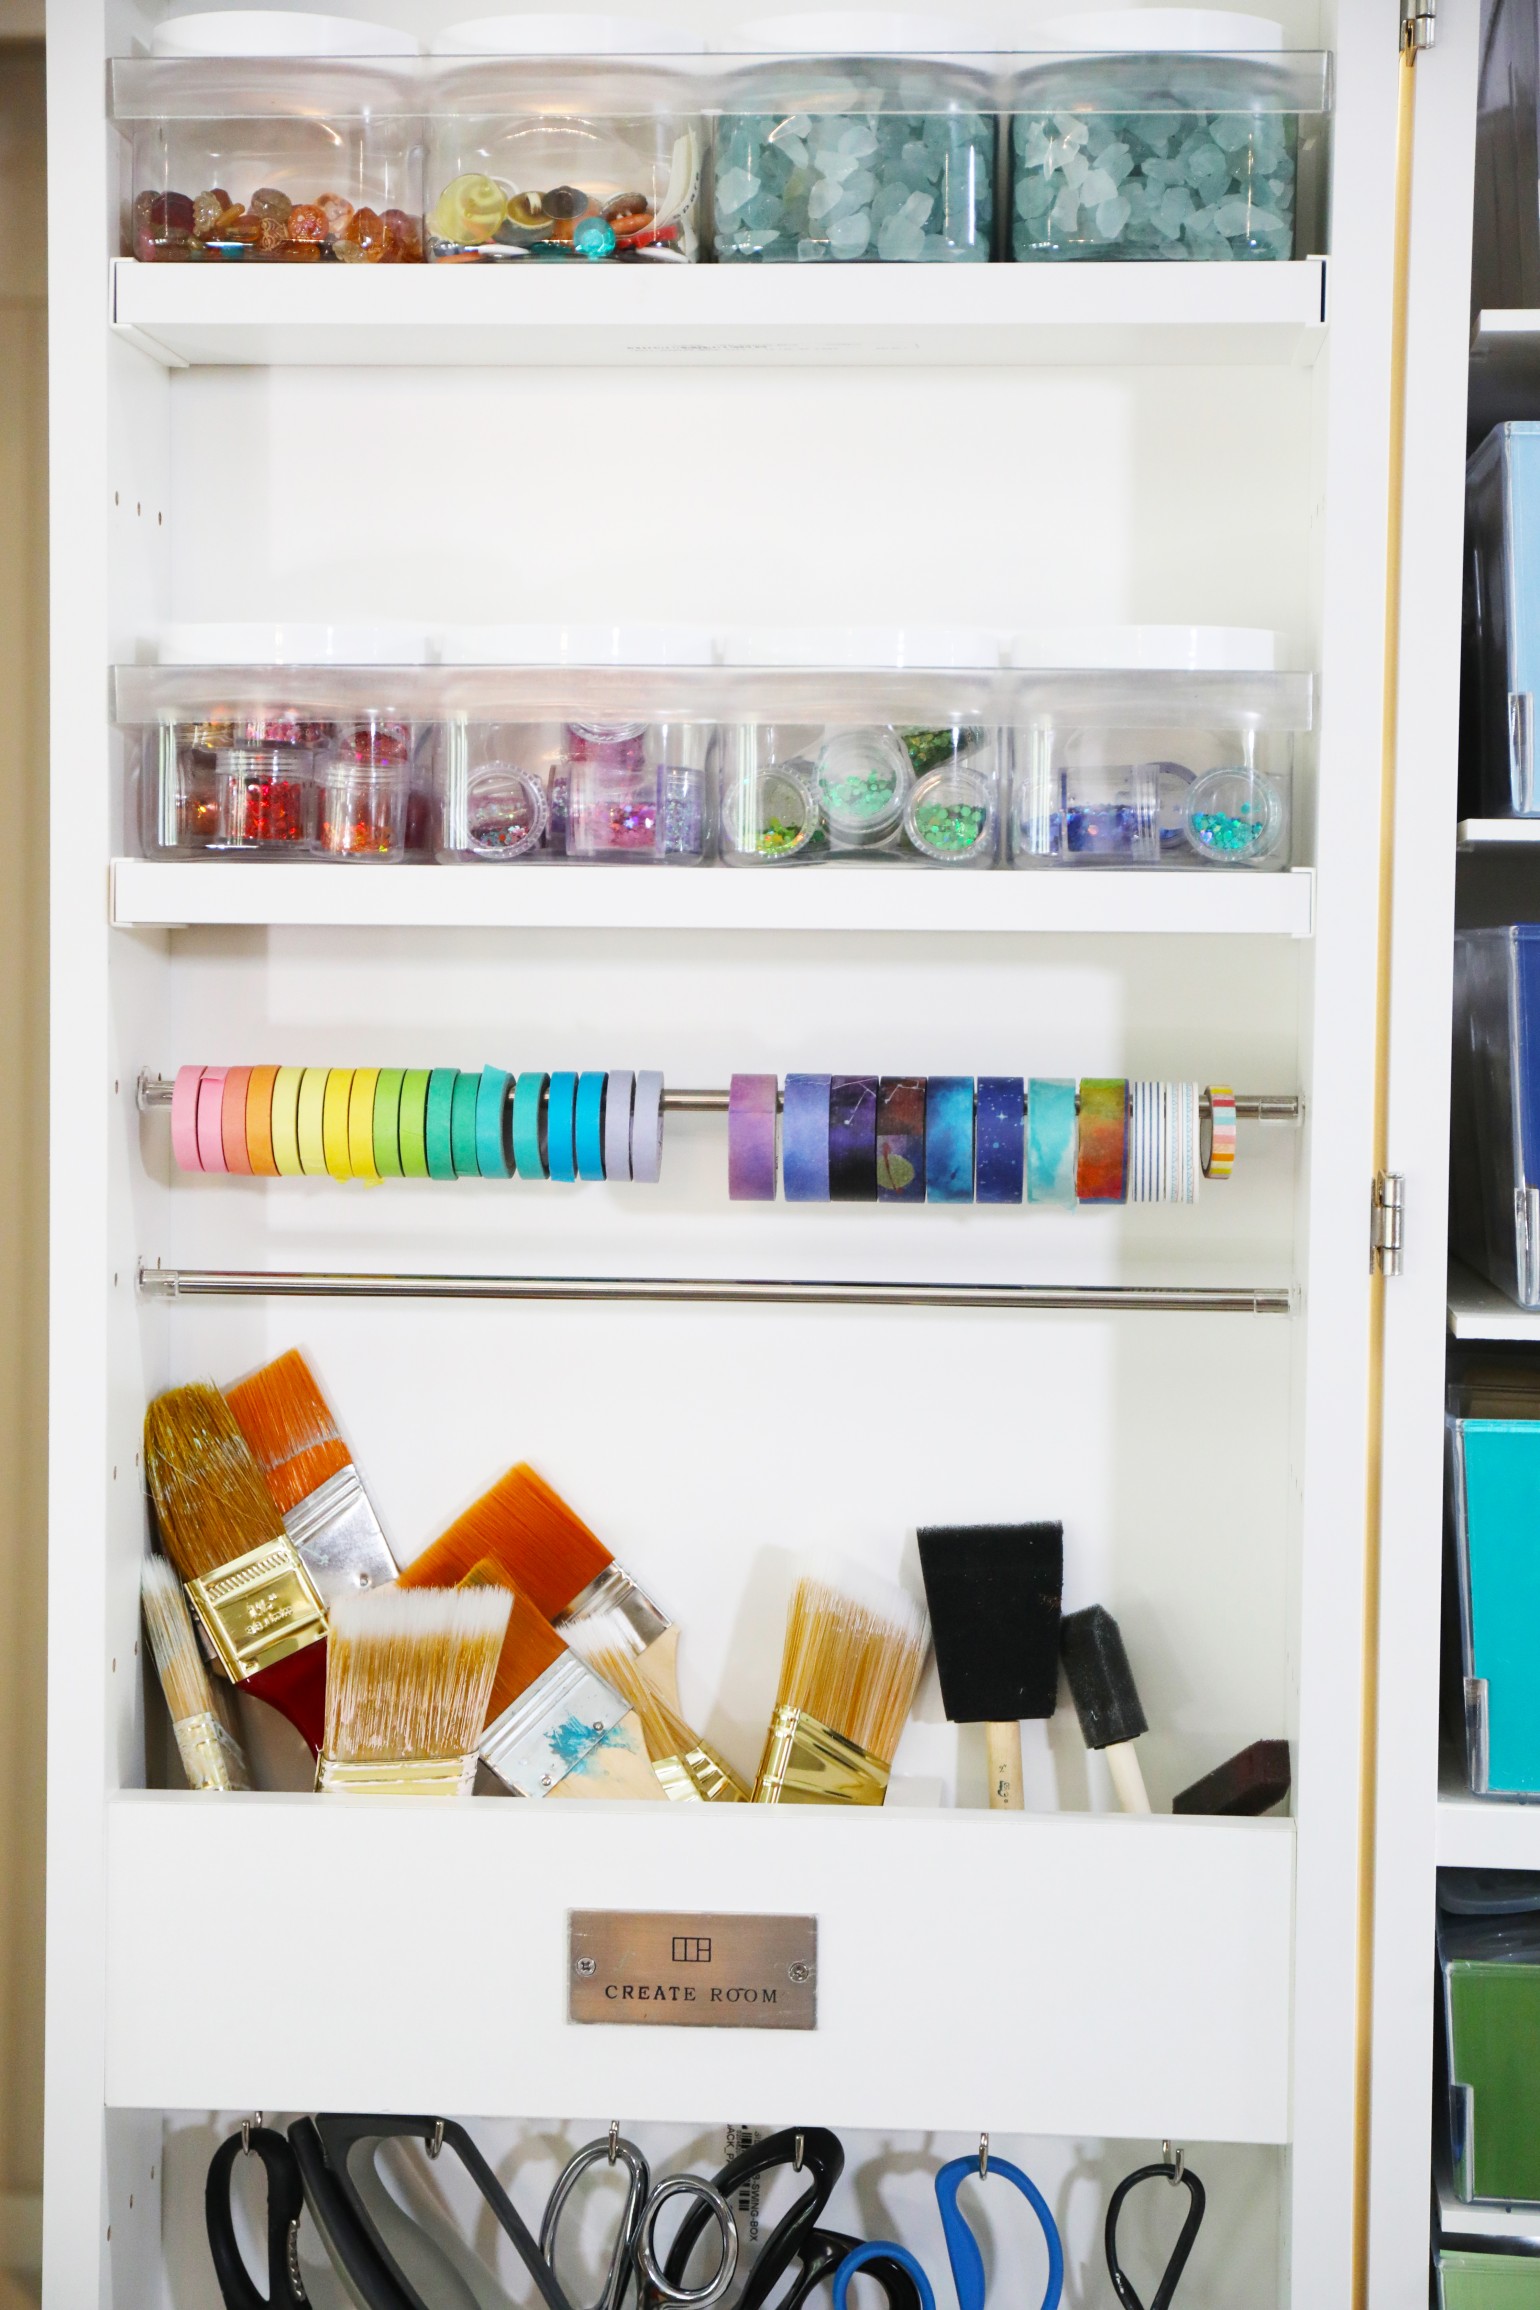
4. Organize by Category.
Pulling out everything, and then streamlining it with a purge, helps you organize by category. That way everything is nearby and easy to grab.
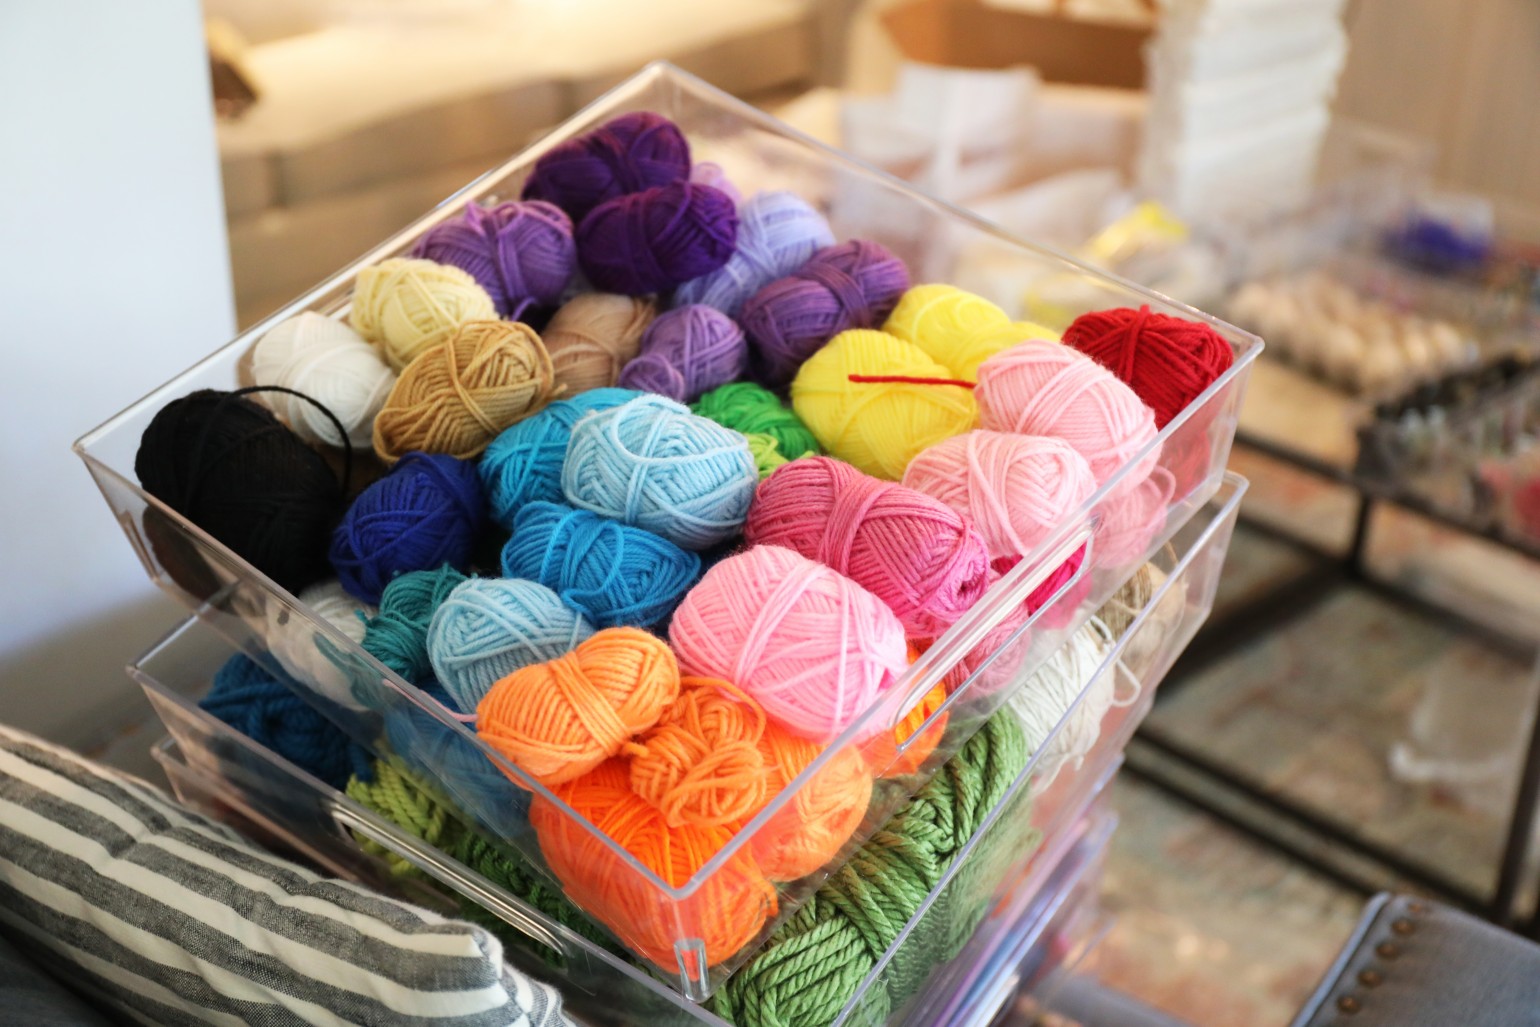
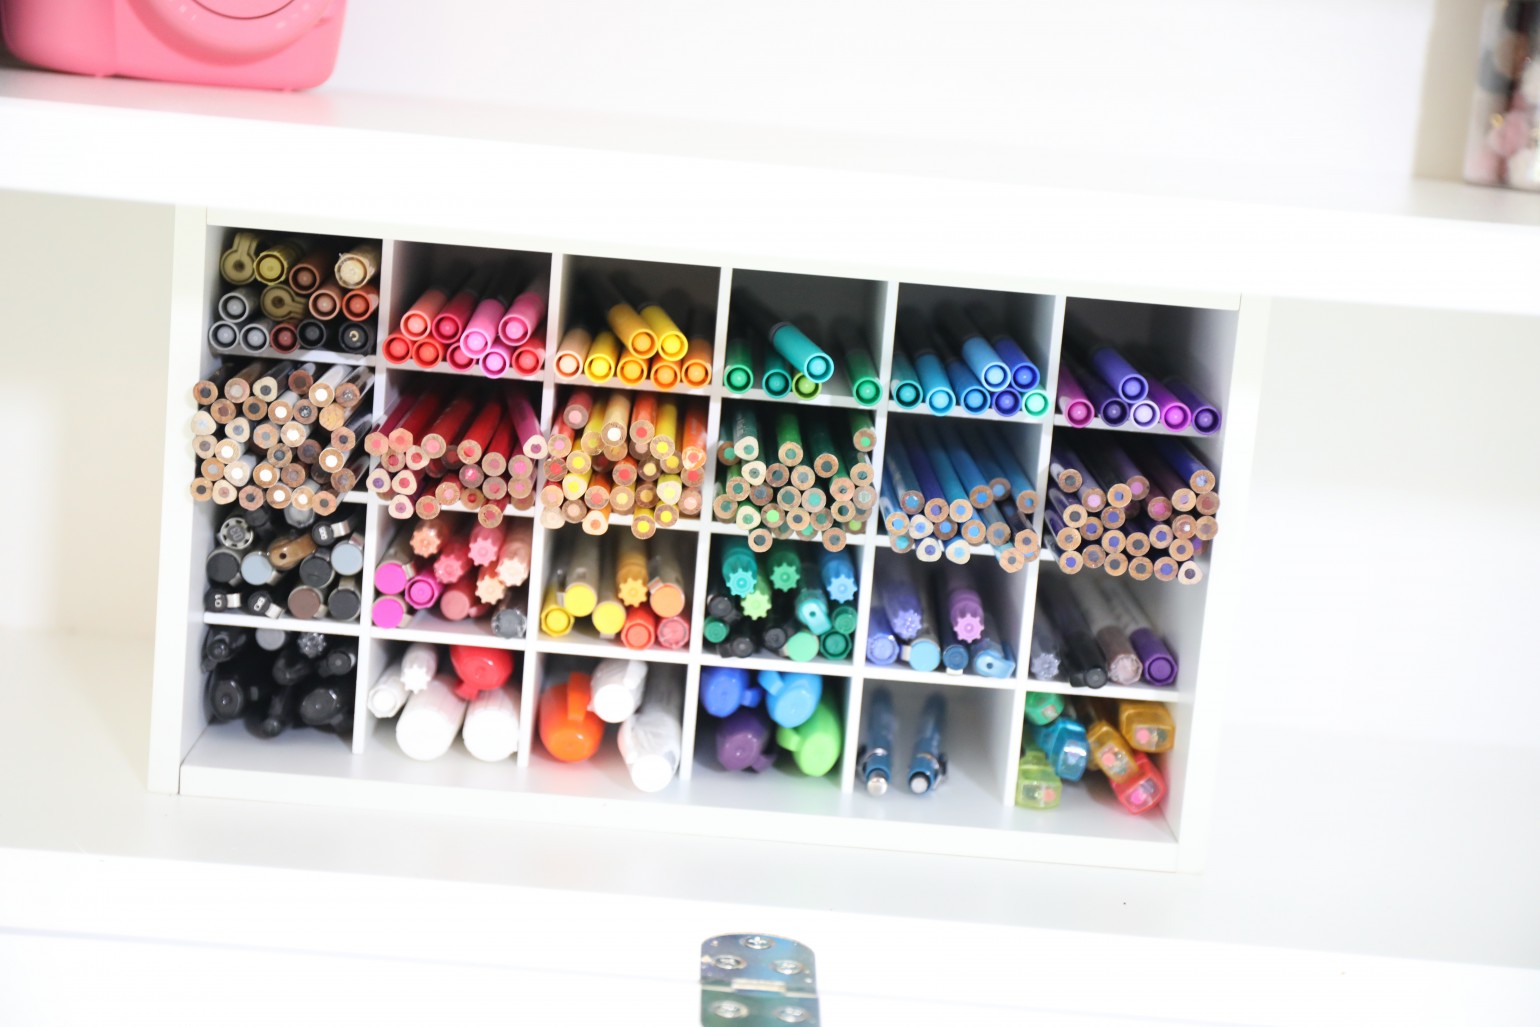
So whether it’s a section for all the types of writing materials, organized by section, yarn by color, paper by type, or brushes… it helps to get everything into sections so that you can access it when you need it. Nothing gave me greater pleasure than to finally have all my art supplies in one section, and easy to grab. I now have a category for acrylic, watercolor, oil and even latex paints.
I love that I’m no longer searching the house for what I need, and that it’s all in one place.
Helpful tip: For smaller items, it also helps to add container dividers. There’s no confusion and it keeps everything organized. That way things don’t get re-cluttered in the future.
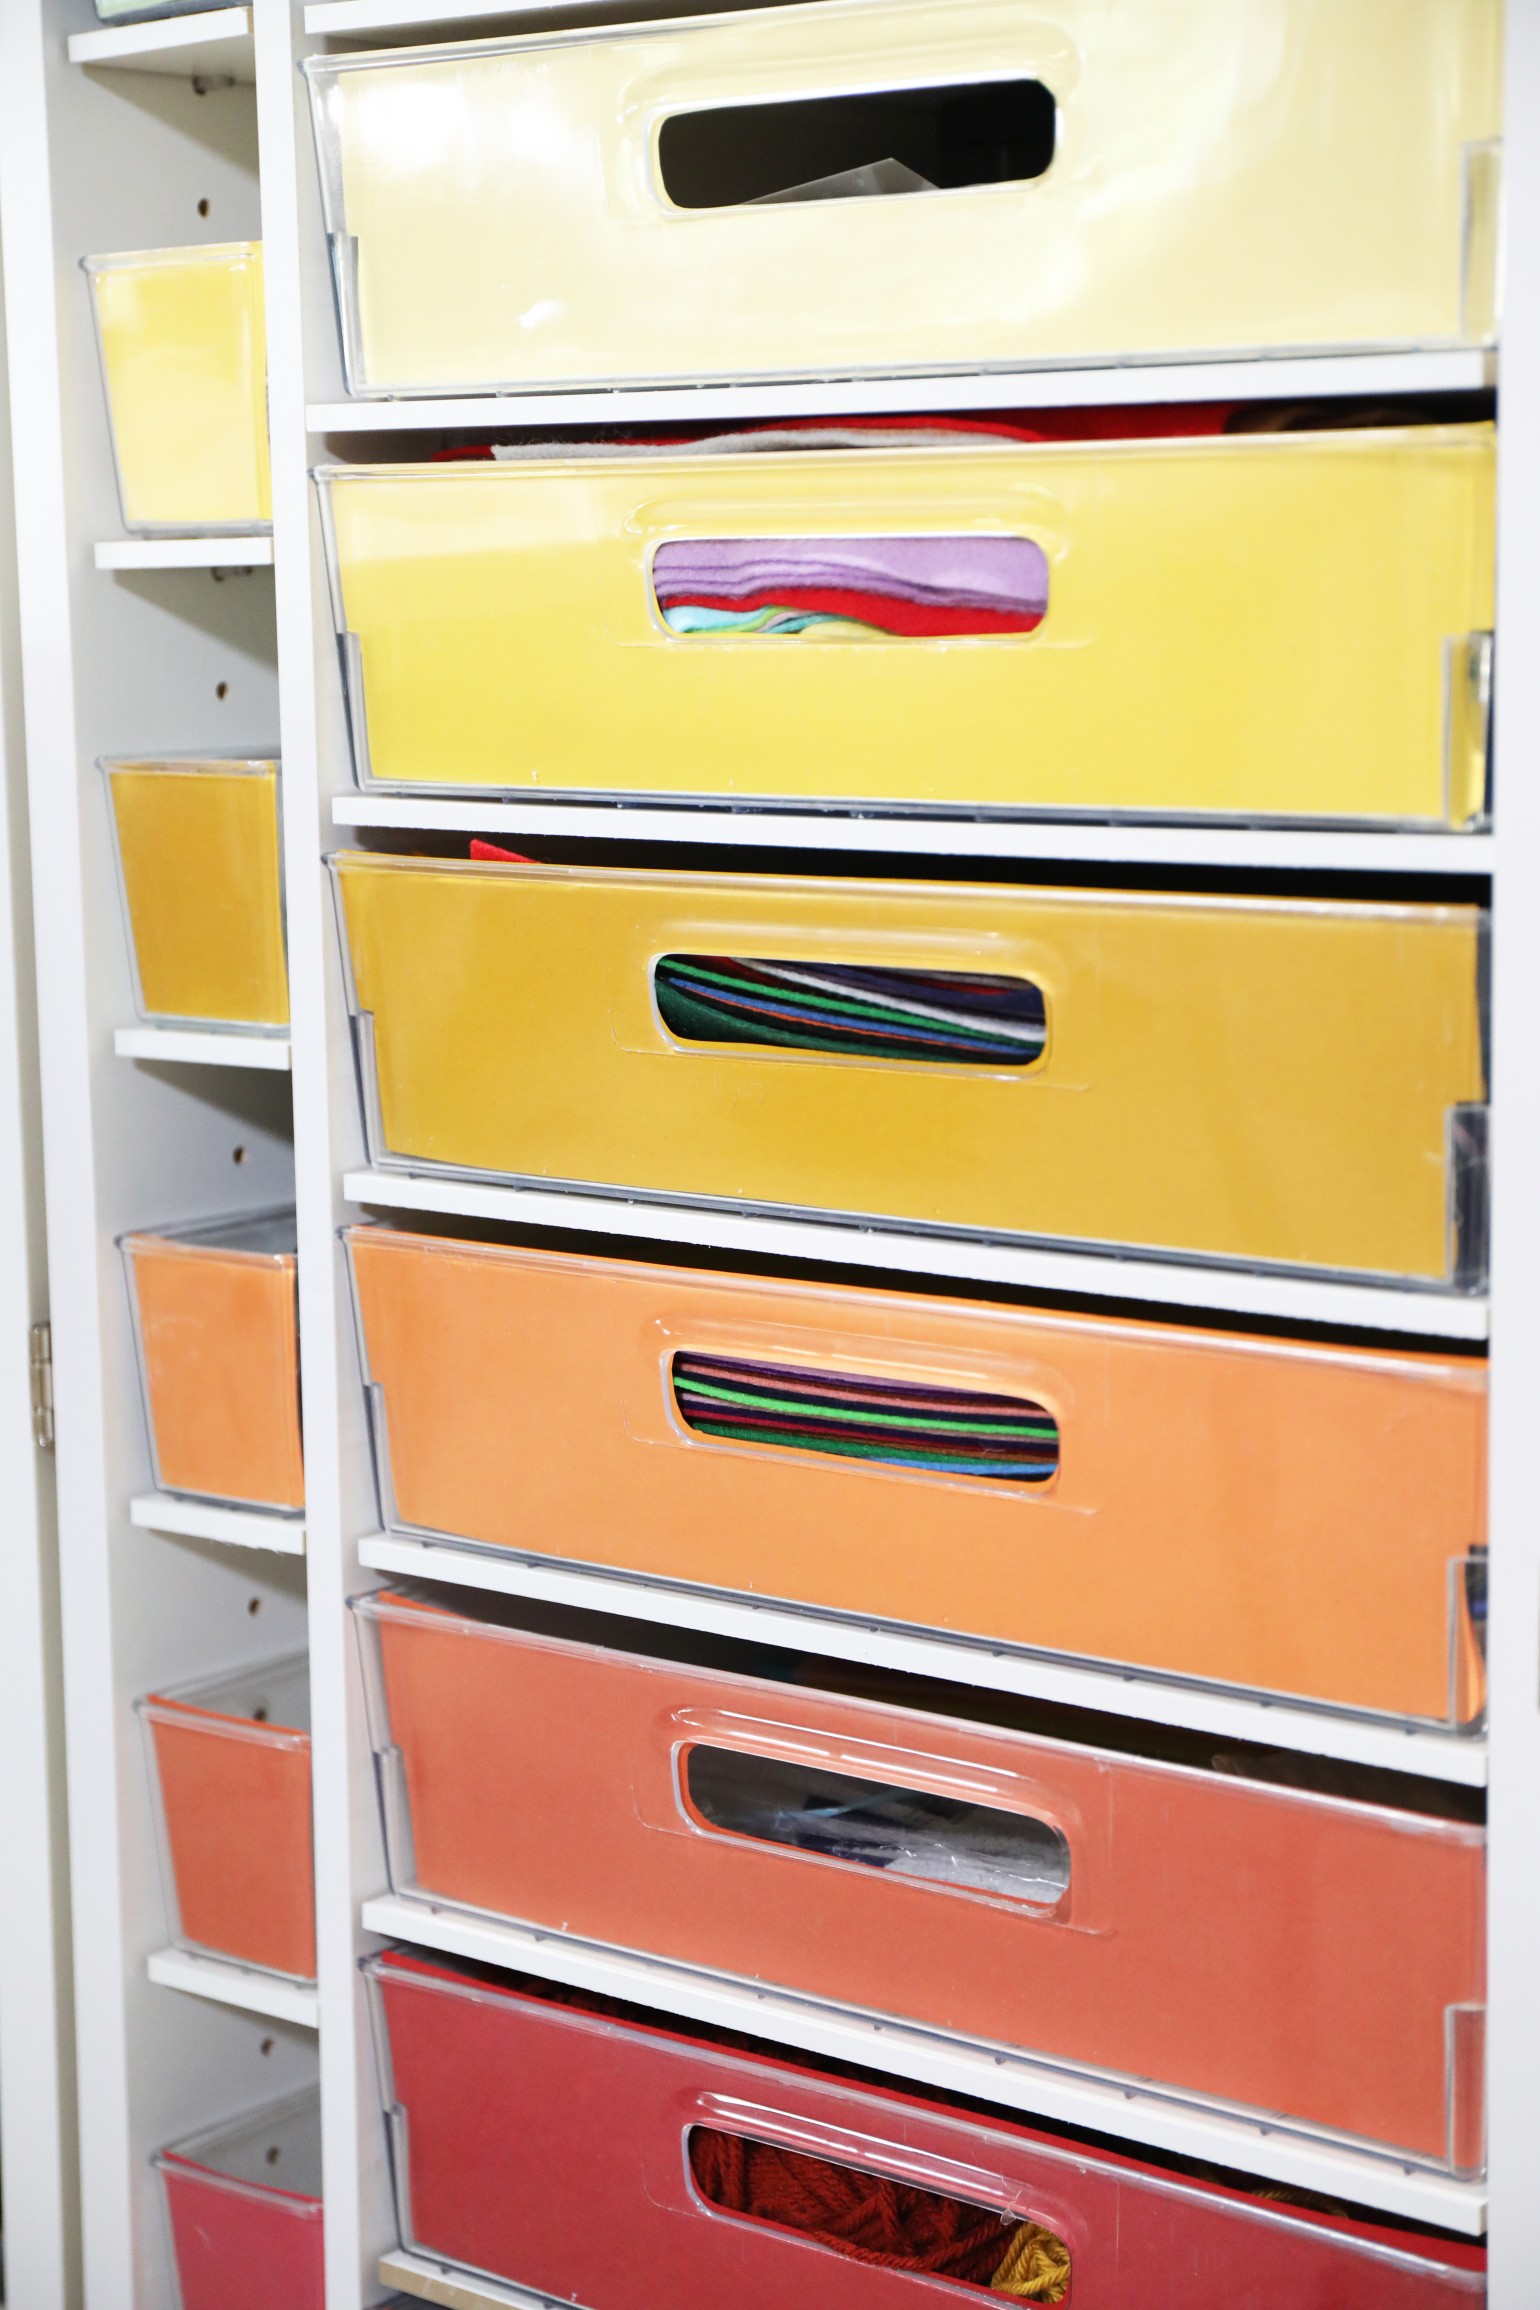
5. File it away by Color
It’s easy to add things at a glance, when they’re organized by color. The point of these awesome totes, is that you can truly see everything at a glance. I just wanted to add a little color on the inside, because it’s so fun to open it up, and see it that way.
I’m still adding labels to my containers because I wanted to fall into a routine and make sure it’s what I wanted, first. But I love that I know that one section holds felt, while another holds twine. And I keep it all together based on that. It’s a whole system I’ve been doing for years with our closets and more, but I had so much fun making these covers, it just added to the whole overall satisfying feel. And every time I open it up… it’s a happy little space.
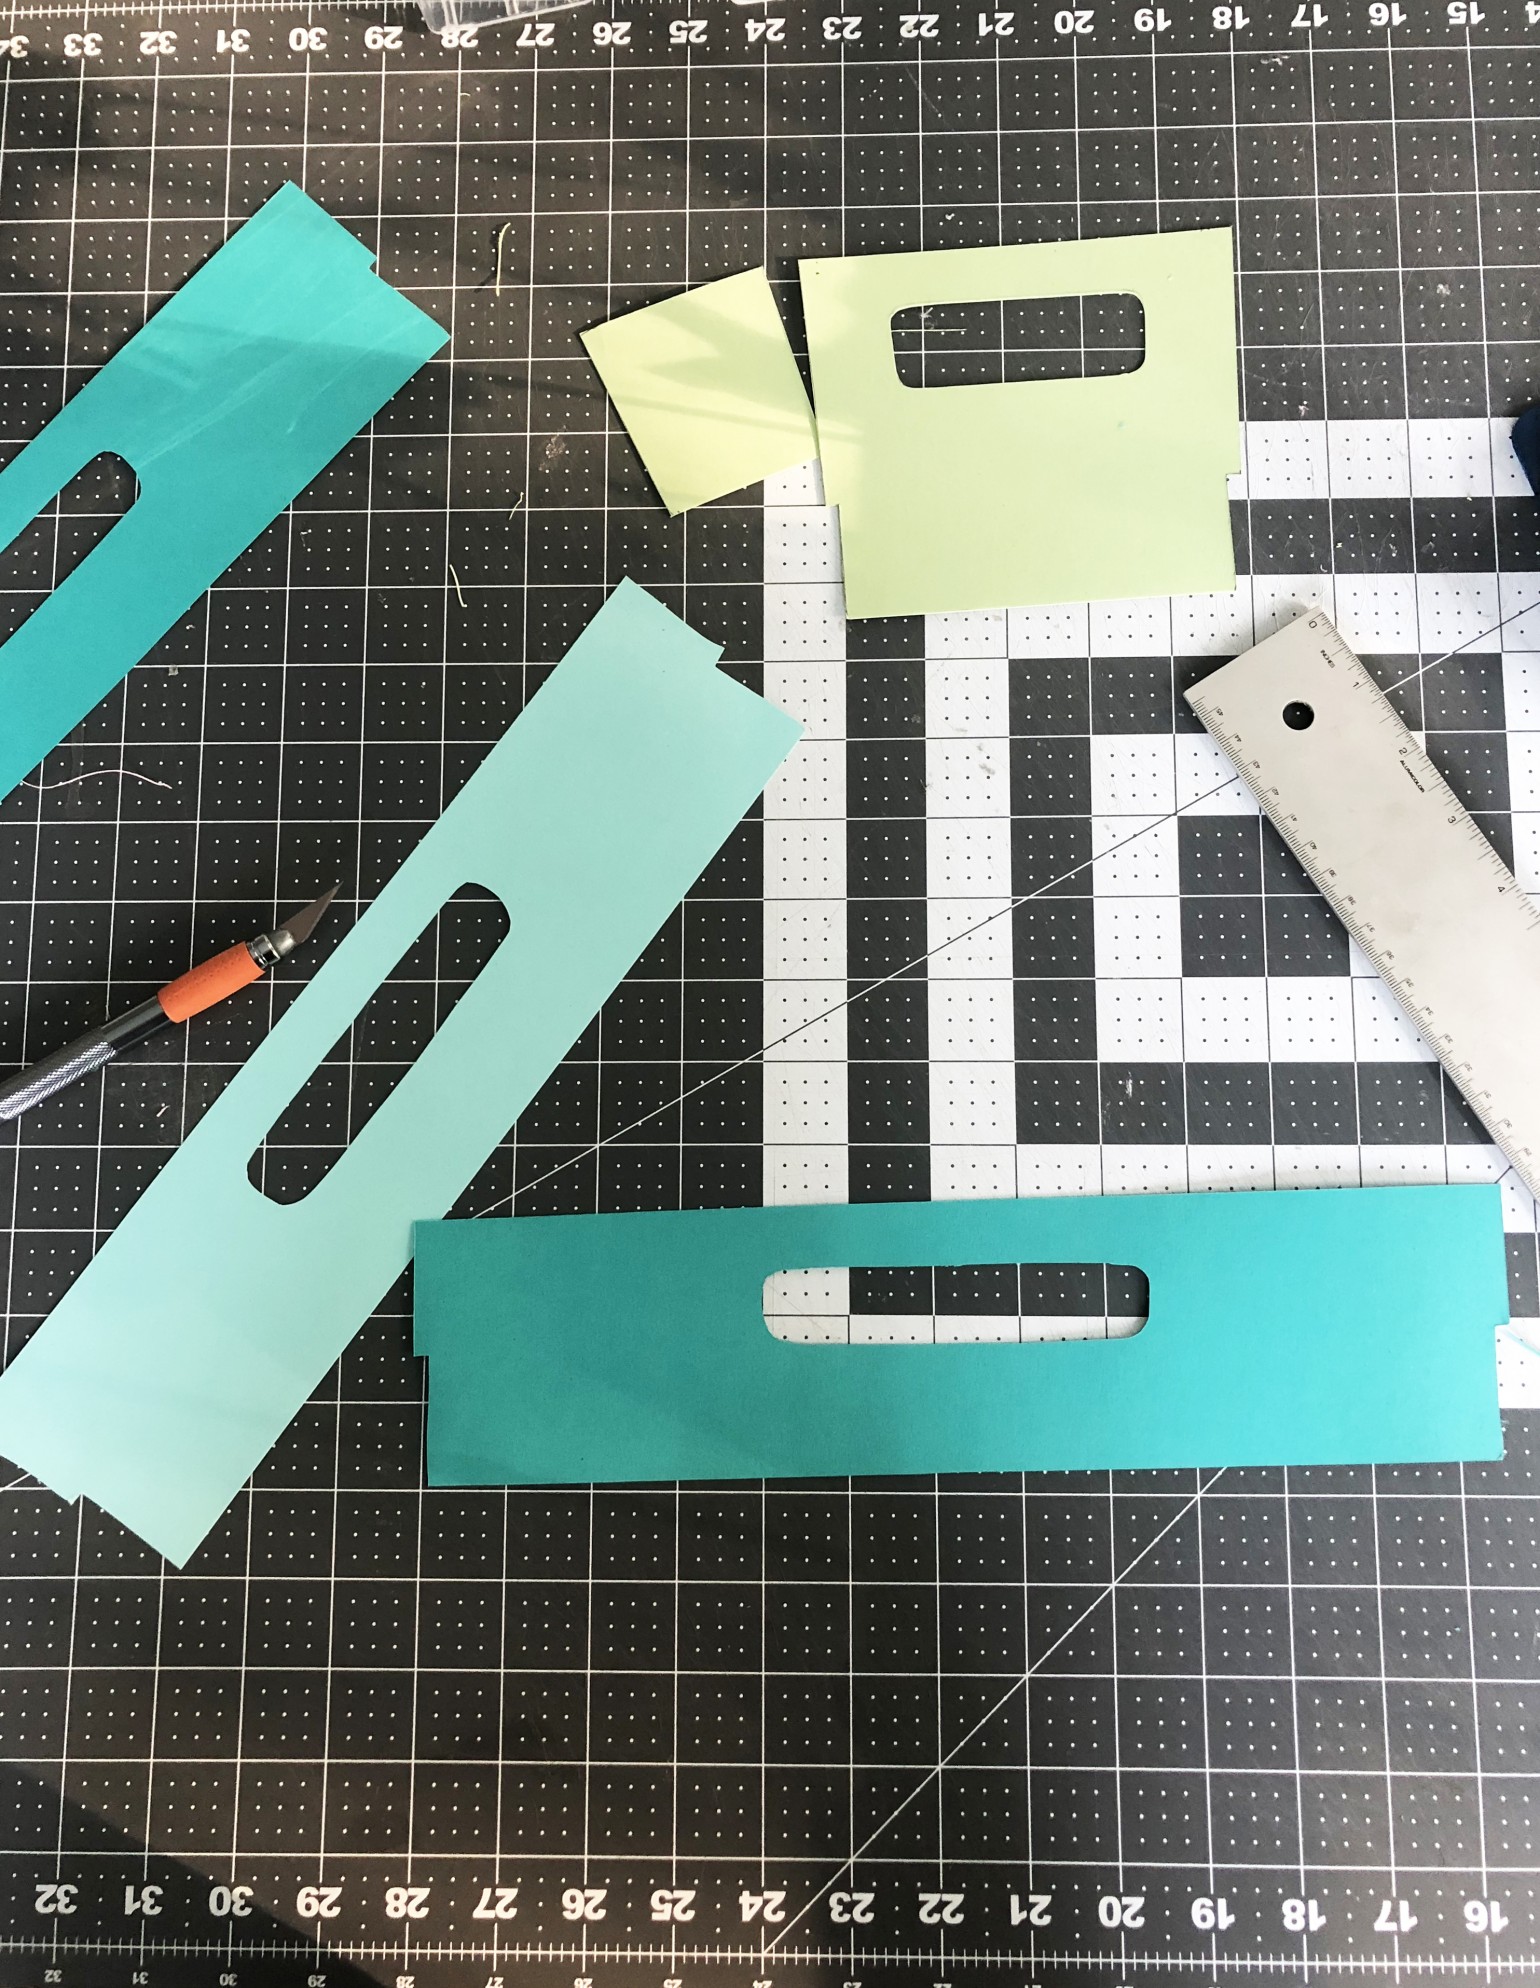
Tote covers: The totes with the create room system come in three sizes. I made these tote covers by placing the containers face down, and trimming accordingly, after measuring the indentions on each side. It was the simple process of making a template, and then trimming it off the top after it was traced. I just traced each shape over and over again, and cut them with an X-Acto on a self-healing mat. I don’t have a Cricut cutter and don’t think I can be bothered to figure it out, so this was a couple of afternoons one weekend when listening to some fun podcasts, and I was finished.
I ordered some colorful card stock, and chose my favorite colors to pull from and make the space so fun.
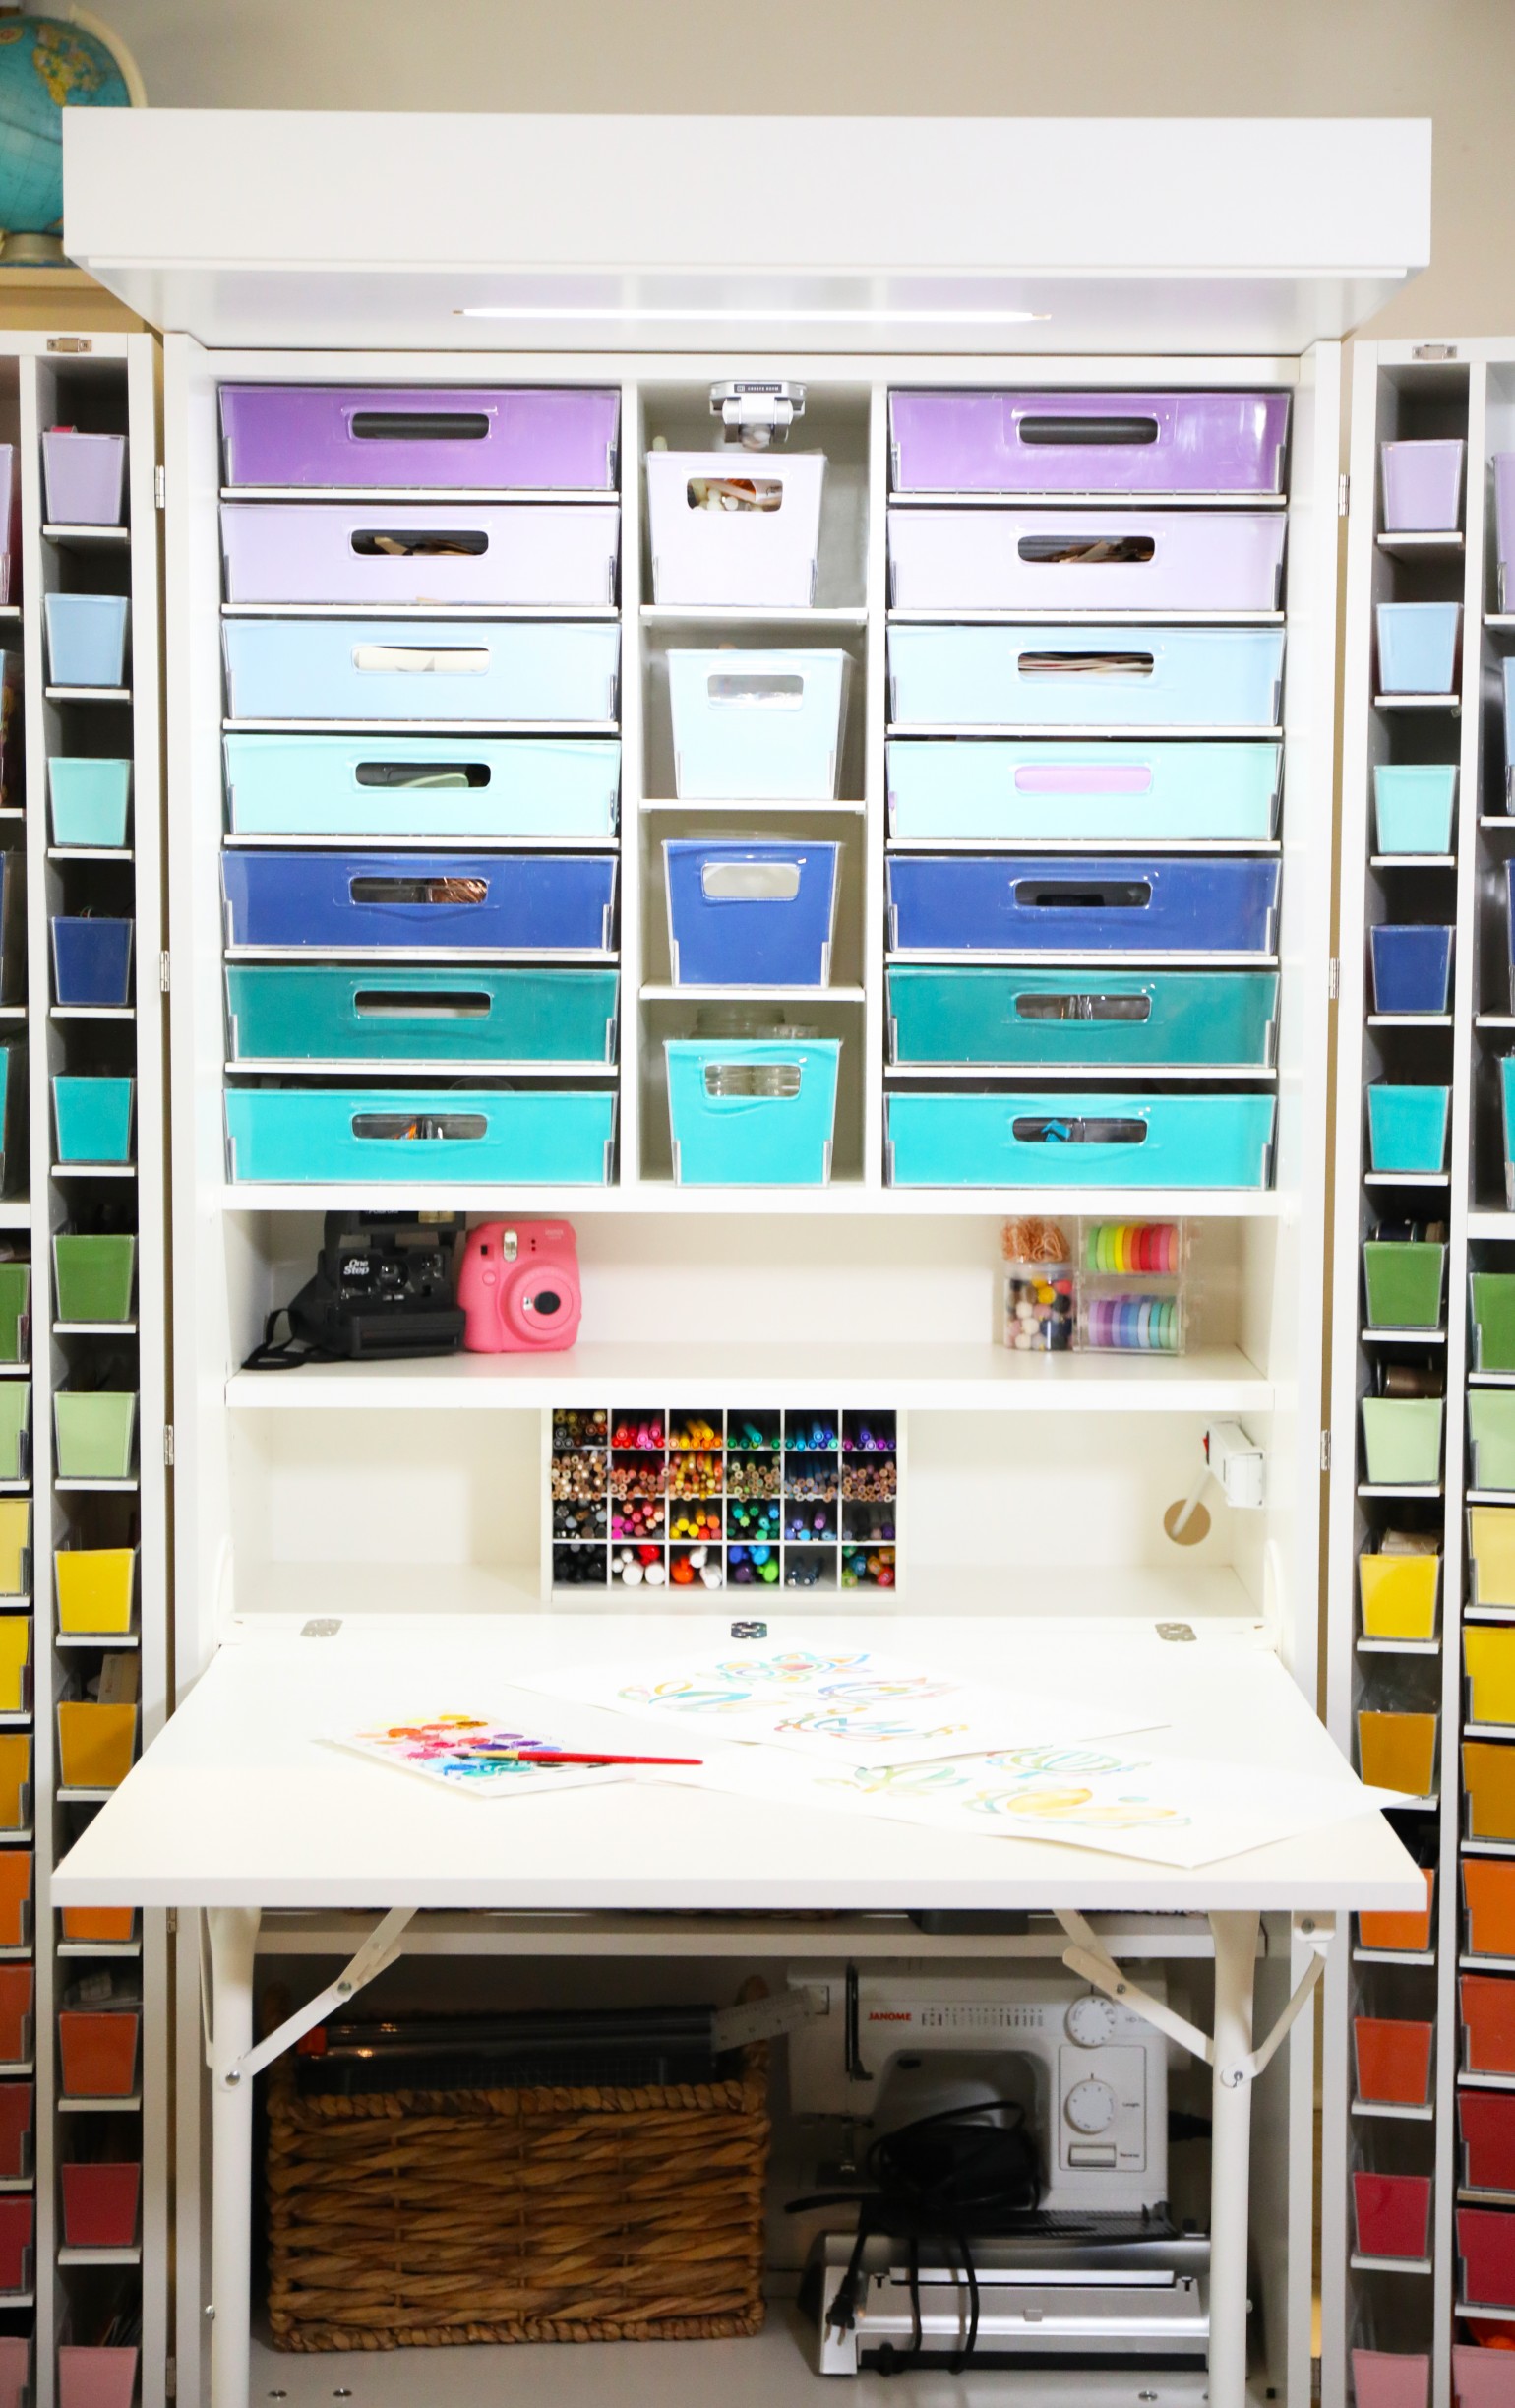
A place for everything and everything in it’s place!
Again, you can totally do some of these things without the actual Create Room system, we just love that we’ve saved so much room with our massive amounts of art and craft supplies.
Even my laminator and sewing machine have a spot in my little closet/room system. We love it!
As always, let us know if you try it. Don’t forget to use the code HANDMADEHOME for a nice discount.
Let us know if you have any questions! We’d love to help with any you may have.
Have an inspired day!