owner’s suite addition: butler’s pantry + laundry room design
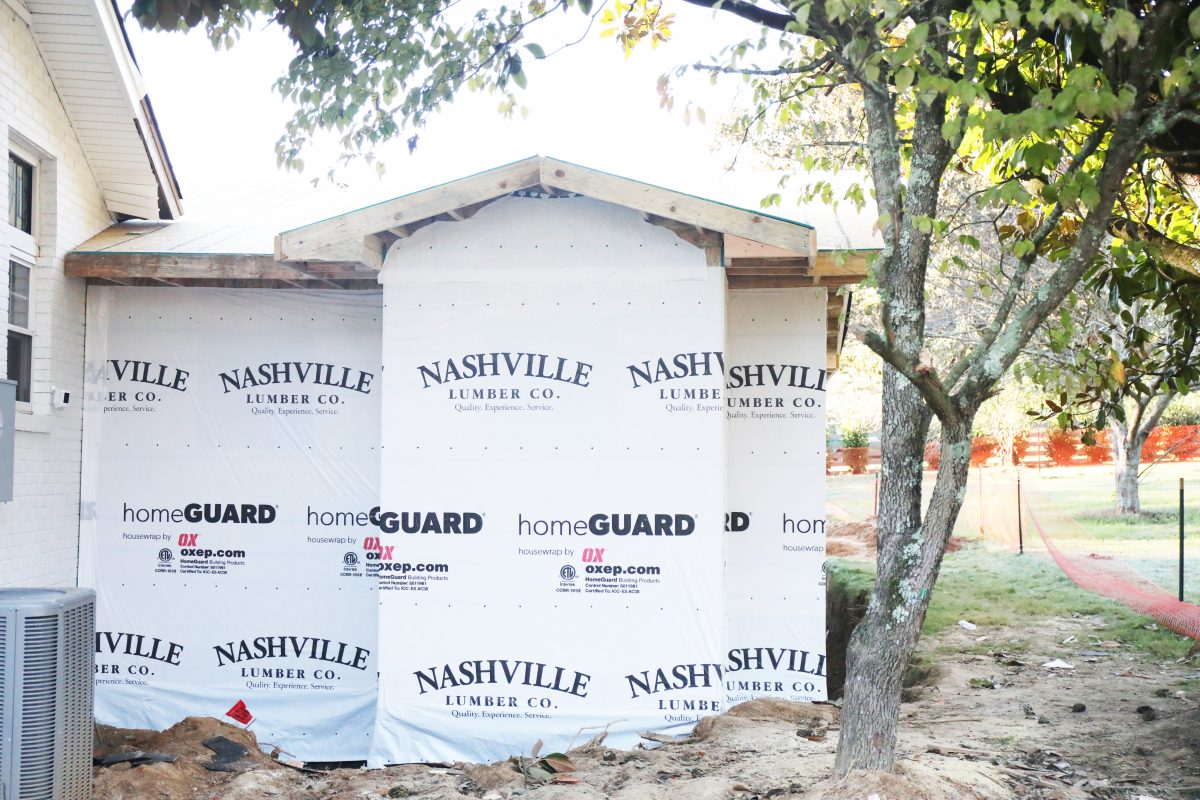
If you’ve been following for a while, then you know that we recently shared the framing of the addition! {If we look tired here, it’s probably because we are. HA!} But it all happens so fast, and then it doesn’t. Or at least that’s what people think who are looking at it from the outside.

And if you’re just now catching up, a little necessary backtracking:
• We were thrilled to announce our primary owner’s suite addition this summer + a history of our house. It’s been a really long process for us, one we weren’t sure would happen. So we’re adding on and expanding in an awesome way for our family.
• Here, we shared our plans, where we’ve been working with an awesome architect {Peter Aylsworth is our hero, so if you’re looking for an amazing person, look him up.} In the meantime, we also shared a little of what we’ll be taking on in our front yard, to solve our mullet prob, as well.
• And the beginning of it all, here.
Today we’re talking about the addition design details! AKA THE FUN STUFF. AKA MAH SPECIALTY.
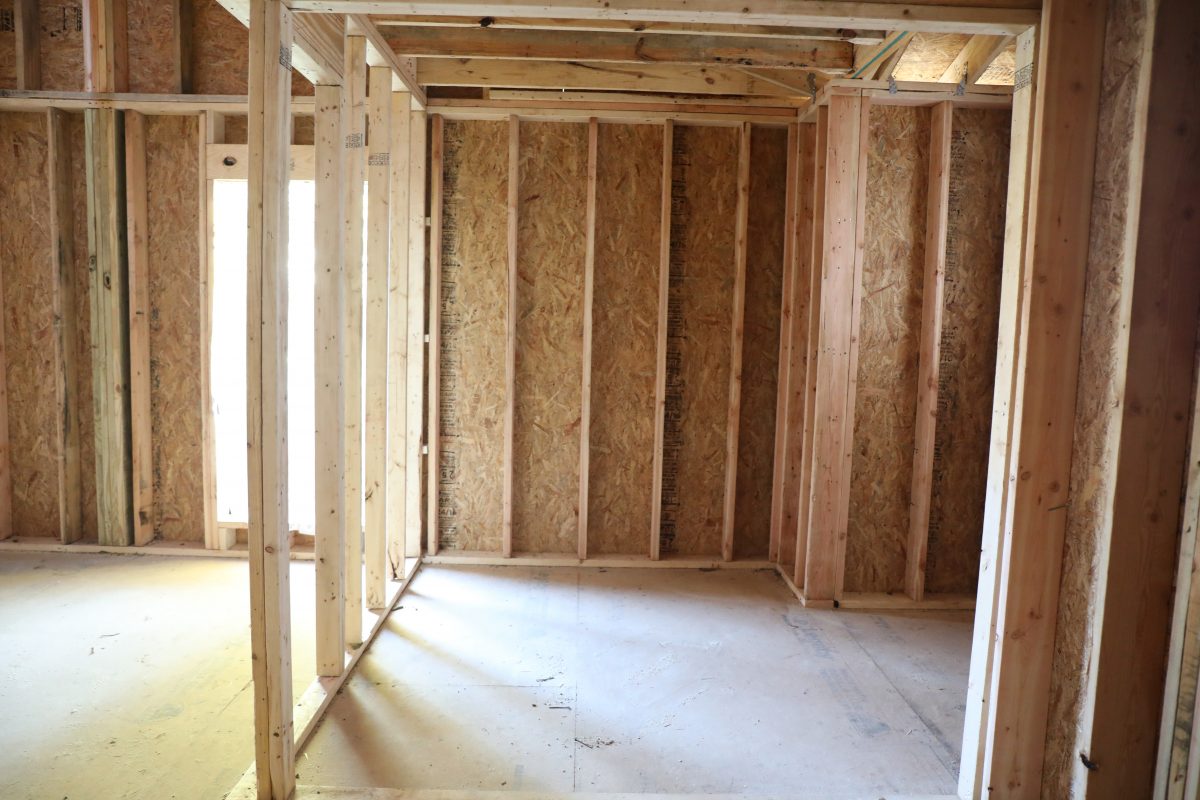
With the framing up, this is the part where it all seems to stand still visually, but there’s a ton happening behind the scenes. While the HVAC & plumbing have been installed, (we even have our fireplace in tact), Jamin’s been working hard on doing the electrical himself.
The crawlspace is being sealed and slowly but surely these important steps are coming together – and it’s basically a lot of organized chaos kind of mess out there. But we’re even looking at roofing samples because it’s the last thing on this house we haven’t touched since our outside makeover with Window World – and now we’ll be replacing the entire thing since it’s easily 25+ years old. Not to mention, it no longer matches our beautiful outside so we couldn’t be more THRILLED about this one.
Meanwhile, on the design front, I’ve been rounding up all the samples, playing with variables in my head, and I’m finally landing on some decisions. True story: I can choose things for clients all day. When it comes to our home, it’s total analysis paralysis. Thus the tired selfie above.
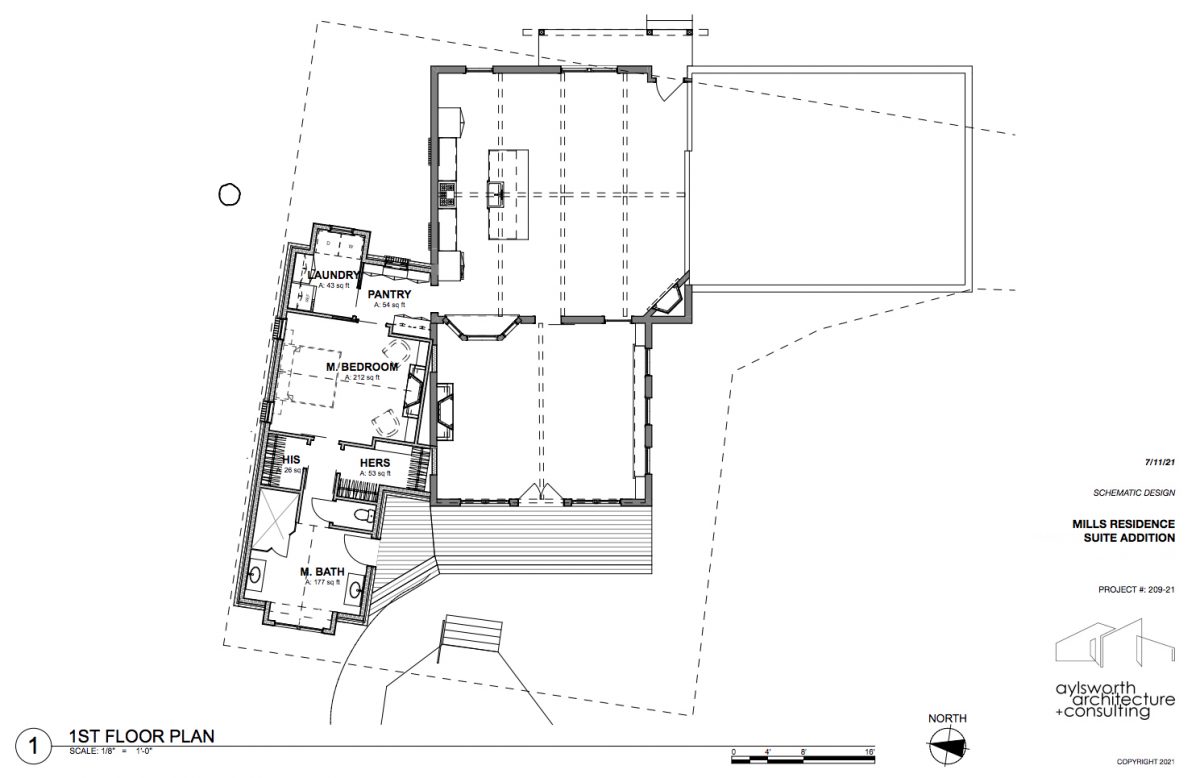
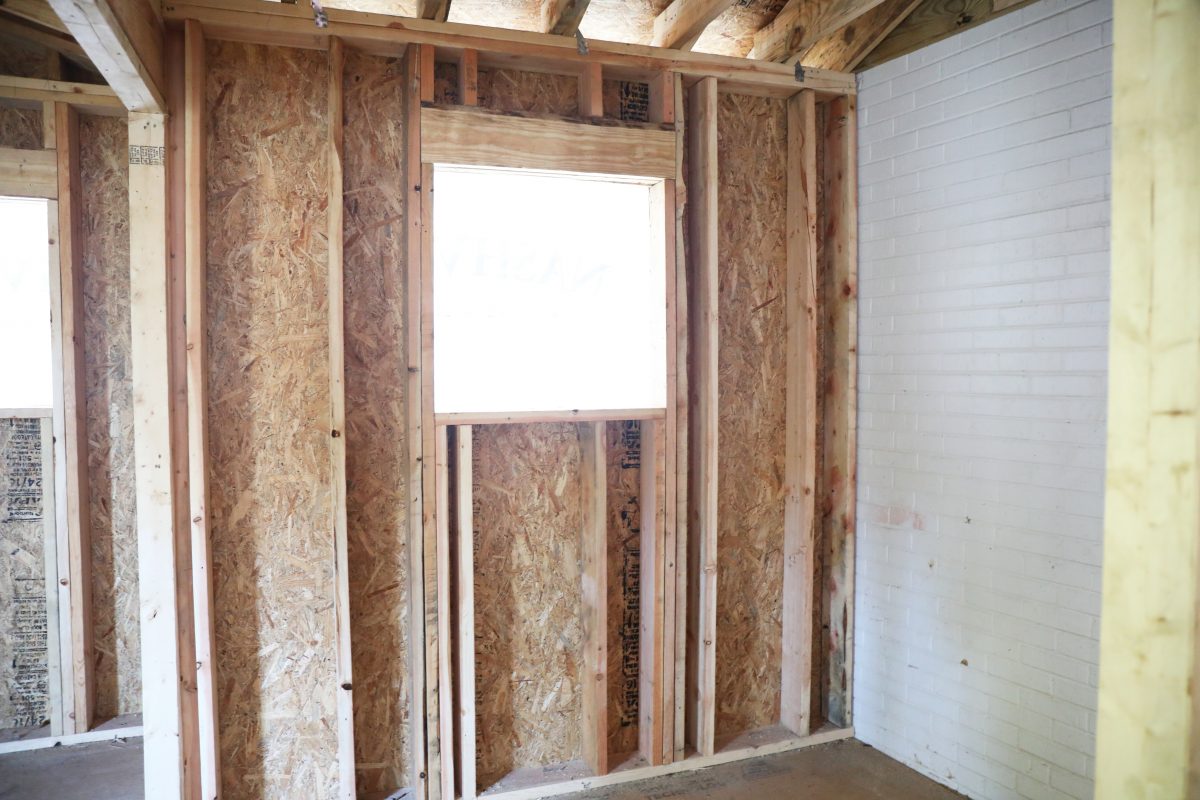
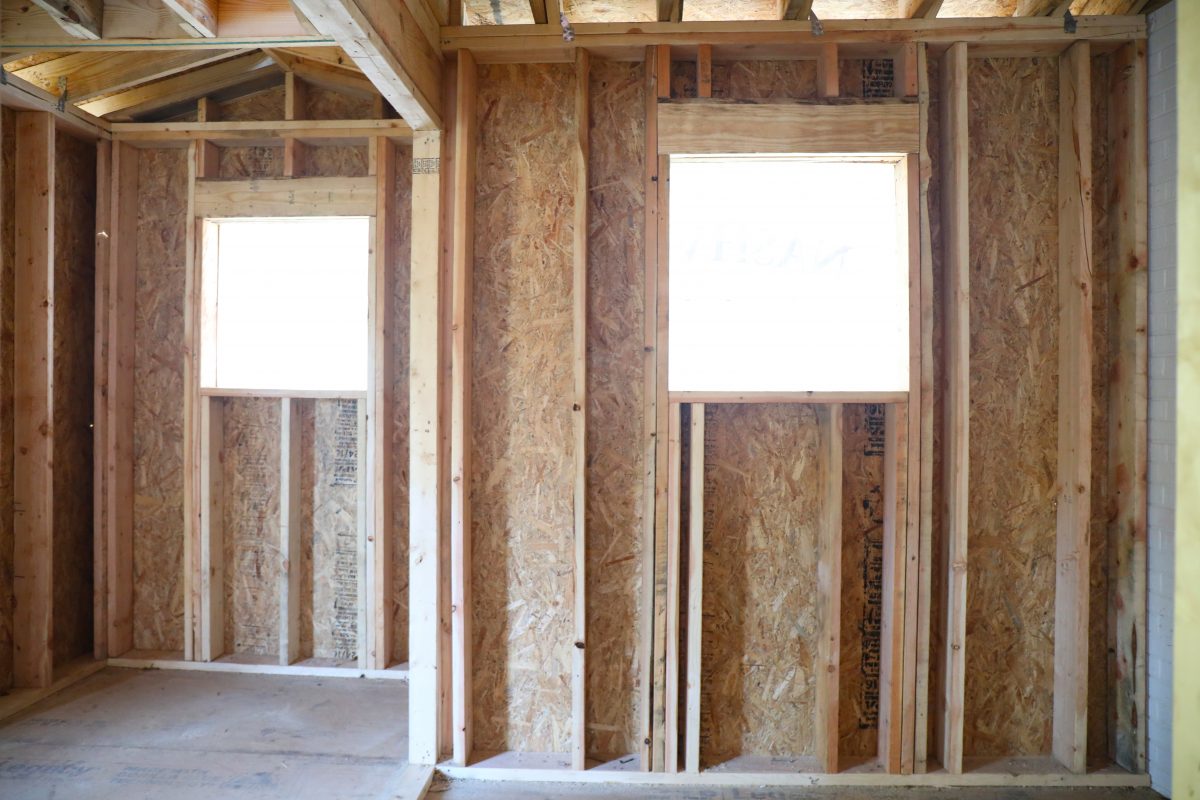
So today, we’re talking about the first section, right off the kitchen when you walk into the new addition. See that area that says PANTRY + LAUNDRY on the above floor plans? See their studded out views, here below. I DO mean studded as a double entendre, since it’s all so handsome to me. #momjoke
The brick wall to the right is that walkthrough from our kitchen on the other side, where our china cabinet currently stands.
This will be an awesome point of flow, right off the kitchen. The china cabinet will be moved to the other side.

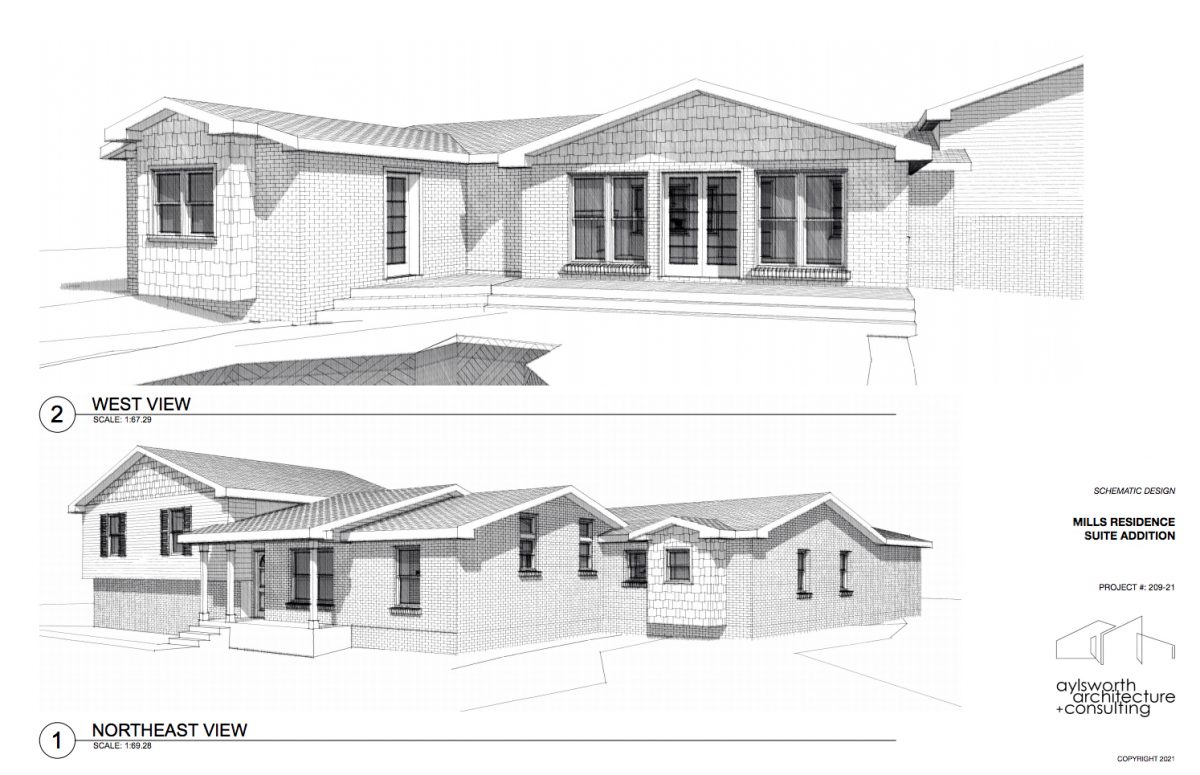
Here’s the front-of-the-house view, if you’re curious about how this works with the plans. You can see a peek of that original brown color that the house once was on the roofline, left side. The photo doesn’t do it justice.
We’ll be working with the amazing Window World again for the outside look, to tie in with the rest of the house. We couldn’t be more thrilled about it! This will be a combo of their awesome shakes, alongside the white brick that we love, and of course, their dependable {to use one of many possible adjectives} windows.
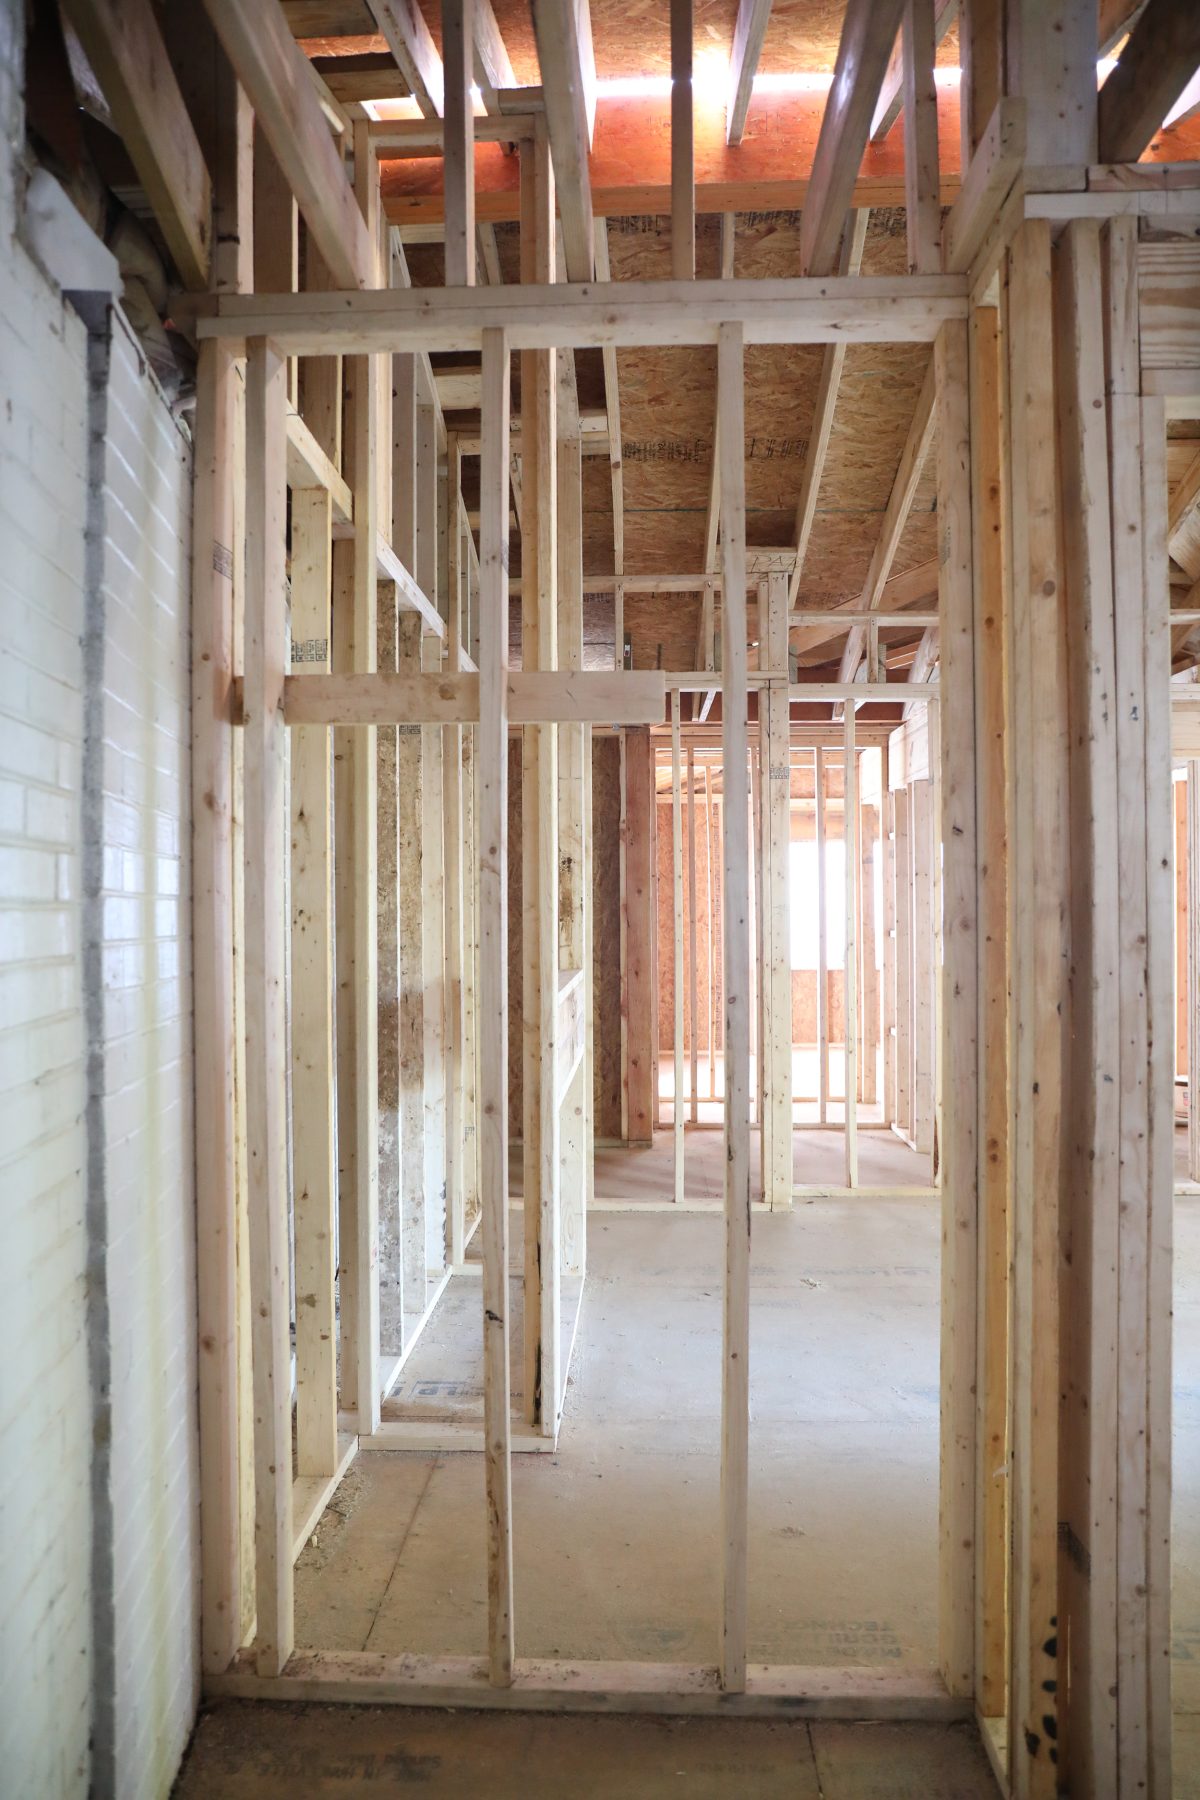
And this is the view standing straight on, of the first side. {The left side will be the laundry room, which I’ll cover more of below.} That will be where the washer + dryer sit.
And here are the rough cabinet plans that we have so far, for the window side of the butler’s pantry area {to the right upon entering}. Because of our “limitations” with septic and setbacks, {explained in posts above} this will be the one space that has the potential to feel a little ‘off’, since we’re literally building on an angle. The rest of the addition “rights” itself as you continue – see the plans above for a visual explanation.

I can not WAIT to have all this storage. If anyone is familiar with old houses, they’re big on charm and low on storage. So what’s double awesome about this, is that when this space happens, the basement will have more space freed up, which means we’ll also be adding more down there as well.
The wall immediately across from this, currently looks like this.
It will hold floor to ceiling cabinets, with something like this.
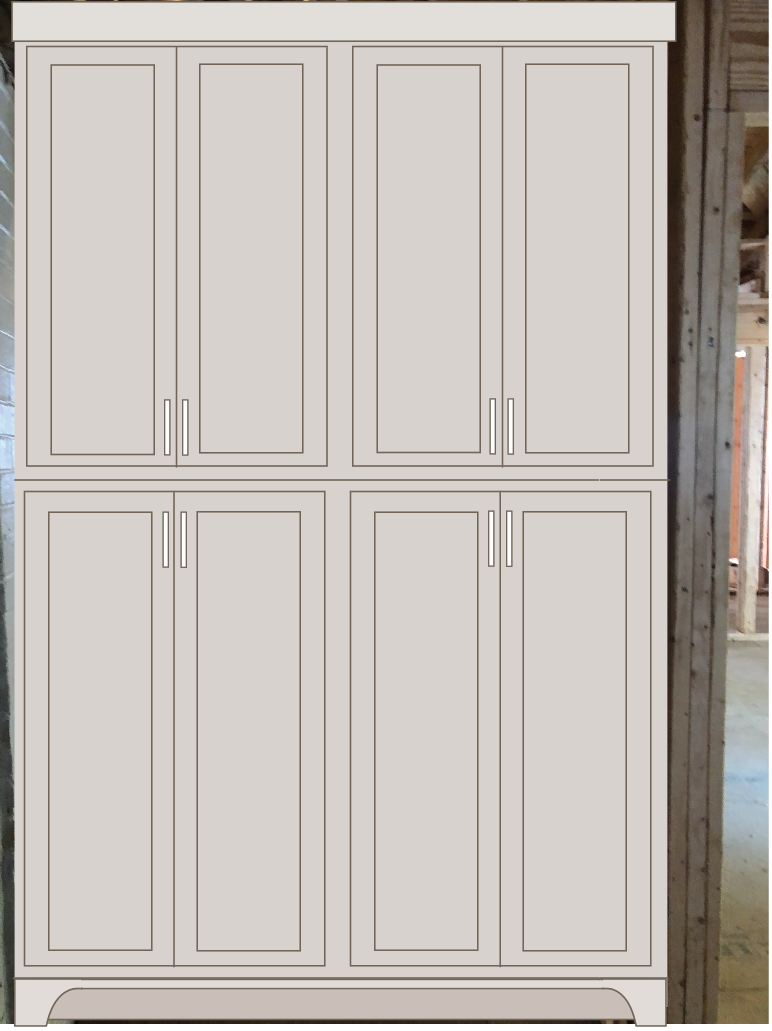
All. The. Storage.
But wait… there’s more! {Say it in your best infomercial voice} Because here are the design elements for this hallway!
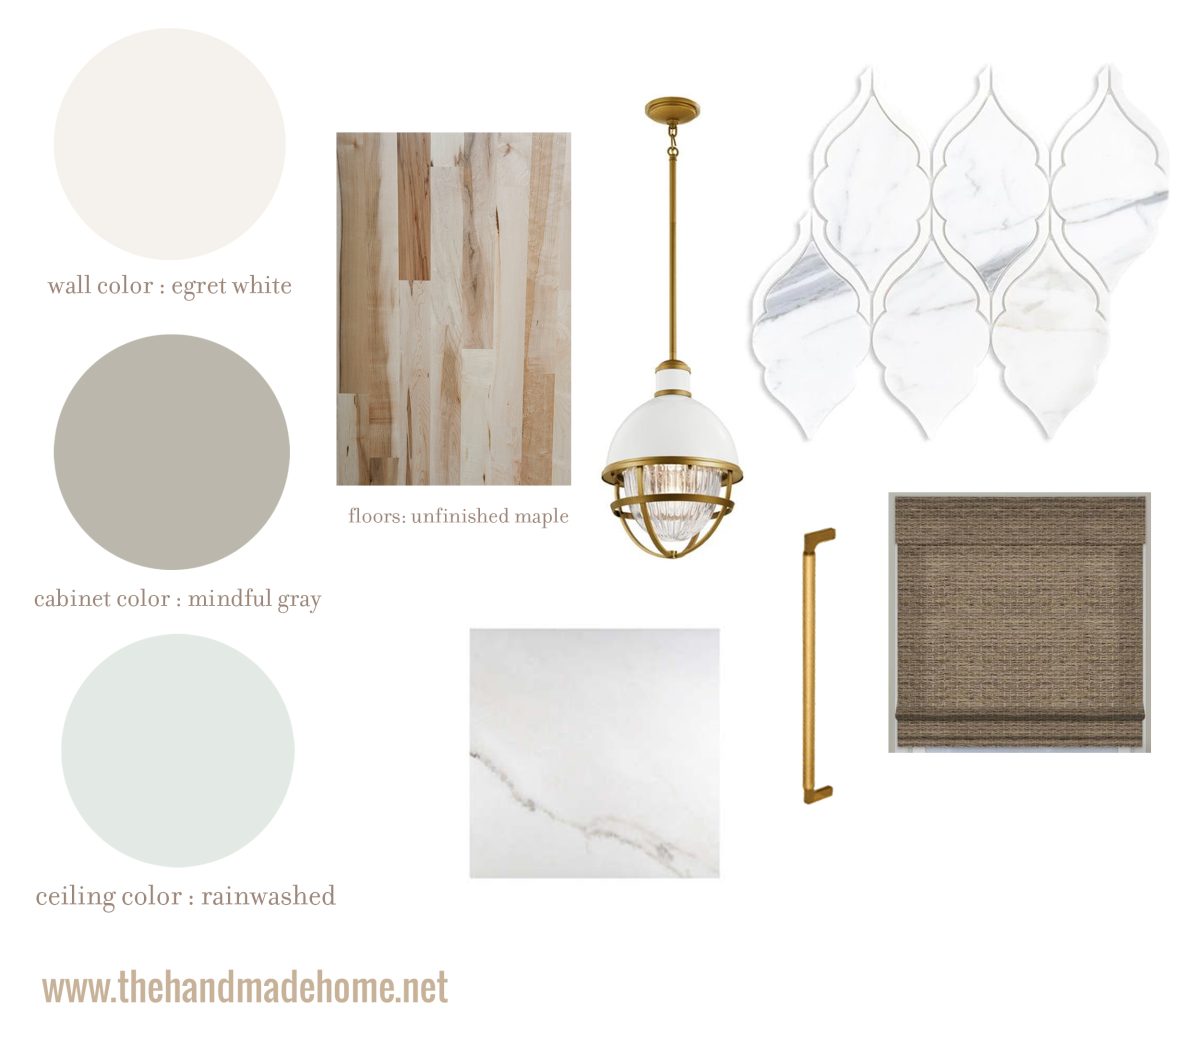
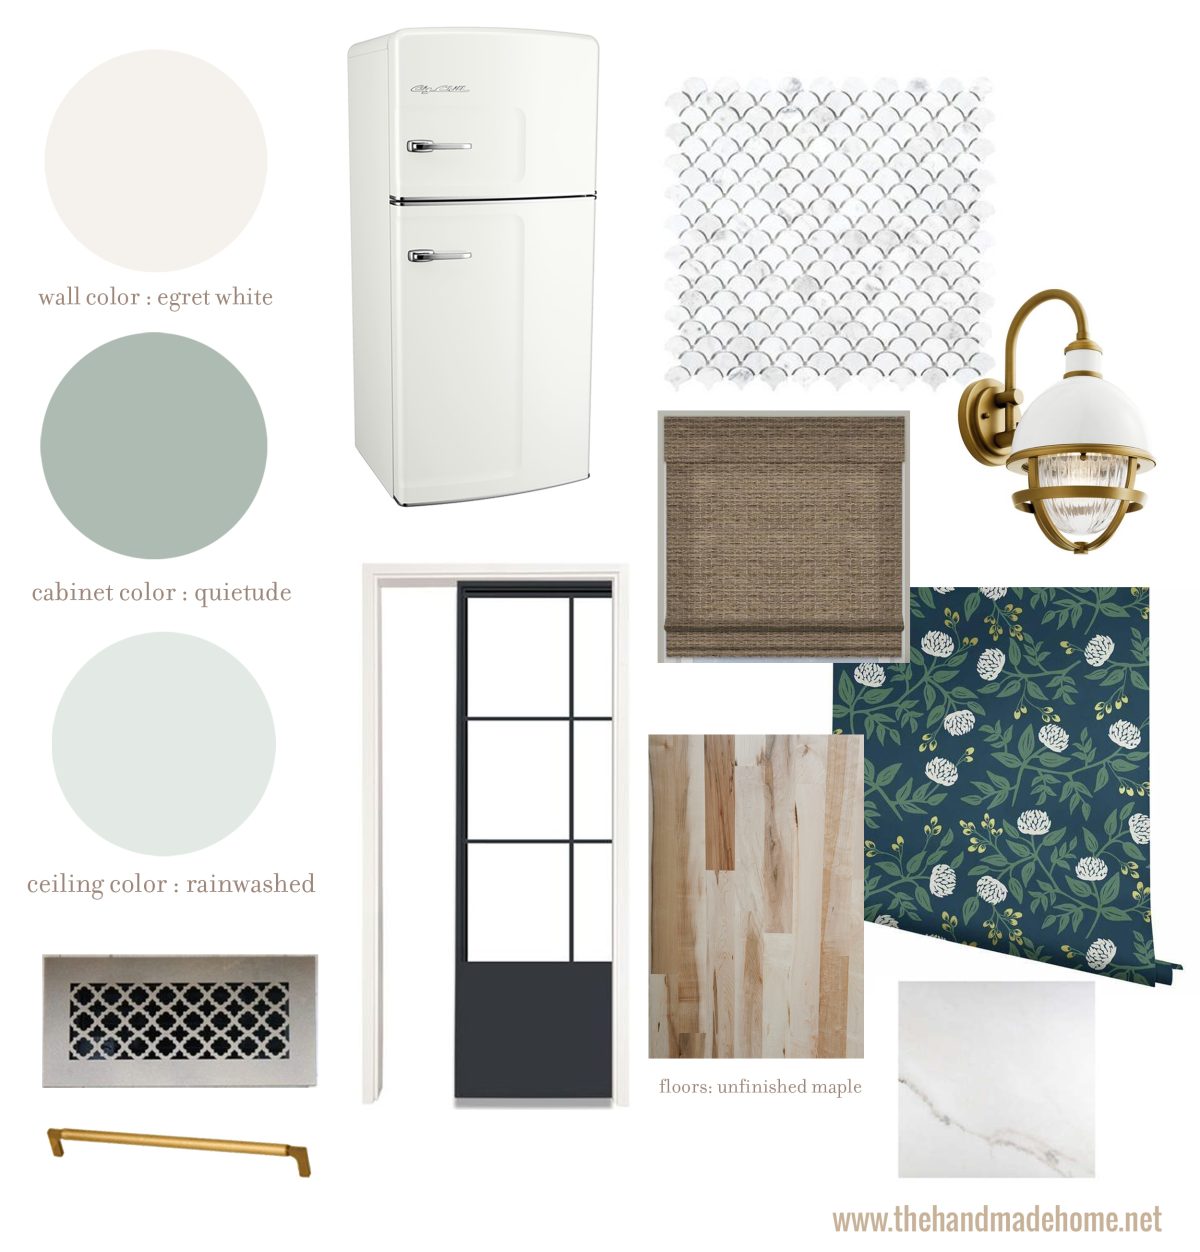
• Colors –
Admittedly for some reason, color has been my biggest hold up with all of this. It’s been like slowly putting a puzzle together, whilst also tying it into our home seamlessly, and thinking about long term choices with design elements.
We’re using Sherwin William’s Egret White for the walls. We’ll be trimming it out with pure white. If you’re unfamiliar with these colors, check them out on our walls here.
The ceilings will be planked/shiplapped again {much to our own dismay, since we’ll be taking it on-ha!} But this time we’re finishing it off with SW Rainwashed.
Cabinetry in this space will be Mindful Gray
• Backsplash – We’re thrilled to use this gorgeous tile from Jeffrey Court, for the window side of the space, and a whole lot of character.
• Pendant Light – I’ve been eyeing this light for a while whenever I use it for clients and I’m not sad about it.
• Blinds – continuing what we love throughout with select blinds – we love the natural element they add to the space. Again, see them in action here.
• Hardware – I love something like this from D.Lawless Hardware for a simple brass element
• Countertop – something in a natural marble to tie in nicely with our kitchen
• Floor – This will connect with our kitchen area, and we have decided to carry hardwoods throughout. You may notice this is a little {read: a whole lot} lighter than our existing hardwoods you see in our home. This is because we will also be refinishing it throughout the entire house, in the future. Being totally honest, the finish on the others are entirely too glossy and now that we’ve eliminated some windows in that space, too dark as well. Our dogs are older now {it was a struggle at first because they were so wild and young}, and they’ll need a good re-sanding six years in, to help make everything look nicer. So we’ll be matching the maple floors with a natural, throughout. The other may not happen for a while, but we plan to do it in the near future. Yes, a home is a never ending thing. We’ll just be living with it for a while.
Next up: THE Laundry room! We couldn’t be MORE thrilled for this actual room, which will totally free up our current basement laundry area, as well. I plan to change this over into a much needed closet area to hold large cleaning items like vacuums, mops, etc. Fun fact: We survived for 6 weeks {thanks to our amazing neighbors and friends who let us do much-needed loads at their home} without a washer this fall. I now no longer have front loaders, and the washer/dryer be placed to the right in this laundry room. Stacked was fun for a while but I’m ready for them to be side by sides with top loads.
Here’s the cabinet layout for this space.
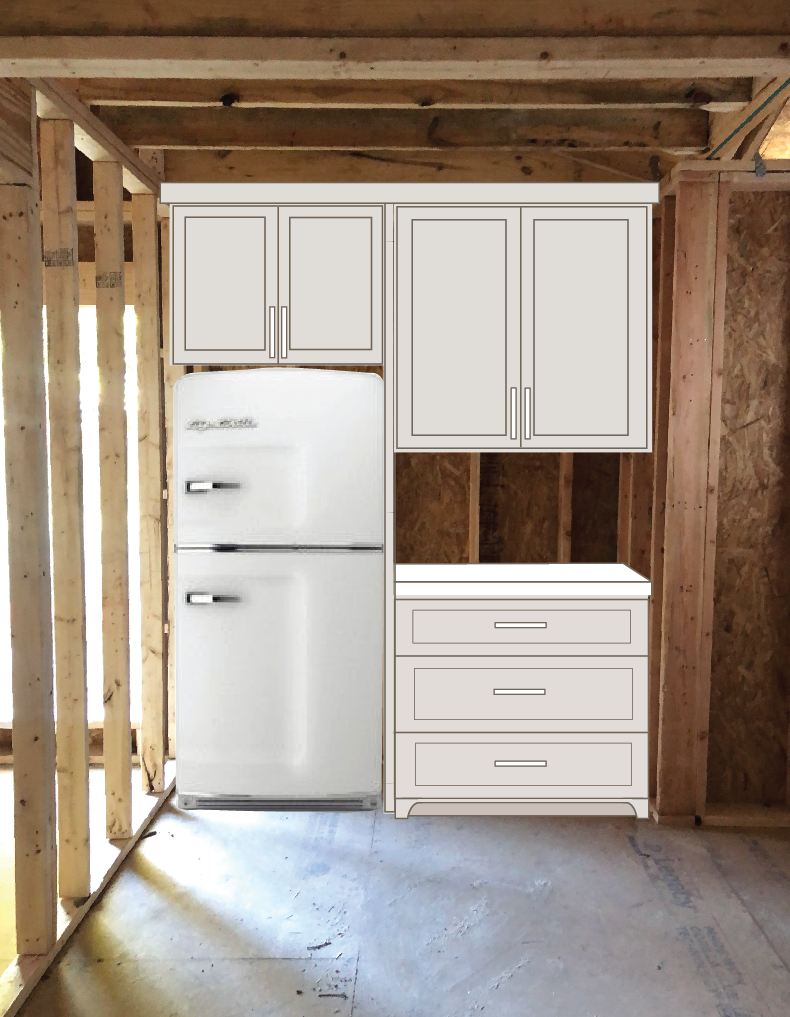
That means that my fave fridge will also be added to this space, AGAIN, freeing up space downstairs. It’s a like a double whammy with ALL OF THE STORAGE. Read: we’ll probably be doing more cabinetry here, to store all my supplies + samples for my office.
 See those barn doors? They’re from the fabulous Artisan Hardware and we love them SO much. Their sister company, Rustica makes these amazing pocket doors which we just love. So in the entry, we will hopefully have something like this. And here’s the rest of the design as well because I totally have design A.D.D. {Pssst…I do it when I clean, too.}
But starting totally out of order:
• Doors –
We love something like this in the entry of the laundry. We went with quite a few pocket/barn doors in our plans to fully maximize the space. I also love the idea of keeping it open, so that the entire space flows, so glass isn’t an issue. I know some people can’t deal, but it works for us. {It ties in beautifully with this door from Artisan Hardware in our pool room}
• Colors –
Again with Sherwin William’s Egret White for the walls. We’ll be trimming it out with pure white. Check them out on our walls here.
The ceilings will be planked/shiplapped again finishing it off with SW Rainwashed. But it’s all in the details.
Cabinetry in this space will be… wait for it… Quietude. I’m so excited to have this beautiful color on some cabinets.
• Vent Covers – throughout, matching the rest of our home – we’re HUGE fans of Vent Covers Unlimited.
• Backsplash – we’ve loved this tile forever from Jeffrey Court. It was time.
• Hardware – I love something like this from D.Lawless Hardware for a simple brass element.
• Countertop – something in a natural marble to tie in nicely with our kitchen.
• Blinds – continuing what we love throughout with select blinds – we love the natural element they add to the space. Again, see them in action here.
• Lighting – This one will be mounted over the window, with that tiny adorable peak that I went against my {super wise and all-knowing} architect to keep. It will sit over the washer + dryer, mounted. Again, tying in with the butler’s pantry for a cohesive but separate space.
• Wallpaper – I ADORE the idea of something bold paired with the delicately beautiful JC tile above. This has gold and that’s all I needed to know once I eyed the sample. It will be placed in the little washer/dryer section, to the right. {It’s gonna be amazing.}
• Floors – read my exhausting explanation above. I was really torn about hardwoods in the laundry room, but I’m also okay with perhaps babysitting it in this small area, vs. Breaking up the space at the risk of it looking smaller in such a small room, for continuity’s sake.
___________
And that, our friends, wraps it up right now for the first little section! If you’re still reading. In retrospect, I think this was a lot to share in one post. We plan to share more as we go, so stay tuned! THIS is the fun part.
Have an inspired day!